Advertisement
Quick Links
ENGLISH
EN
SETUP AND USE
OF THE MINIREMOTE™
1. Open the battery lid located on
The MiniRemote™ and Secondary
the back of the MiniRemote and
remote are designed specifically
insert 2 "AA" batteries.
for Wii™ and are not compatible
2. Thread the wrist strap through
with other game consoles. Your
the hole at the bottom of the
POWER A MiniRemote™ and
remote. Please use the wrist strap
Secondary controller function in
at all times to prevent losing your
place of the Wii Remote™ and
grip on the remote and causing
Wii Nunchuk™.
damage to the remote and
surrounding objects, or injury to
other people.
POWER A PRO PACK MINI
3. Sync the MiniRemote™ with
INCLUDES:
your console:
(1) MiniRemote™
Note: make sure you have
Functions in place of the original
•
placed the batteries in the
Nintendo Wii Remote™
MiniRemote™.
Small, comfortable size
•
a. Press the Power button on the
LED illuminated color changing
•
Wii console to turn it on.
action buttons
b. Remove the battery cover on
Soft-touch surface
•
the back of the remote. Press
Textured grip
•
and release the SYNC button
Safety wrist strap
•
inside the cover. The Player LEDs
will blink.
(1) Secondary Controller
c. Open the SD Card Slot cover on
3 foot connection cord
the front of the Wii console. Press
•
Small, comfortable size
•
and release the SYNC button on
Rubber grip
•
the inside of the compartment.
d. When the Player LED stops
blinking, connection is complete.
The LED that is illuminated
indicates the player number.
FRENCH
FR
piles « AA ».
2. Introduisez la dragonne dans
Les accessoires MiniRemote™ et
le trou qui se trouve au bas de la
contrôleur secondaire sont spéciale-
télécommande. Utilisez toujours la
ment conçus pour la Wii™ et ne
dragonne pour éviter de lâcher la
sont pas compatibles avec les autres
télécommande et de l'endommager
consoles de jeu. Les accessoires Mini-
ainsi que les objets alentour, ou de
blesser d'autres personnes.
Remote™ et contrôleur secondaire
POWER A remplacent les accessoires
3. Synchronisez la télécommande
Wii Remote™ et Wii Nunchuk™.
MiniRemote™ avec votre console:
Remarque : vérifiez que vous avez
bien placé les piles dans la télécom-
LE PRO PACK MINI POWER A
mande MiniRemote™.
COMPREND :
a. Appuyez sur le bouton de mise
en marche de la console Wii pour la
(1) MiniRemote™
mettre sous tension.
Remplace la Nintendo Wii
•
b. Retirez le couvercle du comparti-
Remote™ d'origine
ment des piles à l'arrière de la
Taille petite et confortable
•
télécommande. Appuyez sur le
Boutons d'action éclairés par DEL
•
bouton SYNC dans le compartiment,
Surface texturée pour assurer
•
puis relâchez-le. Les DEL « Joueur »
la prise
se mettent à clignoter.
Dragonne de sécurité
•
c. Ouvrez le logement de la carte SD
(1) Contrôleur secondaire
à l'avant de la console Wii. Appuyez
Stick analogique éclairé
•
sur le bouton SYNC dans le loge-
Cordon de connexion d'environ 1 m
•
ment, puis relâchez-le.
Taille petite et confortable
•
d. Lorsque la DEL « Joueur » cesse de
clignoter, la connexion est terminée.
CONFIGURATION ET
La DEL qui est éclairée indique le
UTILISATION DE LA TÉLÉCOM-
numéro du joueur.
MANDE MINIREMOTE™
4. Pour plus de détails sur la
programmation de la télécommande,
1. Ouvrir le couvercle du com-
reportez-vous au manuel d'utilisation
partiment des piles à l'arrière du
de la console Nintendo Wii. Re-
MiniRemote sans fil et introduire 2
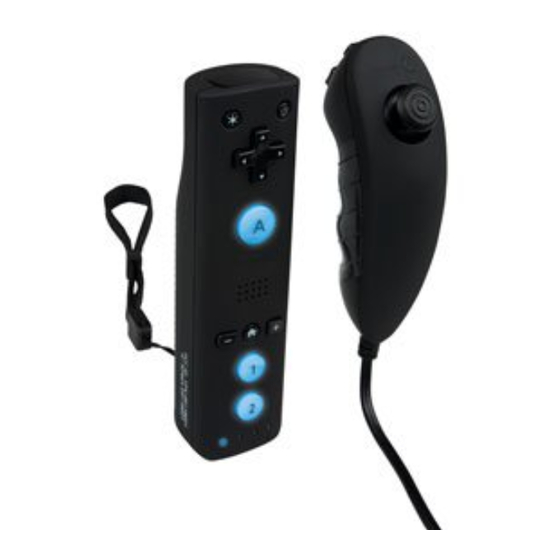
MiniRemote
Secondary
Controller
4. For additional details on how
If your hands, wrists, arms or
•
to program your remote, please
eyes become tired or sore while
see the Wii Operations Manual.
playing, or if you feel symptoms
After 3-5 minutes of inactivity
such as tingling, numbness,
the MiniRemote will enter "Sleep
burning or stiffness, stop and rest
Mode" to conserve battery life.
for several hours before playing
Press any button to reactivate
again.
the remote.
If you continue to have any of
•
5. To change the LED color of your
the above symptoms or other
MiniRemote™, press the LED
discomfort during or after play,
color-select button.
stop playing and see a doctor.
HEALTH AND
WARNING - Electric Shock
SAFETY INFORMATION
The MiniRemote™ can emit
If product will be used by young
radio waves that can affect the
children, this manual should be
operation of nearby electronics,
read and explained to them by
including cardiac pacemakers.
an adult. Failing to do so may
Do not operate the
•
cause injury.
MiniRemote™ within 9 inches of
a pacemaker.
WARNING - Repetitive
If you have a pacemaker or
Motion Injuries and Eyestrain
•
other implanted medical device,
Playing video games can make
do not use the MiniRemote™
your muscles, joints, skin or eyes
without first consulting your
hurt. Follow these instructions to
doctor or the manufacturer of
avoid problems such as tendinitis,
your medical device.
carpal tunnel syndrome, skin
irritation or eyestrain:
WARNING -
Avoid excessive play. Parents
Battery Leakage
•
should monitor their children for
Leakage of battery fluid can cause
appropriate play.
personal injury as well as damage
Take a 10 to 15 minute break
•
to your remote. If battery leakage
every hour, even if you don't think
occurs, thoroughly wash the
you need it.
marque : la télécommande passe en
après chaque heure de jeu, même si
mode de veille après 3 à 5 minutes
vous n'en ressentez pas la nécessité.
d'inactivité pour économiser les piles.
Si vos mains, poignets, bras ou yeux
•
Il suffit d'appuyer sur un bouton
deviennent fatigués ou endoloris
quelconque pour la réactiver.
pendant le jeu, ou si vous ressentez
5. Pour modifier la couleur des
des symptômes tels que picotements,
voyants LED de votre MiniRemote™,
engourdissement, brûlure ou raideur,
appuyez sur le bouton de sélection
arrêtez de jouer et reposez-vous
de la couleur LED
pendant plusieurs heures avant de
reprendre le jeu.
INFORMATIONS RELATIVES À
Si l'un des symptômes cités persiste
LA SANTÉ ET À LA SÉCURITÉ
•
ou si vous ressentez une gêne prolon-
gée pendant ou après le jeu, arrêtez
Si ce produit sera utilisé par des
de jouer et consultez un médecin.
jeunes enfants, un adulte doit leur
lire et expliquer ce manuel pour
AVERTISSEMENT –
éviter le risque de blessures.
Choc électrique
AVERTISSEMENT -
La télécommande MiniRemote™
Microtrau matismes répétés
est susceptible d'émettre des
et fatigue oculaire
ondes radio qui peuvent nuire au
fonctionnement des appareils élec-
troniques se trouvant à proximité, y
Les jeux vidéo peuvent provoquer
compris les stimulateurs cardiaques.
des douleurs au niveau des muscles,
N'utilisez pas la téléco mande
des articulations, de la peau ou
•
MiniRemote™ à moins de 20 cm
des yeux. Respectez ces consignes
d'un stimulateur cardiaque.
pour éviter les problèmes tels
Si vous portez un stimulateur
•
que tendinite, syndrome du canal
cardiaque ou un autre dispositif
carpien, irritation cutanée ou fatigue
médical implanté, n'utilisez pas la
oculaire :
télécommande MiniRemote™ sans
Évitez de jouer trop longtemps. Les
•
avoir au préalable consulté votre
parents doivent surveiller que leurs
médecin ou le fabricant de votre
enfants jouent de manière appropriée.
dispositif médical.
Faites une pause de 10 à 15 minutes
•
Comfortable size and grip for
This device complies with Part 15 of the FCC Rules. Operation is
•
subject to the following two conditions: (1) this device may not cause
secure, extended play
harmful interference, and (2) this device must accept any interference
Oversized backlit buttons
•
™
received, including interference that may cause undesired operation.
Uses (2) "AA" batteries (not
•
Warning: Changes or modifications to this unit not expressly
included)
approved by the party responsible for compliance could void the
user's authority to operate the equipment.
Note: This equipment has been tested and found to comply with
Taille et prise confortables pour
•
the limits for Class B digital device, pursuant to Part 15 of the FCC
un jeu sûr et de longue durée.
Rules. These limits are designed to provide reasonable protection
Boutons rétroéclairés de grande
•
against harmful interference in a residential installation. This
taille.
equipment generates, uses and can radiate radio frequency energy
Utilise (2) piles 1.5V « AA » (non
and, if not installed and used in accordance with the instructions,
•
may cause harmful interference to radio communications. However,
fournies).
there is no guarantee that interference will not occur in a particular
installation. If this equipment does cause harmful interference to
Dimensioni ridotte e impugnatura
•
radio or television reception, which can be determined by turning the
facile per giocare con sicurezza
equipment off and on, the user is encouraged to try to correct the
ed a lungo.
interference by one or more of the following measures:
Tasti retroilluminati di grandi
- Reorient or relocate the receiving antenna.
•
dimensioni.
- Increase the separation between the equipment
and receiver.
Richiede (2) batterie 1.5V "AA"
•
- Connect the equipment into an outlet on a circuit
(non incluse).
different from that to which the receiver is connected.
- Consult the dealer or an experienced radio/ TV
Komfortables Format und Grif-
technician for help.
•
figkeit für sicheren Halt und lange
This device complies with Industry Canada license-exempt RSS
Spielzeit.
standard(s). Operation is subject to the following two conditions:
Übergroße hintergrund-
•
(1) this device may not cause interference, and (2) this device must
beleuchtete Tasten.
accept any interference, including interference that may cause
Betrieb mit (2) 1.5V AA-Batterien
undesired operation of the device.
•
(nicht im Lieferumfang enthalten).
This Class [B] digital apparatus complies with Canadian ICES-003.
Cet appareil numérique de la classe B est conforme à la norme
Tamaño y agarre confortables
•
NMB-003 du Canada. Cet appareil s'accorde avec Industrie Canada
para jugar con seguridad durante
licence-exempte RSS standard. (1) cet appareil ne peut pas causer
más tiempo.
l'intervention, et (2) cet appareil doit accepter de l'intervention, y
Botones retroiluminados de gran
compris l'intervention qui peut causer l'opération non désirée de.
•
tamaño.
Utiliza (2) pilas 1.5V "AA" (no
•
incluidas).
affected skin and clothes. Keep
before being charged
battery fluid away from your eyes
Rechargeable batteries
•
and mouth. Leaking batteries may
should be charged under adult
make popping sounds.
supervision
To avoid battery leakage:
Do not short circuit the supply
•
Do not mix used and new
terminals
•
batteries (replace all batteries at
TROUBLESHOOTING
the same time).
Do not mix different brands of
Q: Why is my MiniRemote not
•
batteries.
connecting to my Wii?
POWER A recommends alkaline
•
A: Confirm you have inserted
batteries. Do not use Lithium ion,
2 "AA" batteries into the
nickel cadmium (nicad), or carbon
MiniRemote and that your Wii is
zinc batteries.
powered "ON."
Do not leave batteries in the
•
A: Your MiniRemote may not have
remote for long periods of
synced properly with your Wii.
non-use.
To sync your MiniRemote, try the
Do not recharge alkaline or non-
•
following steps
rechargeable batteries.
1. Open the small door located on
Do not put the batteries in
•
the front of the Wii.
backwards. Make sure that the
2. Remove the battery lid from the
positive (+) and negative (-)
MiniRemote.
ends are facing in the correct
3. Press the "Sync" button on the
directions. Insert the negative
Wii Console
end first.
4. Press the "Sync" button on the
When removing batteries,
•
MiniRemote
remove the positive end first.
5. A connection has been made
Do not use damaged, deformed
•
when the indicator lights becomes
or leaking batteries.
solid on channel 1, 2, 3 or 4.
Remove exhausted batteries
•
A: Some games need to be
from the MiniRemote
launched before the MiniRemote
Rechargeable batteries must be
•
will connect. Always confirm
removed from the MiniRemote
N'utilisez pas des piles endomma-
•
AVERTISSEMENT –
gées, déformées ou qui fuient.
Fuite des piles
Retirer les piles épuisées les piles
•
MiniRemote rechargeables doivent
La fuite de liquide des piles peut
•
être retirées de la MiniRemote avant
entraîner des blessures ainsi que des
d'être inculpé
dommages sur la télécommande. En
Les piles rechargeables doivent être
cas de fuite des piles, lavez à fond
•
rechargées sous la surveillance d'un
la peau et les vêtements concernés.
adulte
Évitez le contact entre le liquide des
Ne pas court-circuiter les bornes
piles et les yeux et la bouche. Les
•
d'alimentation
piles qui fuient peuvent émettre des
claquements.
Pour éviter une fuite des piles :
Ne mélangez pas des piles neuves
•
avec les anciennes (remplacez toutes
les piles en même temps).
Ne mélangez pas des piles de
•
marques différentes.
POWER A recommande des piles
•
alcalines. N'utilisez pas de piles
au lithium-ion, au nickel-cadmium
(nicad) ou au carbone-zinc.
Ne laissez pas les piles dans la
•
télécommande si celle-ci ne sera pas
utilisée pendant une longue période.
Ne rechargez ni les piles alcalines ni
•
les piles non rechargeables.
Ne placez pas les piles à l'envers.
•
Veillez à ce que les extrémités posi-
tive (+) et négative (-) soient bien
orientées. Insérez d'abord l'extrémité
négative.
Lorsque vous retirez les piles, sortez
•
d'abord l'extrémité positive.
POWER A
Customer Service
PowerA.com
PowerA@bdainc.com
1-888-664-4327
2-Year Limited Warranty
Visit PowerA.com for details
and to register
BDA, Inc.
15525 Woodinville-Redmond Rd NE
Woodinville, WA 98072
that your TV and Wii console are
confirm that the batteries are
powered "ON," and that your
not drained (replace batteries if
game has been placed into the
needed).
Wii console.
A: This could indicate your
A: When trying to sync additional
MiniRemote batteries are low and
MiniRemotes a game may require
need to be replaced.
you to choose (with a synced
Q: My MiniRemote is
remote) the total number of
connected but the on-screen
players before other remotes can
cursor is not accurate.
be synced.
A: Confirm you are within the
Example: You want to play a 2
proper distance of your console.
player game but only one of the
Try moving closer to the console
controllers is connected. Before
and see if the issue is resolved.
the 2nd Remote can connect, you
A: This could indicate your Mini
must first choose 2 players in the
Remote batteries are low and
game you want to play.
need to be replaced.
Q: What if my MiniRemote
Q: My MiniRemote becomes
isn't connecting to channel 1?
disconnected from the Wii.
A: Press the "Home" button to
Why is this?
access the Wii's Remote Settings
A: You may need to replace the
feature. From this menu you
batteries in the MiniRemote. You
can switch between different
can check the battery charge
controller channels and reconnect
status by pressing the "Home"
active controllers.
button on the MiniRemote. This
Q: My MiniRemote is
will allow you to view the charge
connected but not functioning
status in the Wii menu screen.
properly. What should I do?
A: Make sure you do not have
A: This usually indicates a
too many other electronic
problem with your Wii Sensor
devices near your Wii Console.
Bar. Confirm that your Wii Sensor
Sometimes wireless devices can
Bar is properly connected. If you
interfere with your MiniRemote.
are using a Wireless Sensor Bar,
Pro Pack Mini
Plus
™
Quick Start Guide
MiniRemote
™
Secondary
Controller
Make sure your Wii Console is
far from other electronics and or
large metal objects.
A: Confirm you are not too far
away from your game console.
Try moving closer to your console
and confirm if the problem is
resolved.
Q: My MiniRemote LED
illumination is decreasing?
A: You may need to replace the
batteries in the MiniRemote. You
can check the battery charge
status by pressing the "Home"
button on the MiniRemote. This
will allow you to view the charge
status in the Wii menu screen.
The LED Illumination on the
MiniRemote will decrease as the
batteries become weaker.
For even further Syncing
Instructions please reference
your original Nintendo Wii
Console Instruction Manual.
Advertisement

Related Manuals for PowerA Pro Pack Mini Plus


Summary of Contents for PowerA Pro Pack Mini Plus
- Page 1 Visit PowerA.com for details ed a lungo. interference by one or more of the following measures:...
- Page 2 ITALIAN 1. Aprire il coperchio del vano bat- di Nintendo Wii. Nota: dopo 3-5 ogni ora, anche se si ritiene di non La perdita di liquido dalle batterie Rimuovere le batterie scari- • terie situato sul retro del MiniRemote minuti di inattività, il MiniRemote averne bisogno.
Need help?
Do you have a question about the Pro Pack Mini Plus and is the answer not in the manual?
Questions and answers