Table of Contents
Advertisement
Quick Links
Advertisement
Table of Contents

Related Manuals for Mio Cyclo series


Summary of Contents for Mio Cyclo series
- Page 1 User Manual...
-
Page 2: Table Of Contents
Welcome Thank you for purchasing this Mio. Please read this manual carefully before using your Mio for the first time. Keep this manual in a safe place and use as Important information for using the manual ..........2 your first point of reference. -
Page 3: Knowing Your Device
Knowing your device Surprise Me™ ......................14 Other navigating options .................15 Workout mode Main unit Workout by distance ..................15 Workout by time ....................16 Workout by calories ..................16 Customising your device Maps ........................17 Routing ......................... 17 Sound ........................18 Sensors .........................18 Dashboard ......................18 Brightness ......................18 Profiles .........................19 GPS ........................19... -
Page 4: Accessories
* May be sold separately and used for selected models only. To use your device on a bike, ensure you use the specific bike mount kit that came with your device. Mio may provide optional accessories for specific • Via the computer models. -
Page 5: Performing The Initial Start-Up
• Create your user profile. DO NOT delete any files that are pre-installed on the device. Deleting • Calibrate the compass. the files can cause the device to crash. Mio is not responsible for product quality caused by file deletion. • Activate the map. -
Page 6: Installing The Device
Installing the device Installing the sensors on your bike The cadence/speed sensor kit is used for selected models only. Follow the instructions in this section to mount the device and the cadence/ 1. Follow the instruction below to install the cadence/speed sensor kit on your speed sensor kit (for selected models only) on your bike. -
Page 7: Putting On The Heart Rate Monitor
3. When done, you can manually pair the sensor with your device by tapping 2. Adjust the elastic strap so it’s snug while you are putting it on. Ensure that Main menu > Settings > Sensors > Cadence/Speed Rescan. you can take a good deep breath after putting on the strap. 3. -
Page 8: Operating Basics
Operating basics Using the touch screen To operate your device, touch the screen with your fingertip. You can perform the following actions: Using the POWER button • Tap Quick touch the screen once to open menus or select onscreen button/ •... -
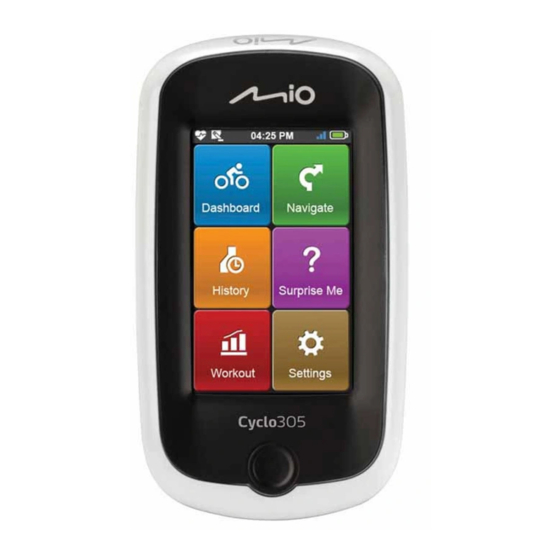
Page 9: Main Menu
Main menu The System icons The Main menu is your starting place for various tasks, providing quick access to The title bar on the top of the screen provides the System icons that indicate applications and settings. Tap a button to start a task or open another menu. the device's status. -
Page 10: Keyboard Screen
Keyboard screen Information screen 1 Information screen 2 • GPS Speed • Sensor speed The Keyboard screen will display when you are required to enter text, such • Heading • Cadence as when searching for a street name. Search results will be listed in matching order, with the closest matches appearing on the screen. -
Page 11: Starting Navigation
Starting navigation Once your home location has been set on the device, simply tap GO on the screen and you will be directed to Home quickly. Tip: On the Searching Result screen, you can select the Bike navigation mode ( ) or Your device is equipped with maps that provide street-level detail for Car navigation mode (... -
Page 12: Searching For A Poi
Searching for a POI Searching for a location using GPS coordinates POI (Point of Interest) is a named site, feature, landmark or public venue which You can manually input the coordinates of your target destination. Tap the can be displayed as an icon on the map. POIs are grouped by category, such as Latitude and Longitude fields to enter the coordinates of the location. -
Page 13: Tracks
Favorite has all your saved locations. by other users and official institutes. Saving the location as a favourite Note: If there is no track downloaded, you can download tracks from Mio Share at: 1. On the Searching Result screen, tap http://mioshare.com 1. -
Page 14: Viewing The History
Viewing the History Surprise Me™ Your device will automatically save the history as the timer starts. History The device features the “Surprise Me” function that will offer you three exciting includes date, time, distance, average speed, and altitude. routes around your location. It generates the routes from your current location and the start/end point will be the same as your current location. -
Page 15: Other Navigating Options
Workout mode Other navigating options Going back to start Cycling is a good aerobic fitness exercise that helps you to burn your calories, The Back to start function enables the device to navigate you back to the lose weight and increase your overall fitness. Workout mode of the device starting point after you have reached the destination or completed your ride. -
Page 16: Workout By Time
Workout by time Workout by calories Workout by time is the perfect tool if you want to set how much time you Workout by calories allows you to set the amount of calories you want to burn would like to spend on the workout. during the workout. -
Page 17: Customising Your Device
Track Up — The direction you are travelling in will display at the top of the Map screen. Note: Depending on your Mio model, certain setting options may not be available. North Up — Always display North at the top of the Map screen. -
Page 18: Sound
Sound Dashboard • On tap screen: Enable or disable the feedback sound In the Dashboard Layout Change screen, you can change while tapping on the screen. the layout of the following screens: • Instructions: Enable or disable the sound while getting •... -
Page 19: Profiles
Profiles Compass The Profile entry screen displays the existing profile(s). The Compass calibration function allows you to calibrate the built-in compass of the device. • You can set up to 6 profiles on the device. To calibrate the compass: • Tap Create new profile and enter the personal data (including Name, Birth date, Weight, Gender, and Bike a. -
Page 20: Date & Time
Date & Time Product Info The Date & Time screen lets you set the correct date and The Product Info screen provides the general information time settings for the system. of the device, including software and ROM versions, the End User License Agreement, and copyright information. •... -
Page 21: Managing Data On The Device
Internet when your device is connected to the computer. For more information, visit: http://mioshare.com/ • Never clean your Mio when it is turned on. Use a soft, lint-free cloth to wipe the screen and the exterior of your Mio. -
Page 22: Troubleshooting
Mio. Charge the battery. • It is your sole responsibility to place, secure and use your Mio in a manner that will not cause accidents, personal injury or property damage. Always observe safe driving Screen responds slowly. -
Page 23: Ipx7 Notice
An IPX7 designation means that the unit withstands immersion in manufacturer. one meter (approx 3ft) of still water for up to 30 minutes. Mio guarantees this grade provided the battery door and all jack covers are properly and securely •... -
Page 24: Weee
User and the consequences thereof, which may alter the conformity of the product with the CE Marking. Declaration of Conformity Hereby, Mio Technology declares that this N402 is in compliance with the essential requirements and other relevant provisions of Directive 1999/5/EC. WEEE...
Need help?
Do you have a question about the Cyclo series and is the answer not in the manual?
Questions and answers