Advertisement
Available languages
Available languages
WARNING: Important: Read and understand these instructions before installing or using the
Walker Tray. Ensure that the Walker Tray is installed as described in the following
paragraphs before use. If the Walker Tray is not properly installed, personal injury
and/or property damage could result.
WARNING: GF Health Products, Inc. assumes no responsibility for any damage or injury caused by
improper installation or use of this product.
WARNING: If components are damaged or missing, contact your Graham-Field Health Products
dealer immediately. DO NOT use substitute parts.
WARNING: Do not sit, push down, or lean on the Walker Tray; this could cause the Walker Tray to
collapse, resulting in loss of support.
WARNING: Before installing the Walker Tray, ensure that the walker is completely unfolded and
locked in open position.
1. With the Walker Tray in a collapsed position between
the brackets, face the front of the walker. Grasp the
Walker Tray by the sides and clamp the brackets onto
the walker's front frame, positioning the lower clamps
on top of the walker's lower cross brace.
2. Ensure that the Walker Tray's lower clamps are rest-
ing on the walker's lower cross brace, and that all four
clamps are securely attached.
3. Pull the Walker Tray out with your thumb and the tips
of your fingers; rotate it upward and lock it into place, as
shown at right.
WARNING: Ensure that the Walker Tray is se-
curely installed as instructed before
use.
4. When the Walker Tray is no longer in use, lift it up, push in on the tops of both support arms while pushing the
tray forward, and rotate the tray down.
WARNING: Do not place your hand or fingers between the tray and the bracket.
GF Health Products, Inc. warrants the Lumex 603900A Walker Tray for a period of one year for defects in work-
manship and materials. During the warranty period, defective items will be repaired or replaced at GF Health Prod-
ucts, Inc.'s option at no charge.
© 2007 GF Health Products, Inc. • 2935 Northeast Parkway • Atlanta, GA 30360 • tel 800-347-5678 • fax 800-721-0601 • www.grahamfield.com
603900A: WAlker TrAy
INSTAllATION INSTrUCTIONS
PleASe SAVe THeSe INSTrUCTIONS FOr FUTUre USe
SAFeTy GUIdelINeS - PleASe reAd BeFOre USe
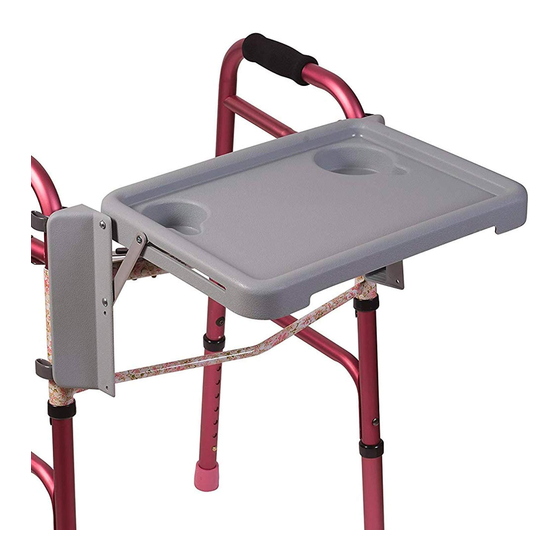
WAlker TrAy INSTAllATION (reFer TO PICTUre)
WArrANTy
support
tray
arm
clamp
bracket
lower cross brace
603900A Walker Tray
603900A-INS-LABRevA07
walker
bracket
Advertisement
Table of Contents

Related Manuals for Lumex WALKER TRAY 603900A


Summary of Contents for Lumex WALKER TRAY 603900A
- Page 1 SAFeTy GUIdelINeS - PleASe reAd BeFOre USe WARNING: Important: Read and understand these instructions before installing or using the Walker Tray. Ensure that the Walker Tray is installed as described in the following paragraphs before use. If the Walker Tray is not properly installed, personal injury and/or property damage could result. WARNING: GF Health Products, Inc. assumes no responsibility for any damage or injury caused by improper installation or use of this product. WARNING: If components are damaged or missing, contact your Graham-Field Health Products dealer immediately. DO NOT use substitute parts. WARNING: Do not sit, push down, or lean on the Walker Tray; this could cause the Walker Tray to collapse, resulting in loss of support. WAlker TrAy INSTAllATION (reFer TO PICTUre) WARNING: Before installing the Walker Tray, ensure that the walker is completely unfolded and locked in open position. 1. With the Walker Tray in a collapsed position between the brackets, face the front of the walker. Grasp the Walker Tray by the sides and clamp the brackets onto the walker's front frame, positioning the lower clamps on top of the walker's lower cross brace. 2. Ensure that the Walker Tray's lower clamps are rest- ing on the walker's lower cross brace, and that all four clamps are securely attached. 3. Pull the Walker Tray out with your thumb and the tips of your fingers; rotate it upward and lock it into place, as shown at right.
- Page 2 dIreCTIVAS de SeGUrIdAd – lee ANTeS de USO AVISO: Importante: Lee y entiende todas las instrucciones antes de instalar o usar esta Bandeja para Andador. Asegure que la Bandeja para Andador está instalado como describido en las siguientes párrafos antes de uso. Si la Bandeja para Andador no está instalada propiamente, puede resultar en lesión personal y/o daño. AVISO: GF Health Products, Inc. no asume ninguna responsabilidad por daño o lesión causado por instalación, asamblea o uso impropio de este producto. AVISO: Si los componentes están dañados y si le faltan, llame a su distribuidor de products de Gra- ham-Field Health Products. NO debe de usar partes sustituto. AVISO: No debe sentarse, empujar en o inclinarse en la Bandeja para Andador; esto puede causar daño a la Bandeja para Andador. INSTAlACIóN de lA BANdejA PArA ANdAdOr (reFIere A lA FOTO) AVISO: Antes de instalar la Bandeja para Andador asegure que el andador está completamente abierto y fijado en la posición abierto. 1. Con la Bandeja para Andador en su posición colapso dentro de los soportes, póngalo en la parte del frente del andador. Agarre la Bandeja para Andador por los lados y ponga los soportes en el marco del andador, posicionando las abrazaderas de abajo encima del apoyo cruzado infe- rior del andador.
Need help?
Do you have a question about the WALKER TRAY 603900A and is the answer not in the manual?
Questions and answers