Table of Contents
Advertisement
Advertisement
Table of Contents

Related Manuals for Drill Master JOURNEYMAN 400


Summary of Contents for Drill Master JOURNEYMAN 400
- Page 1 JOURNEYMAN User’s Guide Guía del usuario Mode d’emploi...
- Page 2 1-800-597-6170 and one of our customer representatives will be there to help. We support what we build! Use this User’s Guide to learn to operate your Drill Doctor. I also want to invite you to visit our website at www.DrillDoctor.com.
-
Page 3: Table Of Contents
Contents English Safety ................® Getting to Know Your Drill Doctor ......Identifying Basic Drill Bits ........... Anatomy of a Drill Bit ..........® Drill Doctor Sharpening Process ......Aligning the Drill Bit ........... Grit Tube Attachment ..........Sharpening the Drill Bit .......... -
Page 4: Safety
Never touch internal parts of the sharpener when it is turned on or plugged in. The rotating diamond wheel can cause injury. • As with any power tool, the Drill Doctor should be kept out of the reach of children. WARNING: Some dust created by power sanding,... -
Page 5: Getting To Know Your Drill Doctor
® Getting to Know Your Drill Doctor Flat Spot Chuck Chuck Knob Alignment Window Hole Cam Guide Flat Spot Sharpening Hole Wheel Access Alignment Cover Button Power Switch (at cord end) Split Point Hole Grit Tube and Cap www.DrillDoctor.com... -
Page 6: Identifying Basic Drill Bits
Identifying Basic Drill Bits The Drill Doctor ® is most efficient when used to resharpen a drill bit’s original point angle. With its standard diamond grind- ing wheel it will sharpen high-speed steel, cobalt, TiN-coated, carbide and masonry drill bits. -
Page 7: The Drill Doctor ® Sharpening Process
Turn the Chuck Knob to the left just until the bit will slide and rotate in the Chuck. With one hand, press in and hold the Alignment Button on the Drill Doctor (do not release until Step 7). www.DrillDoctor.com... - Page 8 With your free hand, insert the Chuck into the Alignment Hole— make sure the flat spots on the Chuck match the flat spots in the hole. At this point, the Chuck should be inserted into the Flat Spots Alignment Hole with the flat spots hidden, and the Chuck should be locked in the hole.
-
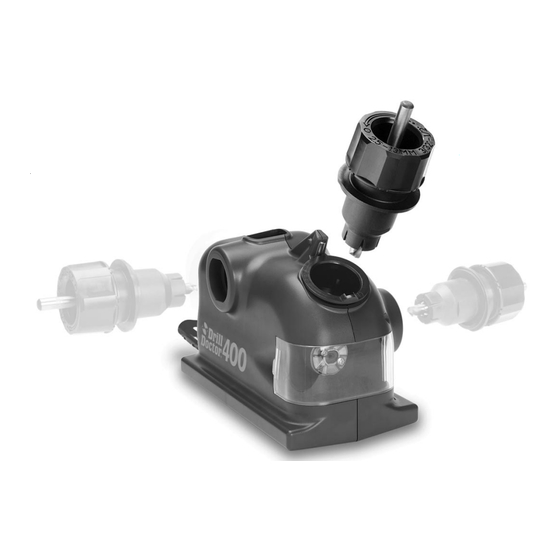
Page 9: Grit Tube Attachment
The grit tube attachment is not critical for the function of the Drill Doctor; however using it offers the following benefits: • Extends the life of your Drill Doctor by removing the grit created when sharpening your drill bits. •... -
Page 10: Sharpening The Drill Bit
Sharpening the Drill Bit Insert the Chuck into the Sharpening Hole. It will be easier to sharpen the bit if you stand up. White Mark Cam Guide Align one of the white marks on the Cam with the Cam Guide, and push the Power Switch to the ON (I) position. -
Page 11: Identifying Correctly Sharpened Drill Bits
Identifying Correctly-Sharpened Drill Bits (And What to Do With Those That Aren’t!) Correctly Sharpened Chisel Point The entire surface from the Cutting Cutting Edge Edge to the Heel will have a finely Heel ground surface without ridges or indentations. And, the Heel will always be lower than the Cutting Edge. -
Page 12: Split Points
Split Points Split point drill bits prevent walk-around on the material before they begin to cut. This feature is described as self centering. The need to center punch is effectively eliminated. A standard drill bit chisel point has to wear an area in the middle of the hole to be drilled before the cutting edges will remove material. -
Page 13: Identifying Correctly Split Bits
Check the tip of the bit carefully to determine that both sides of the bit are split equally. Compare it to this illustration. If it does not match, study the information below. Identifying Correctly Split Drill Bits (And What to Do With Those That Aren’t!) Correctly Split Split lines are nearly straight across. -
Page 14: Sharpening Bits Of Different Lengths And Diameters
Sharpening Bits of Different Lengths and Diameters Drill Bits Of Different Sizes Too many rotations of a small diameter bit may result in incorrect sharpening and too few on a large bit may not sharpen enough. 3/32 inch bits—use 2 to 4 half-turns, 1/8 inch bits—use 4 to 6 half-turns, 3/8 inch bits—use 6 or more half-turns. -
Page 15: Aligning And Sharpening Masonry Drill Bits
Start with four half- turns and then add as many half- turns as needed. Note: The Drill Doctor will place a curved grind on the carbide insert, altering the appearance of the factory point. www.DrillDoctor.com... -
Page 16: Questions And Answers
Questions and Answers 1. Question: When I aligned the drill bit and sharpened it, why was no material removed? Answer: This happens when the bit is not protruding out of the Chuck far enough. You may have allowed the Alignment Button to knock the drill back into the Chuck when aligning the bit. - Page 17 3. Question: Why is the drill point off center? Answer: If the tip of the drill bit appears to be sharpened off center, check the following items: • You may not have done an even number of half-turns when you sharpened and one face of the bit was ground more than the other.
- Page 18 6. Question: Why are my small drill bits grinding off-center? Answer: After aligning the small bit, look into the back of the chuck and determine if the jaws are straight against the bit. If the jaws appear to be out of line, move the Chuck Knob slightly to the left just until the Jaws straighten.
- Page 19 9. Question: Why does the drill bit back up into the Chuck during the sharpening procedure? Answer: Make sure the bit is tight in the Chuck before sharpening. Your Chuck may be dirty. Follow the steps for cleaning the Chuck on page 18.
-
Page 20: Drill Doctor ® Maintenance
Alignment, Sharpening, and Splitting Holes and Chucks, so cleaning on a consistent basis can add life to your machine. Before any maintenance or cleaning is ® performed, be sure to unplug your Drill Doctor. Removing the Wheel Cover Unplug the Drill Doctor. ®... - Page 21 Diamond Sharpening Wheel Is Required Reverse the grinding wheel before you replace it. The grinding ® wheel supplied with the Drill Doctor is designed to give you long and trouble free service, with an average of more than 200 sharpenings.
-
Page 22: Accessories And User-Replaceable Parts
Remove worn wheel by twisting slightly and lifting wheel off shaft. Install new wheel and reinstall wheel retainer and screws. Don’t over-tighten mounting screws. Remove the wrench and replace the wheel access cover before turning on the machine. User Replaceable Parts 180 grit Standard Diamond Sharpening Wheel (Part # SA01326GA) -
Page 23: Warranty
Your Drill Doctor is warranted to be free of defects due to workmanship or design for 1 year from the purchase date. If your Drill Doctor fails to operate, or if any operating problem occurs, contact Drill Doctor Technical Service toll free at: 1-800-597-6170 (U.S. -
Page 24: Español
Phone: 1-888-MYDRILL (693-7455) Professional Tool Manufacturing, LLC P.O. Box 730 210 E. Hersey St. Ashland, OR 97520 USA Fax: 541-552-1377 Email: tech@DrillDoctor.com Web: www.DrillDoctor.com... - Page 25 Phone: 1-888-MYDRILL (693-7455) Professional Tool Manufacturing, LLC P.O. Box 730 210 E. Hersey St. Ashland, OR 97520 USA Fax: 541-552-1377 Email: tech@DrillDoctor.com Web: www.DrillDoctor.com Drill Doctor® is a registered trademark of Professional Tool Manufacturing, LLC. PP40250KF 07/02 Rev 0...
Need help?
Do you have a question about the JOURNEYMAN 400 and is the answer not in the manual?
Questions and answers