Table of Contents
Advertisement
Quick Links
Advertisement
Table of Contents

Related Manuals for Parrot You Com

Summary of Contents for Parrot You Com
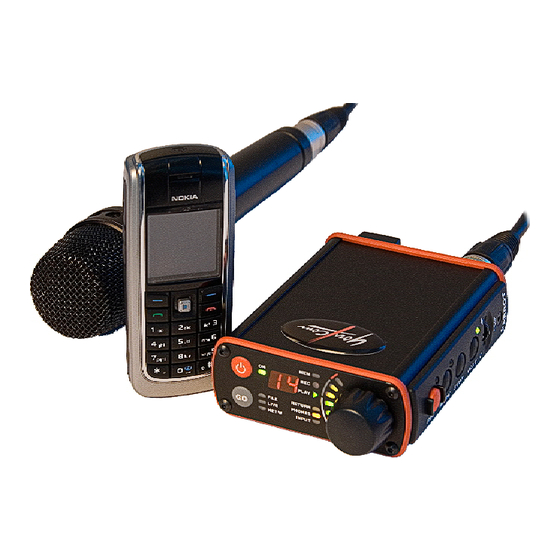
- Page 1 User Manual...
- Page 3 You/Com Audiocommunicatie b.v. Motorenweg 5-k 2623CR Delft (The Netherlands) tel: +31 15 262 59 55 fax: +31 15 257 15 95 e-mail: sales@youcom.nl URL : www.youcom.nl Parrot v1.09 published November 16, 2007...
- Page 4 Copyright 2005 No part of this publication may be reproduced and/or made public by means of printing, photocopying, microfilm or any other way without a prior written permission from You/Com (www.youcom.nl).
-
Page 5: Table Of Contents
Table of contents Quick start............7 Introduction ........... 11 2.1 Front view ................11 2.2 Rear view ................12 2.3 Memory card ..............13 2.4 Audio inputs ...............13 2.5 Audio outputs ..............14 2.6 Bluetooth ................15 2.7 USB...................16 Operation ............19 3.1 Pushbuttons ...............19 3.2 Input sensitivity switches .............20 3.3 Level controller ..............21 3.4 Visual feedback..............22... - Page 6 User settings ..........41 Annex 1: Analog overview........46 Annex 2: Software upgrade ........48 Annex 3: Troubleshooting........50 Annex 4: Specifications......... 51 © 2007 Parrot...
-
Page 7: Quick Start
Press the level-controller on the front briefly to light up [INPUT]. Talk into the microphone with a level you think you will use. Turn the level-control (while [INPUT] is still lit) until your voice makes the level-meter run into yellow occasionally. © 2005 Parrot... - Page 8 ‘beep-up’ on your headphones. (Place Markers): During recording (or playback later on) markers can be set by pressing [MARK] on the side panel. The MARK light will light up briefly indicating it has been set. © 2007 Parrot...
- Page 9 Bluetooth device (may be very brief). NETW lights up steady when the Parrot is successfully connected to the mobile phone (see paragraph 6.1 for pairing with a mobile phone). Use the keyboard on the mobile phone to make the desired connection (make...
- Page 10 1 to 7 LEDs each for about 14% of the file size already transmitted. (if this does not happen, try to pair your mobile phone again to the Parrot; see paragraph 6.1) Transfer successful: The FILE light will light up steady and NETW will blink green.
-
Page 11: Introduction
INTRODUCTION The Parrot is designed to make quick and simple audio recordings using professional microphones/line inputs and headphones. Once the recordings are made, you can select the interesting audio samples and send them out to either a notebook for further editing, as a file transfer directly into the studio, or live on the air using a mobile network. -
Page 12: Rear View
1 - unbalanced line output 2 - headphones output 3 - input sensitivity switches 4 - balanced line/microphone input 5 - Bluetooth antenna 6 - battery charge indication 7 - USB connector (also used for battery charge power) © 2007 Parrot... -
Page 13: Memory Card
Memory card Any Secure Digital memory card can be used for the Parrot to store the audio on. We have tested Sandisk and Dane-Elec up to 512 MByte. The card can only be inserted one way which is with the slanted side inwards and the bottom side pointed towards the belt-clip of the Parrot. -
Page 14: Audio Outputs
Higher impedance headphones can also be connected, but may result in a lower signal level. Line output The rear panel also holds a cinch socket (a.k.a. RCA or PHONO jack) to connect to an unbalanced line input. © 2007 Parrot... -
Page 15: Bluetooth
Bluetooth is a wireless interface and there is therefore no physical connector. This interface connects to another BT device like a mobile telephone. Depending on whether LIVE or FILE is selected with the [GO] key, the Parrot can be either a ‘modem’ or a ‘headphone’ to this mobile phone. -
Page 16: Usb
This could for instance be used to read your email with your laptop through this Bluetooth modem. The Parrot can use this function to set up a data link to a server in the studio and store the audio-files there to be used for further editing or broadcasting. - Page 17 USB audio The Parrot’s headphones are an extra output and the MIC or LINE input is an extra audio input for the PC (when the Parrot is switched ON). So while editing some audio on a notebook, the result can be monitored on your own professional headphones.
- Page 18 © 2007 Parrot...
-
Page 19: Operation
(press in the middle) Select or de-select a sample of audio in between two markers. If this button is pressed longer it will make the unit go in or out of CLIP-mode (see section *) Some buttons may have additional functions: © 2005 Parrot... -
Page 20: Input Sensitivity Switches
‘maximum conceivable signal’ (that would indicate an overload of the pre-amplifier). there is still a few green lights showing on a signal with a ‘normal’ level and the level-control set to about 6 red lights. © 2007 Parrot... -
Page 21: Level Controller
(in case of a LIVE or a USB connection) towards the headphones PHONES will light up by default to adjust the phones level. The Parrot will always return to PHONES after a short idle time. Press the level controller briefly to turn on the INPUT light and adjust MIC/LINE input-level. -
Page 22: Visual Feedback
Visual feedback The user can get the following visual feedback from the Parrot on its’ status or a function that needs attention: Front panel: INPUT (yellow) - the level-controller can be used to alter the input level PHONES (yellow) - the level-controller can... -
Page 23: Attention Tones
PLAY (green) - the Parrot is playing (blinks when it’s in play-pause) CLIP (yellow) - steady when the current audio sample is selected to be a CLIP or blinks when the Parrot is in ‘play CLIPs only’ mode Rear Panel: USB (green) –... - Page 24 © 2007 Parrot...
-
Page 25: Recording Audio
5 seconds. Charging completely depleted batteries will take about 10 to 12 hours. Remark: Make sure that the Parrot is charged every day for at least the number of hours that the unit was used. Clear memory card:... - Page 26 ON (by default after a few idle seconds). The 2-digit display shows the current position of that level with P0...P9. This level is adjusted each time the level controller is turned and as long as this PHONES light is on. © 2007 Parrot...
- Page 27 (this may take a few seconds). An automatic marker on the start, pause and end of the recording will help in browsing through the various recordings on the card. The take number (1..99) is shown in the digit-display. © 2005 Parrot...
- Page 28 © 2007 Parrot...
-
Page 29: Organising Audio Samples
(MARK will light up). Press MARK to delete this marker (MARK turns off). Delete all markers The Parrot goes to so-called ‘hazard-mode’ when it is turned on with the STOP button pressed (all LEDs are flashing). All user-placed-markers (and clips) are removed when you now press MARK!! ©... - Page 30 Example 2: Action: PLAY-button is pressed during PLAY to go to PLAY-PAUSE in between the two user-placed markers and then the CLIP-button is pressed Result: A clip is selected from the previous to the next user-placed-marker. © 2007 Parrot...
- Page 31 Play out selected CLIPs only Press and hold the CLIP-button until the CLIP light starts blinking. Only the samples that were selected to be a clip can now be played out with PLAY. They will also be © 2005 Parrot...
- Page 32 Go to the CLIP you wish to send with PLAY and/or [+]/[-] and press GO twice to activate the FILE function. The Parrot will connect to the phone that it was already paired with (see section 6.1) and start sending the file.
-
Page 33: Sending Audio Live Or In A File
Pairing with a mobile phone The Parrot needs to be paired with a mobile phone, or any Bluetooth host like a notebook. This pairing is only required once, as long as the Parrot is not paired to another device in the mean time. - Page 34 From now on these two devices are paired, even after shut-down or when your mobile phone has been using e.g. your Bluetooth carkit in the mean time. Pairing is only lost when the Parrot itself is used together with an other Bluetooth device. © 2007...
-
Page 35: Make A Live Connection (High-Grade Telephone Quality)
Press [GO] after the connection to clear Bluetooth with the GSM (NETW, LIVE and FILE LED are off). Remark: Try to keep the GSM and its’ antenna away from the Parrot and the microphone cable to prevent ‘GSM humming’ in the audio. -
Page 36: Record The Live Connection (Telephone Logging)
Send audio files (original high quality) The Parrot can either send the current take or a few selected clips (see section 5). Make sure that CLIP is not blinking if you only want to send the current take or that it IS blinking when you want to send only selected clips. - Page 37 Press the GO button one more time to confirm that you have seen either this green or red blinking LED. Check your uploaded files on parrot.youcom.nl, when the modem function is used with the test numbers that are listed in the chapter 8.
- Page 38 © 2007 Parrot...
-
Page 39: Connect To Pc
Parrot is switched on. The PC can be seen as an audio input towards the headphones on the Parrot, with this audio-card functionality. So while editing some audio on a notebook, the result can be monitored on your own professional headphones. -
Page 40: Usb Removable Hard Disk
USB removable hard disk The Parrot also introduces itself to a USB-host (e.g. a PC) as a removable storage device. This feature can only be used when the Parrot is switched off. The file explorer on the PC will show... -
Page 41: User Settings
The settings are listed in a text file inside the Parrot that can be edited using any text editor. When you connect the Parrot to the PC with a USB cable, you can find this file on the SD card called settings.ini. After you have changed this file and saved it back on the Parrots memory card, you have to turn it on again for the new settings to take effect. -
Page 42: Recorder Settings
# What prefix should be added to the filename, when a file is sent # using filetransfer (max 32 characters, including a space at the end): file_prefix=Test Parrot # What description should be added to recordings (max 256 characters): bwf_description=... - Page 43 32 keypad characters (0..9, + , #) e.g. ftn=+31151234567 This is the number to reach the server in the studio that can receive one or more MP3 files from the Parrot. File transfer initialization string: 32 characters e.g. modem_init= AT+ CBST= 71,0,1 This string is sent to the connected BlueTooth modem (e.g.
- Page 44 This is a string of characters that will form the file-name on the server in the studio together w ith the take name on the memory card. E.g. “ Parrot take” + “ 1.mp3” w ill result in a filename “Parrot take1.mp3” after the file transfer.
- Page 45 © 2005 Parrot...
-
Page 46: Annex 1: Analog Overview
ANNEX 1: ANALOG OVERVIEW The following drawing gives an indication of all audio paths, inputs, outputs and controls: © 2007 Parrot... - Page 47 © 2005 Parrot...
-
Page 48: Annex 2: Software Upgrade
Parrot. When the Parrot recognizes the upgrade to be valid, it will show the upgrade- progress as 1 to 7 LEDs in the LED-bar. It will then reboot and the Parrot is ready for use again. - Page 49 © 2005 Parrot...
-
Page 50: Annex 3: Troubleshooting
You/Com in Delft Problem: Parrot does not pair Bluetooth with a mobile phone Possible solutions: The Parrot may have already found a phone that it was paired with once before; try switching off all phones, set Parrot in pairing mode (NETW should start blinking slow and then fast) and then switch on the phone you wish to pair. -
Page 51: Annex 4: Specifications
MIC: 70 dB, LINE: 75 dB Phones Output Description Analog signal + ring Analog signal + sleeve Analog ground Phones connector 6.3 mm jack socket Maximum phones output level 2x200 mW (at 2x 32 Ohms) Phones output impedance © 2005 Parrot... - Page 52 Female RCA (Cinch) asymmetrical Nominal level 2 Vtt (1 kOhm) General Batteries 4xAA 2700mAh NiMH battery pack Battery life 10 hrs typical Charging time (unit off) 10 hrs typical Dimensions 110x85x35 mm Weight 360 g (incl. batteries) © 2007 Parrot...
- Page 53 19 controller, 7; 11; 21 unselect all, 20 indication, 11; 22 date, 44 LEVEL, 22 erase all markers, 20 line erase memory card, 20 input, 13 fast level, 20; 26 forward, 29 output, 12; 14 © 2005 Parrot...
- Page 54 20; 33 stop button, 19 PC, 17; 39 table of contents, 5 PHONES, 22 telephone logging, 15 phones level, 26 time, 44 PLAY, 22; 23 transfer failed, 10 play button, 19 transfer successful, 10 play-pause, 22 UMTS, 16 © 2007 Parrot...
- Page 55 12; 14 user definable, 41; 42 unselect all clips, 20 user settings, 41 USB connector, 12 visual feedback, 22 USB-audio input, 16 XLR connector, 13 © 2005 Parrot...
Need help?
Do you have a question about the You Com and is the answer not in the manual?
Questions and answers