
Summary of Contents for Use Audio Plugiator
- Page 1 Plugiator User Manual User Manual DSP Plug-In based Sound Synthesizer User Manual Version V1.0 January 2008 use audio...
-
Page 2: License And Disclaimer
In no event will Use Audio Inc be liable for any loss of data or for errors in data use or processing resulting from the use of this Product or the documentation. In particular, Use Audio Inc will not be... -
Page 3: Table Of Contents
What’s in the Box ....................... 6 Important Safety Instructions ..................... 7 Getting Started ......................9 Making Connections ......................9 Getting Sound out of your Plugiator ................10 Plugiator Control Interface ....................11 Multi Function Knobs ....................... 11 Single Function Knobs ...................... 13 Quick Pads ........................ - Page 4 MIDI Monitor ........................40 Tabs ..........................41 Preset Manager ....................... 41 Engaging Presets ......................42 Modifying Presets using the Plugiator Control Interface ..........43 Modifying Presets using the Plug-in Manager Software ..........43 Online Sounds ........................44 Recording & MIDI ....................45 Simultaneously using the Plug-in Manager and a MIDI Sequencing Application for Recording and Playback ....................
-
Page 5: Introduction
It has been designed to model the exact behavior and deliver the same powerful sound as the originals. The Plugiator sounds like the original, and not like a recording of it - and maintains all the depth, the dynamics and the liveliness of the sound. Also allows you to tweak any parameter and easily allows you to design new sounds from ground up, if you like. -
Page 6: What's In The Box
Plugiator User Manual What What ’s in the Box ’s in the Box What ’s in the Box ’s in the Box What What ’s in the Box Please check that your product packaging contains all the following items: This User Manual... -
Page 7: Important Safety Instructions
Plugiator User Manual Important Safety Instructions Important Safety Instructions Important Safety Instructions Important Safety Instructions Important Safety Instructions PLEASE CAREFULL PLEASE CAREFULL Y READ THE FOLL Y READ THE FOLL OWING OWING: : : : : OWING PLEASE CAREFULL PLEASE CAREFULL... - Page 8 If your dealer is unable to assist you, you can contact Use Audio Inc. directly and we shall assist you with an environmentally safe disposal.
-
Page 9: Getting Started
9V DC 500mA 9V DC 500mA Use only the 9V DC power adapter supplied with your Plugiator to power the box. In case the supplied power supply comes with different power plug types, you may need to change the power supply over to the plug type which is suitable in your country. -
Page 10: Getting Sound Out Of Your Plugiator
¼" phono jacks as left and right signals. In order to hear audio from the Plugiator, connect the Audio Out L & R to the Left / Right inputs of a mixing console, a pair of powered speakers, a computer sound card or a HiFi system. -
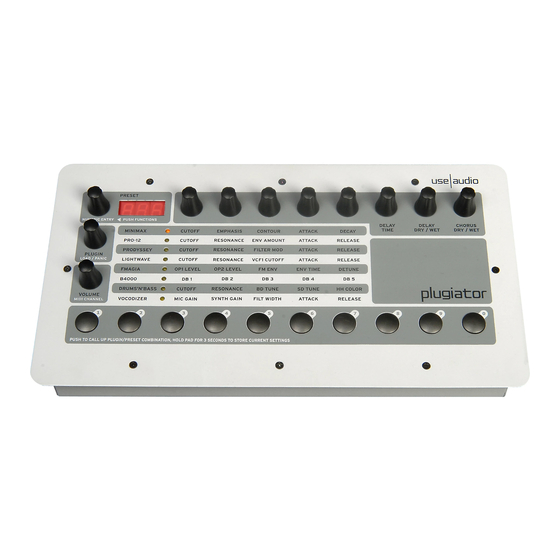
Page 11: Plugiator Control Interface
Plugiator Control Interface Plugiator Control Interface Plugiator Control Interface The Plugiator control interface has been designed to allow you quick and easy access to almost every function and setting you would want to tweak while using the product without a computer connected. - Page 12 Plugin The plugin knob is used in the following actions: Rotating to scroll through the list of plug-ins available on your Plugiator. Single push down to load the currently selected plug-in. Push and hold down for 3 seconds to send an "all notes off" MIDI message.
-
Page 13: Single Function Knobs
The first five single function knobs are used to control various sound design parameters on each plug-in. These knobs do not have a fixed function & vary depending on the currently loaded plug-in: see the printed label ob the Plugiator in the row of the currently active plug-in. -
Page 14: Quick Pads
Note: Note: Note: When making an assignment to a quick pad the Plugiator stores the Plug-in and Preset number that will be recalled when the quick pad is pushed. If you modify a particular preset that was previously assigned to a quick pad, the quick pad would... -
Page 15: Plug-Ins & Presets
Plug-Ins & P Plug-Ins & P resets The Plugiator runs one plug-in at a time and can store upto eight plug-ins (instruments) within its internal memory. Along with your initial purchase of the product you have been supplied with three plug-ins;... -
Page 16: Changing Presets
These presets reside on your computer, and may not be related to presets stored in your Plugiator box. To quickly store a preset which you called up from the... -
Page 17: Midi Program Change List
Plug-In Manager Software. Changes you make in the software will not be stored in the box unless you write the bank to the Plugiator hardware. Vice versa, changes you make to the presets stored in the Plugiator box will not be available in the software unless you read out a bank from the Plugiator box. -
Page 18: Usb Connections And Driver Installation
Recording MIDI information from your Plugiator Control interface & MIDI IN directly into your favourite computer music sequencing application. To install the Plugiator Drivers and Plug-in Manager software on a PC you will require a Windows XP operating system with Service Pack 2 or Windows Vista. For support of the Mac OSX please refer to www.use-audio.com. - Page 19 Plugiator User Manual After connecting the Plugiator to your computer’s USB port, Windows will automatically detect and install the “USB Audio Driver” You will see a dialog box (figure shown below) displaying that a new USB device has been found and that Windows is installing drivers for this device automatically.
-
Page 20: Confirming That The Driver Has Been Correctly Installed
Note: Note: Note: Note: It is recomended that you always use the same USB port to connect the Plugiator Note: to your Computer which you used while installing the drivers. Otherwise, in some computer configurations, your Plugiator may not be recognized. -
Page 21: Installing The Plug-In Manager Software
Plugiator User Manual Installing the Plug-in Manager Software Installing the Plug-in Manager Software Installing the Plug-in Manager Software Installing the Plug-in Manager Software Installing the Plug-in Manager Software To install the Plug-in Manager Software on your computer/laptop, please insert the supplied CD- ROM labeled 'Plug-In Manager Software' into the CD- ROM drive of your computer. -
Page 22: Using The Plug-In Manager Software
General To control your Plugiator with the Plug-in Manager software, you will need to connect the Plugiator to a computer via USB or MIDI. (Please refer to the previous chapter "USB connections and Driver installation") Double clicking on the shortcut called "Plug-in Manager" will load the application. -
Page 23: Panel Layout
Plugiator User Manual P P P P P anel Layout anel Layout anel Layout anel Layout anel Layout On the left section left section left section left section of the editor software you will see four panels available. left section... -
Page 24: Software Menus
Plugiator User Manual Software Menus Software Menus Software Menus Software Menus Software Menus The Menu Bar located on the top section of the screen allows access to the various Menus in the Plug-in Manager Software. File Menu File Menu File Menu... -
Page 25: View Menu
Plugiator User Manual View Menu View Menu View Menu View Menu View Menu Show Plug-in P Show Plug-in P Show Plug-in Panel anel anel anel Show Plug-in P Show Plug-in P anel Shows/hides the panel of the loaded plug-in. Show Slot Configuration... -
Page 26: Options Menu
Plugiator User Manual Options Menu Options Menu Options Menu Options Menu Options Menu P P P P P references... references... references... references... references... Click to open the program preferences dialog box. General: General: General: General: Here you can turn on/off the warning, when overwriting presets and decide... - Page 27 Configure Plugiator Configure Plugiator Configure Plugiator Configure Plugiator Configure Plugiator This dialog box is used to configure the MIDI connection settings of the Plugiator. Also, new plug-ins and DSP OS versions can be uploaded to your hardware via this dialog.
- Page 28 While using USB as the MIDI In/Out device, set Channel to receive in Omni mode. Hardware Information Hardware Information Hardware Information Hardware Information Hardware Information In this section you will find details of your Plugiator unit, which you may need when downloading firmware updates. HW V HW V ersion: ersion:...
-
Page 29: Making Firmware Updates
DSP - Operating System updates DSP - Operating System updates DSP - Operating System updates You can download OS (Operating System) software updates for your Plugiator when they become available. To update the DSP OS: Click & select "UPDATE DSP OS"... - Page 30 Select the Slot into which you will install the plug-in. We recommend you use the slot of the same name so that the plug-in slot will correspond to the labels on your Plugiator box. Browse for the plug-in file which has the file exension .pil .pil .pil .pil .pil (which again stands for “Plug-In Loader”)
- Page 31 100 more presets on the Plugiator box space for 100 more presets on the Plugiator box, then you may want to disable one space for 100 more presets on the Plugiator box...
- Page 32 Plugiator User Manual Note: Note: Note: Note: Please restart your Plugiator (power off, wait three seconds, then power on) Note: after the download process is complete. Note: Note: In the rare event that the write process aborts with an errror, you may try to...
-
Page 33: Online Menu
Plugiator User Manual Online Menu Online Menu Online Menu Online Menu Online Menu Browse Online Sounds Browse Online Sounds Browse Online Sounds Browse Online Sounds Browse Online Sounds Opens the Online Sound panel on the right side if activated in Online Settings. -
Page 34: Using The Plugiator
Note: Note: Note: Note: The number of plug-ins being displayed in the pull-down menu is dependent on Note: the number of plug-ins you have installed. Please visit www.use-audio.com/options for more information about optional plug-ins available for your Plugiator. -
Page 35: Local On/Off
OCAL ON: OCAL ON: OCAL ON: When local is ON, MIDI messages from the MIDI input and the Plugiator control panel will be sent to the Plugiator's internal sound engine. Use Local ON while using the Plugiator in standalone mode. -
Page 36: Activity Monitor
Green it is sending sending sending MIDI information from the Plug-in Manager software to the Output Driver (Plugiator or sequencing application) When the Active Monitor LED shows R R R R Red ed ed ed ed it is receiving receiving... -
Page 37: Presets
In this section you can see the loaded preset files and banks for the currently active plug-in. The library has been structured in the following manner: - Plug-in (one of the 8 plug-ins available on the Plugiator box) - Preset File (contains one or more Banks) - Bank (contains Presets 1 till 100) -
Page 38: Bank - Context Menu
Bank from Hardware ead Bank from Hardware ead Bank from Hardware Reads the Bank, that is saved on your Plugiator's internal memory. W W W W W rite Bank to Hardware rite Bank to Hardware rite Bank to Hardware... -
Page 39: Midi Keyboard
All Notes Off All Notes Off Sends an "all notes off" MIDI message to the Plugiator box in order to stop all current note activities / sound. Stuck notes can easily occur when using the on-screen MIDI keyboard with your computer's alphabetical keyboard while using the mouse to operate the software. -
Page 40: Midi Monitor
Plugiator User Manual MIDI Monitor MIDI Monitor MIDI Monitor MIDI Monitor MIDI Monitor The 'MIDI Monitor' button is located on the lower left of the editor software's display. Click on it to view a list of incoming and outgoing MIDI messages. -
Page 41: Tabs
Plugiator User Manual T T T T T abs abs abs These tabs allow the user to switch between Presets stored locally and Presets stored on the Online Sound Server. Note: Note: Note: In order to see and access sounds on the Online Sound Server, your computer... -
Page 42: Engaging Presets
When engaging a preset in the Plug-in Manager, the controller values for that preset are sent to the Plugiator - however, the preset number on the Plugiator does not change. Similarly when engaging a preset via the Plugiator, the controller values are updated in the Plug-in manager GUI but the preset number does not change. -
Page 43: Modifying Presets Using The Plugiator Control Interface
To save the modified preset with a different name right click on an empty preset and click on Overwrite. To update changes made via the Plug-In Manager to the Plugiator box, right click on the Bank you wish to update and click on „Write Bank to hardware". -
Page 44: Online Sounds
Note: By uploading your sound to the Online Sound Server, you make your sound available to the public and you grant other users as well as Use Audio Inc. the right to use, copy and distribute your sound without limitations. -
Page 45: Recording & Midi
Application for R ecording and Playback For users who wish to use the Plugiator along with the Plug-in Manager and a Sequencing application its important to read through the following chapter. Since both the Plug-in Manager and the MIDI Sequencing application (eg: Cubase) can not use the same driver (USB MIDI) to communicate with the Plugiator, a so called „Loop Back Driver“... - Page 46 Now use the following setup: Launch the Plug-in Manager. Click on LOCAL OFF in order to allow the Plugiator sounds to be triggered only via USB. Go to Plugiator Configuration and select MIDI IN as USB Audio Device & MIDI OUT as LoopBe1 (refer to the image on the following page) Open your sequencing application (e.g.
- Page 47 Plugiator User Manual The Plugiator Plug-in Manager will now use the LoopBe1 driver to send MIDI information to the Sequencing application (Cubase). Your Sequencing application will be connected to the Plugiator Board. via the USB Audio driver. (refer to the image below)
- Page 48 Note: Note: Note: Note: Be sure that you have loaded the Plugiator Plug-in Manager before starting Note: your sequencing application. If you have more than one USB Audio Device connected to your system, you will have to make the correct selection from the pull-down menu for the Plugiator within your sequencing application.
-
Page 49: Specifications
Plugiator User Manual Specifications Specifications Specifications Specifications Specifications Synthesis T Synthesis T echnology echnology Synthesis T Synthesis T Synthesis Technology echnology echnology Virtual Circuit Modelling, Physical Modelling Sampling R Sampling R Sampling Rate and Bit R ate and Bit R... -
Page 50: Frequently Asked Questions (Faq)
The Activation K ey does not work? Each purchased plug-in is usable on a single Plugiator unit. The Key you have received for your newly purchased Plug-in is hardware specific. Make sure that you are using the activation key that was specificly provided for your Plugiator unit. - Page 51 Check that the MIDI Monitor in the Plug-In Manager Software is showing incoming MIDI and that the Plugiator is set the MIDI channel you are using (or OMNI). If not, please check your MIDI keyboard with other MIDI equipment. You may also want to try an alternate MIDI cable, these things may break as you know.
-
Page 52: Midi Implementation Charts
Plugiator User Manual Minimax MIDI Implementation T Minimax MIDI Implementation T able able Minimax MIDI Implementation T Minimax MIDI Implementation T Minimax MIDI Implementation Table able able MIDI Controller Changes / Polyphonic Aftertouch Messages C CC CC CC CC C... - Page 53 Plugiator User Manual B4000 MIDI Implementation T B4000 MIDI Implementation T able able B4000 MIDI Implementation T B4000 MIDI Implementation T B4000 MIDI Implementation Table able able MIDI Controller Changes / Polyphonic Aftertouch Messages C CC CC CC CC C...
- Page 54 Plugiator User Manual LightW LightW ave MIDI Implementation T ave MIDI Implementation T able able LightW LightW LightWave MIDI Implementation T ave MIDI Implementation T ave MIDI Implementation Table able able MIDI Controller Changes / Polyphonic Aftertouch Messages C CC CC CC CC C...
- Page 55 Plugiator User Manual V V V V V ocodizer MIDI Implementation T ocodizer MIDI Implementation T ocodizer MIDI Implementation T able able ocodizer MIDI Implementation T ocodizer MIDI Implementation Table able able MIDI Controller Changes / Polyphonic Aftertouch Messages C CC CC CC CC C...
-
Page 56: Hardware Warranty Regulations
Use Audio Inc. warrants that the product is in material conformance with the requirements for reasonable enjoyment and operation of a sound synthesizer. However, Use Audio does not warrant the fitness of the product for any specific application and the warranted functionality is limited to features described in this edition of the User Manual. -
Page 57: Emi / Emc Compliance
On a side note, we are very proud of our truly global team - people across Christian, Islamic, Hindu, Sikh, Jewish and Buddhist backgrounds have been working together on the Plugiator product as friends. We thank everyone involved for their help to make this product become reality! -
Page 58: Notes
Plugiator User Manual Notes Notes Notes Notes Notes You may want to take note of your Hardware Serial Number as well as further individual Activation Keys here, for later reference: My Hardware Serial Number My Hardware Serial Number My Hardware Serial Number... - Page 59 Plugiator User Manual Notes Notes Notes Notes Notes...
- Page 60 Plugiator User Manual Notes Notes Notes Notes Notes...
Need help?
Do you have a question about the Plugiator and is the answer not in the manual?
Questions and answers