Table of Contents
Advertisement
Advertisement
Table of Contents

Related Manuals for C-SCOPE Newforce R1


Summary of Contents for C-SCOPE Newforce R1
- Page 1 OPERATING INSTRUCTIONS NEWFORCE...
- Page 2 “COIN INLAND” highlighted. • Press the ENTER push-button to select this program. • The R1 is now ready to use. SEARCHING • Keep the search head at a constant height above the ground, i.e. do not allow the search head to swing higher at the right and left edges of your swing.
- Page 3 • Independent volume Control Switch on the R1 and the opening screen tells you that it is all ready to go, select program mode and there’s nothing to adjust except the volume. The R1 is optimised and automatic. There are two powerful computers, each carrying out one million operations every second.
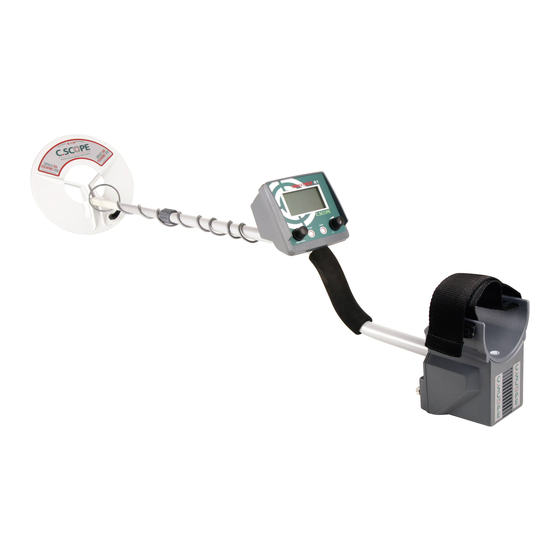
- Page 4 Battery Compartment Upper Stem & Handle Grips Din Plug & Socket Stem Connecting Nut Cable Lower Stem Cable Slots Search Head & Fastener...
-
Page 5: Battery Condition
Turn the stem lock to fix it at the desired position. BATTERIES The R1 is powered by eight AA batteries or a single 12v rechargeable pack from C-Scope. It is advisable to use standard alkaline batteries to start with. You can then evaluate the sort of use you give the detector and decide whether the investment in rechargeables is justified. - Page 6 Battery Monitor GROUND RADAR SIMULATOR This unique continuously scrolling RADAR is a view of the signal received by the R1 circuit. It can be used as an additional tool to analyse any signals. It is also a useful Pin Pointing aid.
- Page 7 The ID, (Identifier), numbers in the lower lefthand side correspond to the position of the ID block on the line at the top of the display. When the R1 has no signal or the signal is too weak or confusing to identify the display will show ‘??’. The ID line at the top of the screen will show a block in the relative position when the R1 successfully analyses a signal.
-
Page 8: Menu System
Once Learn Reject is selected the sample or samples are swept several times over the head. The R1 will then set the disc block at the sample ID point so that any objects with the same ID as the sample will be rejected. - Page 9 Once Learn Accept is selected the sample or samples are swept several times over the head. The R1 will then clear the disc setting at the sample ID point so that any objects with the same ID as the sample will be accepted. Care should be taken to ensure that you do not ‘Learn Accept’...
- Page 10 MENU/SCROLL control press then ENTER button to store the setting. NOTE: This setting has no effect on the RADAR display or audio level in Pin Point mode. TIP! This level should be set as high as possible without the R1 spuriously sounding off. PIN - PT GAIN...
-
Page 11: Silent Search
PIN - PT ON This turns Audio Discrimination ON for Pin Point Mode. This gives a continuous pitch change across the entire ID range. IE a low tone for iron and a corresponding increase in pitch for more valuable metals. MOTION OFF This turns Audio Discrimination OFF for Motion Mode. -
Page 12: Ground Type
SET UP BACK These functions allow the operator to store and recall the set up of the R1. Up to two programs can be stored. A program will store all of the current settings including Discrimination, Sensitivity, Frequencies etc. It will not store the Display Contrast and Brightness settings. - Page 13 MANUAL OFF This turns the manual mode off so when you turn on the R1 you are presented with a short - cut to the easy to use manufacturer defined programs of: for general purpose searching on COIN INLAND most sites i.e.
- Page 14 This option sets the contrast level or viewing angle of the display. Once set it shouldn’t require adjustment. However, if the R1 is used at dawn or dusk when the sun is low in the sky then some adjustment may be required to improve the visibility of the display. The desired level should be set by rotating the MENU/SCROLL control and then pressing the ENTER button when satisfied, this will store the setting.
- Page 15 SET UP BACK This can be used to change the operating frequency of the R1. Three frequencies are provided. Generally the middle frequency should be used but the others can be used if interference from other metal detectors is experienced. Use the MENU/SCROLL control to highlight the desired frequency and the press the ENTER key to store the setting.
-
Page 16: General Hints
Second Sweep First Sweep Detection Range Your R1 is a top performance detector but adverse soil conditions can significantly reduce the depth of detection. Detection ranges will vary depending on the size of the object, the length of time an object has been buried, and the type of ground the object is buried in. - Page 17 Determining the Target Size An operator who is familiar with their instrument will be able to do an excellent job of determining object size, shape and depth before he digs. This technique is learned from careful analysis of the RADAR and audio signal coming from the detector. Each time a signal is heard, listen for any peculiar characteristics it may have, determine over how large an area you get a detector signal, and try to 'outline' the object before you dig.
-
Page 18: Specification
Specification Battery Type: 8 x AA, MN1500 or equivalent, Alkaline cells recommended. Supply Voltage: 12v DC (nominal), 13.8v DC (max) Supply Current: 55mA (no backlight) 100mA (backlight full on) Battery Life: 40 Hours normal detecting using Alkaline batteries and no backlight Battery Indicator: Alkaline: Full 13.2V... -
Page 19: Menu Structure
MENU STRUCTURE DISCRIMination LEARN REJect LEARN ACCept EDIT SENSITIVITY MOTION GAIN PIN PoinT GAIN TUNE AUDIO DISCRIMination PIN PoinT OFF PIN PoinT ON MOTION OFF MOTION ON SILent SEARCH MODE ANALOG DIGITAL PROGRAMS GRouND TYPE INLAND BEACH OPTIONS DEFAULT LAST RECALL COIN INLAND PROGRAM ALL METAL PROGRAM... -
Page 20: Charging Batteries
CHARGING BATTERIES A battery charge socket is provided for use with the C-Scope battery charger (see Accessories) and is located under the protective cap in the battery housing. (The smaller of the two sockets.) Inserting the charger will automatically remove the power from the detector so the charger must be removed to do a battery check. -
Page 21: The Importance Of The Right Approach
THE IMPORTANCE OF THE RIGHT APPROACH Treasure hunting can be a profitable and rewarding hobby, if approached in a patient and diligent manner. Time spent researching to locate a worthwhile site for a search can be time wasted if your search is hasty and erratic. To achieve maximum results it is important then, to decide on your approach to any particular site in advance of the actual search. -
Page 22: Sweeping Technique
The technique of getting the best out of your detector is not learnt overnight. You need to get as much experience as possible so that you can recognise every kind of signal. Indeed, a good detector operator can often tell you what is being detected before it is unearthed. Search Head Position It is essential that the search head is kept close and parallel to the ground as in B. -
Page 23: Code Of Conduct
CODE OF CONDUCT 1. Do not trespass. Obtain permission before venturing on to any private land. 2. Respect the Country Code. Do not leave gates open when crossing fields, and do not damage crops or frighten animals. 3. Do not leave a mess. It is simple to extract a coin or other small objects buried a few inches under the ground without digging a great hole. -
Page 24: Troubleshooting
The R1 internal storage could be corrupted. To reset the detector ensure the R1 is turned OFF, press and hold the ENTER button, turn the R1 ON wait 5 seconds. You will be asked if you wish to reset the detector. Use the MENU/SCROLL control to highlight YES then press the ENTER button. - Page 25 Further Information If you experience any difficulty in operating your R1 or have any questions on the information in your R1 Operating Instructions Manual, please do not hesitate to phone our Customer Service Department on +44 (0)1233 629181 or e-mail: info@cscope.co.uk...
- Page 27 This equipment conforms to the EMC Directive 89/336/EEC. System performance may be impaired by unusually strong electromagnetic fields. Kingsnorth Technology Park, Wotton Road, Ashford, Kent TN23 6LN United Kingdom Telephone: +44 (0) 1233 629181 Fax: +44 (0) 1233 645897 email: info@cscope.co.uk, web: www.cscope.co.uk Pt No.
Need help?
Do you have a question about the Newforce R1 and is the answer not in the manual?
Questions and answers