
Related Manuals for BT EASICOM TV1


Summary of Contents for BT EASICOM TV1
-
Page 1: User Guide
T V1 Digital Telephone Answering Machine with Caller Display User Guide For use with BT’s Caller Display. Caller Display service requires set-up by BT or your service provider and connection to a digital exchange. -
Page 2: Key Features
Key features Optional Camera Monitoring Caller Display on the TV screen 01234 56789786 System Lets you see who is calling you from the comfort of your armchair. If you wish, you can attach a Camera Monitoring System which will transmit pictures and sound to your screen. -
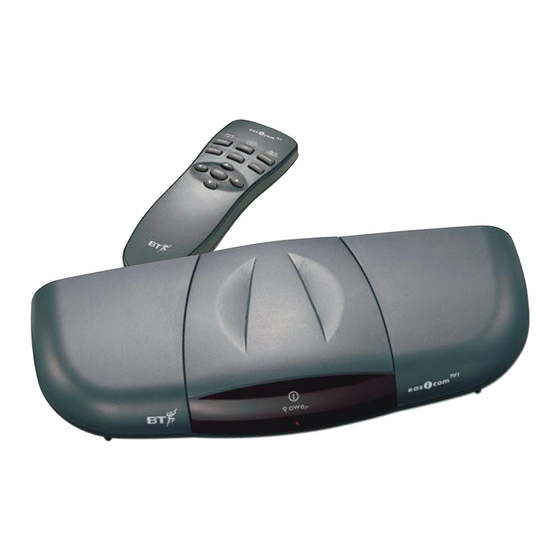
Page 3: At A Glance
At a glance Remote control Directory Calls Brings your Directory details onto Brings the Calls List onto the the screen (see page 13). You can screen (see page 11), so that you now add to or edit the details of can see who has been trying to your most frequent callers. - Page 4 Set-top box Front Power Status Indicator Red light is on when the power is connected. The light flashes to let you know when you have calls in your Calls List (page 10) and flashes fast when a priority caller has called you (page 17). Back Scart socket ( to TV ) Scart socket ( AUX )
-
Page 5: Table Of Contents
Contents At a Glance Introduction Setting up Safety Instructions T V1 Using Your Easicom Optional Camera Monitoring System Maintenance Help and advice Technical specification Index... -
Page 6: Introduction
Introduction Look who’s calling! Unpacking your Easicom BT are always looking for new ways to make T V1 When you have unpacked your Easicom communicating easier. That is why we are should have: pleased to introduce the Easicom T V1... -
Page 7: Setting Up
(or your network 0800 800 150 you (this is a chargeable service). Alternatively, provider). you can purchase a DIY extension kit (available from BT shops and other retail outlets) and fit Place your Easicom on your an extension yourself. Television set... - Page 8 Connect the plug at the other end of the Scart Plug the telephone line cord into lead to the Scart connector on the back of your the telephone wall socket Television set. If you are unsure which is the Scart socket on your television, please refer to Run the other end of the telephone line cord to the manufacturers guide for your particular set.
- Page 9 T V1 Plug this end into the back of the Easicom Plug the power adaptor into the power socket on the socket marked AUX. the wall and switch on. Aux Scart TV Scart Telephone Line Connect a telephone (optional) VIDEO If you happen to be recording on to video when If you wish, you can connect your existing a call comes in, the callers number will be...
-
Page 10: Safety Instructions
Safety instructions Do not submerge any part of the Warning T V1 Easicom , base or batteries in water or use in a damp environment, such For the remote control use only as a bathroom. approved batteries (2 x AAA Alkaline batteries). -
Page 11: Using Your Easicom
Using your Easicom Caller Display on your TV screen PLEASE NOTE When a call is received or stored by your T V1 The Easicom lets you see who is calling you Easicom , the screen will momentarily without you having to move from your armchair! go blank and the sound briefly mute. -
Page 12: The Calls List
To stop all numbers appearing on The Calls List the screen The Calls List provides a visual record of the last Disconnect the telephone socket 25 telephone numbers that called you (whether from the back of the Easicom T V1 you answered the call or not). - Page 13 The name allocated to that number To exit from the Calls List (if associated with a name stored in your Directory, see page 12) From the Calls List screen: Whether the call was one of your allocated Priority numbers (see page 17). This will be Press the button.
-
Page 14: The Directory
To view the Calls List on a plain blue To delete an entry from the Calls List background From the Calls List screen: Press buttons in the order shown Use the DOWN ARROWS To improve clarity, you may wish to highlight the entry you wish to delete. - Page 15 Sample of Directory screen Moving around the Directory Directory Page 1 of 5 The Directory entries will be displayed DEREK JOANNE over up to 3 screens (up to 20 entries). JOHN JOHN MOBILE You can scroll through the entries using buttons - your DOWN ARROW position on the screen will be indicated...
- Page 16 When you reach the character you Adding a new name and number to wish to use, release the button ARROW the Directory so that the character is displayed on screen. You cannot add a number to the Directory without storing a name to go Press the button.
- Page 17 Using the move the DOWN ARROW To add a number from the Calls List cursor down to the next line, which to the Directory gives you the option to allocate the entry a Priority status (see Priority You cannot add a number to the Call page 17).
- Page 18 Press the button. The screen Using the STORE DOWN ARROW will show SAVE CHANGES. buttons to move up and down the screen to select the line you wish to edit. Use the LEFT RIGHT ARROW When editing names and numbers in the buttons to select either YES or NO Directory, use the button to...
-
Page 19: Priority Calls
Press the Once you have recieved a Priority call, the red LEFT RIGHT ARROW buttons to select either YES or NO light will continue to flash at the faster rate, letting then press the button to STORE you know that a Proirity call has been received. confirm. -
Page 20: Optional Camera Monitoring System
Optional Camera Monitoring System Easicom T V1 has purpose built ports into which Connect the Audio output from your camera into you can connect a camera monitoring system. the CAMERA AUDIO IN port at the back of your Easicom T V1 Setting up Aux Scart TV Scart... - Page 21 To remove the camera image from the TV screen Press and hold the button CAMERA until the camera image disappears from the screen. The image and audio will return to the TV broadcast. A callers telephone number will appear on your TV screen as normal while viewing the camera picture.
-
Page 22: Maintenance
Maintenance General Easicom T V1 Clean the outside of the and remote control with damp (not wet) cloth or anti-static wipe. Service Do not leave dead batteries in the Remote Control. Replace them immediately with new AAA Alkaline batteries as soon as they run out. There are no customer replaceable parts on the T V1 Easicom... -
Page 23: Help And Advice
Help and advice Symptom Possible Cause Solution The product does not appear to be Easicom T V1 not powered. Ensure the power supply lead is working at all. plugged in and switched on, (see page 7.) The red light starts flashing Scart cable fitted incorrectly. - Page 24 Symptom Possible Cause Solution Caller Display information does not Have you registered to the Caller Call BT or your telephone service appear on the screen and red light Display service? provider. doesn’t flash when new calls are received. No name is presented when I receive There is no directory entry for this Enter the person’s name in your...
- Page 25 Symptom Possible Cause Solution There is no Scart connector on the BT recommended that the Easicom T V1 back of my TV. is connected to a TV via a scart. However, if you do not have a TV with a scart connection ability, Easicom...
-
Page 26: Technical Specification
Technical specification Non-volatile Memory Storage 1Kbytes On Screen Display 24 Characters X 10 Lines TV and AUX sockets Scart Camera video and audio sockets Phono Power Supply 12v DC, 300mA Infra Red Controller batteries 2 X AAA alkaline Video Levels 1Volt p-p, 75 Ohms Weight 400 grams... -
Page 27: Index
Telephone extension socket 2, 5 remove camera image from TV screen Telephone line cord 2, 5, 6 setting up Time Out using with your Easicom TV1 Unpacking viewing camera image on screen Video 6, 11 Cleaning Warnings Connection to other equipment... - Page 28 Offices in Europe, North America, Japan and Asia Pacific. CE compliant to 89/336/EEC The telecommunications services described in this publication are subject to availability and may be modified from time to time. (EMC Directive) & 73/23/EEC Services and equipment are provided subject to British (Low Voltage Directive) Telecommunications plc’s respective standard conditions of contract.
Need help?
Do you have a question about the EASICOM TV1 and is the answer not in the manual?
Questions and answers