BT Duet 210 - Corded Phone User Guide
- User manual (16 pages) ,
- User manual (16 pages)
Advertisement
Introduction
- 10 number quickdial memory - for ease of dialling your most important telephone numbers
- Mute – mutes your voice so you can talk to someone else in the room without your caller hearing you
- Last number redial – easy, one-touch dialling of the last number called
- Desk or wall mountable for your convenience
Getting started
Setting up
- Plug the telephone line cord into the telephone wall socket.
 Using broadband on the same phone line?
To avoid problems with your broadband or noise on your phone line, you might need to plug it into the wall socket via a microfilter (not supplied).
If your main phone socket has a single socket, as shown, you'll need to use microfilters.

You don't need to use microfilters if your main phone socket has two separate sockets, like these:

- You can use your telephone on a desk or similar surface or it can be wall mounted:
To use on a desk
- Press the telephone line cord into the groove on the underside of the base to ensure the phone sits flat.
To wall mount your phone

Before you wall mount, please check that:
- the wall can support the weight of the phone
- you are not drilling into any hidden wiring or plumbing
- the telephone line cord will reach the telephone socket
BT are not responsible for any damage/injury caused while attempting to wall mount your telephone.
- Drill two 4mm diameter holes in the wall either 100mm or 72mm apart according to your preference.

- Insert wall plugs into the holes, and then insert a screw into each hole. Leave approximately 5mm of the screw head protruding from the wall to hold the base securely in place.
- Position the telephone onto the screws. Drop down and secure into place.

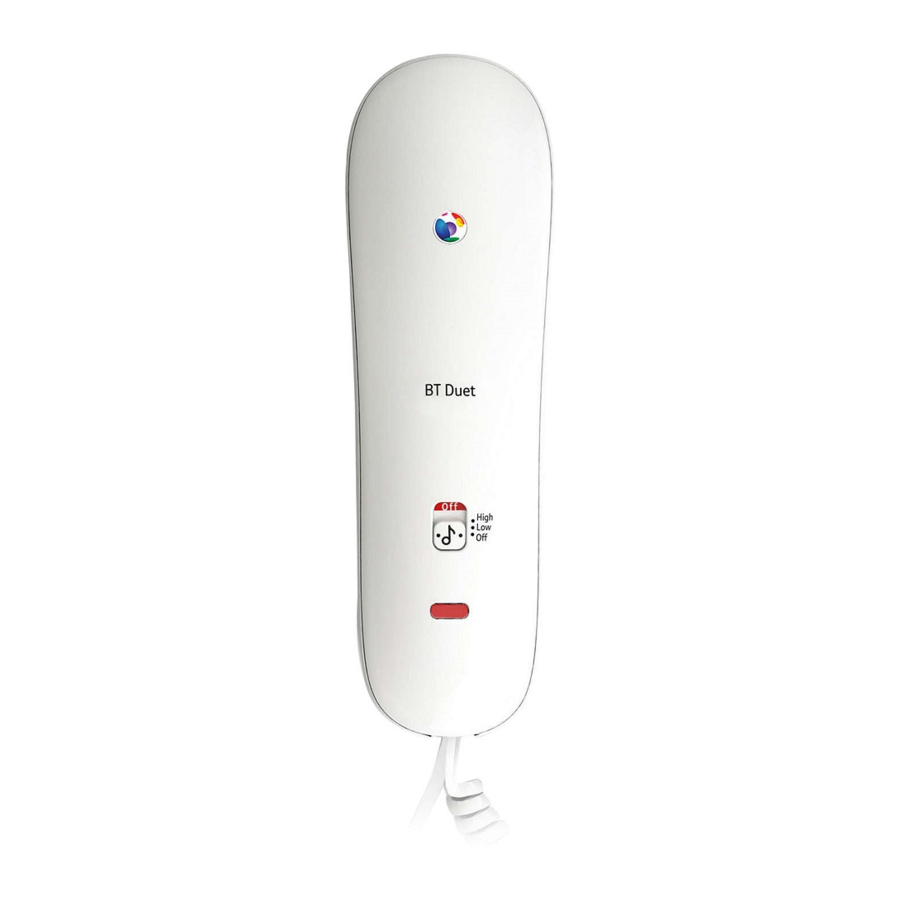
Getting to know your phone

- Hook switch
Press to make a follow-on call without replacing the handset. If wall mounted, allows your handset to rest securely on the base. - Quick dial
Use to store and dial telephone numbers in the quickdial memory. - R
Used with switchboard services and certain BT Calling Features. - Mute (with LED indicator)
During a call, mutes your voice so your caller cannot hear you. The red LED illuminates when the mute function is on and flashes when storing a number in the quickdial memory. - Redial
Press to redial the last number called. - Ringer volume switch
Use to select the ringer volume: high, low or off. - Incoming call LED indicator
Red LED flashes to indicate an incoming call.
Using the phone
Make a call
- Lift the handset and wait for the dial tone.
- Enter the telephone number.
End a call
- Replace the handset or press the hook switch if you want to make a follow-on call.
Receive a call
- When you receive a call, the telephone rings and the red incoming call LED indicator will flash. Simply pick up the handset to answer the call.
Last number redial
- Lift the handset and press the
![]() button. The last number called will be redialled.
button. The last number called will be redialled.
 button. The last number called will be redialled.
 A redial number can only be 32 digits long. If the last number redialled was longer than 32 digits only the first 32 digits will be dialled out.
Mute
- During a call, press and release the
![]() button to mute the handset microphone. The red LED on the mute button will illuminate to indicate that the mute feature is on. Your caller now cannot hear you speak.
button to mute the handset microphone. The red LED on the mute button will illuminate to indicate that the mute feature is on. Your caller now cannot hear you speak. - To switch mute off, press and release the
![]() button again. The red LED will turn off and your caller will now be able to hear you.
button again. The red LED will turn off and your caller will now be able to hear you.
 button to mute the handset microphone. The red LED on the mute button will illuminate to indicate that the mute feature is on. Your caller now cannot hear you speak.
 The mute feature will automatically switch off if you replace the handset on the base.
Adjust the ringer volume
- Adjust the switch on the front of the handset to the volume you want. There are 3 volume levels: high, low or off. The default is high.
![]()

Quickdial memory
You can store 10 of your most frequently dialled telephone numbers under the quickdial memory buttons  to
to  . There is a quickdial memory card located on the base of the telephone so you can make a note of the number or the contact associated with the number you have stored.
You'll need to lift the plastic plate up so you can write on the card.
Quickdial memory telephone numbers can be a maximum of 32 digits. If you enter more than 32 digits you will hear an error tone and the number entered will not be saved.
Store a number in the quickdial memory
- Lift the handset.
- Press and hold the
![]() button for 2 seconds until you hear a confirmation tone, then release. The red LED on the Mute button will flash.
button for 2 seconds until you hear a confirmation tone, then release. The red LED on the Mute button will flash. - Press a button to assign a number:
![]() to
to ![]() . A confirmation tone will be heard.
. A confirmation tone will be heard. - Dial the number you want to store.
- Press and release the
![]() button. A confirmation tone will be heard.
button. A confirmation tone will be heard. - Replace the handset.
 button for 2 seconds until you hear a confirmation tone, then release. The red LED on the Mute button will flash.
 If you wish to cancel storing a number, replace the handset on the base. The storing process will be cancelled and any number that was previously stored will be retained.
Dial a quickdial memory number
- Lift the handset and wait for the dial tone.
- Press the
![]() button.
button. - Press the quickdial memory location button
![]() to
to ![]() under which the number you want is stored. The number will be dialled out automatically.
under which the number you want is stored. The number will be dialled out automatically.
Delete a number stored in the quickdial memory
- Lift the handset.
- Press and hold the
![]() button until you hear a confirmation tone, then release. The red LED on the mute button will flash.
button until you hear a confirmation tone, then release. The red LED on the mute button will flash. - Press the quickdial memory location button
![]() to
to ![]() that you want to delete.
that you want to delete. - Press the
![]() button. You will hear a confirmation tone. Replace the handset on the base.
button. You will hear a confirmation tone. Replace the handset on the base.

Documents / ResourcesDownload manual
Here you can download full pdf version of manual, it may contain additional safety instructions, warranty information, FCC rules, etc.
Advertisement


Need help?
Do you have a question about the Duet 210 and is the answer not in the manual?
Questions and answers