Kenmore Elite Owner's Manual
Hide thumbs
Also See for Elite:
- Use & care manual (18 pages) ,
- Use & care manual (44 pages) ,
- Use & care manual (38 pages)
Table of Contents
Advertisement
Available languages
Available languages
E
E
L
L
I
I
E
E
E
L
L
L
I
I
I
Owners Manual
Table of Contents ..... 3
CAUTION: Read and Save All Instructions
COPY YOUR MODEL AND SERIAL NUMBER HERE:
If you need service or call with a question, have this information ready:
Model: ____________________________________________________________________
Serial Number: ______________________________________________________________
Purchase Date: ______________________________________________________________
Printed in Canada
T
T
E
E
T
T
T
E
E
E
1-35660-001 Rev. 03
Advertisement
Chapters
Table of Contents

Related Manuals for Kenmore Elite


Summary of Contents for Kenmore Elite
- Page 1 Owners Manual Table of Contents ..3 CAUTION: Read and Save All Instructions COPY YOUR MODEL AND SERIAL NUMBER HERE: If you need service or call with a question, have this information ready: Model: ____________________________________________________________________ Serial Number: ______________________________________________________________ Purchase Date: ______________________________________________________________ Printed in Canada 1-35660-001 Rev.
-
Page 2: Warranty
SEARS LIMITED WARRANTY FREEZERS Every new Sears Freezer is warranted to be free from defects in material or workmanship. What Sears will do, free of charge, in case of Defect PARTS LABOUR At SEARS option, either How long Warranted Install repaired or What is covered? repair or supply (From date of sale) -
Page 3: Table Of Contents
INTRODUCTION Read this book carefully. It is intended to help you operate and maintain your new Sears Freezer properly. The features described in this manual are not incorporated on all models. It is important that you familiarize yourself with the features present on your model. TABLE OF CONTENTS WARRANTY INTRODUCTION... -
Page 4: Maintenance Agreement
MAINTENANCE AGREEMENT We Service What We Sell "We Service What We Sell" is our assurance to you that you can depend on Sears for service because Sears service is nationwide. Your Sears freezer has added value when you consider that Sears has a service unit near you, staffed by Trained Technicians - professional technicians specifically trained on Sears freezers, having the parts, tools and equipment to ensure that we meet our pledge to you - "... -
Page 5: Important Safety Instructions
IMPORTANT SAFETY INSTRUCTIONS Protect Children Children may suffocate if they crawl into a freezer to hide Read all instructions before using this appliance. or play. WARNING: When using this appliance, always Remove the lid of a freezer not in use, even if you plan to exercise basic safety precautions, including the following: discard the freezer. -
Page 6: Installation Instructions
INSTALLATION INSTRUCTIONS Clean the freezer interior and parts to remove dust from shipping and packaging. Clean the inside of the freezer Choose a Location with a mild detergent. • Locate the freezer so that extension cords are not Electrical Supply necessary. -
Page 7: Operating Instructions
OPERATING INSTRUCTIONS Setting the cold control knob to number "0" position (Off) does not remove power to the freezer. Do not attempt to do any cleaning, repairs or defrost the freezer Cooling the Freezer First without first unplugging the freezer first. After plugging the freezer in, it must run for 3 hours in Temperature Monitor Alarm (Some Models) order to cool before placing any food inside. -
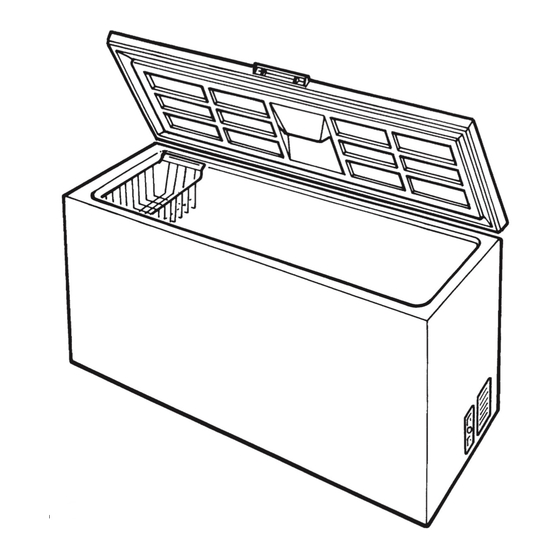
Page 8: Key Eject Lock
Key Eject Lock (Some Models) The key eject lock is located in the center of the handle. The key is packaged in the plastic bag with the use and care guide. Outer Drain The purpose of the lock is to keep your frozen food supply secure and to help reduce the hazard of child entrapment. -
Page 9: Cleaning Instructions
Cleaning Instructions For Periodic Complete Cleaning and Frost Removal If the frost is too thick or too hard to be scraped, we In order to retain the finish of the freezer cabinet, inside suggest you do the following: and outside, wash the enamelled and plastic parts with warm water and mild soap only, then rinse and dry. -
Page 10: Troubleshooting Instructions
TROUBLESHOOTING INSTRUCTIONS The freezer temperature is too warm. • The freezer may not be plugged in at the wall outlet. The freezer does not operate. The lid was opened too frequently or too long. • Check to make sure the freezer is plugged in at the •... - Page 11 Warning: Risk of Child Entrapment Never allow children to operate, play with, or crawl inside a freezer or refrigerator. If you are storing a refrigerator or freezer: 1. Block the door open: Glue thick wooden blocks to the door so it can't close. Be sure to use strong glue and place the blocks high, out of children's reach.
- Page 12 Dear Customer: In manufacturing this Sears product, many steps have been taken to provide you with the highest quality. Unfortunately, errors or omisssions occasionally occur. In the event that you find a missing or defective part, please contact your nearest Sears' store. If you have any suggestions that would help us to improve our assembly/operation instructions, or this product, please write them down and mail to: ____________________________________________________________...
- Page 13 Manuel du propriétaire Table des matières ..3 ATTENTION: Lisez et conservez ces instructions NOTEZ CI-DESSOUS LE NUMÉRO DE SÉRIE ET DE MODÈLE DE VOTRE APPAREIL: Vous devez avoir cette information à portée de la main, si vous téléphonez pour obtenir de l’aide ou poser une question.
- Page 14 GARANTIE LIMITÉE DES CONGÉLATEURS SEARS Tous les congélateurs neufs Sears sont garantis exempts de vice de matière et de fabrication. En cas de défectuosités, et ceci gratuitement, SEARS... PIÉCES MAIN-D'OEUVRE Durée de la garantie A son choix, réparera la Posera la pièce réparée ou Ce qui est couvert (A partir de la date pièce ou fournira une pièce...
- Page 15 INTRODUCTION Lisez ce manuel attentivement. Il vous aidera pour l’entretien et le fonctionnement de votre congélateur Sears. Toutes les caractéristiques décrites dans ce manuel ne sont pas comprises dans tous les modèles de congélateurs. Il est important que vous vous familiarisiez avec les caractéristiques du modèle que vous avez acheté.
-
Page 16: Garantie
CONTRACT D'ENTRETIEN NOUS ASSURONS LE SERVICE APRÉS-VENTE "Nous assurons le service aprés-vente" ... une devise que Sears se fait fort de répéter en s'appuyant sur son service aprés-ventre national. Lorsque vous achetez un congélateur Sears vous obtenez quelque chose que vous ne trouvez nulle part ailleurs: le service aprés-vente national Sears. -
Page 17: Protégeons Nos Enfants
IMPORTANTES CONSIGNES DE SÉCURITÉ Protegeons Nos Enfants Lisez toutes les consignes de sécurité avant d'utiliser votre congélateur: Un enfant peut rester enfermé et suffoquer s’il grimpe à l’intérieur d’un congélateur pour s’y cacher ou y jouer. ATTENTION: Lorsque vous utilisez cet appareil, prenez toujours des précautions élémentaires de sécurité, y compris Enlevez le couvercle du congélateur si vous ne l’employez les suivantes:... -
Page 18: Instructions Pour L'installation
INSTRUCTIONS POUR L’INSTALLATION Lorsque vous enlevez le ruban adhésif et le carton, faites attention de ne pas jeter des accessoires. Choix de l’emplacement Époussetez l’intérieur du congélateur ainsi que les accessoires. Nettoyez l’intérieur avec un détergent doux. • Placez le congélateur à un endroit où vous n’aurez pas besoin de cordon de rallonge. -
Page 19: Notice D'utilisation
DÉBRANCHEZ TOUJOURS LE CONGÉLATEUR AVANT DE NOTICES D’UTILISATION PROCÉDER À DES RÉPARATIONS, AVANT DE LE NETTOYER OU POUR LE DÉGIVRER. ATTENTION. MÊME Mise en marche de l’appareil avant l’utilisation SI LE BOUTON DE RÉGLAGE DE TEMPÉRATURE EST À Après avoir branché le congélateur, laissez-le fonctionner LA POSITION “0”, pendant 3 heures avant d’y placer toute nourriture. -
Page 20: Serrures
Serrure 1re étape. Enlevez d’abord le bouchon de l’extérieur en tournant ¼ de tour vers le bas et retirez-le avec les doigts. 2e étape. Insérez l’adapteur dans le trou d’écoulement et connectez le boyau à l’adapteur. Lampe témoin Serrure à Éjection de Clé. (Sur certains modèles) La serrure se trouve au centre de la poignée. -
Page 21: Instructions Pour Le Nettoyage
NE VOUS SERVEZ JAMAIS d’objets pointus ou coupants Instructions pour le nettoyage pour dégivrer le congélateur. Vous pourriez l’égratigner ou l’endommager. Pour ne pas endommager le fini à l’intérieur et à l’extérieur du congélateur, lavez les parties émaillées et celles de Nettoyage périodique complet et enlèvement du givre. -
Page 22: Diagnostics De Défectuosités
Diagnostics de défectuosités La température du congélateur est trop élevée. Le congélateur ne fonctionne pas. • Le congélateur est-il branché dans la prise de courant? • Le congélateur est-il bien branché? Si la fiche est bien solide et que l’appareil ne fonctionne toujours pas, branchez •... - Page 23 AVERTISSEMENT: Il y a risque qu'un enfant se prenne au piège Ne jamais permettre aux enfants de faire fonctionner ou jouer autour, ou de se glisser à l’intérieur d’un réfrigérateur ou congélateur. Si vous entreposez un congélateur ou réfrigérateur : 1.
- Page 24 Cher client: Lors de la fabrication de cet appareil Sears, nous avons pris toutes les mesures nécessaires pour vous fournir un produit de toute première qualité. Mailheureusement des erreurs ou des omissins se produisent parfois. Au cas où une pièce serait manquante ou défectueuse, veuillez vous adresser à votre magasin Sears le plus proche.
Need help?
Do you have a question about the Elite and is the answer not in the manual?
Questions and answers