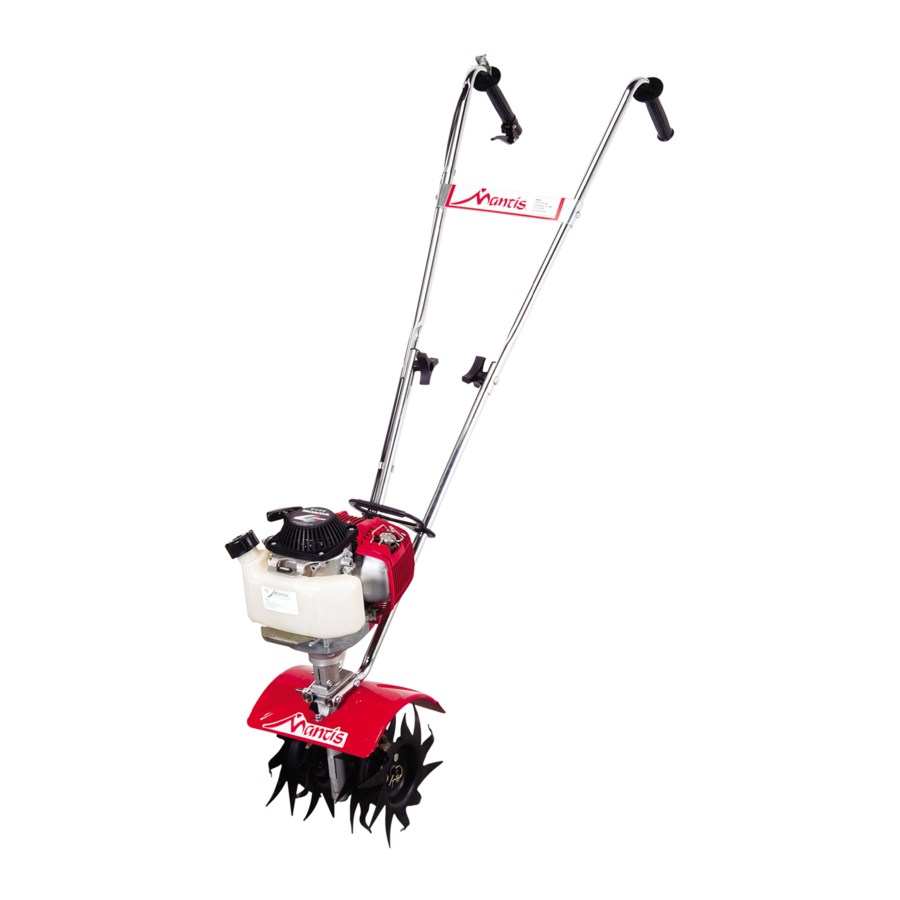
Mantis Tiller Owner's Manual
Tiller/cultivator with 4 stroke engine
Hide thumbs
Also See for Tiller:
- Owner's manual (32 pages) ,
- Owner's manual (32 pages) ,
- Owner's manual (20 pages)
Table of Contents
Advertisement
Advertisement
Table of Contents

Related Manuals for Mantis Tiller


Summary of Contents for Mantis Tiller
- Page 1 Tiller/Cultivator with 4 Stroke Engine OWNER’S MANUAL...
- Page 2 Safety Rules & Warnings ....3-5 MANTIS Tiller Assembly Layout ...18 Safety Decals ......4 Engine Parts Assemblies .
- Page 3 FAILURE TO COMPLY MAY RESULT IN SERIOUS PERSONAL INJURY, AND/OR EQUIPMENT AND PROPERTY DAMAGE. II. Safety & Warnings WARNING • DANGER IMPROPER USE OR CARE OF THIS TILLER OR FAILURE TO WEAR PROPER PROTECTION CAN RESULT IN SERIOUS INJURY. READ AND UNDERSTAND THE RULES FOR SAFE OPERATION AND ALL INSTRUCTIONS IN THIS MANUAL.
- Page 4 III. Safety Decal Information An important part of the safety system incorporated in this tiller are the warning and information decals found on various parts of the tiller. These decals must be replaced in time due to abrasion, etc. It is your responsibility to replace these decals when they become hard to read.
- Page 5 Don’t work on excessively Don’t operate while under steep slopes. the influence of alcohol or drugs. Don’t use tiller with one hand. Don’t attempt to clear tines Don’t attempt to repair this Keep both hands on handles with while they are moving. Never try tiller.
- Page 6 Tiller’s base. Plastic Carrying Handle The list at the right, shows the parts that Bag of Hardware Containing: come with your tiller. Check to make sure Cap Screws you have them. Lock Nuts The bag of hardware is in the plastic bag Bolts (3”...
- Page 7 3. Fit the handle clamp along the Make sure you insert them from outside of the short leg. Line up the the rear of the tiller (gasoline tank holes on the clamp and the leg. faces away from the operator)... so 4.
- Page 8 2. Gently pull the lower the handles properly. When you THIS MUST BE DONE handles out to their original stand behind your tiller, BEFORE STARTING THE position. ENGINE. holding the handles, the gas 3. Attach the upper handle 4.
- Page 9 IMPORTANT NOTE: Check the oil level in the engine before each use. If oil is low, top it off with 10W-30 before using. See your 4 Stroke Tiller Engine Manual and information above for details. Never use starting fluids as they WARNING •...
- Page 10 POSITION, RELEASE THE THROTTLE, ALLOW ENGINE TO IDLE, PUT THE (Picture 4) TILLER DOWN AND PULL THE CHOKE BUTTON OUT TO SHUT ENGINE 5. Once the engine is running, DOWN. HAVE PRODUCT SERVICED BEFORE USING. slowly push the choke lever...
-
Page 11: Additional Information
WARNING • DANGER I F ENGINE DOES NOT STOP WHEN SWITCH IS PUT IN THE STOP POSITION, RELEASE THE THROTTLE, ALLOW ENGINE TO IDLE. PUT THE TILLER DOWN, AND SLIDE THE CHOKE LEVER FORWARD TO THE COLD START (CLOSED) POSITION. - Page 12 Vacuum Cleaner. through the weed or root. Place your Tiller at the head of the row Your MANTIS Tiller Handles or area you want to till. Start it up. Then Special Tilling Projects.
- Page 13 Picture 1 Picture 2 tractor or larger tiller to break the How to Switch From Your MANTIS Tiller ground for you. This is a one- Tilling to Cultivating Makes Weeding a time-only investment that’s well...
- Page 14 Tines point toward the Your Mantis Tiller weeds six* to back of the tiller, or toward the nine inches wide. So you can run operator. it in a tightly planted garden...
- Page 15 Maintenance How to Check the Grease Level Inside the Worm Gear Housing When we built your MANTIS Tiller, we lubricated the worm gear housing thoroughly. It is imperative that you inspect the grease level once a year. Simply remove the cover plate on the worm gear housing.
- Page 16 WD-40, to prevent IMPORTANT It is important to store your 4 Stroke Mantis Tiller in an upright position. Laying the Tiller on its side will cause the oil to leak out of the engine through the air cleaner case.
-
Page 17: Using The Border Edger Attachment
2. Slide the Edger’s blade onto the Tiller or Engine. time! Just attach the Edger blade the right axle. The blade’s pointed on one axle and a Tiller tine on face should hit the ground when the other axle, “Mix and match” The Border Edger you spin the blade forward. - Page 18 Mantis Tiller Assembly...
- Page 19 Mantis Tiller Assembly KEY # QTY MATERIAL KEY # QTY MATERIAL 400257 TRIGGER HANDLE TINE SHAFT ASSM. RH WORM GEAR THRUST 400255 HANDLE ASSM. LH WASHER 400224 LOWER HANDLE - WORM GEAR BEARING FOLD DOWN BEARING 400620 LABEL BEARING SEAL RETAINER...
- Page 20 MANTIS TILLER. maintenance, whether performed by you or a dealer, is at your expense. MANTIS will repair or replace, at its option, any part or parts of the product proven to be MANTIS MAKES NO EXPRESS OR IMPLIED...
Need help?
Do you have a question about the Tiller and is the answer not in the manual?
Questions and answers