Rimage Producer 8100N User Manual
Hide thumbs
Also See for Rimage Producer 8100N:
- User manual (120 pages) ,
- Setup and installation manual (12 pages) ,
- Reference manual (7 pages)
Table of Contents
Advertisement
Rimage Producer™ IIIN+ User Guide
8100N, 7100N, 6100N, and 6100
This manual provides the information needed to operate, identify the parts of, and configure the printing preferences for the Rimage Producer III. To
,
set up and install your Rimage Producer III
refer to the Setup and Installation Guide included with your product.
Advertisement
Table of Contents

Subscribe to Our Youtube Channel
Related Manuals for Rimage Rimage Producer 8100N


Summary of Contents for Rimage Rimage Producer 8100N
- Page 1 Rimage Producer™ IIIN+ User Guide 8100N, 7100N, 6100N, and 6100 This manual provides the information needed to operate, identify the parts of, and configure the printing preferences for the Rimage Producer III. To set up and install your Rimage Producer III...
- Page 2 2001475_A...
- Page 3 This document may contain links Rimage Europe GmbH to sites on the Internet that are owned and operated by Albert-Einstein-Str. 26 third parties. Rimage Corporation is not responsible for the 63128 Dietzenbach Germany content of any such third-party site. ©2009, Rimage Corporation Tel: +49-(0) 6074-8521-0 Rimage®...
- Page 4 2001475_A...
-
Page 5: Table Of Contents
Contents Introduction ..............................1 About this User Guide ....................................1 About Your Product ....................................... 1 Important Information ............................. 3 Support Information ...................................... 3 Learn More Online ......................................3 Technical Support ......................................3 Optical Disc Recording Software Disclaimer ..............................4 Safety and Compliance Information ................................4 Safety Precautions ..................................... - Page 6 Rimage Producer™ IIIN+ User Guide 7100N/8100N/6100N/6100 2001475_A...
-
Page 7: Introduction
This manual provides the information needed to operate, identify the parts of, and configure the printing preferences for the Rimage® Producer™ 8100N, 7100N, 6100N, and 6100. These products are part of the Rimage Producer IIIN and III series of products. The terms ‘Producer III’ and ‘autoloader’ are used throughout this document to refer to these products. - Page 8 Rimage Producer™ IIIN+ User Guide 7100N/8100N/6100N/6100 2001475_A...
-
Page 9: Important Information
Support for the Rimage Producer III is available through your authorized reseller. Important! Make sure to register your Producer III so Rimage can notify you of upgrades as they become available. Registration for products using Rimage software versions 8.2 or higher is now managed through the Rimage website at www.rimage.com/support/warranty-registration... -
Page 10: Optical Disc Recording Software Disclaimer
An authorized applications outside North America, refer to the technician should perform all service procedures. nearest Rimage office for assistance in selecting a locally approved power cord. • Use of controls or adjustments or performance of procedures other than those specified herein may •... -
Page 11: Compliance Information
Important Information Compliance Information Product Producer Product Model Producer 6100 (PIII) RAS24 Producer 6100N (PIIIN) RAS24E Producer 7100N (PIIIN) RAS19E Producer 8100N (PIIIN) RAS18E Notice for USA NOTE: This equipment has been tested and found to comply with the limits for a Class A digital device, pursuant to part 15 of the FCC Rules. -
Page 12: Producer Iii Specifications
Note: The Producer 6100, 6100N, and 8100N have an external output bin. See the Input bin capacity note above for additional information. Networking To submit orders from a networked PC, refer to the Rimage Advanced Setup (Networking) Guide. Power 100 – 240 VAC, 60/50 Hz, 4.7 – 3.7 Amp, 500 watt maximum Specifications are continued on page 7. - Page 13 • Partition two is used for the Rimage System Folder **These optimum PC specifications are recommended if you are using the Rimage Producer 6100 to record DVD/BDs. Throughput is based on this system configuration. For optimum performance, use a PC with these specifications.
- Page 14 Rimage Producer™ IIIN+ User Guide 7100N/8100N/6100N/6100 2001475_A...
-
Page 15: Identify The Parts Of The Producer Iii
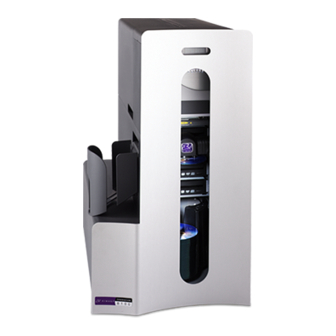
Identify the Parts of the Producer III Identify the Parts of the Producer III Note: Your system may not look exactly like the system pictured. Front View 7100N and 8100N Status Light (Optional) Operator Button Operator Panel Disc Dispenser (8100N only) Lift Arm Output Bin (8100N only) Recorder(s) -
Page 16: Back View
Rimage Producer™ IIIN+ User Guide 7100N/8100N/6100N/6100 Back View 7100N/8100N Power Switch Power Cord Network Cable 6100 6100N Power Switch Power Switch Power Cord USB Cable Network Cable Power Cord 2001475_A... -
Page 17: Parts Information
After initialization, the Producer IIIN displays the name of the embedded PC. Refer to the section on page 23 to see other options. Operate Gemini Utilities Note: The caret symbol ‘^’ in the upper right corner of the operator panel indicates that the Rimage software is currently communicating with the autoloader. Operator Button Open the front door to access the operator button. -
Page 18: Operate The Producer Iii
Rimage Producer™ IIIN+ User Guide 7100N/8100N/6100N/6100 Operate the Producer III This section provides the information that you need to produce discs with the Producer III. Power On the Producer III Before you begin: The carousel must be installed before you power on the system. For more information about installing the carousel, refer to Install the Carousel section on page 13. -
Page 19: Install The Carousel
Remove the carousel from the autoloader to load or unload discs. Important! If the Rimage software is currently running an operation on the autoloader, wait for the software to complete the operation, or pause the software operation before removing the carousel. -
Page 20: Load The Discs
Rimage Producer™ IIIN+ User Guide 7100N/8100N/6100N/6100 Load the Discs You can load up to 100 discs in each bin. You can either remove the carousel to load discs, or use the procedure below to place discs in a bin. Open the front door. -
Page 21: Maintain The Producer Iii
Maintain the Producer III Maintain the Producer III Use the information in this section to keep your Producer III in optimal operating condition. Overview Regular preventative maintenance of your Producer III can help to ensure error-free recordings and clean printed labels. Maintenance involves cleaning the system and aligning the printer on top of the autoloader. -
Page 22: Diagnostic Tests
Perform only the diagnostic tests provided below. Do not attempt to perform other diagnostic tests without the • assistance of a Rimage trained technician. Make sure that the Producer III is not in an error state before you perform any of the diagnostic tests. -
Page 23: Exit Diagnostic Mode
Maintain the Producer III Exit Diagnostic Mode If a diagnostic test is currently in process, press the operator button once to stop the test. Note: To exit diagnostic test 1 (carousel diagnostic test), press and hold the operator button to stop the test and return to diagnostic mode. -
Page 24: Diagnostic Test 3 - Calibrate Diagnostic Test
Rimage Producer™ IIIN+ User Guide 7100N/8100N/6100N/6100 Manually, slowly move the lift arm and disc down into the bin. Make sure that the disc does not interfere with the carousel as it moves into the bin. Important! If the disc interferes with the carousel in step 7, the lift arm may be miscalibrated or there may be an issue with the hardware that positions the carousel. -
Page 25: Calibrate The Carousel
Maintain the Producer III Press the operator button to begin the test. • The lift arm moves down into bin 1. • The lift arm picks up and releases the disc to measure the gripper length. • The lift arm moves up to the top position. •... -
Page 26: Align The Printer
Rimage Producer™ IIIN+ User Guide 7100N/8100N/6100N/6100 Manually, slightly rotate the carousel so that the distance between the edges of the carousel and the edge of the disc is equal on all four points, as shown. Note: The edge of the disc should not touch any part of the carousel. - Page 27 Maintain the Producer III Open the top access cover. Top Access Cover Tip: Look down through the top opening to observe the printer alignment. Align the printer. Slowly move the lift arm down until the disc touches the recessed print pad. Lift Arm Printer Button Side to Side Alignment...
- Page 28 Rimage Producer™ IIIN+ User Guide 7100N/8100N/6100N/6100 If the disc is not centered front to back on the print pad, align the printer front to back by turning the front to back alignment screw until the gap between the raised edge of the disc retainer and the disc is correct.
-
Page 29: Operate Gemini Utilities
Operate Gemini Utilities Operate Gemini Utilities The Rimage Producer Software Suite includes an application called Gemini Utilities, which is used to change the display name of the Producer III and to enable the beeper. Tip: To access Gemini Utilities for the Producer 6100N, 7100N or 8100N, use the remote desktop connection from a networked PC, or connect a monitor, keyboard, and mouse to the Producer 6100N, 7100N or 8100N.
Need help?
Do you have a question about the Rimage Producer 8100N and is the answer not in the manual?
Questions and answers