Table of Contents
Advertisement
Quick Links
Advertisement
Chapters
Table of Contents

Related Manuals for Asus J103


Summary of Contents for Asus J103
- Page 1 Welcome the world in the palm of your hands!
- Page 2 Product warranty or service will not be extended if: (1) the product is repaired, modified or altered, unless such repair, modification of alteration is authorized in writing by ASUS; or (2) the serial number of the product is defaced or missing.
-
Page 3: Chapter Summary
Chapter summary Chapter 1: Welcome! Chapter 1: Welcome! Chapter 1: Welcome! Chapter 1: Welcome! Chapter 1: Welcome! Chapter 2: Basic phone information Chapter 2: Basic phone information Chapter 2: Basic phone information Chapter 2: Basic phone information Chapter 2: Basic phone information (Pages 9 ~ 24) This chapter features the basic information on the mobile phone including the phone layout, installation of phone components, and procedures that you have to perform before using the... - Page 4 Chapter 7: Capturing moments Chapter 7: Capturing moments Chapter 7: Capturing moments Chapter 7: Capturing moments Chapter 7: Capturing moments (Pages 197 ~ 228) This chapter provides information on how to capture photos and videos using the camera. Chapter 8: Having fun Chapter 8: Having fun Chapter 8: Having fun Chapter 8: Having fun...
-
Page 5: Safety Precautions
Safety precautions For your safety and to keep your phone in good operating condition, read the following tips and reminders carefully before using your phone. Do not use your phone while Do not use the phone where driving, unless you use an blasting is in progress. - Page 6 Conventions To make sure that you perform certain tasks properly, take note of the following conventions used throughout this user guide. N O T E N O T E N O T E N O T E N O T E: Tips and information to aid in completing a task. I M P O R T A N T I M P O R T A N T I M P O R T A N T...
-
Page 7: Package Contents
J103 is a dual-band mobile phone with dual LCD, built-in 300K camera, MMS/SMS messaging capability, organizer, WAP, and GPRS. With 4 MB memory, J103 allows you to save graphics, audio, video, and text files like no other mobile phone could match. The J103 mobile phone also comes in a light and compact design making it a perfect partner whether you’re on or off the road. - Page 8 Optional accessories Optional accessories Optional accessories Optional accessories Optional accessories These phone accessories are optional items and are purchased separately. Ask your phone operator for details. C a r c h a r g e r C a r c h a r g e r D e s k t o p c h a r g e r D e s k t o p c h a r g e r D e s k t o p c h a r g e r...
- Page 9 This chapter features the basic information on the mobile phone including the phone layout, installation of phone components, and procedures that you have to perform before using the mobile phone.
-
Page 10: Table Of Contents
Chapter summary Chapter summary Chapter summary Chapter summary Chapter summary Phone layout ..................11 Function keys ..................13 Multi-color LED indicator ..............14 Changeable faceplate ................ 15 Subscriber Identity Module (SIM) card ..........16 Battery ....................17 Battery power levels ..............17 Installing and removing the battery ........... -
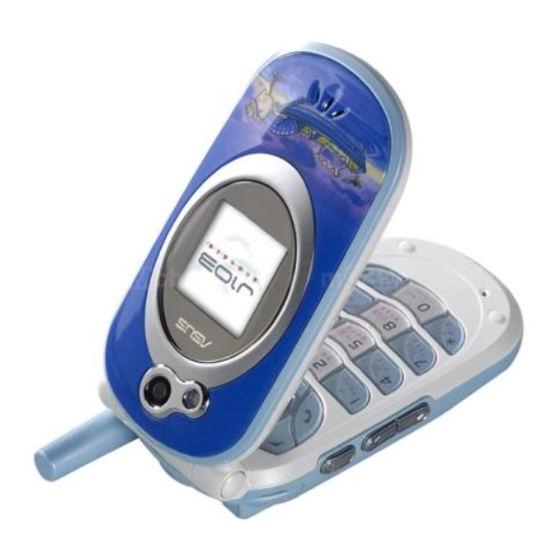
Page 11: Phone Layout
S p e a k e r S p e a k e r S p e a k e r The battery comes uninstalled on the J103 mobile phone. Refer to the battery installation section for instructions on how to install the battery. - Page 12 Phone layout Side view (Left) Side view (Left) Side view (Left) Side view (Left) Side view (Left) Front view (Open flip top) Front view (Open flip top) Front view (Open flip top) Front view (Open flip top) Front view (Open flip top) C a m e r a / V o i c e C a m e r a / V o i c e C a m e r a / V o i c e...
-
Page 13: Function Keys
Function keys When the phone is in idle mode, you can press the following function keys to launch some of the most common phone functions and features. Displays the SMS/MMS inbox Displays the Camera menu Displays the Fun menu Displays the phone book when in idle Launches the phone menu;... -
Page 14: Multi-Color Led Indicator
Multi-color LED indicator The phone comes with a multi-color LED located below the external display. This LED displays the phone, message, or call status in four different color indications. C o l o r C o l o r C o l o r C o l o r C o l o r S t a t u s... -
Page 15: Changeable Faceplate
Changeable faceplate The faceplate of the phone can be easily removed and replaced with a different one without the need for any tools. To change the faceplate: 1. With the front of the phone facing you, wedge your 1 1 1 1 1 fingernail into the notch located right above the faceplate . -
Page 16: Subscriber Identity Module (Sim) Card
Subscriber Identity Module (SIM) card The phone operator provides you with a Subscriber Identity Module (SIM) card that stores your mobile phone number, phone book entries, SMS/MMS messages, graphics, etc. Install the SIM card before you install the battery. The SIM card usually comes embedded on a plastic card. Read the SIM card documentation before removing the SIM card. -
Page 17: Battery
To remove or replace a SIM card: 1. When installed, remove the battery following the instructions in the next section. 2. From the dent (A) on the SIM card slot, use A A A A A 3 3 3 3 3 your fingertip to push the SIM card halfway out of the slot. -
Page 18: Installing And Removing The Battery
Installing and removing the battery Installing and removing the battery Installing and removing the battery Installing and removing the battery Installing and removing the battery Follow these instructions to install the battery to the mobile phone. To install the battery: 1. - Page 19 To remove the battery: 1. Push the battery latch upward until the 2. Lift the battery until it is disengaged from battery ejects from the unit. the battery terminals. Set the battery aside. These illustrations are for reference only and may not exactly show the actual unit. Colors were used for emphasis.
-
Page 20: Charging The Battery
Charging the battery Charging the battery Charging the battery Charging the battery Charging the battery Make sure that the battery is properly installed before charging. 1 1 1 1 1 To charge the battery: 1. Connect the charger to a power source. 2 Flip open the I/O connector cover on the side of the phone. - Page 21 When the phone is on When the phone is on When the phone is on When the phone is on When the phone is on The battery icon on both external and main displays animates to indicate that the battery is charging.
-
Page 22: Signal Strength
Signal strength Your phone has an external antenna and I c o n I c o n I c o n I c o n I c o n I n d i c a t i o n I n d i c a t i o n I n d i c a t i o n I n d i c a t i o n I n d i c a t i o n... -
Page 23: Camera
Camera Your phone comes with a built-in camera that allows you to capture, edit, and share photos and videos with other mobile phone, PDA, notebook, or PC users. Refer to Chapter 5 “Having fun” for more information. S p e c i f i c a t i o n S p e c i f i c a t i o n S p e c i f i c a t i o n S p e c i f i c a t i o n... -
Page 24: Switching The Phone On Or Off
Switching the phone ON or OFF To turn O N O N the phone: 1 Open the phone flip top to access the keypad. 2. Press and hold for a few seconds until the display turns on. 3. If you are asked for a Personal Identification Number (PIN) code, key-in the code using the keypad, then press . - Page 25 This chapter provides information on the display layout, screen icons, and basic phone operations so you can start using your mobile phone.
- Page 26 Chapter summary Chapter summary Chapter summary Chapter summary Chapter summary Display layout ................... 28 Other display modes ..............29 Indicator icons ................... 30 Main menu ..................32 Navigating the main menu ............33 Sub-menu ..................33 Changing initial settings ..............34 Setting the date and time ............
- Page 27 Adjusting the ring volume ............53 Saving a phone number in the phone book ........ 54 Entering text ................56...
-
Page 28: Display Layout
Display layout The phone display area has three parts when in idle mode. Icon/Title bar Icon/Title bar Icon/Title bar Icon/Title bar Icon/Title bar i d l e i d l e In i d l e i d l e i d l e mode, this bar shows the indicator icons. -
Page 29: Other Display Modes
Other display modes Other display modes Other display modes Other display modes Other display modes The phone display varies according to menu levels and modes. M e n u m o d e M e n u m o d e M e n u m o d e S u b - m e n u m o d e S u b - m e n u m o d e... -
Page 30: Indicator Icons
Indicator icons The icons that appear on the displays indicate the activated phone features and alert you of an SMS/MMS message or other useful information. The screen displays below show all the icons in the main and external displays. Refer to the table on the next page for a description of each icon. - Page 31 I c o n I c o n D e s c r i p t i o n D e s c r i p t i o n I c o n I c o n I c o n D e s c r i p t i o n D e s c r i p t i o n D e s c r i p t i o n...
-
Page 32: Main Menu
Main menu The icons in the main menu represents all the functions and features of your mobile phone. You can open the main menu by pressing when the phone is in idle mode. When selected, the menu icon animates and the screen shows the menu description on the bottom left corner of the display. -
Page 33: Navigating The Main Menu
Navigating the main menu Navigating the main menu Navigating the main menu Navigating the main menu Navigating the main menu To navigate the main menu: Use the navigation buttons to select a menu icon, then press to display the menu items. For example, if you want to select S e t t i n g s S e t t i n g s S e t t i n g s, press... -
Page 34: Changing Initial Settings
Changing initial settings You need to change some initial phone settings such as the date, time, time zone, and greeting text before using the phone. These initial settings are important so you can synchronize the mobile phone and your current location time. Setting the date and time Setting the date and time Setting the date and time... -
Page 35: Setting The Time Zone
Setting the time zone Setting the time zone Setting the time zone Setting the time zone Setting the time zone To set the time zone: Phone Settings Phone Settings Date/Time Date/Time 1. From the Phone Settings Phone Settings Phone Settings sub-menu, select Date/Time Date/Time Date/Time. -
Page 36: Setting The Date Format
Setting the date format Setting the date format Setting the date format Setting the date format Setting the date format There are three available date formats you can choose from. To set the date format: 1. From the Phone Settings Phone Settings Phone Settings Phone Settings... -
Page 37: Setting The Time Format
Setting the time format Setting the time format Setting the time format Setting the time format Setting the time format You can select a 24-hour or a 12-hour time format. To set the time format: 1. From the Phone Settings Phone Settings Phone Settings Phone Settings... -
Page 38: Selecting A Language
Selecting a language Selecting a language Selecting a language Selecting a language Selecting a language To select a language: Phone Settings Phone Settings Language. Language. 1. From the Phone Settings Phone Settings Phone Settings sub-menu, select Language. Language. Language. The default language is displayed on top of the soft key bar. -
Page 39: Creating A Greeting Text
Creating a greeting text Creating a greeting text Creating a greeting text Creating a greeting text Creating a greeting text The greeting text appears in the main display every time you turn on the phone. To create a greeting text: Phone Settings Phone Settings Greeting Text... -
Page 40: Basic Operations
Basic operations Placing a local call Placing a local call Placing a local call Placing a local call Placing a local call To place a local call: 1. Set the phone in idle mode. 2. Use the numeric keys [ ] to key-in the number of the party you wish to call, then press When available, the display shows the name and photo of the called... -
Page 41: Placing An International Call
Placing an international call Placing an international call Placing an international call Placing an international call Placing an international call To place an international call: 1. Set the phone in idle mode. 2. Long press to display the (+) sign. 3. -
Page 42: Calling A Number From Your Phone Book
Calling a number from your phone book Calling a number from your phone book Calling a number from your phone book Calling a number from your phone book Calling a number from your phone book To call a number from your phone book: 1. - Page 43 Using voice command to dial a number Using voice command to dial a number Using voice command to dial a number Using voice command to dial a number Using voice command to dial a number You must save at least one voice command or voice tag before you can use this feature.
- Page 44 Using speed dial Using speed dial Using speed dial Using speed dial Using speed dial You should have previously assigned a phone number to one of the speed dialing keys before using this feature. Refer to Chapter 5 “Managing the phone book” for details on speed dialing. To use speed dialing: 1.
-
Page 45: Initiating A Conference Call
Initiating a conference call Initiating a conference call Initiating a conference call Initiating a conference call Initiating a conference call You can talk to two parties at the same time using the conference call feature of the mobile phone. To initiate a conference call: 1. - Page 46 4. Place a call to When connected, person B using the the display shows keypad (when you person B’s name selected New Call New Call New Call New Call New Call), (or number), photo or the phone book (when available), (when you selected and duration of the Search Names...
- Page 47 Recording a conference call Recording a conference call Recording a conference call Recording a conference call Recording a conference call You can record the proceedings of a conference call using the voice recorder. To record a conference call: 1. During the The voice recorder conference call, records the...
- Page 48 Talking privately to a conference call member Talking privately to a conference call member Talking privately to a conference call member Talking privately to a conference call member Talking privately to a conference call member You can talk privately to a conference call member using the split feature of the call conference function.
- Page 49 To talk privately to another conference call member: 1. After you finished 2. The other talking to the first conference call conference call member is selected. You can now talk to member, press the other member (Option), select privately while the Swap Swap Swap...
- Page 50 Terminating a conference call member Terminating a conference call member Terminating a conference call member Terminating a conference call member Terminating a conference call member To terminate a member from a conference call: 1. During the 2. The display shows conference call, the conference call members.
- Page 51 Ending a conference call Ending a conference call Ending a conference call Ending a conference call Ending a conference call To end a conference call: E n d C a l l E n d C a l l During the conference call, press (Option), select E n d C a l l E n d C a l l E n d C a l l from the...
-
Page 52: Answering A Call
Answering a call Answering a call Answering a call Answering a call Answering a call When the phone receives an incoming call, it rings, vibrates, or rings and vibrates depending on your settings. There are four ways to answer an incoming call. •... - Page 53 Adjusting the ring volume Adjusting the ring volume Adjusting the ring volume Adjusting the ring volume Adjusting the ring volume Your mobile phone has a convenient volume control button on the left side that allows you to quickly increase or decrease the phone volume. I n c r e a s e I n c r e a s e I n c r e a s e...
- Page 54 Saving a phone number in the phone book Saving a phone number in the phone book Saving a phone number in the phone book Saving a phone number in the phone book Saving a phone number in the phone book Using the keypad Using the keypad Using the keypad...
- Page 55 Using the Call Records Using the Call Records Using the Call Records Using the Call Records Using the Call Records When you dialed a number, received or missed a call, the number called or the calling party is automatically saved in the phone call records. You can save the phone numbers in the call records to your phone book.
- Page 56 Entering text Entering text Entering text Entering text Entering text You will need to enter text to use several phone functionalities. For example, storing a name entry in the phone book, creating a text message, or scheduling appointments in your calendar.
- Page 57 Changing text input modes Changing text input modes Changing text input modes Changing text input modes Changing text input modes While in the text editing screen, press to select either one of the text input modes. The currently selected mode is indicated by an icon, located on the top left corner of the screen.
- Page 58 General rules on text entry General rules on text entry General rules on text entry General rules on text entry General rules on text entry When entering text: • Use the alphanumeric keys to enter letters, numbers, and symbols. • Press a key repeatedly until your desired character appears on the screen (refer to the Character display chart for a list of letters and numbers that each key represents).
- Page 59 Character chart Character chart Character chart Character chart Character chart K e y K e y K e y K e y K e y U p p e r c a s e ( A B C ) U p p e r c a s e ( A B C ) U p p e r c a s e ( A B C ) U p p e r c a s e ( A B C ) U p p e r c a s e ( A B C )
- Page 60 English mode English mode English mode English mode English mode P r e d i c t i v e P r e d i c t i v e P r e d i c t i v e P r e d i c t i v e P r e d i c t i v e The English mode...
- Page 61 Screen displays using predictive text input ( P ) ( P ) ( P ) ( P ) ( P ) ( O ) ( O ) ( O ) ( O ) ( O ) ( N ) ( N ) ( H ) ( H ) ( H )
- Page 62 To use the normal text method: For example, if you want to enter the word phone. 1. Press once to key-in p p p p p . Character navigator 2. Press twice to key-in h h h h h . 3.
- Page 63 Number/Symbol mode Number/Symbol mode Number/Symbol mode Number/Symbol mode Number/Symbol mode The Number/Symbol mode allows you to enter numbers and symbols. Select this mode to key-in numbers and symbols within your alphabetic text. To enter numbers: 1. Press to select the number mode (123). 2.
- Page 64 To display the available symbols: 1. Select the symbol mode (sym). The initial screen displays the first set of symbols assigned to the number keys. See Screen 1. 2. Press (down) twice to shift the symbols upward and display another set. Note that the symbols initially assigned to keys 1, 2, 3, 4, and 5 disappear, and the symbols previously assigned to keys 6, 7, Screen 1 Screen 1...
- Page 65 This chapter provides information on how to change the phone settings. It tells you how to change and customize your call, display, ring tone, and phone security settings.
- Page 66 Chapter summary Chapter summary Chapter summary Chapter summary Chapter summary Settings .................... 68 Phone Settings .................. 69 Security ................70 Shortcuts ................77 ................79 My Phone Number ..............80 Factory Settings ................ 81 Firmware Version ............... 82 Display settings ................83 Brightness ................
- Page 67 Composer ................98 Ring Mode ................102 Volume ................102 Misc Tones Switch ..............104 Power On Ringtone ..............106 Power Off Ringtone ..............106 Call Settings ..................107 Auto Redial ................108 Speed Dial ................109 Call Waiting ................112 Hide My No.
-
Page 68: Settings
Settings The S e t t i n g s S e t t i n g s S e t t i n g s S e t t i n g s menu allows you to change and customize most of the S e t t i n g s phone settings and network configuration. -
Page 69: Phone Settings
Phone Settings You can change the basic phone settings such as the time, date, language, phone security, and other phone configuration using this menu. To access the P h o n e S e t t i n g s P h o n e S e t t i n g s P h o n e S e t t i n g s P h o n e S e t t i n g s menu:... -
Page 70: Security
Security Security Security Security Security The Security Security Security Security Security menu allows you to activate, deactivate, or change the phone security settings. M e n u i t e m M e n u i t e m M e n u i t e m A l l o w s y o u t o A l l o w s y o u t o A l l o w s y o u t o... - Page 71 Activating your PIN Activating your PIN Activating your PIN Activating your PIN Activating your PIN The default PIN and PIN2 codes come with the SIM card package. You must key-in the default codes before you can change them. 1 1 1 1 1 Refer to the SIM card documentation for information on the PIN codes and PIN Unblocking Keys (PUK).
- Page 72 Changing the PIN Changing the PIN Changing the PIN Changing the PIN Changing the PIN To change the PIN: P I N P I N 1. Highlight P I N P I N P I N from the menu, then press (Option).
- Page 73 Changing the PIN2 Changing the PIN2 Changing the PIN2 Changing the PIN2 Changing the PIN2 To change the PIN2: 1 1 1 1 1 P I N 2 P I N 2 1. Highlight P I N 2 P I N 2 P I N 2 from the menu, then press (Modify).
- Page 74 Changing the network code Changing the network code Changing the network code Changing the network code Changing the network code The network code is supplied by your phone operator. The network code is required when enabling some call security features such as call barring.
- Page 75 Activating the phone lock code Activating the phone lock code Activating the phone lock code Activating the phone lock code Activating the phone lock code • You are prompted to enter the code every time you turn on the phone. •...
- Page 76 Changing the phone lock code Changing the phone lock code Changing the phone lock code Changing the phone lock code Changing the phone lock code To change the phone lock code: Phone Lock Code Phone Lock Code 1. Highlight Phone Lock Code Phone Lock Code Phone Lock Code from the menu, then press (Options).
-
Page 77: Shortcuts
Shortcuts Shortcuts Shortcuts Shortcuts Shortcuts The Shortcuts Shortcuts Shortcuts Shortcuts Shortcuts menu allows you to create shortcuts for common phone Shortcuts Shortcuts features and applications. You can quickly launch the Shortcuts Shortcuts Shortcuts menu by pressing when the phone is in idle mode. 1 1 1 1 1 Creating shortcuts Creating shortcuts... - Page 78 5. Select a command or 6. Put the phone in idle function from the mode, then press 6 6 6 6 6 5 5 5 5 5 list, then press to display the S h o r t c u t S h o r t c u t shortcut list.
-
Page 79: Led
This menu allows you to activate the LED for several phone events and status. Activating the LED Activating the LED Activating the LED Activating the LED Activating the LED To activate the LED for phone events or status: 1 1 1 1 1 1. -
Page 80: My Phone Number
My Phone Number My Phone Number My Phone Number My Phone Number My Phone Number This menu allows you to save and easily retrieve your mobile phone numbers. To add a phone number: 1. Select M y P h o n e M y P h o n e M y P h o n e M y P h o n e... -
Page 81: Factory Settings
Factory Settings Factory Settings Factory Settings Factory Settings Factory Settings The Factory Settings Factory Settings Factory Settings Factory Settings Factory Settings menu allows you to reset the device and revert all settings to their default values. Reverting the phone to factory settings erases all previously saved data in the phone memory and resets all customized settings such 1 1 1 1 1 as display, ring tone, and manners. -
Page 82: Firmware Version
Firmware Version Firmware Version Firmware Version Firmware Version Firmware Version To view the phone firmware version: 1. Highlight F i r m w a r e V e r s i o n F i r m w a r e V e r s i o n F i r m w a r e V e r s i o n F i r m w a r e V e r s i o n F i r m w a r e V e r s i o n from the P h o n e S e t t i n g s... -
Page 83: Display Settings
Display settings The Display Settings Display Settings Display Settings Display Settings menu allows you to change various display Display Settings properties including the theme, wallpaper, animation, backlight, brightness, and display elements. To access the D i s p l a y S e t t i n g s D i s p l a y S e t t i n g s D i s p l a y S e t t i n g s D i s p l a y S e t t i n g s menu:... -
Page 84: Brightness
Brightness Brightness Brightness Brightness Brightness The Brightness Brightness Brightness Brightness Brightness menu allows you to adjust the main display brightness level. The display brightness is set to 80% by default. Adjusting the display brightness Adjusting the display brightness Adjusting the display brightness Adjusting the display brightness Adjusting the display brightness To adjust the display brightness:... -
Page 85: Theme
Theme Theme Theme Theme Theme The T h e m e T h e m e T h e m e T h e m e T h e m e menu allows you to select the display color from four preset themes. -
Page 86: Wallpaper
Wallpaper Wallpaper Wallpaper Wallpaper Wallpaper The Wallpaper Wallpaper Wallpaper Wallpaper Wallpaper menu allows you to select the main and external display wallpapers from preset or saved photos, and set a time interval for the main wallpaper to change automatically. Changing the main or external display wallpaper Changing the main or external display wallpaper Changing the main or external display wallpaper Changing the main or external display wallpaper... - Page 87 Setting the wallpaper timer Setting the wallpaper timer Setting the wallpaper timer Setting the wallpaper timer Setting the wallpaper timer You can set the main display wallpaper to automatically change at a specified time interval. To adjust the wallpaper timer: Wallpaper Wallpaper 2.
-
Page 88: Power On/Off Animation
Power On/Off Animation Power On/Off Animation Power On/Off Animation Power On/Off Animation Power On/Off Animation The Power On/Off Animation Power On/Off Animation Power On/Off Animation Power On/Off Animation Power On/Off Animation menu allows you to select the animation everytime you turn the phone on or off. -
Page 89: Main Idle Screen
Main Idle Screen Main Idle Screen Main Idle Screen Main Idle Screen Main Idle Screen The Main Idle Screen Main Idle Screen Main Idle Screen Main Idle Screen Main Idle Screen menu allows you to show or hide the items appearing on the main display when the phone is in idle mode. -
Page 90: Sub Idle Screen
Sub Idle Screen Sub Idle Screen Sub Idle Screen Sub Idle Screen Sub Idle Screen The Sub Idle Screen Sub Idle Screen Sub Idle Screen Sub Idle Screen Sub Idle Screen menu allows you to select the screen for the external display when the phone is in idle mode. - Page 91 To display the business clock on the external display: 1. From the S u b I d l e S u b I d l e S u b I d l e S u b I d l e S u b I d l e 2.
- Page 92 5. Use the (up) or 6. Select the option Select City Select City Select City from Select City Select City (down) button to select the visiting the menu to open the World Clock World Clock World Clock World Clock World Clock clock, then press screen.
-
Page 93: Clean Wallpaper
Clean Wallpaper Clean Wallpaper Clean Wallpaper Clean Wallpaper Clean Wallpaper The Clean Wallpaper Clean Wallpaper Clean Wallpaper Clean Wallpaper Clean Wallpaper feature allows you to hide all the items appearing on the main display when the phone is in idle mode. To enable the clean wallpaper feature: 1. -
Page 94: Backlight Timer
Backlight Timer Backlight Timer Backlight Timer Backlight Timer Backlight Timer The backlight timer allows you to specify a time before the LCD display backlight turns off. Setting a shorter backlight timer saves battery power. To set the backlight timer: Backlight Timer Backlight Timer Display Settings Display Settings... -
Page 95: Sleep Timer
Sleep Timer Sleep Timer Sleep Timer Sleep Timer Sleep Timer The sleep timer allows you to specify a time before the main and external display turns off. Setting a shorter sleep timer saves battery power. To set the sleep timer: Sleep Timer Sleep Timer Display Settings... -
Page 96: Ringtone
Ringtone The Ri ngtone Ri ngtone Ri ngtone Ri ngtone menu allows you to select, change, adjust, and compose Ri ngtone the phone ring tone To access the R i n g t o n e R i n g t o n e R i n g t o n e menu: R i n g t o n e R i n g t o n e... -
Page 97: Incoming
Incoming Incoming Incoming Incoming Incoming The phone comes with 20 pre-installed polyphonic ring tones that you I n c o m i n g I n c o m i n g can select using the I n c o m i n g I n c o m i n g I n c o m i n g ring tone menu. -
Page 98: Key Tone
Key Tone Key Tone Key Tone Key Tone Key Tone The key tone sounds off every time you press a key on the keypad. To select a key tone: 1. Select K e y T o n e K e y T o n e K e y T o n e K e y T o n e 2. -
Page 99: Composer
Composer Composer Composer Composer Composer In addition to the pre-installed ringtones, you can compose five ring tones, each with up to 200 notes, if you know how to compose with musical notes. Composing a ring tone Composing a ring tone Composing a ring tone Composing a ring tone Composing a ring tone... - Page 100 4. When done, press 5. Use (up) or (down) to highlight (Option), select an instrument, then Instrument Instrument Instrument Instrument Instrument, then press to select. press to display the available Press (Back) to instrument sounds return to your that you can use. composition.
- Page 101 8. Press (Option), select P l a y P l a y P l a y P l a y, then press to listen to your P l a y composition. When playing, press (Stop) to stop. 9. When finished, press (Option), select S a v e S a v e S a v e...
-
Page 102: Ring Mode
Ring Mode Ring Mode Ring Mode Ring Mode Ring Mode The Ring Mode Ring Mode Ring Mode Ring Mode Ring Mode menu allows you to select the behavior of your phone every time you receive an incoming call. To select a ring mode: 1. -
Page 103: Volume
Volume Volume Volume Volume Volume Adjusting the volume Adjusting the volume Adjusting the volume Adjusting the volume Adjusting the volume To adjust the incoming ring volume: 1. Select V o l u m e V o l u m e V o l u m e V o l u m e V o l u m e from... - Page 104 To adjust the earpiece volume: 1. Select E a r p i e c e E a r p i e c e E a r p i e c e E a r p i e c e E a r p i e c e 2.
-
Page 105: Misc Tones Switch
Misc Tones Switch Misc Tones Switch Misc Tones Switch Misc Tones Switch Misc Tones Switch To set miscellaneous tone alerts: 1. Select Misc Tones Switch Misc Tones Switch Misc Tones Switch Misc Tones Switch Misc Tones Switch from the R i n g t o n e R i n g t o n e R i n g t o n e R i n g t o n e... -
Page 106: Power On Ringtone
Power On Ringtone Power On Ringtone Power On Ringtone Power On Ringtone Power On Ringtone Power On Ringtone Power On Ringtone The Power On Ringtone Power On Ringtone Power On Ringtone menu allows you to select the tone played every time you turn on the phone. -
Page 107: Call Settings
Call Settings The Call Settings Call Settings Call Settings Call Settings menu allows you to enable and customize the call Call Settings features of your mobile phone. To access the C a l l S e t t i n g s C a l l S e t t i n g s C a l l S e t t i n g s menu: C a l l S e t t i n g s... -
Page 108: Auto Redial
Auto Redial Auto Redial Auto Redial Auto Redial Auto Redial This menu allows you to enable or disable the Auto Redial feature. Auto redialing allows the phone to redial the phone number when it is busy or when the called party does not answer. To enable Auto Redial: 1 1 1 1 1 1. -
Page 109: Speed Dial
Speed Dial Speed Dial Speed Dial Speed Dial Speed Dial This menu allows you to activate or deactivate the speed dial feature of the mobile phone. Speed dialing allows you to dial a phone number by pressing an assigned key (1 ~ 10). Activating speed dial Activating speed dial Activating speed dial... - Page 110 Assigning the speed dial keys Assigning the speed dial keys Assigning the speed dial keys Assigning the speed dial keys Assigning the speed dial keys To assign the speed dial keys: 1. Select N u m b e r N u m b e r N u m b e r N u m b e r N u m b e r...
- Page 111 6. The name or number 7. Select Modify, 6 6 6 6 6 of the contact is Delete, or Delete All displayed in the from the menu, then Speed Dial number press list. Otherwise, press 7 7 7 7 7 Press (Option) (Back) to return to...
-
Page 112: Call Waiting
Call Waiting Call Waiting Call Waiting Call Waiting Call Waiting Call waiting allows you receive an incoming call while you are on the phone. To enable Call Waiting: 1 1 1 1 1 1. Select Call Waiting Call Waiting Call Waiting Call Waiting Call Waiting from the Call Settings Call Settings... -
Page 113: Hide My No
Hide My No. Hide My No. Hide My No. Hide My No. Hide My No. This feature allows you to show or hide your phone number to the mobile phone of the person you are calling. To show or hide your phone number: 1. -
Page 114: Call Barring
Call Barring Call Barring Call Barring Call Barring Call Barring The call barring feature allows you to block incoming or outgoing calls to and from your mobile phone. To activate your call barring settings: 1 1 1 1 1 1. Select Call Barring Call Barring Call Barring Call Barring... -
Page 115: Call Forwarding
Call Forwarding Call Forwarding Call Forwarding Call Forwarding Call Forwarding The call forwarding feature allows you to forward an incoming call to another phone when your mobile phone is busy, turned off, out of the network coverage area, or when you missed the call. Activating call forwarding Activating call forwarding Activating call forwarding... - Page 116 3. When prompted for confirmation, press (Yes). 4. When prompted, key-in the phone number where you want the calls to be forwarded, then press Press (Names), select a phone book entry, then press twice. 3 3 3 3 3 A Call Forwarding Unconditional Activated! Call Forwarding Unconditional Activated! Call Forwarding Unconditional Activated! Call Forwarding Unconditional Activated!
-
Page 117: Fixed Dialing
Fixed Dialing Fixed Dialing Fixed Dialing Fixed Dialing Fixed Dialing This menu allows you to activate or deactivate the fixed dialing feature. The SIM card stores the default status of the fixed dialing function. Activating fixed dialing Activating fixed dialing Activating fixed dialing Activating fixed dialing Activating fixed dialing... - Page 118 Specifying the fixed dial numbers Specifying the fixed dial numbers Specifying the fixed dial numbers Specifying the fixed dial numbers Specifying the fixed dial numbers To specify the fixed dial numbers: 1. Select N u m b e r N u m b e r N u m b e r N u m b e r N u m b e r...
-
Page 119: Money Keeper
Money Keeper Money Keeper Money Keeper Money Keeper Money Keeper The Money Keeper feature allows you to monitor and control your call costs by putting a time cap on all outgoing or incoming calls. Depending on your settings, Money Keeper either reminds you, ends the call, or do both when an outgoing or incoming call reaches the specified time. - Page 120 Setting the Money Keeper function Setting the Money Keeper function Setting the Money Keeper function Setting the Money Keeper function Setting the Money Keeper function To set the Money Keeper function: 1. Select Function Setting Function Setting Function Setting Function Setting from the Money Keeper Money Keeper Money Keeper Money Keeper menu, then...
- Page 121 Setting the Money Keeper timer Setting the Money Keeper timer Setting the Money Keeper timer Setting the Money Keeper timer Setting the Money Keeper timer To set the Money Keeper timer: 1. Select Timer Setting Timer Setting Timer Setting Timer Setting Timer Setting from the Money Keeper Money Keeper Money Keeper...
-
Page 122: Call Summary
Call Summary Call Summary Call Summary Call Summary Call Summary Depending on your settings, a Call Summary Call Summary Call Summary Call Summary Call Summary screen appears after you end an incoming or outgoing call. The Call Summary displays the call duration and voice recording, if any. -
Page 123: Answering Mode
Answering mode By default, you can answer all incoming calls by pressing the key. The Answering Mode Answering Mode Answering Mode Answering Mode Answering Mode menu allows you to customize the way you answer incoming calls. To customize your answering mode: 1. -
Page 124: Accessory Devices
Accessory Devices This menu allows you to change the headset settings. To enable auto answer: 1. From the S e t t i n g s S e t t i n g s S e t t i n g s S e t t i n g s menu, use S e t t i n g s (up) or... -
Page 125: Transmit
Transmit The phone is capable of transmitting data to and/or receiving data from a computer using the optional interface cable and installation CD. Make sure that you have installed the necessary drivers and applications before attempting to transmit or receive data to and from your computer. -
Page 126: Network Selection
Network Selection To choose a network selection mode: 1. From the S e t t i n g s S e t t i n g s S e t t i n g s S e t t i n g s menu, S e t t i n g s (up) or (down) to select... - Page 127 This chapter provides information on how to save, share, and manage contact information using the phone book.
- Page 128 Chapter summary Chapter summary Chapter summary Chapter summary Chapter summary Phonebook ..................130 Phonebook options ..............131 Adding contact information ............132 Adding a contact information to the SIM card ......132 Adding a contact information to the phone memory ....134 Adding a photo to a phone book entry ........
- Page 129 Selecting the phone book memory .......... 153 Viewing the phone book storage ..........154 Other phone book features ............. 155 Sending an SMS/MMS message ..........155 1 2 9 1 2 9 1 2 9 1 2 9 1 2 9...
-
Page 130: Phonebook
Phonebook The Phone book Phone book Phone book Phone book allows you to store, use, share, and manage contact Phone book information such as names, phone numbers, company and home addresses, e-mail addresses, etc. You can also add a voice recording and personalize the ringtone and LED settings for a particular contact using this menu. -
Page 131: Phonebook Options
Phonebook options Phonebook options Phonebook options Phonebook options Phonebook options O p t i o n s O p t i o n s O p t i o n s O p t i o n s O p t i o n s A l l o w s y o u t o A l l o w s y o u t o A l l o w s y o u t o... -
Page 132: Adding Contact Information
Adding contact information The phone memory can store up to 300 phone book entries and supports a SIM card that can store up to 255 phone book entries. Adding a contact information to the SIM card Adding a contact information to the SIM card Adding a contact information to the SIM card Adding a contact information to the SIM card Adding a contact information to the SIM card... - Page 133 4. Press to key-in 7. Use the keypad to key-in the phone the contact name. number of the contact, then press 5. Use the keypad to 8. When finished, press key-in the contact (Save) to save name, then press the contact information.
-
Page 134: Adding A Contact Information To The Phone Memory
Adding a contact information to the phone memory Adding a contact information to the phone memory Adding a contact information to the phone memory Adding a contact information to the phone memory Adding a contact information to the phone memory Aside from the contact name and phone number, you can add other information to a phone book entry when you save it to the phone memory. - Page 135 To add a phone book entry to the phone memory: 1. From the Phonebook, 5. Use the keypad to key-in the contact press (Option) to name, then press display a pop-up menu. 2. Use (up) or (down) to select A d d A d d A d d A d d...
- Page 136 8. Key-in other contact information including the home phone number, office phone number, other phone number, fax number, company, title, home address, e-mail address, birthday, remarks, and gender. Refer to the next sections when adding a photo and/or voice tag, or when classifying the phone book entry to a group.
-
Page 137: Adding A Photo To A Phone Book Entry
Adding a photo to a phone book entry Adding a photo to a phone book entry Adding a photo to a phone book entry Adding a photo to a phone book entry Adding a photo to a phone book entry •... -
Page 138: Adding A Voice Recording To A Phone Book Entry
Adding a voice recording to a phone book entry Adding a voice recording to a phone book entry Adding a voice recording to a phone book entry Adding a voice recording to a phone book entry Adding a voice recording to a phone book entry •... -
Page 139: Searching Phone Book Entries
Searching phone book entries Using Quick Find Using Quick Find Using Quick Find Using Quick Find Using Quick Find To search a phone book entry using Quick Find: 2 2 2 2 2 1. From the Phonebook, press (Option) to display a pop-up menu. 2. -
Page 140: Using Name Search
Using Name Search Using Name Search Using Name Search Using Name Search Using Name Search To search a phone book entry using Name Search: 1. From the Phonebook, press (Option) to display a pop-up menu. 2 2 2 2 2 2. -
Page 141: Managing Phone Book Entries
Managing phone book entries Viewing phone book entries Viewing phone book entries Viewing phone book entries Viewing phone book entries Viewing phone book entries To display the phone book entry information: 1. Select a phone book entry using (up) or (down), then press . -
Page 142: Displaying Long Entries
Displaying long entries Displaying long entries Displaying long entries Displaying long entries Displaying long entries The phone book has a scrolling feature that allows you to see a name entry even if it is longer than the screen width. To display a long phone book entry: 1. -
Page 143: Modifying A Phone Book Entry
Modifying a phone book entry Modifying a phone book entry Modifying a phone book entry Modifying a phone book entry Modifying a phone book entry You can change or add contact information to a phone book entry even after it has been saved to the phone memory. To modify a phone book entry: 1. -
Page 144: Deleting A Phone Book Entry
Deleting a phone book entry Deleting a phone book entry Deleting a phone book entry Deleting a phone book entry Deleting a phone book entry To delete a phone book entry: 1. From the 2. Press (Option), Phone book Phone book Phone book, select Phone book Phone book... - Page 145 To delete a phone book entry from the V i e w R e c o r d V i e w R e c o r d V i e w R e c o r d V i e w R e c o r d window: V i e w R e c o r d 1.
-
Page 146: Copying Name Entries
Copying name entries Copying name entries Copying name entries Copying name entries Copying name entries Copying a SIM phone book entry to the phone memory Copying a SIM phone book entry to the phone memory Copying a SIM phone book entry to the phone memory Copying a SIM phone book entry to the phone memory Copying a SIM phone book entry to the phone memory To copy a SIM phone book entry to the phone memory:... - Page 147 Copying a phone book entry to the SIM card Copying a phone book entry to the SIM card Copying a phone book entry to the SIM card Copying a phone book entry to the SIM card Copying a phone book entry to the SIM card To copy a phone book entry to the SIM card: 1.
- Page 148 Copying multiple entries Copying multiple entries Copying multiple entries Copying multiple entries Copying multiple entries To copy multiple phone book entries: 2. Select All Records All Records All Records All Records, 1. From the All Records Phone book Phone book Phone book Phone book Phone book, Press...
- Page 149 4. When prompted for 5. Another confirmation, press confirmation screen appears. Select (Yes). whether to keep or delete the original data after copying, then press When you select K e e p O r i g i n a l D a t a K e e p O r i g i n a l D a t a K e e p O r i g i n a l D a t a K e e p O r i g i n a l D a t a...
-
Page 150: Changing The Phone Book Settings
Changing the phone book settings Customizing group settings Customizing group settings Customizing group settings Customizing group settings Customizing group settings You can customize the phone book group name, ring tone and LED color. To customize the group settings: Phone book Phone book S e t t i n g s S e t t i n g s... - Page 151 Restoring a phone book group settings Restoring a phone book group settings Restoring a phone book group settings Restoring a phone book group settings Restoring a phone book group settings To restore the default phone book group settings: 1. From the Phonebook Phon ebook Phonebook Phon ebook...
-
Page 152: Classifying A Phone Book Entry To A Group
Classifying a phone book entry to a group Classifying a phone book entry to a group Classifying a phone book entry to a group Classifying a phone book entry to a group Classifying a phone book entry to a group To classify an entry to a group: 1. -
Page 153: Changing The Speed Dial Settings
Changing the speed dial settings Changing the speed dial settings Changing the speed dial settings Changing the speed dial settings Changing the speed dial settings You can change the speed dial key assignments and other speed dial S e t t i n g s S e t t i n g s settings using the S e t t i n g s S e t t i n g s... -
Page 154: Viewing The Phone Book Storage
3. Select an option from the menu, then press . Refer to the options description below. F r o m S I M F r o m S I M F r o m S I M F r o m S I M F r o m S I M Displays only all phone book entries saved in the SIM memory. -
Page 155: Other Phone Book Features
Other phone book features Sending an SMS/MMS message Sending an SMS/MMS message Sending an SMS/MMS message Sending an SMS/MMS message Sending an SMS/MMS message You can send an SMS or MMS message from the phone book entry. To send an SMS message: 1. - Page 156 To send an MMS message: 1. From the Phone book Phone book Phone book Phone book, select the entry you want to send an MMS Phone book message, then press Send MMS Send MMS 2. Press (Option), then select Send MMS Send MMS Send MMS from the pop-up menu.
- Page 157 This chapter provides information on the MMS and SMS messaging features of your mobile phone including instructions on how to send text, graphics, and audio files to other mobile phones.
- Page 158 Chapter summary Chapter summary Chapter summary Chapter summary Chapter summary Messaging features ................. 160 Short Message Service (SMS) ............161 Composing and sending an SMS message ........ 161 Launching the SMS message editor ........161 Choosing the message recipient(s) ........161 Composing the SMS message ...........
- Page 159 Multimedia Messaging Service (MMS) ..........178 Composing an MMS message ........... 178 Launching the MMS message editor ........178 Choosing the message recipient(s) ........178 Entering the message subject .......... 180 Adding text to the MMS message ........180 Adding an image to the MMS message ......182 Adding an audio file to the MMS message ......
-
Page 160: Messaging Features
Messaging features The phone is capable of creating, sending, and receiving both multimedia messaging service (MMS) or short message service (SMS) messages to and from other mobile phones. MMS allows you to send text messages with audio and image attachments to an MMS-enabled mobile phone or e-mail. -
Page 161: Short Message Service (Sms)
Short Message Service (SMS) The phone allows you to compose and send Short Message Service (SMS) or text message to another mobile phone. Composing and sending an SMS message Composing and sending an SMS message Composing and sending an SMS message Composing and sending an SMS message Composing and sending an SMS message Launching the SMS message editor... -
Page 162: Composing The Sms Message
2. Key-in the phone 3. The recipient’s name number of the recipient, or number appears in then press the T o T o field. Highlight the C o n t e n t C o n t e n t C o n t e n t field, then C o n t e n t C o n t e n t... -
Page 163: Sending The Sms Message
Sending the SMS message Sending the SMS message Sending the SMS message Sending the SMS message Sending the SMS message To send the SMS message: 1. From the E d i t S M S E d i t S M S E d i t S M S E d i t S M S E d i t S M S... -
Page 164: Saving The Sms Message
Saving the SMS message Saving the SMS message Saving the SMS message Saving the SMS message Saving the SMS message Save an SMS message to the SMS Outbox if you want to edit it or send it later. To save an SMS message: 1. -
Page 165: Viewing An Sms Message
Viewing an SMS message Viewing an SMS message Viewing an SMS message Viewing an SMS message Viewing an SMS message When the phone is in idle mode and you receive an SMS message, the screen displays an animated letter enevelope. Press (View) to open and view the message. -
Page 166: Managing The Sms Inbox
Managing the SMS Inbox Managing the SMS Inbox Managing the SMS Inbox Managing the SMS Inbox Managing the SMS Inbox The phone saves all SMS messages received in the SMS Inbox. You can view, reply, forward, or delete the messages stored in the SMS Inbox. Take note of the following icons preceding a message. -
Page 167: Managing The Sms Outbox
Managing the SMS Outbox Managing the SMS Outbox Managing the SMS Outbox Managing the SMS Outbox Managing the SMS Outbox The SMS Outbox contains all saved and draft messages. You can view, send, or delete the messages stored in the SMS Outbox. Take note of the following icons preceding messages in the SMS Outbox. -
Page 168: Changing The Sms Message Settings
Changing the SMS message settings Changing the SMS message settings Changing the SMS message settings Changing the SMS message settings Changing the SMS message settings To access the S M S S e t t i n g s S M S S e t t i n g s S M S S e t t i n g s S M S S e t t i n g s menu: S M S S e t t i n g s... -
Page 169: Changing The Service Center Number
Changing the service center number Changing the service center number Changing the service center number Changing the service center number Changing the service center number Obtain the correct service center number from your phone operator 1 1 1 1 1 before you change this item. -
Page 170: Changing The Message Format
Changing the message format Changing the message format Changing the message format Changing the message format Changing the message format To select a message format: 1 1 1 1 1 Send Format Send Format 1. Highlight Send Format Send Format Send Format from the SMS Settings menu, then press 2. -
Page 171: Changing The Sms Validity Period
Changing the SMS validity period Changing the SMS validity period Changing the SMS validity period Changing the SMS validity period Changing the SMS validity period The SMS validity period is the time period that you allow the phone operator to send your SMS message until it reaches the recipients. For example, if you sent an SMS message to a mobile phone that is not in the coverage area, the phone operator continuously sends the SMS message to that mobile phone within the duration you specified. -
Page 172: Creating Common Message(S)
Creating common message(s) Creating common message(s) Creating common message(s) Creating common message(s) Creating common message(s) For your convenience, you can create and store Common Messages Common Messages Common Messages Common Messages Common Messages in your phone. You can easily retrieve these messages when you want to send a quick note. -
Page 173: Activating Delivery Reports
Activating delivery reports Activating delivery reports Activating delivery reports Activating delivery reports Activating delivery reports If you wish to know that the messages you sent are delivered to the Delivery Rpt. Delivery Rpt. recipient, enable the Delivery Rpt. Delivery Rpt. Delivery Rpt. -
Page 174: Activating The Reply Path
Activating the reply path Activating the reply path Activating the reply path Activating the reply path Activating the reply path Activating the reply path allows the SMS message recipient to reply to your SMS message, using the embedded service center number. To activate the reply path: 1. -
Page 175: Auto Moving Sms Messages To The Handset
Auto moving SMS messages to the handset Auto moving SMS messages to the handset Auto moving SMS messages to the handset Auto moving SMS messages to the handset Auto moving SMS messages to the handset Activating the Auto Move to Handset feature allows you to transfer all incoming SMS messages from the SIM card to the handset automatically. -
Page 176: Viewing The Sms Memory Status
Viewing the SMS memory status Viewing the SMS memory status Viewing the SMS memory status Viewing the SMS memory status Viewing the SMS memory status To view the phone and SIM SMS memory status: From the S M S S M S S M S S M S S M S menu, use... -
Page 177: Changing The Cell Broadcast Settings
Changing the Changing the Changing the Changing the Changing the cell broadcast settings cell broadcast settings cell broadcast settings cell broadcast settings cell broadcast settings The cell broadcast feature allows your phone to receive cell broadcast messages. In cell broadcasting, users can set a topic and language for receiving a specific cell broadcast channel. -
Page 178: Multimedia Messaging Service (Mms)
Multimedia Messaging Service (MMS) Multimedia Messaging Service or MMS allows you to send text, image, and audio files to an MMS-enabled mobile phone or e-mail. A typical MMS message is compose of one or many slides. Each slide contains a combination of text, image, or audio file. - Page 179 Recipient List Recipient List A d d A d d 2. From the Recipient List Recipient List Recipient List screen, press (Option), select A d d A d d A d d, then press 3. Use (up) or (down) to select the contact information for the 2 2 2 2 2 MMS message, then press If you select Phon ebook...
-
Page 180: Entering The Message Subject
Entering the message subject Entering the message subject Entering the message subject Entering the message subject Entering the message subject To enter the message subject: 1. In the E d i t M M S E d i t M M S E d i t M M S E d i t M M S E d i t M M S... - Page 181 4. The created text appears in the C o m p o s e r C o m p o s e r C o m p o s e r C o m p o s e r C o m p o s e r window. Press (Option) to add another MMS message attachment.
-
Page 182: Adding An Image To The Mms Message
Adding an image to the MMS message Adding an image to the MMS message Adding an image to the MMS message Adding an image to the MMS message Adding an image to the MMS message To add an image to the MMS message: 1. -
Page 183: Image Gallery
To replace, delete, or time the duration of the image: 1. In the C o m p o s e r C o m p o s e r C o m p o s e r C o m p o s e r C o m p o s e r window, select the image, then press . -
Page 184: Adding An Audio File To The Mms Message
Adding an audio file to the MMS message Adding an audio file to the MMS message Adding an audio file to the MMS message Adding an audio file to the MMS message Adding an audio file to the MMS message To add an audio file to the MMS message: C o m p o s e r C o m p o s e r... - Page 185 To replace, delete, or time the duration of the audio file: 1. In the C o m p o s e r C o m p o s e r C o m p o s e r C o m p o s e r C o m p o s e r window, select the audio file, then press .
-
Page 186: Adding Another Slide(S)
Adding another slide(s) Adding another slide(s) Adding another slide(s) Adding another slide(s) Adding another slide(s) To add another slide to the MMS message: 1. In the Composer Composer Composer Composer 2. Create the slide Composer following the window, press instructions in the (Option), select A d d A d d A d d... -
Page 187: Adjusting The Slide Duration
Adjusting the slide duration Adjusting the slide duration Adjusting the slide duration Adjusting the slide duration Adjusting the slide duration To adjust the slide duration: 1. Select the slide from 3. Adjust the slide the C o m p o s e r C o m p o s e r C o m p o s e r C o m p o s e r... -
Page 188: Sending The Mms Message
Sending the MMS message Sending the MMS message Sending the MMS message Sending the MMS message Sending the MMS message To send the MMS message: 1. When in the 2. Press (Option), C o m p o s e r C o m p o s e r C o m p o s e r C o m p o s e r... -
Page 189: Managing The Mms Inbox
Managing the MMS Inbox Managing the MMS Inbox Managing the MMS Inbox Managing the MMS Inbox Managing the MMS Inbox The phone saves all downloaded MMS messages in the MMS Inbox. You can view, review, forward, or delete the messages stored in the MMS Inbox. -
Page 190: Managing The Mms Outbox
Managing the MMS Outbox Managing the MMS Outbox Managing the MMS Outbox Managing the MMS Outbox Managing the MMS Outbox The MMS Outbox contains all saved and draft MMS messages. You can view, review, forward, or delete the messages stored in the MMS Outbox. Take note of the following icons preceding a message. -
Page 191: Changing The Mms Message Settings
Changing the MMS message settings Changing the MMS message settings Changing the MMS message settings Changing the MMS message settings Changing the MMS message settings To access the M M S S e t t i n g s M M S S e t t i n g s M M S S e t t i n g s M M S S e t t i n g s menu: M M S S e t t i n g s... -
Page 192: Changing The Mms Validity Period
Changing the MMS validity period Changing the MMS validity period Changing the MMS validity period Changing the MMS validity period Changing the MMS validity period The MMS validity period is the time period that you allow the phone operator to send your MMS message until it reaches the recipients. For 1 1 1 1 1 example, if you sent an MMS message to a mobile phone that is not in the coverage area, the phone operator continuously sends the MMS... -
Page 193: Delaying The Mms Message Delivery
Delaying the MMS message delivery Delaying the MMS message delivery Delaying the MMS message delivery Delaying the MMS message delivery Delaying the MMS message delivery You can delay the sending of the MMS message using this item. 1 1 1 1 1 To delay the MMS message delivery: Delay Delivery Delay Delivery... -
Page 194: Activating The Read Report Function
Activating the Read Report function Activating the Read Report function Activating the Read Report function Activating the Read Report function Activating the Read Report function The Read Report function notifies you every time the phone receives an MMS message. 1 1 1 1 1 To activate the read report function: 1. -
Page 195: Auto Downloading Mms Messages
Auto downloading MMS messages Auto downloading MMS messages Auto downloading MMS messages Auto downloading MMS messages Auto downloading MMS messages Auto download allows the phone to immediately download from the phone operator MMS server all MMS messages received. To activate the auto download function: 1. -
Page 196: Viewing The Mms Memory Status
Viewing the MMS memory status Viewing the MMS memory status Viewing the MMS memory status Viewing the MMS memory status Viewing the MMS memory status To view the phone MMS memory status: From the M M S M M S M M S M M S M M S menu, use... - Page 197 This chapter provides information on how to capture photos and videos using the camera.
- Page 198 Chapter summary Chapter summary Chapter summary Chapter summary Chapter summary Camera .................... 200 Capture ................... 201 Capture display ................ 201 Key definition ................202 Basic camera settings .............. 203 Capturing a photo ..............204 Changing the camera settings ..........205 Viewing your photos ..............
- Page 199 Adjusting the brightness and contrast ........225 Viewing your videos ..............227 Using the video capture options ..........228 1 9 9 1 9 9 1 9 9 1 9 9 1 9 9...
-
Page 200: Camera
Camera The phone comes with a built-in 300K pixel camera and flash that allows you to capture, edit, and share photos and videos. The following sections tell how to use the camera and its features. To access the C a m e r a C a m e r a C a m e r a C a m e r a menu:... -
Page 201: Capture
Capture The C a p t u r e C a p t u r e C a p t u r e C a p t u r e function allows you to capture single or multiple photos, edit, and share them C a p t u r e using the MMS messaging feature. -
Page 202: Key Definition
Key definition Key definition Key definition Key definition Key definition The function of the following keys changes when the phone is in Capture mode. Normal capture mode (Main display) Normal capture mode (Main display) Normal capture mode (Main display) Normal capture mode (Main display) Normal capture mode (Main display) K e y K e y... -
Page 203: Basic Camera Settings
Self capture mode (External display) Self capture mode (External display) Self capture mode (External display) Self capture mode (External display) Self capture mode (External display) K e y K e y K e y K e y K e y P r e s s t o P r e s s t o P r e s s t o... -
Page 204: Capturing A Photo
Capturing a photo Capturing a photo Capturing a photo Capturing a photo Capturing a photo DO NOT use the camera on places where picture taking is prohibited. Take note of local regulations before using the camera. To capture a photo: 1. -
Page 205: Changing The Camera Settings
Changing the camera settings Changing the camera settings Changing the camera settings Changing the camera settings Changing the camera settings You can change the capture size, quality, mode, brightness, contrast, multi-capture interval, and flash settings using the capture display menu. To access the camera settings: 1. -
Page 206: Photo Size
Setting the photo size Setting the photo size Setting the photo size Setting the photo size Setting the photo size To set the photo size: 1. Use (up) or (down) to highlight Photo Size Photo Size Photo Size Photo Size from the Photo Size camera settings menu. - Page 207 Setting the photo quality Setting the photo quality Setting the photo quality Setting the photo quality Setting the photo quality To set the photo quality: 1. Use (up) or (down) to highlight Photo Quality Photo Quality Photo Quality Photo Quality from the Photo Quality camera settings menu.
- Page 208 Setting the capture mode Setting the capture mode Setting the capture mode Setting the capture mode Setting the capture mode To set the capture mode: 1. Use (up) or (down) to highlight Capture Mode Capture Mode Capture Mode from the Capture Mode Capture Mode camera settings menu.
- Page 209 Adjusting the photo brightness and contrast Adjusting the photo brightness and contrast Adjusting the photo brightness and contrast Adjusting the photo brightness and contrast Adjusting the photo brightness and contrast To adjust the brightness: 1. Use (up) or (down) to highlight Brightness Brightness Brightness Brightness from the...
- Page 210 Setting the multi-capture interval Setting the multi-capture interval Setting the multi-capture interval Setting the multi-capture interval Setting the multi-capture interval To set the multi-capture interval: 1. Use (up) or (down) to highlight Multi-Capture Interval Multi-Capture Interval Multi-Capture Interval Multi-Capture Interval Multi-Capture Interval from the camera settings menu.
- Page 211 Turning the flash on or off Turning the flash on or off Turning the flash on or off Turning the flash on or off Turning the flash on or off To turn the flash on or off: 1. Use (up) or (down) to highlight Flash Switch Flash Switch Flash Switch...
-
Page 212: Viewing Your Photos
Viewing your photos Viewing your photos Viewing your photos Viewing your photos Viewing your photos You can view all saved photos in the M y A l b u m M y A l b u m M y A l b u m M y A l b u m M y A l b u m folder. -
Page 213: Using The Photo Options
Using the photo options Using the photo options Using the photo options Using the photo options Using the photo options The photo options allow you to save, hide, delete, rename, edit, send, My Album My Albu m and slideshow the photos saved in the My Album My Albu m My A lbu m folder. -
Page 214: Editing Your Photos
Editing your photos Editing your photos Editing your photos Editing your photos Editing your photos You can add special effects, frame design, and texts to photos saved in M y A l b u m M y A l b u m Edit Image Edit Image M y A l b u m... -
Page 215: Adding Preview Effects To Your Photo
Adding preview effects to your photo Adding preview effects to your photo Adding preview effects to your photo Adding preview effects to your photo Adding preview effects to your photo You can add a preview effect to your subject before capturing the photo. -
Page 216: Adding Frames To Your Photo
Adding frames to your photo Adding frames to your photo Adding frames to your photo Adding frames to your photo Adding frames to your photo You can add a frame design to your photos using any of the 20 pre-installed frames. To add a frame to your photo: 1. -
Page 217: Using The External Display For Self-Capture
Using the external display for self-capture Using the external display for self-capture Using the external display for self-capture Using the external display for self-capture Using the external display for self-capture You can use the external display to do a self-capture. To use the self-capture feature: 1. -
Page 218: Using The Capture Timer
Using the capture timer Using the capture timer Using the capture timer Using the capture timer Using the capture timer You can use the capture timer to capture a photo without pressing the key or button. • Determine the best location for the phone before using this feature. - Page 219 I c o n I c o n I c o n I c o n I c o n T i m e r T i m e r T i m e r T i m e r T i m e r D e s c r i p t i o n D e s c r i p t i o n...
-
Page 220: Using Multi-Capture
Using multi-capture Using multi-capture Using multi-capture Using multi-capture Using multi-capture The multi-capture feature allows you to capture multiple photos in specific time intervals. Use multi-capture when capturing sequential or motion photos. To use multi-capture: 1. Set the multi-capture interval following the instructions on the “Setting the multi-capture interval”... - Page 221 Viewing multi-capture photos Viewing multi-capture photos Viewing multi-capture photos Viewing multi-capture photos Viewing multi-capture photos To view the multi-captured photos: 1. Open the M y A l b u m M y A l b u m M y A l b u m M y A l b u m folder.
-
Page 222: Avi Recorder
AVI Recorder The AVI Recorder AVI Recorder AVI Recorder AVI Recorder allows you to capture short video files using the AVI Recorder phone camera. The video files are saved in .AVI format and are stored in the M y V i d e o s M y V i d e o s M y V i d e o s folder. -
Page 223: Capturing Videos
Capturing videos Capturing videos Capturing videos Capturing videos Capturing videos DO NOT use the recorder in places where video capture is prohibited. Take note of local regulations before using the recorder. To capture a video: 1. Put the Camera in AVI Recorder AVI Recorder AVI Recorder AVI Recorder mode. -
Page 224: Adding Preview Effects To Your Video Capture
Adding preview effects to your video capture Adding preview effects to your video capture Adding preview effects to your video capture Adding preview effects to your video capture Adding preview effects to your video capture You can apply a preview effect to your video before capturing. The phone comes with six pre-installed preview effects that you can choose for your videos. - Page 225 Adjusting the brightness and contrast Adjusting the brightness and contrast Adjusting the brightness and contrast Adjusting the brightness and contrast Adjusting the brightness and contrast To adjust the brightness: 1. Use (up) or (down) to highlight Brightness Brightness Brightness Brightness Brightness from the video settings menu.
- Page 226 Turning the flash on or off Turning the flash on or off Turning the flash on or off Turning the flash on or off Turning the flash on or off To turn the flash on or off: 1. Use (up) or (down) to highlight Flash Switch Flash Switch Flash Switch...
- Page 227 Viewing your videos Viewing your videos Viewing your videos Viewing your videos Viewing your videos You can play and view all saved videos in the My Video My Video My Video My Video My Video folder. M y V i d e o M y V i d e o To open the M y V i d e o M y V i d e o...
- Page 228 Using the video capture options Using the video capture options Using the video capture options Using the video capture options Using the video capture options The video capture options allow you to view, delete, and rename video files save in the My Video folder. You can also use this menu to set a video as power on or off animation.
- Page 229 This chapter tells you how to play games on your mobile phone, change the ring tone settings, and browse your captured photos and videos.
- Page 230 Chapter summary Chapter summary Chapter summary Chapter summary Chapter summary .................... 231 Ringtone ..................231 Java Games ..................232 Playing games on your phone ..........232 Changing the game settings ............ 233 Image Gallery .................. 234 Accessing the Image Gallery ............ 234 Opening the Private Album ............
-
Page 231: Fun
The F u n F u n F u n F u n menu consists of three menu: R i n g t o n e R i n g t o n e R i n g t o n e, Java Games R i n g t o n e Java Games Java Games, and... -
Page 232: Java Games
Java Games The Java Games Java Games Java Games Java Games menu lets you play Java games on your mobile Java Games phone. You can play pre-installed Java games or download a new game from your computer using the optional PC sync cable. 1 1 1 1 1 Playing games on your phone Playing games on your phone... -
Page 233: Changing The Game Settings
Changing the game settings Changing the game settings Changing the game settings Changing the game settings Changing the game settings To change the game settings: F u n F u n J a v a J a v a 1. In the F u n F u n F u n menu, use (up) or... -
Page 234: Image Gallery
Image Gallery The Image Gallery Image Gallery Image Gallery Image Gallery menu allows you to browse, edit, share, and Image Gallery manage photo files and video clips saved in your mobile phone. Accessing the Image Gallery Accessing the Image Gallery Accessing the Image Gallery Accessing the Image Gallery Accessing the Image Gallery... -
Page 235: Opening The Private Album
Opening the Private Album Opening the Private Album Opening the Private Album Opening the Private Album Opening the Private Album The Private Album Private Album Private Album Private Album is protected by the Phone Lock Code. Private Album P r i v a t e A l b u m P r i v a t e A l b u m To access the P r i v a t e A l b u m P r i v a t e A l b u m... -
Page 236: Viewing The Image Gallery Memory
Viewing the Image Gallery memory Viewing the Image Gallery memory Viewing the Image Gallery memory Viewing the Image Gallery memory Viewing the Image Gallery memory To view an image folder’s memory: F u n F u n I m a g e I m a g e 1. - Page 237 This chapter provides information on how to use the phone organizer for your daily activities.
- Page 238 Chapter summary Chapter summary Chapter summary Chapter summary Chapter summary Organizer ..................240 Launching the Organizer ............240 Calendar ..................241 Displaying the calendar options ..........242 Adding a calendar event or record .......... 243 Viewing all calendar events or records ........244 Deleting calendar events or records ........
- Page 239 Voice Memo ..................257 Creating a voice memo ............257 Listening to a voice memo ............259 Sending a voice memo using MMS ........... 260 Deleting a voice memo(s) ............261 Memory Status ................262 Viewing the memory status ............. 262 Voice Recognition ................
-
Page 240: Organizer
Organizer The Organi zer Organi zer O rgani ze r O rgani ze r menu allows you to organize your daily activities O rgani ze r through helpful applications such as the Calendar, Voice and Text Memo, Calculator, Currency Exchange, Alarm, World Clock, etc. Launching the Organizer Launching the Organizer Launching the Organizer... -
Page 241: Calendar
Calendar The Calendar Calendar Calendar Calendar menu allows you to manage your daily schedule with Calendar settings that you can customize according to your needs. To open the C a l e n d a r C a l e n d a r C a l e n d a r C a l e n d a r: C a l e n d a r... -
Page 242: Displaying The Calendar Options
Displaying the calendar options Displaying the calendar options Displaying the calendar options Displaying the calendar options Displaying the calendar options To display the calendar menu options: 1. In the Calendar Calendar Calendar Calendar Calendar, press (Option) to display the calendar options. 2. -
Page 243: Adding A Calendar Event Or Record
Adding a calendar event or record Adding a calendar event or record Adding a calendar event or record Adding a calendar event or record Adding a calendar event or record To add a calendar event or record: 1. In the Calendar Calendar Calendar Calendar, press... -
Page 244: Viewing All Calendar Events Or Records
Viewing all calendar events or records Viewing all calendar events or records Viewing all calendar events or records Viewing all calendar events or records Viewing all calendar events or records To view all calendar events or records: 1. In the Calendar Calendar Calendar Calendar, press... -
Page 245: Setting The Start Of The Week Day
To delete all calendar events or records: Calendar Calendar 1. In the Calendar Calendar Calendar, press (Option) to display the calendar options. 2. Use (up) or (down) to highlight Delete All Delete All Delete All Delete All, then press Delete All 3. -
Page 246: Setting A Holiday
Setting a holiday Setting a holiday Setting a holiday Setting a holiday Setting a holiday To set a holiday: 1. In the Calendar Calendar Calendar Calendar Calendar, press (Option) to display the calendar options. 2. Use (up) or (down) to highlight Set Holiday Set Holiday Set Holiday Set Holiday... -
Page 247: Listing Horoscopes
3. Use (up) or (down) to highlight a holiday, then press view the holiday details. 4. When finished, press (Back) to return to the List Holiday List Holiday List Holiday List Holiday List Holiday menu. Listing horoscopes Listing horoscopes Listing horoscopes Listing horoscopes Listing horoscopes To view a list of horoscopes:... -
Page 248: Alarm
Alarm The A l a r m A l a r m A l a r m A l a r m menu allows you to set five alarms with different frequency, A l a r m time, and alarm tone, so you are notified of important events everytime. To open the A l a r m A l a r m A l a r m... - Page 249 5. Use (up) or 4. Press (Option), (down) to highlight select Alarm Type Alarm Type Alarm Type Alarm Type Alarm Type the alarm frequency, from the menu, then then press press 6. Press (Back) to return to the A l a r m A l a r m A l a r m A l a r m...
-
Page 250: Turning Off An Alarm
Turning off an alarm Turning off an alarm Turning off an alarm Turning off an alarm Turning off an alarm To turn-off an alarm: A l a r m A l a r m 1. In the A l a r m A l a r m A l a r m menu, use (up) or... -
Page 251: World Clock
World Clock The World Clock World Clock World Clock World Clock lets you know the time in other countries and cities. World Clock This menu also allows you to set the local time, or view the time in other parts of the world with the local time as reference. To open the W o r l d C l o c k W o r l d C l o c k W o r l d C l o c k... -
Page 252: Changing The Local Time
Changing the local time Changing the local time Changing the local time Changing the local time Changing the local time To change the local time using the time line: 1. Press (left) or (right) to move the local time line across the world map until it is over the desired location. -
Page 253: Viewing Other Locations
Viewing other locations Viewing other locations Viewing other locations Viewing other locations Viewing other locations If you cannot locate your city or country using the time line, you can view other locations using the World Clock options. To do this: 1 1 1 1 1 1. -
Page 254: Calculator
Calculator The calculator allows you to compute simple mathematical operations. To open the C a l c u l a t o r C a l c u l a t o r C a l c u l a t o r C a l c u l a t o r C a l c u l a t o r: From the Organizer... -
Page 255: Text Memo
Text Memo The text memo menu allows you to create short memos containing important notices or reminders. To open the T e x t M e m o T e x t M e m o T e x t M e m o T e x t M e m o: T e x t M e m o From the Organizer... - Page 256 The blank text 3. Press (Option), memo screen select Edit Title Edit Title Edit Title Edit Title Edit Title appears. from the menu, then press 4. When prompted, key-in the text memo title then press 6. When prompted, 5. Press (Option), key-in the text select E d i t...
-
Page 257: Voice Memo
Voice Memo The Voice Memo feature allows you to record short memos, notices, or reminders using voice recorder. To open the V o i c e M e m o V o i c e M e m o V o i c e M e m o V o i c e M e m o: V o i c e M e m o From the Organizer... - Page 258 3. During recording, 2. Press (Record) you can press to start recording the voice memo. stop, or cancel the recording. 4. The date and time of the created voice memo now appears in the voice memo list. 2 5 8 2 5 8 2 5 8 2 5 8...
-
Page 259: Listening To A Voice Memo
Listening to a voice memo Listening to a voice memo Listening to a voice memo Listening to a voice memo Listening to a voice memo To listen to a voice memo: Voice Memo Voice Memo 1. In the Voice Memo Voice Memo Voice Memo screen, use (up) or... -
Page 260: Sending A Voice Memo Using Mms
Sending a voice memo using MMS Sending a voice memo using MMS Sending a voice memo using MMS Sending a voice memo using MMS Sending a voice memo using MMS To send a voice memo using MMS: 1. In the Voice Memo Voice Memo Voice Memo Voice Memo... -
Page 261: Deleting A Voice Memo(S)
Deleting a voice memo(s) Deleting a voice memo(s) Deleting a voice memo(s) Deleting a voice memo(s) Deleting a voice memo(s) To delete a voice memo(s): 1. In the Voice Memo Voice Memo Voice Memo Voice Memo Voice Memo 2. Press (Option), screen, use (up) -
Page 262: Memory Status
Memory Status This menu allows you to view the phone book, SMS, calendar, ring tone, and shared memory information. To open the M e m o r y S t a t u s M e m o r y S t a t u s M e m o r y S t a t u s M e m o r y S t a t u s: M e m o r y S t a t u s... -
Page 263: Voice Recognition
Voice Recognition The Voice Recognition Voice Recognition Voice Recognition Voice Recognition menu allows you record voice commands and Voice Recognition voice dials for phone recognition. The Voice Recognition menu has two functions: Name Dialing Name Dialing Name Dialing Name Dialing for the voice dial feature and V o i c e V o i c e V o i c e V o i c e... - Page 264 2. Highlight an (EMPTY) recording, then press (Option). 2 2 2 2 2 3. Select Record Voice Record Voice Record Voice Record Voice from the pop-up menu, then press Record Voice 4. An I n f o I n f o I n f o I n f o window appears prompting you to say the name of the I n f o...
-
Page 265: Recording Voice Commands
Recording voice commands Recording voice commands Recording voice commands Recording voice commands Recording voice commands To record a voice command: 1. In the Voice Recognition Voice Recognition Voice Recognition Voice Recognition screen, use (up) or (down) to Voice Recognition 2 2 2 2 2 highlight Voice Command Voice Command Voice Command... -
Page 266: Currency Exchange
Currency Exchange The currency exchange menu allows you to calculate the exchange rate between two currencies. To open the C u r r e n c y E x c h a n g e C u r r e n c y E x c h a n g e C u r r e n c y E x c h a n g e C u r r e n c y E x c h a n g e: C u r r e n c y E x c h a n g e... -
Page 267: Calculating An Exchange Rate
5. A S a v e d S a v e d S a v e d S a v e d S a v e d The display returns successfully! successfully! successfully! successfully! successfully! to the C u r r e n c y C u r r e n c y C u r r e n c y C u r r e n c y... -
Page 268: Adding An Exchange Currency
Adding an exchange currency Adding an exchange currency Adding an exchange currency Adding an exchange currency Adding an exchange currency To add an exchange currency: 1. In the Currency Exhange Currency Exhange Currency Exhange Currency Exhange Currency Exhange screen, press (Option), highlight List Currency List Currency... -
Page 269: Stopwatch
Stopwatch The Stopwatch Stopwatch Stopwatch Stopwatch allows you to record time in split and lap modes. Stopwatch To open the S t o p w a t c h S t o p w a t c h S t o p w a t c h S t o p w a t c h S t o p w a t c h: From the Organizer... -
Page 270: Using The Split Stopwatch
Using the split stopwatch Using the split stopwatch Using the split stopwatch Using the split stopwatch Using the split stopwatch To use the split stopwatch: 1 1 1 1 1 1. In the Stopwatch Stopwatch Stopwatch Stopwatch Stopwatch screen, select the split stopwatch mode by pressing (up) or (down). -
Page 271: Using The Lap Stopwatch
Using the lap stopwatch Using the lap stopwatch Using the lap stopwatch Using the lap stopwatch Using the lap stopwatch To use the lap stopwatch: 1 1 1 1 1 1. In the Stopwatch Stopwatch Stopwatch Stopwatch Stopwatch screen, select the lap stopwatch mode by pressing (up) or (down). - Page 272 2 7 2 2 7 2 2 7 2 2 7 2 2 7 2...
- Page 273 This chapter provides information on how to manage the call records and how to select or customize the phone manner.
- Page 274 Chapter summary Chapter summary Chapter summary Chapter summary Chapter summary Calls .................... 276 Opening Calls ................276 Missed Calls ..................277 Viewing and returning a missed call ......... 277 Saving a missed call number ............ 279 Deleting a missed call number(s) ..........280 Answered Calls ................
- Page 275 Call Filter ..................287 Activating call filter ..............287 Adding an entry to the Ignore or Privilege List ......289 Deactivating an Ignore or Privilege List entry ......290 Deleting an Ignore or Privilege List entry ......... 290 Manners ................... 291 Opening Manners ..............
-
Page 276: Calls
Calls The C a l l s C a l l s C a l l s C a l l s menu allows you to view and manage call record information C a l l s such as missed, answered, and dialed numbers, view call costs and call duration, and activate the call filter feature. -
Page 277: Missed Calls
Missed Calls The Missed Calls Missed Calls Missed Calls Missed Calls list allows you to view, save, or delete missed call Missed Calls numbers received by your phone. To open the M i s s e d C a l l s M i s s e d C a l l s M i s s e d C a l l s M i s s e d C a l l s list:... - Page 278 The screen displays the missed call information including the caller name, caller number, date, and time of call. 3. Press to return the call. Otherwise, press (Back) to return to Missed Calls Missed Calls the Missed Calls Missed Calls Missed Calls list. When the phone flip top is close, you can view the missed call information from the external display by pressing the camera key on the side of the phone.
-
Page 279: Saving A Missed Call Number
You can also refer to the following sections when saving or deleting answered and dialed numbers. Saving a missed call number Saving a missed call number Saving a missed call number Saving a missed call number Saving a missed call number To save a missed call number: 1 1 1 1 1 1. -
Page 280: Deleting A Missed Call Number(S)
Deleting a missed call number(s) Deleting a missed call number(s) Deleting a missed call number(s) Deleting a missed call number(s) Deleting a missed call number(s) To delete a missed call number(s): 1. In the Missed Calls Missed Calls Missed Calls Missed Calls list, use (up) or (down) to select the... -
Page 281: Answered Calls
Answered Calls The Answered Calls Answered Calls Answered Calls Answered Calls list allows you to view, save, or delete answered Answered Calls calls by your phone To open the A n s w e r e d C a l l s A n s w e r e d C a l l s A n s w e r e d C a l l s A n s w e r e d C a l l s list:... -
Page 282: Dialed Calls
Dialed Calls The Dialed Calls Dialed Calls Dialed Calls Dialed Calls list allows you to view, save, or delete all dialed calls Dialed Calls placed by your phone. To open the D i a l e d C a l l s D i a l e d C a l l s D i a l e d C a l l s D i a l e d C a l l s list:... -
Page 283: Call Costs
Call Costs The Call Costs Call Costs Call Costs Call Costs menu allows you to determine the last or the total call Call Costs costs. To open the C a l l C o s t s C a l l C o s t s C a l l C o s t s C a l l C o s t s menu: C a l l C o s t s... -
Page 284: Viewing The Cost Of All Calls
Viewing the cost of all calls Viewing the cost of all calls Viewing the cost of all calls Viewing the cost of all calls Viewing the cost of all calls To view the cost of all calls made from your mobile phone: C a l l C o s t C a l l C o s t 1. -
Page 285: Call Time
Call Time The Call Time Call Time Call Time Call Time menu allows you to determine the last call duration as Call Time well as the time spent for all, answered, and dialed calls. To open the C a l l T i m e C a l l T i m e C a l l T i m e C a l l T i m e menu:... -
Page 286: Viewing The Duration Of All Calls
Viewing the duration of all calls Viewing the duration of all calls Viewing the duration of all calls Viewing the duration of all calls Viewing the duration of all calls To view the duration of all calls made to and from the mobile phone: 1. -
Page 287: Call Filter
Call Filter The Call Filter Call Filter Call Filter Call Filter menu allows you to filter incoming calls by activating Call Filter the I g n o r e I g n o r e I g n o r e I g n o r e I g n o r e or Privilege Privilege... - Page 288 2. Use (up) or (down) to highlight a call filter option, then press . Refer to the call filter options description below. Ignore List Ignore List Ignore List Ignore List Ignore List Activates the call filter Ignore List Ignore List Ignore List Ignore List Ignore List.
-
Page 289: Adding An Entry To The Ignore Or Privilege List
Adding an entry to the Ignore or Privilege List Adding an entry to the Ignore or Privilege List Adding an entry to the Ignore or Privilege List Adding an entry to the Ignore or Privilege List Adding an entry to the Ignore or Privilege List To add a an entry to the Ignore or Privilege list: 2 2 2 2 2 1. -
Page 290: Deactivating An Ignore Or Privilege List Entry
Deactivating an Ignore or Privilege List entry Deactivating an Ignore or Privilege List entry Deactivating an Ignore or Privilege List entry Deactivating an Ignore or Privilege List entry Deactivating an Ignore or Privilege List entry To deactivate an entry from the Ignore or Privilege list: 1. -
Page 291: Manners
Manners The M a n n e r s M a n n e r s M a n n e r s M a n n e r s menu allows you change and customize the phone M a n n e r s profiles. -
Page 292: Renaming A Manner
Renaming a manner Renaming a manner Renaming a manner Renaming a manner Renaming a manner To rename a phone manner: 1 1 1 1 1 M a n n e r M a n n e r 1. From the M a n n e r M a n n e r M a n n e r list, use (up) or... -
Page 293: Customizing Phone Manners
Customizing phone manners Customizing phone manners Customizing phone manners Customizing phone manners Customizing phone manners You can change the phone manner ring tong, ring mode, volume, and miscellaneous tone settings in this menu. To customize a phone manner: 1 1 1 1 1 1. -
Page 294: Default Manner Settings
Default manner settings Default manner settings Default manner settings Default manner settings Default manner settings Each ring tone manner has default settings for ring mode, incoming ring tone, volume level, and miscellaneous tones. The current ring tone manner is shown in the middle of the main display. Refer to the table below for details on ring tone manners. - Page 295 This chapter tells you how to surf the Internet using your mobile phone and how to access value-added services offered by your phone operator.
- Page 296 Chapter summary Chapter summary Chapter summary Chapter summary Chapter summary Network ..................297 Opening the Network menu ............. 297 .................... 298 Changing your WAP settings ........... 299 Surfing the Internet ..............302 Closing the browser ..............304 STK (Sim Tool Kit) ................305 Owner information ................
-
Page 297: Network
Network The N e t w o r k N e t w o r k N e t w o r k N e t w o r k menu allows you to configure the network settings of the N e t w o r k mobile phone and surf the Internet. -
Page 298: Wap
The W A P W A P W A P W A P (Wireless Application Protocol) allows you to configure the W A P phone WAP configuration, browse the Internet, create URL bookmarks, and activate the network WAP profiles. To open the W A P W A P W A P W A P... -
Page 299: Changing Your Wap Settings
Changing your WAP settings Changing your WAP settings Changing your WAP settings Changing your WAP settings Changing your WAP settings You may need to change some WAP and network settings before you can use the Internet features of your mobile phone. Activating an Internet profile Activating an Internet profile Activating an Internet profile... - Page 300 Modifying an Internet profile Modifying an Internet profile Modifying an Internet profile Modifying an Internet profile Modifying an Internet profile To modify an Internet profile: 1. After activating a profile, press (Options), select M o d i f y M o d i f y M o d i f y M o d i f y M o d i f y, then...
- Page 301 Changing WAP settings Changing WAP settings Changing WAP settings Changing WAP settings Changing WAP settings The WAP settings menu allows you to manage the Internet browser settings including cache use, cookies, passwords, text wrap, and security configuration. To change the WAP settings: 1.
-
Page 302: Surfing The Internet
Surfing the Internet Surfing the Internet Surfing the Internet Surfing the Internet Surfing the Internet After adjusting or changing the necessary Internet settings, you are now ready to surf the Internet on your phone. Browsing the homepage Browsing the homepage Browsing the homepage Browsing the homepage Browsing the homepage... - Page 303 2. When necessary, press (Options) to view the browser options. Refer to the table below for a description of the browser options. O p t i o n O p t i o n O p t i o n O p t i o n O p t i o n A l l o w s y o u t o...
-
Page 304: Closing The Browser
Browsing another website Browsing another website Browsing another website Browsing another website Browsing another website To browse another website: W A P W A P G o T o G o T o 1. From the W A P W A P W A P menu, use (up) or (down) to select G o T o... -
Page 305: Stk (Sim Tool Kit)
STK (Sim Tool Kit) The S T K S T K S T K S T K list allows you to view and use value-added services offered by S T K your phone operator. To open the S T K S T K S T K S T K list:... -
Page 306: Owner Information
Owner information Owner’s Name ............Mobile Phone No ........ Address ......................................................Manufacturer ............. Model ............................ Serial Number ........Retailer ..............Telephone No........Purchase Date ............Firmware Version ....... Accessories ....................................................... Security Phone lock code ............PIN1 .......... - Page 308 RF Exposure Information (SAR) RF Exposure Information (SAR) RF Exposure Information (SAR) RF Exposure Information (SAR) RF Exposure Information (SAR) This model phone meets the government’s requirements for exposure to radio waves. This phone is designed and manufactured not to exceed the emission limits for exposure to radio frequency (RF) energy set by the Federal Communications Commission of the U.S.
Need help?
Do you have a question about the J103 and is the answer not in the manual?
Questions and answers