Table of Contents
Advertisement
ELECTRICAL SPECIFICATIONS 115V ~ 60Hz
DONNEES ELECTRIQUES 115V~60Hz
CARACTERISTICAS ELECTRICAS 115V ~ 60Hz
CARATTERISTICHE ELETTRICHE 115V~60Hz
P A C W 1 1 0 E
W
/A
A
ATER
IR
IR
Instructions for use
Keep these instructions
C
L I M AT I S E U R
Mode d'emploi
Conservez cette notice
A
C
R
ONDICIONADO
Instrucciones para el uso
Repase y guarde estas instrucciones
Lea cuidadosamente este instructivo
antes de usar su aparato
C
ONDIZIONATORE
Istruzioni per l'uso
Leggere e conservare queste
istruzioni
Register this product on-line and receive a
free trial issue of Cook's Illustrated.
Visit www.delonghiregistration.com.
Visit www.delonghiusa.com for a list of servi-
ce centers near you. (U.S. Only)
Enregistrez ce produit en ligne et recevez un
numéro gratuit de Cook's Illustrated.
Visitez www.delonghiregistration.com.
Visitez www.delonghiusa.com pour y voir une
liste des centres de réparation proches de
chez vous. (É.-U. uniquement)
Registre este producto en línea y reciba un
ejemplar gratis de Cook's Illustrated.
Visite www.delonghiregistration.com.
Visite www.delonghiusa.com para ver la lista
de centros de servicios cercanos a usted.
(Solamente en los Estados Unidos)
Registra questo prodotto "on-line" per riceve-
re una copia omaggio della rivista.
Visita www.delonghiregistration.com.
Visita www.delonghiusa.com per una lista dei
centri di servizio a te piu vicini. (Solo negli Stati
Uniti)
C
ONDITIONER
E
A
A U -
I R
Á
A
GUA/
R
A
/A
CQUA
RIA
Advertisement
Table of Contents

Related Manuals for DeLonghi PAC W110E


Summary of Contents for DeLonghi PAC W110E
-
Page 1: Instructions For Use
P A C W 1 1 0 E ATER ONDITIONER Instructions for use Keep these instructions L I M AT I S E U R A U - Mode d'emploi Conservez cette notice Á ONDICIONADO GUA/ Instrucciones para el uso Repase y guarde estas instrucciones Lea cuidadosamente este instructivo antes de usar su aparato... -
Page 2: Important Safeguards
Children should be supervised to ensure that they do not play with the appliance. • Should repairs be necessary, contact the nearest authorized De’Longhi Repair Service Center. Unauthorized Delonghi servicing can be dangerous. • This appliance is to be used by adults only; keep away from children. - Page 3 WHAT IS THE WATER-AIR PINGUINO During the summer, you feel comfortable at a temperature of between 75°F and 81°F (24 and 27° C) with a relative humidity of about 50%. An air conditioner removes excess moisture and heat from the room where it is located. Compared with installed models, portable air conditioners have the advantage that they can be moved from one room to another in the home or be transported from one building to another.
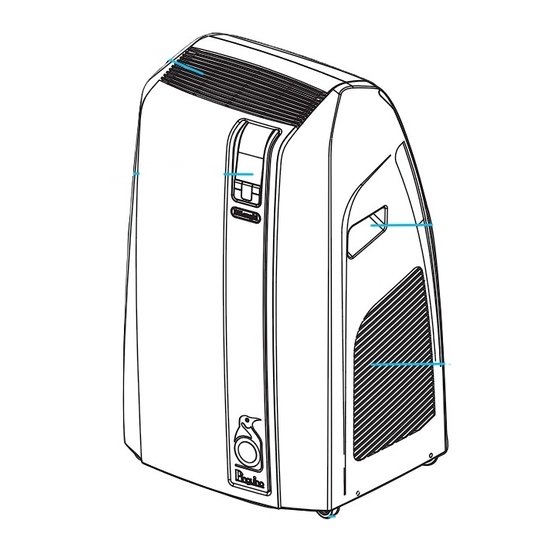
- Page 4 DESCRIPTION A Air outlet grille B Control panel with advanced LCD display C Handle D Grille Castors Air intake grille with dust filter G Air exhaust hose housing H Water drainage hose door Power cable compartment door Water fill door K Air exhaust hose Remote control M Water jug...
-
Page 5: Preparing For Use
PREPARING FOR USE The instructions below will enable you to prepare your air condi- tioner for operation as efficiently as possible. Before use, make sure the air intake and outlet grilles are unob- structed. CONDITIONING WITHOUT INSTALLATION Just a few simple steps and your comfort is ensured with your appliance: •... - Page 6 CONDITIONING WITH INSTALLATION If required, your appliance can also be installed semi-perma- nently (Fig. 6). Proceed as follows: 11.8 in • Drill a 4.17 inches (106 mm) diameter hole respecting the 30 cm heights shown in fig. 7 and following the indications in figs. 8, 9 and 10.
- Page 7 PREPARING OPERATION WATER MODE Once the appliance has been installed following the instructions above, it is ready for use. However, its efficiency can be enhan- ced by operating it in the exclusive De'Longhi water mode. The water in the tank increases the cooling power of your Pinguino and at the same time reduces noise levels and electrical con- sumption.
-
Page 8: Operating From Control Panel
DESCRIPTION OF THE CONTROL PANEL WITH LCD DISPLAY 1 Signal receiver 2 Air conditioning symbol 3 Dehumidifying symbol 4 Fan symbol 5 Temperature indicator 6 Timer symbol 7 Alarm symbol 8 WATERSAVE symbol 9 Speed indicator 10 SMART symbol 11 "No water" symbol 12 BOOST symbol 13 SLEEP symbol 14 AUTOFAN indicator... -
Page 9: Dehumidifying Mode
AIR CONDITIONING . 16) MODE Ideal for hot muggy weather when you need to cool and dehu- midify the room. Always make sure the water fill door (J) is completely closed before setting this mode. To set this mode correctly: •... - Page 10 . 18) MODE When using the appliance in this mode, the air hose does not need to be attached. To set this mode correctly: • Press the MODE button (15) a number of times until the fan symbol appears. • Select the required fan speed by pressing the FAN button (16). Three speeds are available: Maximum speed: for maximum fan power.
-
Page 11: Using Remote Control
DESCRIPTION OF THE REMOTE CONTROL 1 Air conditioning symbol 2 Dehumidifying symbol 3 Fan symbol 4 WATERSAVE symbol 5 Fan speed indicator 6 SMART symbol 7 BOOST symbol 8 SLEEP symbol 9 AUTOFAN indicator 10 MODE button (selects the modes) 11 FAN button 12 Increase (+) and decrease (-) tem- perature button... -
Page 12: Inserting Or Replacing Batteries
NSERTING OR REPLACING THE BATTERIES • Remove the back cover of the remote control (fig. 20); • Insert two R03 “AAA” 1.5V batteries, making sure they are in the correct position (see the instructions inside the battery compartment); • Replace the cover. If the remote control is replaced or discarded, the batteries must be removed and disposed of in accordance with cur- rent legislation as they are harmful to the environment. - Page 13 SLEEP . 24) FUNCTION This function is ideal for the night as it gradually reduces opera- tion of the appliance. To set this function correctly: • Press the button. The appliance operates in the previously selected mode with low fan speed. The SLEEP function maintains the room at optimum temperature without excessive fluctuations in either temperature or humidity and with silent operation.
-
Page 14: Programming Start Up
ROGRAMMING THE TIMER The appliance can be programmed to start up and shut down when required. Programming start up • Press the button. The start-up time and message flash on the remote con- trol display (fig. 26). • Press the buttons to set the time you want the applian- ce to start up. -
Page 15: Tips For Correct Use
TIPS FOR CORRECT USE To get the best from your air conditioner, follow these recom- mendations: • Close the windows and doors in the room to be air conditio- ned (fig. 30). When installing the air conditioner semi-permanently, you close doors and should leave a door slightly open (as little as 1/2 “) to guaran- windows... - Page 16 CLEANING Before cleaning or maintenance, turn the appliance off by pres- sing the ON/Standby button on the control panel or remote con- trol, wait for a few minutes then unplug from the socket. LEANING THE CABINET You should clean the appliance with a slightly damp cloth then dry with a dry cloth.
- Page 17 DESCALING When using the appliance in water mode, lime scale will inevi- tably form and must be removed to maintain efficiency. After about 500 hours of operation, the appliance therefore warns that descaling is required by displaying the message CL (CLEAN). Descale the appliance.
-
Page 18: Troubleshooting
TROUBLESHOOTING PROBLEM CAUSE SOLUTION The air conditioner • No electricity • Restore electricity does not come on • Plug into the socket • It is not plugged into the socket •Wait 30 minutes, if the problem • The internal safety device has persists, contact your service tripped center... -
Page 19: Technical Characteristics
TECHNICAL CHARACTERISTICS: Power supply voltage see rating plate Max. power input “ Refrigerant “ Cooling capacity “ IMIT CONDITIONS Room temperature for air conditioning 70÷95°F 35 in 21÷35°C 910 mm PPLIANCE DIMENSIONS • width 22 in 570 mm • height 35 in 910 mm •... -
Page 20: Limited Warranty
Please contact our toll free hotline at 1-800-322-3848 or log onto our website at www.delonghiusa.com. For all accessories, spare parts or replacement parts, please contact our parts division at 1-800-865-6330. CANADA Residents: Please contact our toll free hotline at 1-888-335-6644 or log onto our website at www.delonghi.com. Other countries: Please visit: www.delonghi.com.