
Subscribe to Our Youtube Channel
Related Manuals for Gaggenau VC 230-612


Summary of Contents for Gaggenau VC 230-612
- Page 1 Operating and Assembly Instructions VC 230-612 Glass ceramic cooking range...
-
Page 2: Table Of Contents
VC 230-612 Preface Important safeguards Page 3-4 1. Important notes Page 5-6 1.1 For your safety Page 5 1.2 Operating for the first time Page 6 1.3 About use Page 6 2. Structure and operating principle Page 7 2.1 Structure Page 7 2.2 Special accessories... -
Page 3: Preface
Preface Cooking with your new glass-ceramic cooker will be even more fun than before. The appliance offers you the following advantages – The cooker features SuperQuick cooking zones. – Thanks to the novel installation method implemented, installation is child's play! To ensure that you will be able to use this appli- ance in all its diversity, read through the operating and assembly instructions conscientiously before... -
Page 4: Important Safeguards
Important safeguards Read All Instructions. 4. a) Use Proper Pan Size – This appliance is equipped with one or more surface units of different size. Select utensils having flat 2. To eliminate the risk of burns or fire by reaching bottoms large enough to cover the surface over the heated surface units, cabinet storage unit heating element. - Page 5 7. DO NOT TOUCH SURFACE UNITS OR AREAS NEAR UNITS – Surface units may be hot even though they are dark in color. Areas near surface units may become hot enough to cause burns. During and after use, do not touch or let clothing or other flammable materials contact heating elements or areas near units until they have had sufficient time to cool.
-
Page 6: Important Notes
1. Important notes 1.1 For your safety No warranty claims can be lodged for any You must not operate the appliance if it is damage resulting from failure to observe these damaged. instructions. The appliance must only be connected by an Do not store any substances that are sensitive authorised specialist, paying attention to the to high temperatures, or which pose a fire hazard... -
Page 7: Operating For The First Time
Pay attention to the fact that there are accessories do with the power supply, please contact your in the base of the packaging. specialist dealer or your local Gaggenau after- Keep packaging elements out of the reach of sales service. -
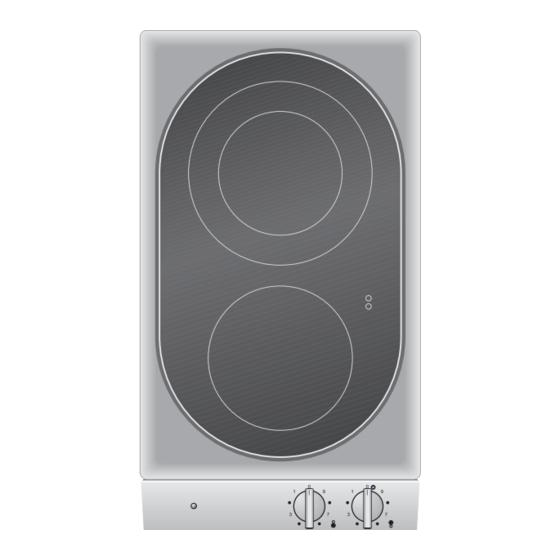
Page 8: Structure And Operating Principle
2. Structure and operating principle 2.1 Structure 1 Pilot light 2 Control knob for front cooking zone 3 Control knob for rear cooking zone 4 SuperQuick cooking zone Ø 140 mm / 5 ” (1200 W) 5 Residual heat display 6 SuperQuick cooking zone Ø... -
Page 9: Operation
3. Operation 3.1 Switching on /off Switching on: Front cooking zone Switching on: Turn control knob 2 to the left or right to the required cooking level (1-9). (Fig. 4) Rear cooking zone Turn control knob 3 to the left to the required cooking level (1-9). -
Page 10: Operating With The Combination Function
3.2 Operating with the combination function Switching on the combination function – Turn control knob 3 (rear cooking zone) to the left to the (Combination) position on the left and then to the cooking level you require. Switching off combination: –... -
Page 11: Cleaning And Care
If the power supply is functioning correctly, but your appliance still does not work, please contact your Gaggenau dealer who will provide you with the address and telephone number of your nearest manufacturer’s authorized service agent or contact Gaggenau USA on (800) 828-9165. -
Page 12: Assembly Instructions
6. Assembly instructions 6.1 Important notes on installation Pay attention to the "Important notes" (Chapter 1). Damages caused by failure to observe these installation instructions cannot be recognised. The appliance must only be installed by an There should be a distance of at least 20 mm ( ”) authorised specialist, paying attention to the relevant regulations of the power supply companies... -
Page 13: Electrical Connection
Pay attention to the information on the rating plate and connect the PE conductor. Connect the connecting cable to the mains. VC 230-612 FD xxx xxxxxxxxx AC 208/220-240 V 60 Hz 2500/3000 W... - Page 14 The minimum spaces that must be maintained between the appliance cooking surface and the horizontal surface above the cooking top shall be: A = 30 inches (762 mm) minimum clearance between the top of the cooking surface and the bottom of an unprotected wood or metal cabinet; or A = 24 inches (600 mm) minimum when bottom of wood or metal cabinet is protected by no less than -inch-thick flame-retardant millboard covered...
-
Page 15: Installation And Removal
6.3 Installation and removal Installation – Produce the recess for one or several Vario appliance(s) in your worktop. Proceed as indicated on the installation sketch and the dimension table. The dimension table contains details of the space requirement for the trim between the appliances. - Page 16 GAGGENAU HAUSGERÄTE GMBH 5551 McFADDEN AVENUE CARL-WERY-STR. 34 · 81739 MÜNCHEN HUNTINGTON BEACH, CA 92649 GERMANY Y (0 89) 45 90 - 03 Y (800) 828-9165 · FAX (714) 901-0979 FAX (0 89) 45 90 - 23 47 www.gaggenau-usa.com...
Need help?
Do you have a question about the VC 230-612 and is the answer not in the manual?
Questions and answers