
Related Manuals for Champion 22 TON LOG SPLITTER


Summary of Contents for Champion 22 TON LOG SPLITTER
-
Page 1: Log Splitter
92201 Rev 92201-20090714 10006 Santa Fe Springs Road Santa Fe Springs, CA 90670 USA Made in China Owner’s Manual and Operating Instructions 22 TON LOG SPLITTER... -
Page 3: Table Of Contents
Table of Contents Introduction ........1 Storage ........... 16 Portable Log Splitter......... 1 Log Splitter Storage ........ 16 Accessories ..........1 Specifications ......... 17 This Booklet ..........1 Log Splitter Specifications ...... 17 ... -
Page 5: Introduction
Champion Power Equipment manufactures Congratulations on your purchase of a and sells accessories designed to help you Champion Power Equipment log splitter. get the most from your purchase. To find out CPE designs and builds log splitters to strict more please visit our web site at specifications. -
Page 6: Manual Conventions
Manual Conventions CAUTION Manual Conventions CAUTION indicates a potentially hazardous This manual uses the following symbols to situation which, if not avoided, result in help differentiate between different kinds of minor or moderate injury. information. The safety symbol is used with a key word to alert you to potential hazards in operating and owning power equipment. -
Page 7: Safety Rules
Safety Rules WARNING Safety Rules Sparks can result in fire or electrical shock. When servicing the engine: WARNING Disconnect the spark plug wire and place it where it cannot contact the plug. Read this manual thoroughly before operating DO NOT check for spark with the plug removed. your log splitter. - Page 8 Safety Rules WARNING Make certain that the log splitter is resting firmly on level ground. When operating the log splitter: Skin Injection Hazard. High pressure hydraulic DO NOT move or tip the log splitter during oil can inject under your skin. operation.
-
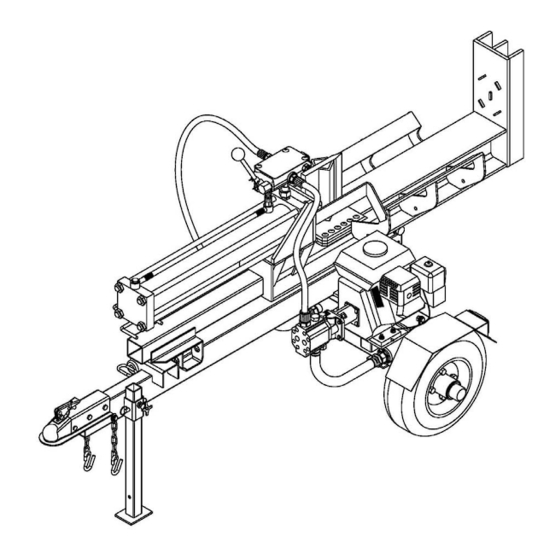
Page 9: Controls And Features
Controls and Features Controls and Features Read this owner’s manual before operating your log splitter. Familiarize yourself with the location and function of the controls and features. Save this manual for future reference. Log Splitter (1) 2” Ball Coupler– For towing the log (6) Beam –... -
Page 10: Assembly
Assembly Step 2 – Tow Bar and Support Leg Assembly Attach the support leg (62) to the tow bar (30). Tighten by hand with a set Your log splitter requires some assembly. screw (88). 2. Assemble according to diagram below If you have any questions regarding the assembly of your log splitter, call our help line at 1-877-338-0999. -
Page 11: Step 4 - Assemble Rear Support Leg
Assembly Step 4 – Assemble rear Step 6 – Attach engine support leg Attach the engine to the oil tank mounting plate using 4 M8x55 bolts, M8 Attach rear support leg to tow bar using flat washers, lock washers, and nuts. 1 M10x75 bolt, M10 flat washer and nut. -
Page 12: Step 8 - Attach Wheel Fenders
Assembly Step 8 – Attach wheel WARNING fenders Attach two fenders using M10x25 bolts, Make sure the Hydraulic Hoses do not touch any M10 lock washers, flat washers and lock hot surfaces or cutting areas. nuts. Hoses need to be positioned were they are clear from the engine and cutting wedge. -
Page 13: Add Engine Fuel
Assembly Add Hydraulic Oil Add Engine Fuel Make sure the log splitter is on a flat, level surface. Use clean, fresh, regular unleaded fuel 2. Remove the oil cap from the oil tank. with a minimum octane rating of 85. 3. -
Page 14: Operation
Operation 4. Always disconnect the log splitter from Operation the towing vehicle before operating. Log Splitter Location Before Each Use Inspect the This log splitter must have at least seven feet Log Splitter of clearance from combustible material. Leave at least three feet of clearance on all sides of the log splitter to allow for adequate Check the hydraulic oil level and cooling, maintenance and servicing. -
Page 15: Starting The Engine
Operation WARNING ALWAYS use the log splitter for its intended use. The log splitter should only be used to split wood logs, length wise with the grain. NEVER modify, alter or change the log splitter in anyway. Modifications will void the warranty. NEVER attach a rope, cable or other device to the control lever on the log splitter. -
Page 16: Stopping The Engine
Operation Stopping the Engine Turn the ignition switch to the “Off” NOTE position. If a log gets stuck, embedded or will not split 2. Turn the fuel knob to the “Off” position. completely. Push the control handle in the reverse direction and allow the splitter to strip the log from the wedge. - Page 17 Operation Rev 92201-20090714...
-
Page 18: Maintenance
Maintenance Maintenance The owner/operator is responsible for all periodic maintenance. WARNING Spark Plugs Never operate a damaged or defective log splitter. Remove the spark plug cable from the spark plug. 2. Inspect the electrode on the plug. It must be clean and not worn to produce the spark required for ignition. -
Page 19: Cleaning
Follow the service intervals indicated in the schedule below. Service your log splitter more frequently when operating in adverse conditions. Contact our help line at 1-877- 338-0999 to locate the nearest Champion Power Equipment authorized service dealer for your log splitter or engine maintenance needs. -
Page 20: Storage
Storage WARNING Storage Never store the log splitter inside next to appliances where there is a source of heat or Log Splitter Storage open flame, spark or pilot light because they can Refer to the Maintenance section for proper ignite gasoline vapors. cleaning instructions. -
Page 21: Specifications
Specifications Fuel Specifications Fuel capacity is 0.93 US gallons (3.5L). Use regular unleaded gasoline with a minimum octane rating of 85. Log Splitter Specifications Engine Oil Oil capacity is 0.63 qt (0.6 L). Ram Force 22 Ton Cycle Time 18 seconds Hydraulic Tank Capacity 3.4 gal (12.8 L) Max Log Length... -
Page 22: Parts Diagram
Specifications Parts Diagram Rev 92201-20090714... -
Page 23: Parts List
Specifications Parts List Item Part Number Description 92201-001 Beam 90037-002 Bolt M12x55 90037-003 Flat Washer Ø12 90037-004 Nut M12 90037-005 Wedge Slide 90037-006 Spacer 90037-007 Plate 90037-008 Lock Washer Ø18 90037-009 Flat Washer Ø18 90037-010 Nut M18 90037-011 Wedge Pin 90037-012 Split Pin Ø4x40 92201-013... - Page 24 Specifications Item Part Number Description 92201-053 Engine 90037-054 Valve Handle Connector 90037-055 Bolt M8x45 90037-056 Plate 90037-057 Lock Nut M8 90037-058 Lock Washer Ø12 90037-059 Outlet Connector of Pump 90037-060 Oil Pipe 90037-061 O ring Ø16x2.4 90037-062 Front Support Leg 90037-063 Gear Pump Connector 90037-064...
-
Page 25: Engine Parts Diagram
Specifications Engine Parts Diagram Rev 92201-20090714... -
Page 26: Engine Parts List
Specifications Engine Parts List Item Part Number Description GB5781-B4-12 Bolt M4×12 ST168F-1070003-G Fuel Valve Knob GB5789-FB6-12 Flange Bolt M6×12 ST168F-1070002-G Fuel Tank Shroud GB5789-FB5-12 Flange Bolt M5×12 ST168F-1070200-G Fuel Valve ST168F-1070008-G Tube Clip ST168F-1070004-G Tube, I ST188FD-1070006A Clip ST168F-1071000-CARB Fuel Meter Assembly ST168F-1121100-C Switch ST168F-1070005-G... - Page 27 Specifications Item Part Number Description ST168F-2-1050001-Q Threaded Crankshaft ST168F-1030008-G Case Cover Packing ST160F-1030001-B Oil Filler Cap ST160F-1030002 Oil Filler Cap Packing ST168F-1030007-5/16-G Crankcase Cover GB5789-FB8-32 Flange Bolt M8×32 ST168F-1090100 Air Cleaner Cover Nut ST168F-1090001-G Air Cleaner Cover ST168F-1090200-C Air Cleaner Element ST168F-1090500-G Air Cleaner Elbow GB5789-FB6-25...
- Page 28 Specifications Item Part Number Description ST168F-1050004 Piston Pin Clip ST168F-1050003 Piston Pin ST168F-1050100 Connecting Rod Comp ST160F-1030005-B Oil Filler Cap ST160F-1070006 Fuel Filter ST1P68F-1070006-F Clip GB90-W-6 Washer ø6 GB93-LW-6 Lock Washer ø6 GB5789-FB6-35 Flange Bolt M6×35 GB5789-FB6-15 Flange Bolt M6×15 GB41-N-6 Nut M6 ST168F-1040014-A...
-
Page 29: Troubleshooting
Specifications Troubleshooting Problem Cause Solution Engine will not start No fuel Add fuel Faulty spark plug Replace spark plug Unit loaded during start up Remove load from unit Engine will not start; Low oil level Fill crankcase to the proper level Engine starts but runs roughly Place generator on a flat, level surface Choke in the wrong position. -
Page 30: Warranty
Wear items such as filter elements, o-rings, etc. Accessory parts such as starting batteries, and Warranty Qualifications storage covers. Champion Power Equipment (CPE) will register Failures due to acts of God and other force this warranty upon receipt of your Warranty majeure events beyond the manufacturer’s Registration Card and a copy of your sales receipt control. -
Page 31: Notes
Notes Notes Rev 92201-20090714...
Need help?
Do you have a question about the 22 TON LOG SPLITTER and is the answer not in the manual?
Questions and answers