Advertisement
Table of Contents
- 1 Technical Features
- 2 External Unit
- 3 Internal Unit
- 4 Electrical Connection (U.k. Only)
- 5 Installation
- 6 Electrical Connections
- 7 Remote Control
- 8 Setting the Clock
- 9 Proper Use
- 10 Description of the Remote Con- Trol
- 11 Automatic Sleep Function
- 12 Programming the Timer
- 13 If Something Goes Wrong
- Download this manual
Advertisement
Table of Contents

Related Manuals for DeLonghi PAC 180


Summary of Contents for DeLonghi PAC 180
- Page 1 PAC180 GB 16-05-2003 11:56 Pagina 17 Air-conditioner PAC 180 Instructions for use...
-
Page 2: Technical Features
PAC180 GB 16-05-2003 11:56 Pagina 18 Carefully read this instructions booklet before installing or using this appliance. Only by doing so will you have the best results and enjoy the greatest safety when using the appliance. Please pay particular attention to the warnings on page 30. -
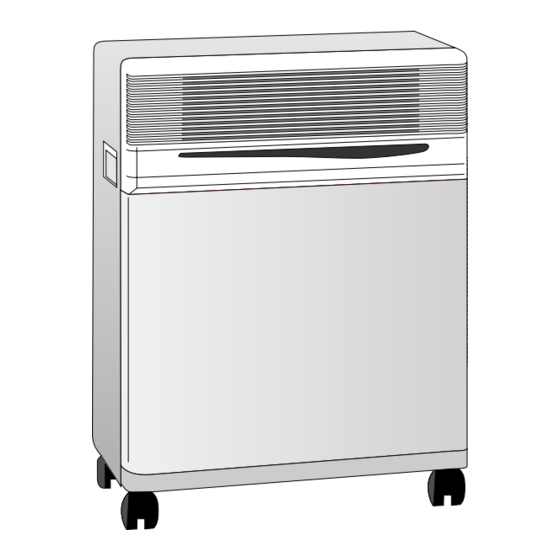
Page 3: External Unit
PAC180 GB 16-05-2003 11:56 Pagina 19 DESCRIPTION Air delivery grille External unit handle Forced operations but- Castors EXTERNAL UNIT INTERNAL UNIT Castor stop INTERNAL UNIT Carrying handle ;;;; ;;;; ;;;; ;;;; ;;;; ;;;; ;;;;; Removable filter ;;;;; ;;;; ;;;; ;;;; ;;;; Air intake grille Power cable compartment Power cable... -
Page 4: Electrical Connection (U.k. Only)
PAC180 GB 16-05-2003 11:56 Pagina 20 ACCESSORIES DRAWING DESCRIPTION NO. PIECES PROVIDED Wall-attachment bracket Support block for external unit Anchor screws + screws ø 6 mm Screws M6 mm Screws M4x25 mm Belt with hooks Screw eye for a belt Sheathing frame Castor stop Drain connection for condensation... -
Page 5: Installation
PAC180 GB 16-05-2003 11:56 Pagina 21 INSTALLATION In this case, the hook-ups with the external unit must be disconnected as follows: The sheathing that connects the external to the 1) Remove the plug from the electric outlet; internal unit may pass: 2) Remove the handle by loosening the two a) through a slightly-open window or door;... - Page 6 PAC180 GB 16-05-2003 11:56 Pagina 22 To re-connect the detached ends of the sheath to 2) Screw the support blocks the internal unit, you must repeat operations 1 to the external unit with through 7 in reverse order, being careful to included M4mm observe the following precautions:...
-
Page 7: Electrical Connections
PAC180 GB 16-05-2003 11:56 Pagina 23 • In order to insure low-cost operations, protect the room from direct sunlight by drawing the curtains and/or by partially lowering or closing ELECTRICAL CONNECTIONS the shutters or blinds Before putting the plug in an electrical outlet, you must check to be certain that: •... - Page 8 PAC180 GB 16-05-2003 11:56 Pagina 24 BUTTONS AND INDICATORS ON THE INTERNAL UNIT SIGNAL RECEIVER FORCED OPERATION GREEN LED YELLOW LED RED LED BUTTON THE LEDS These lights turn on depending on the operation selected or to indicate breakdowns. FUNCTION RED LED YELLOW LED GREEN LED...
-
Page 9: Remote Control
PAC180 GB 16-05-2003 11:56 Pagina 25 REMOTE CONTROL Inserting the batteries • Push down and forward on the case’s pebbled cover. The cover will lift up automatically. • Insert two new non-rechargeable batteries, being careful to place them in the correct posi- tions (+) and (-). -
Page 10: Description Of The Remote Con- Trol
PAC180 GB 16-05-2003 11:56 Pagina 26 DESCRIPTION OF THE REMOTE CON- BUTTONS TROL On / Off The display lights up when you press this The display button. Once the air-conditioner is turned on, all the sym- Pressing it again, the display goes out. bols will be shown. - Page 11 PAC180 GB 16-05-2003 11:56 Pagina 27 AIR-CONDITIONING FUNCTION This operation is ideal on especially hot days. First press the button to turn the appliance on. A beep will indicate that the air-conditioner has turned on, and the symbol will begin to blink. Now press the MODE button until the air-condi- tioning symbol appears on the display.
-
Page 12: Automatic Sleep Function
PAC180 GB 16-05-2003 11:56 Pagina 28 VENTILATION FUNCTION If it is a truly sweltering day, you can activate the ventilation function by pressing the button. A beep will indicate that the air-conditioner has turned on, and the symbol will begin to blink. Now press the MODE button until the ventilation symbol appears on the display. -
Page 13: Programming The Timer
PAC180 GB 16-05-2003 11:56 Pagina 29 PROGRAMMING THE TIMER Programming the ON function With the air-conditioner already running, press the ON button: the ON TIME symbol will start blinking and the clock will read 12:00. Remember that the timer turns the air-conditioner on, thereby resetting all the functions and proce- dures operating before the appliance was last turned off. - Page 14 PAC180 GB 16-05-2003 11:56 Pagina 30 MAINTENANCE device. Always pull the plug from the electrical outlet IMPORTANT ADVICE before beginning any cleaning or maintenance • This appliance has been built to air-condition, operations. dehumidify and ventilate rooms in the home For safety reasons, never wash the air-condition- and must not be used for other purposes.
-
Page 15: If Something Goes Wrong
PAC180 GB 16-05-2003 11:56 Pagina 31 IF SOMETHING GOES WRONG Most malfunctions are caused by a very minor and easily solved problem. So carefully check this list before contacting the Authorised Technical Service Centre in your area. PROBLEMS CAUSES REMEDIES The air-conditioning •... - Page 16 PAC180 GB 16-05-2003 11:56 Pagina 32...
- Page 17 PAC180 GB 16-05-2003 11:56 Pagina 33...
Need help?
Do you have a question about the PAC 180 and is the answer not in the manual?
Questions and answers