Table of Contents
Advertisement
Quick Links
Advertisement
Table of Contents

Related Manuals for AEG Voxtel D235


Summary of Contents for AEG Voxtel D235
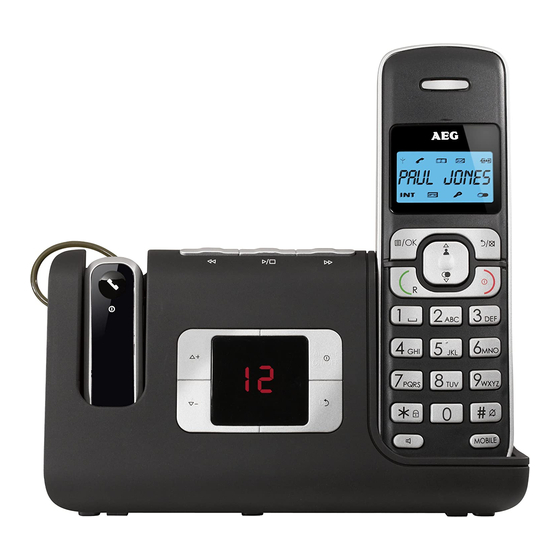
- Page 1 USER GUIDE CORDLESS TELEPHONE Voxtel D235...
- Page 2 14 15 16...
-
Page 3: Important Safety Instructions
BECAUSE WE CARE Thank you for purchasing this product. This product has been designed and assembled with utmost care for you and the environment. This is why we supply this product with a quick installation guide to reduce the number of paper (pages) and therefor save trees to be cut for making this paper. -
Page 4: Intended Use
10. The use of other battery types or non-rechargeable batteries/primary cells can be dangerous. These may cause interference and/or damage to the unit or surroundings. The manufacturer will not be held liable for damage arising from such non-compliance. 11. Do not use third party charging bays. Damage may be caused to the batteries. -
Page 5: Getting To Know Your Phone
GETTING TO KNOW YOUR PHONE Handset overview (see P1) Meaning Up key In idle mode: press to access the call list In menu mode: press to scroll up the menu items In phonebook list / redial list / call list: press to scroll up the list During a call: press to increase the earpiece volume During ringing: press to increase the ringer volume... - Page 6 Speakerphone key During a call: press to turn on / off the speakerphone. In Redial list / call list / phonebook list: press to make a call with speakerphone During ringing: press to answer a call with speakerphone Down key (redial/down) In idle mode: press to access the redial list In menu mode: press to scroll down the menu items In phonebook list / redial list / call list: press to scroll...
- Page 7 Indicates that speakerphone is being used. Indicates that your answering machine (TAM) is on and flashes when there is a new message. Indicates that the handset ringer is switched off. Steady when an alarm is set. Flashes when the alarm is sounding. Indicates that the keypad is locked.
- Page 8 Right soft key function. Press to go back to the previous menu level or cancel the current action. Right soft key function. Press the alarm or mute / unmute the microphone during a call. Base station with telephone answering machine (TAM) control (see P3) Meaning Find...
- Page 9 Play / stop In message playback mode: press to playback or stop playing messages. Skip In message playback mode: press to play the next message. Base two digit-LED display information Steadily on: answering machine is off. Steadily on: there are no voice messages in the answering machine.
- Page 10 Overview of the wireless headset (see P4) Power / talk on/off In idle mode: press and hold to power the wireless headset on or off. During ringing: press to answer the call. During a call: press to end the call. During registration: press to exit the registration mode.
- Page 11 Steadily on: when the wireless headset is charging on the base. Single flashing: indicates that the battery is low, the unit is not on the base, and the headset will emit short double beeps. Double flashing: indicates that the battery is low while the headset is in use and short double beeps will be emitted.
-
Page 12: Installing Your Phone
5.8.1 English Character Set Alphanumeric Editing Number Editing (For phonebook name editing and renaming (For phone handset) number editing, date/time editing) Key Press 1st 2nd 3rd 9th 10th space , or P (if press and hold) ° ‘ & Some other characters are available with some of the alternative handset language options. -
Page 13: Using Your Phone
>The handset will give a beep when it is properly placed on the base or charger. Installing and charging the wireless headset (see P7) Attach the ear hook to the headset body as indicated, for either left or right ear operation, according to your preference. Put the wireless headset on the base cradle for charging before using. - Page 14 Note: You can also access the call list by pressing twice. 7.1.5 Call from the redial list Press to access the redial list and press to select the desired redial number. Press to dial out the selected redial number. 7.1.6 Call timer Your handset automatically times the duration of every call.
- Page 15 Mute a call You can talk to someone nearby without letting the caller hear you during a call. During a call: Press to mute the microphone and “MUTED” will display on the LCD. Your caller cannot hear you. Press again to unmute the microphone. Turn off the handset ringer In idle, press and hold # to turn off the handset ringer.
- Page 16 Press to dial to the selected redial number. Note: If there are no numbers in the redial list, the display shows “EMPTY”. 7.9.2 Store a redial number into the phonebook Follow Steps 1 and 2 in section 7.9.1. Press to select ”ADD TO PB”. Press and then enter the name you want to use in the phonebook.
- Page 17 Note: If there is an incoming call during paging, the phone will ring with the incoming call instead of paging. 7.11 Make an internal call (Multi-handset versions only) This feature is only applicable when there are at least two registered handsets or at least one handset and a headset.
- Page 18 Press to select “INTERCOM“. Press to show all the other registered handset / headset numbers, plus 9. Enter the number for the handset / headset you want to transfer the call to. The external call is put on hold automatically and the called handset / headset rings.
-
Page 19: Private Phonebook
PRIVATE PHONEBOOK Each handset can store up to 50 private phonebook entries with names and numbers. Each phonebook entry can have a maximum of 20 digits for the phone number and 12 characters for the name. You can also select different ringtones for your phonebook entries. (Note: the different ringtones only play when you receive a call if you subscribe to caller display and the incoming number matches the stored number.) Phonebook entries are stored alphabetically by name. - Page 20 Edit a Phonebook Entry In idle: Press to select “PHONEBOOK“ and then press access the phonebook. Press to select the desired phonebook entry. Press to select “EDIT“. Press to display the current name. Edit the name and press Edit the number and press Press to select the ringtone and press to confirm.
-
Page 21: Caller Display (Network Dependent)
CALLER DISPLAY (NETWORK DEPENDENT) This feature is available if you have subscribed to the calling line identification service with your network service provider. Your phone can store up to 20 received calls with date/time information in the call list. The number will be shown on the handset display when the phone is ringing. -
Page 22: Phone Settings
Delete an entry in the call list Follow steps 1 and 2 in section 9.1. Press to select “DELETE”. Press to confirm. Delete all call list entries Follow steps 1 and 2 in section 9.1. Press to select “DELETE ALL”. Press to display “CONFIRM?”. - Page 23 10.1.3 Set the Time Press to select “HS SETTINGS“. Press to select “DATE & TIME“. Press to select “SET TIME“. Press and then enter the time information in 24 hour format. Press to confirm. Note: If time has been set before, the current time will display, otherwise, “HH:MM”...
- Page 24 tone will be emitted from the earpiece to alert the user the alarm time Once the user presses any key or presses and holds. to disable the alarm, the display will revert to the call duration. During paging or ringing, the alarm will not sound when the alarm time isreached.
- Page 25 Press to select “EXT RING“. Press to select melody you want to hear for external calls. Note: The respective melody will be played while browsing the ringtone list. Press to confirm. 10.3.3 Set the Ringer Volume Press to select “HS SETTINGS“. Press to select “RING SETUP“.
- Page 26 10.3.6 Rename the handset Press to select “HS SETTINGS“. Press to select “RENAME HS“. Press and change the name of your handset, using to delete letters and the alphanumeric keys to enter up to 10 letters for the name. Press to confirm.
- Page 27 10.4.2 Set the Ringer Volume Press to select “BS SETTINGS“. Press to select “RING VOLUME“. Press to select the desired ringer volume (a total of 6 ringer volume levels including “VOLUME OFF“). Note: The respective ringer volume will be played during your selection. Press to confirm.
-
Page 28: Pbx Access
10.4.5 Change the System PIN Code A 4-digit system PIN code is used for changing the system settings of the base station. It is used to protect your phone against unauthorised use. The default system PIN code is 0000. Press to select “BS SETTINGS“. - Page 29 You can register additional handsets to have up to five handsets per base unit, with each handset‘s number (1 to 5) shown on its display. (Note: each handset can only be registered to one base.) 10.6 To register a new handset to your base: Press and hold on the base station for more than five seconds, to put the base station into registration mode.
-
Page 30: Answering Machine
Note: If the headset LED flashes slowly in purple, it means that the headset is registered but the base is not available. 10.8 Reset your phone You can reset your phone to the default settings. After a reset, all your personal settings, call list entries, redial list entries, and answering machine messages will be deleted but your phonebook remains unchanged. - Page 31 Press to select “TAM ON/OFF”. Press to select “ON” or “OFF”. Press to confirm. >If answering machine is set to “ON”, displays on the handset LCD. >If answering machine is set to “OFF”, will not display on the handset LCD. 11.2 Listen to the messages in the answering machine When new messages are recorded on the answering machine, the...
- Page 32 PREVIOUS Repeat playing the current message from the beginning. DELETE Delete the current message and the next message will be played. Note: Alternatively, you can use the following shortcut keys to control different operations during message playback. Press key 5 to stop message playback. Press key 4 once to skip to repeat playing the current message from the beginning.
- Page 33 11.5 Answering machine settings You can use the “TAM SETTINGS“ menu through the handset to change the settings of your answering machine. 11.5.1 Set the answer mode By default, the answer machine is set in “ANS & REC“ mode which allows callers to leave a message.
- Page 34 your personalised OGM during playback and record a new one whenever you want. Please note that pre-set OGM cannot be deleted. 11.5.3.1 Playback the OGM Press to select “ANS. MACHINE“. Press to select “TAM SETTINGS“. Press to select “OGM SETTINGS“. Press to select “ANS &...
- Page 35 11.5.5 Set the recording time of incoming message You can set the maximum length of the recording time of the incoming messages. Press to select “ANS. MACHINE“. Press to select “TAM SETTINGS“. Press to select “RECORD TIME“ (Available options: “60S“, “120S“, “180S“, or “UNLIMITED“). Press to select your desired recording time.
- Page 36 machine is in the process of recording, the message already stored will be saved. 11.5.7 Change the compression rate Three different compression rates (“HIGH“, “MEDIUM“ and “LOW“) are provided for you to select different quality levels of recording incoming message. The lower the compression rate, the higher the recording quality level attained, but the shorter the total recording time available.
- Page 37 11.5.8.2 Activate or deactivate the remote access Press to select “ANS. MACHINE“. Press to select “TAM SETTINGS“. Press to select “REMOTE ACC“. Press to select “ON“ or “OFF“ to turn the remote access on or off respectively. Press to confirm. 11.5.8.3 Access your answering machine remotely You can ring your phone from another tone-dialling phone to switch the answering machine on or off, and/or listen to your messages remotely.
-
Page 38: Troubleshooting
TROUBLESHOOTING Problem Causes Solutions No dialling tone when The connection cord Check the connections. pressing key of the base station Unplug and plug back is not plugged in. in the mains. Check The adapter cord is not that the telephone cord plugged in correctly has been plugged into in the base station. -
Page 39: Guarantee And Service
I cannot operate You are entering If you forget the remote the answering the wrong remote access code, reset to machine remotely. access code the default settings. You are pressing the Press each key firmly. dial keys too quickly. Try again using a You are using a touch tone phone. -
Page 40: Technical Details
TECHNICAL DETAILS Standard Digital Enhanced Cordless Telecommunication (DECT) Frequency range 1.88 to 1.9 GHz (bandwidth = 20 MHz) Channel 1.728 MHz bandwidth Operating range Up to 300 m outdoors; up to 50 m indoors For headset: up to 150 m outdoors; up to 25 m indoors Operating time Standby: 100 hours;... -
Page 41: Disposal Of The Device (Environment)
DISPOSAL OF THE DEVICE (ENVIRONMENT) At the end of the product lifecycle, you should not throw this product into the normal household garbage but bring the product to a collection point for the recycling of electrical and electronic equipment. The symbol on the product, user guide and/or box indicate this. - Page 42 © 2012 Binatone Electronics International Limited All rights reserved Subject to avaibility. Rights of modification reserved. AEG is a registered trademark used under license from AB Electrolux (publ) www.aegtelephones.eu...
Need help?
Do you have a question about the Voxtel D235 and is the answer not in the manual?
Questions and answers