NETGEAR Stora User Manual
Hide thumbs
Also See for Stora:
- Installation manual (2 pages) ,
- Installation manual (2 pages) ,
- User manual (132 pages)

Related Manuals for NETGEAR Stora


Summary of Contents for NETGEAR Stora
-
Page 1: User Manual
Stora User Manual 350 East Plumeria Drive San Jose, CA 95134 May 2011 202-10540-05... -
Page 2: Technical Support
NETGEAR, Inc. Technical Support Thank you for choosing NETGEAR. To register your product, get the latest product updates, or get support online, visit us at http://support.netgear.com. -
Page 3: Table Of Contents
Check Package Contents ........20 Connect Stora to Your Network ....... 21 Configure Your Stora . - Page 4 Start the Stora Application ........54...
- Page 5 Chapter 7 Premium Features Back Up My Stora to a USB Device ......134 Enable a Device .
-
Page 6: Chapter 1 Getting Started
Getting Started This chapter provides an overview of the NETGEAR Stora. Topics discussed in this chapter include: • About NETGEAR Stora • Standard and Premium Features • File Types • Media Server • iTunes Client • Mobile Devices... -
Page 7: About Netgear Stora
NETGEAR Stora is a highly secure and stable home server that lets you collect, store, manage, share, and enjoy your digital media content, including personal photos, music, videos, and documents. It is easy to drag and drop digital media to Stora, catalog it into folders, and share it by creating albums. -
Page 8: Standard And Premium Features
NETGEAR Stora Standard and Premium Features Premium features extend Stora capabilities and are available to licensed users. The following table outlines the main standard and premium features Feature Standard Premium User accounts unlimited Remote access to Stora applications and folders; manage your Stora from anywhere x... -
Page 9: File Types
113 for more information. iTunes Client An iTunes client on the network can access music stored on Stora. The music files need to be within folders or albums that are configured to share with digital media adapters (DMAs) or media players. -
Page 10: Mobile Devices
Browse folders in the Media Library • Create new folders • Upload media directly from the mobile device to Stora After you set up your Stora, you can access it from a mobile device by visiting http://www.myStora.com/mobile. Stora supports the following mobile devices: • iPhone •... -
Page 11: Chapter 2 Stora Hardware
Stora Hardware This chapter describes the physical features of the NETGEAR Stora. It includes the following topics: • Front Panel • Disks and Disk Bays • Rear Panel • LED and Connector Descriptions • Install a Disk... -
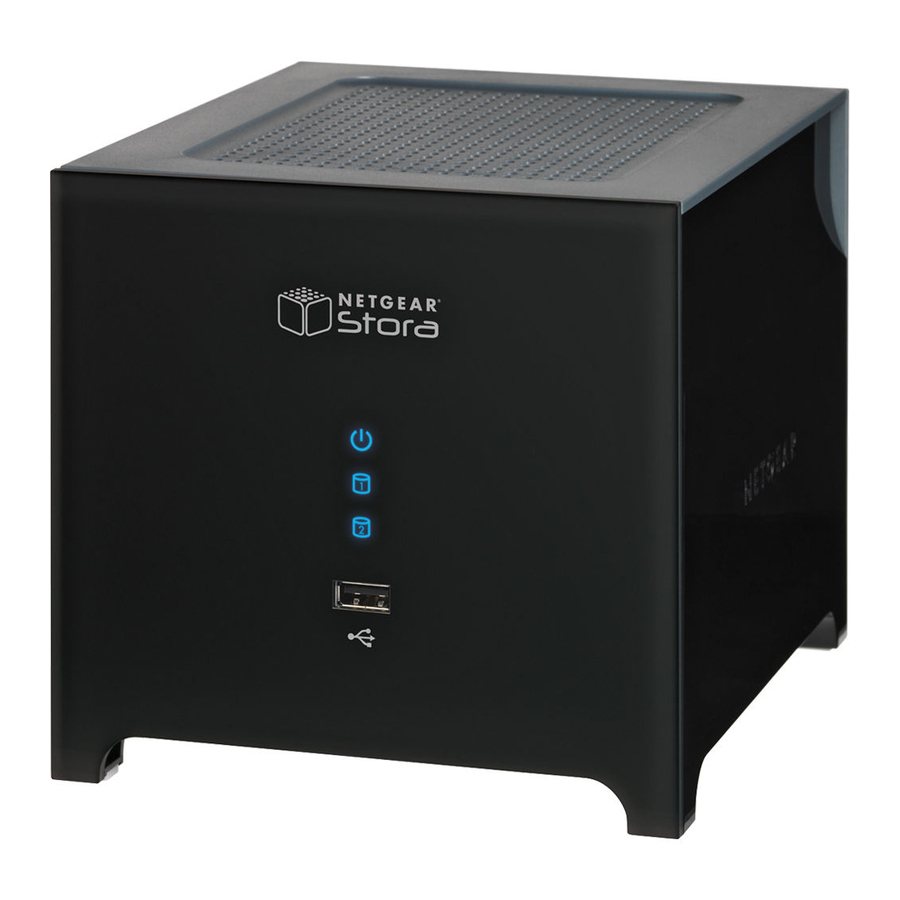
Page 12: Front Panel
NETGEAR Stora Front Panel The following figure shows the Stora’s front panel. 1. Exhaust fan vent 2. Power LED 3. Disk 1 and Disk 2 LEDs 4. USB port Stora Hardware... -
Page 13: Disks And Disk Bays
NETGEAR Stora Disks and Disk Bays The following figure shows the Stora’s disk bays, which are located inside the unit behind the front panel. 1. Disk 1 bay 2. Disk 2 bay Install a Disk on page 16 for information about installing, ejecting, and replacing disks. -
Page 14: Rear Panel
NETGEAR Stora Rear Panel The following figure shows the Stora’s rear panel. 1. Disk release latches 2. Unit serial number and network MAC address 3. Power button 4. Power cable socket 5. Ethernet port 6. Reset button Stora Hardware... -
Page 15: Led And Connector Descriptions
• Blinking green or amber. Indicates link activity. Power Plug the power cable into the Stora system. cable socket Reset Insert a paper clip or pen to reset Stora to its original factory default settings. Can also be used when changing your password. button Stora Hardware... -
Page 16: Install A Disk
The following procedure explains how to set up and install a single drive. If you purchased a Stora with only one installed drive, and you want to add a second drive, carefully repeat these same instructions. ... -
Page 17: Replace A Disk
Replace a Disk If a disk fails in your Stora device, you are notified of the failure by e-mail. On the front of the Stora device, an amber LED might indicate a failed disk. The top LED is disk 1; the bottom one is disk 2. - Page 18 Slide the disk tray back into the unit and secure the latch. Note: To protect against data loss, add a second disk to your Stora to be used as a mirrored backup of the data on the first disk. Stora Hardware...
-
Page 19: Chapter 3 Installation
Installation This chapter describes how to install your NETGEAR Stora system. It includes the following topics: • Initial Setup • Install Desktop Applications • Backup Options • Access Your Stora • Documentation, Tools, and More • Reset Your Stora... -
Page 20: Initial Setup
Worldwide customer support information Note: If you purchased a Stora unit with only one disk and want to add a second disk for redundancy, NETGEAR recommends that you first install your Stora, then connect Stora to your network and validate the installation before adding the disk. -
Page 21: Connect Stora To Your Network
Avoid putting the unit in a location where it could be easily knocked over. Do not place items on top of Stora, or place liquids near or on top of the unit; the ventilation vents are on the top of Stora. - Page 22 To run the Stora setup software from the Resource CD: Make a note of the product key. The product key is located on the Resource CD sleeve and on the bottom of Stora unit. Write the product key down, as it is required later in the installation process.
- Page 23 NETGEAR Stora After a few minutes, the Setup screen changes to show a series of steps. Click Step 1: Set Up Your Stora. The software license agreement displays. Click the I Accept button. A registration screen displays. Enter the product key that you noted in Step 1.
- Page 24 The Administrator Account Creation screen displays when the process is complete. Enter a user name. This is the name you use to log in to the Stora system. Your user name is case-sensitive. Enter a display name. This is a case-sensitive name that guests see when they view your shared files and photos.
- Page 25 To add more than one email address, separate the addresses using a comma. (Optional) Upgrade to a Premium subscription. During installation you have the option to upgrade your Stora subscription to include premium features not available with the Standard subscription.
- Page 26 NETGEAR Stora (Optional) Configure your router for UPnP. This screen displays if Stora finds a setup problem with your UPnP router or if your router is not UPnP capable. Most users with newer routers should not see this message. See...
- Page 27 NETGEAR Stora Click the Finish button. The Setup screen displays with a check mark next to Step 1. You can do one of the following: • Click Exit to end the installation. • Click Step 2 to install desktop applications.
-
Page 28: Install Desktop Applications
NETGEAR Stora Install Desktop Applications Stora comes with software applications to help you manage and administer the device. After you complete the initial configuration of your Stora, you have the option to install these applications. To install desktop applications: Click Step 2: Install Desktop Applications. - Page 29 NETGEAR Stora Click Next. The Setup Type screen displays. Select an option: • Typical. This is the recommended setup option. • Custom. Select which applications you want to install. If you select Custom, the following screens display: Installation...
- Page 30 NETGEAR Stora Click Next. The Ready to Install the Program screen displays. Verify the settings and click Install. A progress screen displays. When the application installation completes, the Back and Next buttons become active. Installation...
- Page 31 The Setup screen displays. A check mark next to Step 2 confirms that the applications were successfully installed. Your Stora is now ready for you to use. You can do one of the following: • Click Exit to end the installation.
-
Page 32: Backup Options
NETGEAR Stora Backup Options Stora is compatible with Windows and Time Machine backup processes. For more information, see Computers Backup on page 112. Windows Backup requires configuration before it will work with Stora. To configure Windows Backup to work with Stora: On the Resource CD’s Setup screen, click Step 3: Windows/Time Machine Backup... - Page 33 Select the Activate Windows Backup Feature check box. Create and enter a password. This password is different from your Stora credentials. You might want to write it down for future reference. Click Next and on the next screen, click Next again.
- Page 34 NETGEAR Stora In the Backup area, click the Set up backup link and follow the prompts. In the Restore area, click an option, and follow the prompts. Installation...
-
Page 35: Access Your Stora
If you are on your local network, Stora automatically uses your LAN and no data is passed over the Internet. If you are not using your local network, you can securely access your Stora over the Internet. You can share and upload files using the Stora’s drag-and-drop interface; however, only specific default folders can be shared over the Internet. -
Page 36: Stora Agent
Stora Agent Stora Agent is a local client that is installed on a PC or Mac. It is available by double-clicking the icon on the bottom status bar on a PC or on the dock on a Mac. During installation, a shortcut is also added to your desktop. -
Page 37: Documentation, Tools, And More
You can use the Resource CD’s Setup screen to access documentation and other information about using your Stora. Register Your Stora After installing your device, locate the serial number on the back of your Stora unit and use it to register your product at http://www.NETGEAR.com/register. Documentation and Support A link to the Stora user manual is available on the Resource CD that came with your product. -
Page 38: Reset Your Stora
NETGEAR Stora Reset Your Stora The Resource CD provides a reset option. Your Stora system might need to be reset if you forget your user ID or password. Reset from the Resource CD Resetting your Stora from the Resource CD does not delete data from the disk; however, you need to re-create the same login and password after the reset in order to access the data in private folders. - Page 39 • Refresh. Click this option if you have more than one Stora on the system; you can choose which unit to reset. If you have more than one Stora, choose the one you want to reset. Follow the prompts to reset your Stora.
-
Page 40: Factory Reset
NETGEAR Stora Factory Reset A factory reset clears all user names and passwords, resets the Stora to be a DHCP client, and allows you to rerun the Setup software. To reset to factory default settings: Turn off your Stora, then turn it on and wait 10 seconds. -
Page 41: Chapter 4 Stora Agent
Stora Agent This chapter provides information about the Stora Agent. It includes the following topics: • About the Stora Agent • Connect a Printer... -
Page 42: About The Stora Agent
NETGEAR Stora About the Stora Agent Stora Agent is a local client that runs in the background and allows you to explore your folders, quickly open Stora Applications and Desktop Mirror, or check for updates. It can be installed on any system that is connected to a Stora. -
Page 43: Starting Stora Agent
Start Finder and browse to Applications > Stora Desktop Applications > Stora Agent. Login Status The label at the top of the Stora Agent menu displays who is currently logged in to Stora, or shows Not logged in. This menu option is available on a PC only. -
Page 44: Switch User
Switch User If someone is logged in to Stora, the Switch User menu option logs out the current user, and allows another person to log in. Note that this option is not available if no one is logged in to the system. -
Page 45: Explore My Stora Folders
NETGEAR Stora Explore My Stora Folders Stora folders let you use Microsoft Explorer or Mac Finder to work with content on your Stora. This way you can manage your files in a familiar environment and can upload files greater than 2 GB. -
Page 46: Open Stora Application
Application. Open Desktop Mirror Desktop Mirror lets you back up PCs and Macs on your home network to Stora. The Desktop Mirror application backs up selected folders on a regular basis. The Open Desktop Mirror menu option starts the Desktop Mirror application and is used to back up selected folders. -
Page 47: Preferences
NETGEAR Stora Preferences The Preferences menu option on the Stora Agent allows you to check for software updates to the desktop applications and displays the name and IP address of Stora on your home network. The Advanced tab shows Stora devices found on your network and allows you to keep Desktop Mirror running in the background. -
Page 48: About
The About menu option displays the Stora Agent version installed on your computer. Exit Stora Agent The Exit Stora Agent menu option closes Stora Agent and removes the icon from the system tray. For information about how to restart Stora Agent on a Mac or PC, see... -
Page 49: Connect A Printer
To add a printer to a PC: Connect a USB cable from the printer to the Stora or to a USB hub connected to the Stora. Log in to the Stora. Double-click the Stora Agent icon and select Explore my Stora folders from the menu that displays. - Page 50 Use the Add Printer Wizard to load the printer driver. Select a manufacturer and printer and click OK. The printer is now available through Stora. You can select it from the list of printers by selecting Settings > Printer and Faxes.
- Page 51 NETGEAR Stora To add a printer to a Mac: Connect a USB cable from the printer to the Stora or to a USB hub connected to the Stora. From the Apple menu, select System Preferences > Printer & Fax.
- Page 52 NETGEAR Stora In the Print Using list, select a printer model and click Add. The first time you print, you are prompted for your user name and password: a. Enter your user name and password. b. Select remember this password in my keychain.
-
Page 53: Chapter 5 Stora Application
Stora Application This chapter describes how to use the standard Stora Application features. It includes the following sections: • About the Stora Application • Albums • Media Library • MyLibrary • Preferences • Set Up Social Networking Connections... -
Page 54: About The Stora Application
NETGEAR Stora About the Stora Application The Stora Application runs in your browser, and allows you to access your folders within the MediaLibrary, view albums, and set preferences. The Stora Application is available whether your Stora unit is located locally on the home network, or remotely across the Internet. The Stora Application works the same even with different computers and browsers. - Page 55 Go to www.mystora.com. Select a language. Your language preference might already be set as the default. Complete the Stora name, Your User Name, and Your Password fields and click the Sign In button. Premium Subscription Offerings The Login screen gives you the option to upgrade your subscription. During your 30-day free trial period, all premium services are available.
-
Page 56: Stora Application Home Screen
NETGEAR Stora Stora Application Home Screen After you log in to the Stora Application, the Stora home screen displays. This screen gives you local access to the Albums, Media Library and Preferences areas, as well as the Help menu, which contains a link to the User Manual and Stora support. -
Page 57: Main Menu
About Stora The About Stora link displays at the bottom-left corner of the home screen. Click this link to see the software version, your product key, the name of your Stora unit, and links to additional information. -
Page 58: Menu Bar Options
NETGEAR Stora Menu Bar Options The menu bar across the top of the screen offers additional options. View Files Use the Viewing menu to specify which file types you want to show. Set a Display Method Set a display method to specify how files are displayed within the currently selected folder or album. - Page 59 You can sort your files using the Sorted by drop-down menu. Search for Files and Folders When you search for files or folders, Stora checks all the folders to which you have access and displays items with captions, tags, or file names that match the search criteria.
-
Page 60: Albums
NETGEAR Stora Albums An album allows you to group related pictures, music, videos, and documents from multiple folders. The Albums area shows albums you have created using the Media Library. From this screen, you or the people to whom you have given access can run a slideshow or download files. - Page 61 NETGEAR Stora To download a file after displaying an album: Select a file by clicking it. To select multiple files, press the Ctrl key while clicking files. A window lists the selected files. Click the Download button next to the desired the file.
-
Page 62: Media Library
Access the Media Library From Stora application home screen, click Media Library. The Media Sources screen displays. It allows you to manage your files, folders, and digital media and place them into albums that you can share with friends and family. If you want to share the files in a folder with your friends, display the menu for that folder and select Share Selected Items. -
Page 63: Tip Of The Day
NETGEAR Stora Tip of the Day Unless you disable the Tip of the Day, each time you launch the Media Library, Stora provides helpful tips and tricks for using your system to its fullest potential. You can click Previous tip or Next tip to see other tips. -
Page 64: Media Sources Area
NETGEAR Stora Media Sources Area The Media Sources area shows your FamilyLibrary folders, MyLibrary folders, and MyComputers folders. The default view is the FamilyLibrary screen. You can add your own folders, as well. FamilyLibrary The FamilyLibrary folder comes with a series of standard subfolders: FamilyDocuments, FamilyMusic, FamilyPhotos, and FamilyVideos. -
Page 65: Mylibrary
MyComputers The MyComputers folder contains a folder for each computer using the Desktop Mirror application. You can download files or folders using the Stora Application or you can copy and paste them through Stora folders. For added security, you can only access the MyComputers folder if your specific login credentials were used to configure the backup. -
Page 66: Working With Folders
NETGEAR Stora For more information about working with these folders, see Working with Folders on page 66. On a PC, enable Windows Networking to see your MyComputers folders. See Server Preferences on page 98. Working with Folders Selecting a folder highlights the folder name and displays its subfolders and files in the Files section. - Page 67 NETGEAR Stora Expand or Collapse a Folder Expanding or collapsing a folder shows or hides the subfolders contained within the folder. To expand or collapse a folder: In the right panel, click the right arrow next to a folder name to expand it.
- Page 68 NETGEAR Stora When prompted, enter a name for the folder and click the Create button. The new folder displays alphabetically on the left navigation panel and in the main screen. Stora Application...
- Page 69 NETGEAR Stora Delete a Folder Delete folders carefully. Deleting a folder removes it and all its content from Stora. WARNING! If you delete a folder, any item in that folder that is contained within an album is no longer available in the album.
- Page 70 Blocked accounts do not have access to it. Stora Application allows you to a copy a file or set of files that are less than 2 GB. If you want to copy files greater than 2 GB, use Stora folders. For more information, see...
- Page 71 NETGEAR Stora Drag and Drop lets you drag multiple files and entire folders from Explorer or Finder. Follow these steps to use drag and drop to upload a file: a. Drag the file from Explorer or Finder, and drop it into the window.
-
Page 72: Folder Options
NETGEAR Stora Folder Options The Stora Application offers many options for working with folders. To display folder options from the Media Sources list or subfolders: Move the mouse over a folder. An arrow displays on the bottom right side of the folder. - Page 73 NETGEAR Stora To move a folder using the cut and paste method: Select the folder you want to move and display the menu. Select Cut. Select the destination folder and display the menu. Select Paste. Stora Application...
- Page 74 Note: The details and advanced options display on the far right. If the Stora interface is in a small window, or the screen resolution is too low, the details and advanced options might not show. To fix the problem, increase the window size until the entire screen displays.
- Page 75 Select a destination folder and display the menu. Select Paste. Note: You cannot copy and paste a folder from the Stora Application into another application, and you cannot copy and paste data from another application into the Stora Application. Stora Application...
- Page 76 NETGEAR Stora Rename a Folder Renaming a folder changes its name. To rename a folder: Select a folder and display the menu. Select Rename. When prompted, enter a new name. Click Rename. Note: If you rename a folder, and an album contains a reference to a file within the folder, the item is no longer be available from the album.
-
Page 77: Working With Albums
However, if you delete a file from the folder, it is no longer available in the albums. If you already added files to an album and they do not appear, it might be that Stora is disconnected, or the files might have been deleted, moved, or renamed. - Page 78 NETGEAR Stora Display the Album Menu Options To display the menu options for albums, move the mouse over an album and click the arrow that displays beside the name. Rename an Album If you rename a shared album (whether shared with friends or with everyone), the original link no longer works.
- Page 79 NETGEAR Stora Enter a new name and click the Rename button. Create an Album You can add the contents of a folder to a new album that only you can see. You can share the album later by using the Details panel to modify the settings.
- Page 80 NETGEAR Stora Enter a name for your new album. (Optional) Enter a description. (Optional) Select a theme. You can add a theme to an album by displaying background graphics that come with the Stora Application. (Optional) Click the More Sharing Options link.
- Page 81 Guest login screen, where their email address is verified before they have access to the album. By default, anyone who clicks the link can view the album. The first time you share an album with friends, Stora prompts you for your email address.
- Page 82 NETGEAR Stora Change Album Settings You can change an album from shared to unshared, and vice versa, or modify the album settings by changing the settings in the Details area. To change album settings: From the Media Library, select the album you want to change.
-
Page 83: File Options
NETGEAR Stora Click Yes to delete the album. If you click No, the album is not deleted. If you click Yes, the album is deleted. File Options File options are similar to folder options. To display the options from the Media Sources list or subfolders: Move the mouse over a file. -
Page 84: Working With Files
NETGEAR Stora Working with Files The Stora Application offers several ways to work with files. Add Files to an Album You can add contents of any folder to an existing album. You can add a single file or multiple files at once. If you add files from a folder to an album, files within subfolders are not included. - Page 85 Stora Application. You cannot copy and paste a file from the Stora Application into another application, and you cannot copy and paste data from another application into the Stora Application.
- Page 86 Add Tags Tags store additional information about the file. Tags allow you to describe each file on your Stora. If you tag files consistently, you can find them more easily, especially as their number grows over time. For example, assume you took a number of pictures at Jane’s 11th birthday, which was held at your cottage.
-
Page 87: Download A File
NETGEAR Stora To add tags to a file: Select the folder that contains the file that you want to tag. Select the file, display the menu, and select View Details. The file details display. Enter tags in the Tags field. -
Page 88: Working With Images
NETGEAR Stora Working with Images Use an Image as Home Background Using an image as the background causes it to display on your home screen. To set the home screen background theme: From Media Library, select the image that you want to use. - Page 89 NETGEAR Stora View Viewing an image displays it in a paused slideshow. To view an image: Double-click the image you want to view. Rotate an Image Rotating an image clockwise turns it to the right. Rotating an image counterclockwise turns it to the left.
-
Page 90: Setting Up Contacts
This allows you to share each album with a different set of your friends. Additionally, all Stora users can set up their own address books that contain the names and email addresses of their contacts. - Page 91 The address book displays in the Share with your contacts screen. You can add, edit, or remove contacts. Set Up Your Address Book Your address book stores email addresses of people with whom you want to share Stora content. ...
- Page 92 NETGEAR Stora Click the Add Friends icon on the bottom of the screen. The Add New Contact dialog box displays. Complete the fields in the Add New Contact dialog box: a. Enter the contact’s name. b. Enter the contact’s email address.
- Page 93 NETGEAR Stora Set Up the Allowed Access List After you create contacts in your address book, you can include them in the Allowed Access list for an album. To add or remove a contact in the Allowed Access list: From the Media Library, select an album, display the menu, and select View Details.
-
Page 94: Preferences
NETGEAR Stora Preferences The administrator can set up user, server, and administration preferences. Where noted, some preferences are available to all users. Other preferences require administrator permission. Display the Preferences Screen From the home screen, click Preferences. The Preference area is divided into three main sections: •... -
Page 95: User Preferences
Click the arrow next to User to expand the section. Users can set the following preferences: • Language. The language for the Stora Application user interface. The selection of languages depends on your region. The default language is from your computer’s configuration. - Page 96 Rename new file. The old file is retained, and the new file is copied or moved, but is renamed. • Share new albums with other family accounts by default. Determines whether new albums are shared with other Stora users by default, as follows: • No. New albums are not shared with family. •...
- Page 97 NETGEAR Stora Disk Space All users can view the amount of space on Stora. Change Password To change your password: Select Preferences > User Preferences > Change Password. The change password area expands. Enter a new password in the Password field.
-
Page 98: Server Preferences
No. Users cannot access their private folders through Explorer or Finder. The Workgroup Name field sets the name of the workgroup. The workgroup gives the computers on your home network access to Stora through Explorer or Finder, and to the USB printer optionally connected to Stora. - Page 99 *This is a sample IP address. The actual IP address of your Stora is assigned by your router, and is automatically entered by your Stora and might vary from the IP address shown here. The IP address in your router's interface is the IP address for your Stora.
-
Page 100: Network Services
To set up email notifications: Enter email addresses where you want to receive notifications about your Stora in the Notifications field. You can set one or more email addresses to receive notifications about Stora. Use a comma to separate email addresses Click Submit. -
Page 101: Lan Connection
Yes. Stora automatically obtains a dynamic IP address from the router using DHCP In most cases, use this setting. • No. Stora uses the static IP address entered into the Server IP address field. This is rarely required, but might improve performance for remote users. Selecting No makes the following settings available: •... -
Page 102: Date And Time
/16 (255.255.0.0) • /32 (255.255.255.255) • Gateway. Sets the IP address of the device that routes data from Stora to the Internet (usually a router). The Gateway field displays only if Obtain IP address automatically is set to No. •... - Page 103 Remote access enables your device to be accessed from anywhere in the world over the Internet. To enable remote access you need to provide the Stora name used to identify your device remotely. Select the check box to enable remote access. Clear the check box to remove access.
-
Page 104: Administration
• Display Name. Sets the name that displays in the main menu of Stora Application. The display name also displays on the Albums screen before the user’s albums. This is an optional field. If used, the display name needs to be at least three characters. -
Page 105: Delete User
The default setting grants access. Note: If you disable access to the FamilyLibrary folders, a user can still access them using Windows Explore or Mac Finder through Stora folders. Edit User Click the arrow next to Edit User to expand the area. - Page 106 NETGEAR Stora Shut Down Click the arrow next to Shut Down to expand this area. You can use this area to gracefully shut down or restart Stora. Software Updates You can check for software and firmware updates to Stora. ...
-
Page 107: Disk Management
This button allows you to safely remove and replace a disk without damaging the disk or losing data. Format This button allows you to erase all data from Stora disk. This option automatically reboots your Stora. You can maximize data protection by adding a second backup disk to your RAID1 configuration. - Page 108 NETGEAR Stora To format a new disk: Click the Format button. Click Yes to continue the format process. Follow the prompts as they display. Rebuild This button displays only if a disk has a problem. To restore functionality: Click the Rebuild button and click OK to refresh the browser.
- Page 109 If you have one disk in your Stora, it is formatted as RAID1. If you have two disks in your Stora, you can use either to use either RAID1 or just a bunch of disks (JBOD) disk format. It is important to understand the advantages of the RAID1 and JBOD formats: •...
- Page 110 You can use an external device that uses a USB port to upload or download content to and from your Stora. To use USB external storage: Plug a USB device into the USB port on the front of Stora. The device displays as a folder in the Media Sources area. Stora Application...
-
Page 111: Power Timer
USB drives. Multiple printer support is not available. Power Timer Stora automatically spins down when not used for 12 minutes. To reduce power consumption, you can use Power Timer to set your Stora to turn on and off automatically. Stora Application... - Page 112 Computers Backup Your can configure Stora to be the destination for Windows Backup and Mac OS X Time Machine backups. When you enable this feature, a special hidden section on Stora is assigned to contain the backed-up files.
-
Page 113: Set Up Social Networking Connections
Windows Media Connect standard. Media players include gaming consoles (such as Xbox 360 and PS3), digital photo frames, iTunes clients, IP televisions, networked sound systems (such as Sonos and Logitech), digital video players (such as NETGEAR NeoTV ), and many more. -
Page 114: Share With Facebook
Share with Facebook When you share an album on Facebook, Stora uploads the images from the album, and Facebook adds them to a photo album. If you add more images to the album, Stora automatically uploads them to the photo album. -
Page 115: Share With Flickr
You can upload and download files from your Stora using File Transfer Protocol (FTP). FTP provides access to your MyLibrary folders. If your account has access, FTP also provides access to the FamilyLibrary folders. The router needs to forward port 21 to Stora. This is set up automatically if the router has UPnP enabled. -
Page 116: Itunes
These are case-sensitive. iTunes Computers can use iTunes to access music stored in the iTunes library on Stora. These iTunes clients need to be connected to the same home network as Stora. They cannot access the iTunes library remotely across the Internet. - Page 117 NETGEAR Stora Playing Songs with an iTunes Client Music files stored on Stora appear in the SHARED > Stora:iTunes folder. You can play these songs within iTunes, but you cannot add them to a playlist. Pictures, videos and documents stored on Stora are not available within iTunes.
-
Page 118: Chapter 6 Desktop Mirror
Desktop Mirror This chapter includes the following topics: • Desktop Mirror Overview • Starting Desktop Mirror • Initial Configuration • Add Folders to the Desktop Mirror Backup • View Files within a Folder • Remove Folders from the Desktop Mirror Backup •... -
Page 119: Desktop Mirror Overview
MyComputers folder makes it easy to locate and restore single files or entire folders. Desktop Mirror backs up the files in one direction, from the computer to Stora. It backs up the files in the listed folders, using the settings in the Schedule tab. Files that have not changed since the last backup are ignored. -
Page 120: Initial Configuration
If required, enter your Stora name, user name, and password and click Next. Use the credentials you created when you installed Stora. When you log in to the Stora Application using these credentials, the backup directory for the computer displays under MyComputers. - Page 121 NETGEAR Stora You can add folders later. If the Stora Desktop Mirror is blocked by Windows Firewall, click Unblock. Click Next. The Set your backup schedule screen displays. Set the backup schedule, as follows: • Timed Backup. Offers the following settings: •...
- Page 122 NETGEAR Stora Click Next. The Congratulations screen displays. (Optional) Select the Start backing up my folders when I click finish check box. If you click this check box, the Desktop Mirror begins as soon as you click the Finish button.
-
Page 123: Add Folders To The Desktop Mirror Backup
NETGEAR Stora Add Folders to the Desktop Mirror Backup Adding a folder includes the folder, its subfolders, and its files in the subsequent backups. To add folders to the Desktop Mirror backup: Select File > Add. The Browse for Folder dialog box displays. -
Page 124: View Files Within A Folder
NETGEAR Stora View Files within a Folder After files and folders are backed up, they are marked with a check mark, as shown in the following figure. To view files within a folder: Double-click a folder link. The backed-up files display. -
Page 125: Remove Folders From The Desktop Mirror Backup
NETGEAR Stora Remove Folders from the Desktop Mirror Backup Removing a folder excludes the folder, its subfolders, and its files from subsequent backup jobs. Select the folder you want to remove from the backup job. Select File > Remove. You are prompted to confirm the folder removal. -
Page 126: View The Desktop Mirror Backup Report
NETGEAR Stora View the Desktop Mirror Backup Report A report is generated after every backup or restore event. To view the desktop mirror backup report: Select View > View Report. The backup data log displays in the Backup Activity screen. -
Page 127: Manual Desktop Mirror Backups
NETGEAR Stora Click OK to dismiss the report. WARNING! If Desktop Mirror reaches the limit of the file path length it can handle, the Backup Mirror report shows: “skipping overly long name: <name of the file>.” When this warning is displayed, the file is not backed up. - Page 128 NETGEAR Stora To cancel a backup in progress: During a backup, click the X button on the status bar. A “Process aborted” message displays on the status bar. The folder or folders included in the job are marked with a warning icon indicating that they are out of sync and need to be backed up.
-
Page 129: Restore All Backed-Up Folders
Select Tools > Restore. You are prompted to confirm the restore command. Click OK. If you click Cancel, the restore process is aborted. If you click OK, files and folders on Stora are added to or replace those on the computer. Desktop Mirror... -
Page 130: Change Account Settings
Changing accounts settings lets you modify the device name, user name, password, and backup schedule. Identity Tab You can use the Identity tab to choose which Stora and user you want to mirror. To choose a Stora and user account to mirror: Choose Tools >... -
Page 131: Schedule Tab
Select your options so that all your changes are saved and the process does not interfere with your work. Click OK. Advanced Tab Support for the Alternate Ports option is not available on Stora. Desktop Mirror... -
Page 132: View Online Help
NETGEAR Stora View Online Help You can access the Stora User Manual from the Desktop Mirror area. To view the Stora User Manual from within Desktop Mirror: Select Help > View Online Help. The manual displays. About Desktop Mirror You can view details about the current version of Desktop Mirror. -
Page 133: Chapter 7 Premium Features
Premium Features When you upgrade to a Premium subscription, in addition to the Standard offerings, Stora offers the additional features that are described in the following sections: • Back Up My Stora to a USB Device • Torrents • FTPS Integration •... -
Page 134: Back Up My Stora To A Usb Device
Back Up My Stora to a USB Device Using the USB port located on the front of your Stora, you can back up your files from your Stora to an external device. You manage these backups in the Backup my Stora area that is accessible from the home screen. - Page 135 Click the Enable USB Backup Now button. A screen displays that tells you to connect an external device to the USB port on the front of your Stora unit. After you connect the device, a warning notice displays, informing you that you need to remove any data that you want to keep from the USB device.
- Page 136 Media Library will no longer visible in the Media Library. Click Yes to continue. If you click No, the enable USB backup process aborts. If you click Yes, the Welcome to Stora Backup screen displays. Click Ok. The backup application launches.
-
Page 137: Back Up Stora Data To A Usb Device
Back Up Stora Data to a USB Device After your backup device is enabled, you can use the device to back up the data on your Stora. For information about how to enable your device, see Enable a Device on page 134. - Page 138 NETGEAR Stora A progress bar displays. When to backup job is complete, a screen similar to the following displays: Click the X button in the upper-right corner to close this screen. A check mark in the USB column indicates that the folder was backed up to a USB device.
-
Page 139: Schedule Backups
NETGEAR Stora Schedule Backups You can schedule backups to run on a daily basis. To schedule daily backups: Select Backup > Schedule Backup from the backup application screen. The Backup Scheduling dialog box displays. Use the arrows to set the time and click Ok. -
Page 140: Show Backup Jobs
You can view active and previous backup jobs. To view active jobs: Select Backup My Stora > Show Jobs > View Active Jobs from the backup application screen. The screen populates with information about active jobs, if any. Click the X button in the upper-right corner to close the window. -
Page 141: Remove A Folder From A Backup Job
NETGEAR Stora To view job history: Select Backup My Stora > Show Jobs > History from the backup application screen. The Backup - History screen displays with job history information, if any. It offers these history options: • To see more information about a job, click the Information icon next to the job. - Page 142 NETGEAR Stora Select Remove from Backup from the drop-down menu. Stora removes the folder from the backup device and marks it accordingly. Premium Features...
-
Page 143: Archive Stora Data To A Usb Device
To archive Stora data: Click the Backup My Stora icon on the home screen. The backup to USB application launches. Select the check box next to the file you want to archive. A drop-down menu displays. -
Page 144: Torrents
Stora’s torrents service allows you to download files from torrent sites directly to your Stora. This feature requires different login credentials than your Stora credentials. To use this feature, you must first enable torrents. - Page 145 You use these credentials to log in to the torrent management application. For security reasons, NETGEAR recommends that you use a different user name and password than you use for your Stora user account. Alternatively, you can download a compatible torrent client for your PC or Mac from http://support.netgear.hipserv.com/support/torrents/download.
-
Page 146: Using Torrents
NETGEAR Stora Using Torrents You can use the Stora interface to download files using torrents. Note that you cannot use the Stora’s torrent interface remotely. You can access it only from your local area network (LAN). To download a torrent file: Download a torrent link or have a torrent URL on hand. -
Page 147: Ftps Integration
FTPS is a secure version of the FTP file transfer protocol that allows you to transfer files between computers on a network. You can upload and download files from your Stora using FTPS. FTPS provides secure access to your MyLibrary folders. If your account has access, FTPS also provides secure access to the FamilyLibrary folders. -
Page 148: Rss Integration And Support
NETGEAR Stora RSS Integration and Support Really simple syndication (RSS) is a format for updating subscribers to frequently changing web sites, like blogs or news sites, when updates occur. The summary produced by RSS is called a feed. If you share an album with everyone, an RSS icon displays above the album’s images. If the person viewing the album clicks the RSS icon, the browser shows the album in an RSS reader. -
Page 149: Flickr
Flickr is a social media website that hosts images and videos and allows users to share them. Your Stora uploads the images from the album to Flickr, then Flickr adds them to the photostream or to a set. If you add more images to the album, Stora automatically uploads them. -
Page 150: Cooliris
NETGEAR Stora Cooliris Cooliris is a plug-in that allows you to view photos and media on the Cooliris 3D flying wall. To use Cooliris: Download and install the Cooliris plug-in for your browser. Plug-ins are available at the Cooliris website at www.cooliris.com. -
Page 151: Tivo Support
To view Stora files on a TiVo device: Ensure that the Stora files that you want to view on a TiVo device have sharing with digital media adapters (DMAs) enabled. For more information about how to share files with DMAs, see Share Files with DMAs page 115. -
Page 152: Appendix A Notification Of Compliance
FCC Declaration Of Conformity We, NETGEAR, Inc., 350 East Plumeria Drive, San Jose, CA 95134, declare under our sole responsibility that the NETGEAR Stora complies with Part 15 of FCC Rules. Operation is subject to the following two conditions: •... - Page 153 Canadian Department of Communications Radio Interference Regulations This digital apparatus, NETGEAR Stora, does not exceed the Class B limits for radio-noise emissions from digital apparatus as set out in the Radio Interference Regulations of the Canadian Department of Communications.
-
Page 154: Index
Index Contacts setting up about Stora working with about Stora, application Cooliris about, Agent about, Desktop Mirror access options data backup account settings date add new user date and time, set administration deleting folders Agent access desktop applications Albums Desktop Mirror... - Page 155 Media Library enable LAN access FTPS media players media sources menu bar, Stora Application Gateway mobile devices moving folders MyComputers help MyLibrary history...
- Page 156 NETGEAR Stora spin down standard features network services Stora network sharing about notifications access agent application, open configuring online help folders registration setup Stora agent package contents about exit play songs Stora Application play videos home screen port mapping, UPnP...
- Page 157 NETGEAR Stora version, find view details Windows Backup wipe button Workgroup...
Need help?
Do you have a question about the Stora and is the answer not in the manual?
Questions and answers