Table of Contents
Advertisement
Quick Links
Download this manual
See also:
Quick Reference Manual
Advertisement
Table of Contents

Subscribe to Our Youtube Channel
Related Manuals for imagistics DL260


Summary of Contents for imagistics DL260
- Page 1 DL260/360 Operating Manual For use with Imagistics and Pitney Bowes DL260/360 copier/printers.
-
Page 2: Using The Copier Properly
Using the Copier Properly To ensure the optimum performance of the copier, follow the precautions listed below. • Never place a heavy object on the copier. • Never subject the copier to shocks. • Never open any doors or turn the copier off while the copier is making copies. •... - Page 3 Using the Copier Properly • Never use a multiple outlet adapter, as a fire or electrical shock can result. • Should the power cord become damaged, immediately turn the copier off, unplug the power cord and call your technical representative. A damaged cord can result in a fire or cause an electric shock.
- Page 4 ® As an NERGY Partner, we have determined that this ® machine meets the NERGY Guidelines for energy efficiency. 1149O133AA What is an Energy Star Machine? Energy Star machines have a feature that allows them to automatically turn off or “go to sleep” after a period of inactivity, ensuring night and weekend shut off.
- Page 5 This operator’s manual explains how to operate the copier and replenish its supplies. It also gives some troubleshooting tips as well as general precautions to be observed when operating the copier. To ensure the best performance and effective use of your copier, read this manual carefully until you familiarize yourself thoroughly with the copier’s operation and features.
-
Page 6: Table Of Contents
1. Typical Copies You Can Make With Your Copier Typical Copies You Can Make With Your Copier .........2-2 2. System Overview System Overview ....................2-6 DL260 and Options ..................2-6 DL360 and Options ..................2-8 Copier Accessories ..................2-10 Outside the Copier ..................2-12 Inside the Copier ...................2-13 3. - Page 7 Contents 3. Selecting the Zoom Zoom Ratio ....................3-10 4. Selecting the Finishing Finishing Functions ..................3-16 Selecting the Finishing Function ..............3-18 Loading the Originals ................... 3-21 5. Selecting the Original Copy Type Original Copy Types ................. 3-22 Selecting the Original Copy Type ............. 3-26 6.
- Page 8 Contents Chapter 5 When a Message Appears 1. When the Message “The current Paper Drawer is empty.” Appears Adding paper ....................5-2 2. When the Message “Add Toner.” Appears Replacing the Toner Bottle ................5-10 3. When the Message “Please change Imaging Unit.” Appears Changing the Imaging Unit ................5-12 4.
- Page 9 Contents...
-
Page 10: Terms And Symbols For The Type Of Originals And Copy Paper
Terms and Symbols for the Type of Originals and Copy Paper A few special terms and symbols are used in this manual to designate types of originals and copy paper. This page explains about these terms and symbols. Feeding Direction (copy paper path) In this copier system, copy paper is taken up from the right-hand side of the copier, fed through the copier toward the left-hand side, and ejected face down onto the Copy Tray. -
Page 11: Safety Information
Safety Information Laser Safety This is a digital machine which operates by means of a laser. There is no possibility of danger from the laser, provided the machine is operated according to the instructions in this manual. Since radiation emitted by the laser is completely confined within protective housing, the laser beam cannot escape from the machine during any phase of user operation. -
Page 12: Laser Safety Label
A laser safety label is attached to the outside of the copy machine as shown below. Manufacturer’s Name Plate Laser safety label For United States Imagistics International Inc. 100 Oakview Drive Trumbull, Connecticut 06611 1166O262EA MANUFACTURED: THIS PRODUCT COMPLIES WITH 21 CFR CHAPTER I, SUBCHAPTER J. -
Page 14: Chapter 1 Safety Notes
Chapter 1 Safety Notes... -
Page 15: Installing The Copier
1. Installing the Copier Installation Site To ensure utmost safety and prevent possible malfunctions of the copier, install it in a location which meets the following requirements. A place away from a curtain or the like that may catch fire and burn easily. An area where there is no possibility of being splashed with water or other types of liquid. -
Page 16: Precautions For Use Operating Environment
2. Precautions for Use Operating Environment The operating environmental requirements of the copier are as follows. Temperature : 10°C to 32°C (50°F to 89.6°F) with a fluctuation of 10°C (18°F) per hour. Humidity : 15% to 85% with a fluctuation of 20% per hour. Using the Copier Properly To ensure the optimum performance of the copier, follow the precautions listed below. -
Page 17: Note On Making Multiple Copies
2. Precautions for Use Note on making multiple copies If you make smaller than Legal size copies during a multi-copy cycle, there is a possibility that the copying speed will be reduced due to a rise in fusing temperature. The copying speed will automatically return to normal when the optimum fusing temperature is re-established. -
Page 18: Chapter 2 Getting To Know Your Copier
Chapter 2 Getting to Know Your Copier... -
Page 19: Typical Copies You Can Make With Your Copier
1. Typical Copies You Can Make With Your Copier Typical Copies You Can Make With Your Copier Here’s a sample of the features the copier is equipped with to turn out different types of copies. For the specific operations, see the relevant pages indicated by Original Copy p. - Page 20 1. Typical Copies You Can Make With Your Copier Mixed Original Detection p. 2-24 Mixed Original Detection 1155O003AA Finishing p. 3-16 Sort Staple 1149O031AA 1149O029AA Group Hole Punch 1155O713EA 1149O030AA Zoom Ratio p. 3-10 Reduce, Full size, Enlarge, X/Y Zoom 1166O117AA...
- Page 21 1. Typical Copies You Can Make With Your Copier Auxiliary Functions Cover p. 3-34 Page Insertion p. 3-36 1149O013AA 1149O014A OHP Interleaving p. 3-40 File Margin p. 3-44 1149O015AC 1149O017AA Erase p. 3-46 Image Repeat p. 3-48 1166O259AA 1149O016AA...
- Page 22 1. Typical Copies You Can Make With Your Copier Distribution p. 3-50 Separate Scan p. 3-52 1166O114AA 1155O556AA Small Original Adjustment p. 3-51 155O555AA...
-
Page 23: System Overview
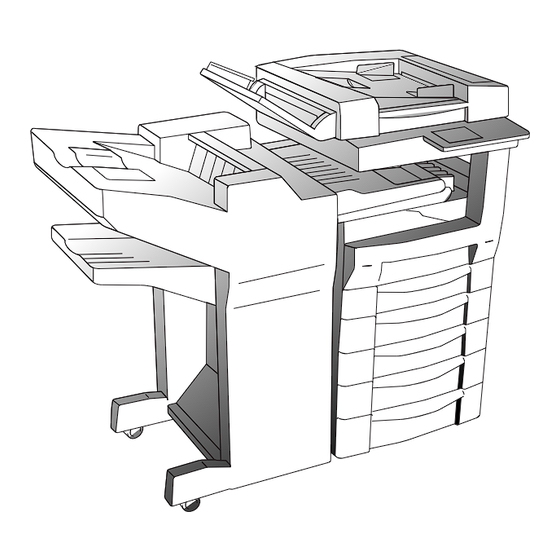
The following overview presents the copier and the available options with a brief explanation of the function of each. Refer to “Control Panel Keys and Indicators” ( p. 2-14) for using the Touch Panel and Control Panel. DL260 and Options 1166O016AA Original Cover <Option>... - Page 24 2. System Overview Duplexing Document Feeder 9608<Option> In addition to the automatic feeding of multiple originals, it can automatically turn over 2-sided originals for making 1166O014AA copies of both sides. Duplex Unit 9628 <Option> Automatically turns over 1-sided copies to make 2-sided copies.
-
Page 25: Dl360 And Options
2. System Overview DL360 and Options 1166O206AA Original Cover <Option> Holds the original in position on the Original Glass. 1166O007AA Automatic Document Feeder 9607 <Option> Performs automatic feeding of multiple originals. 1166O008AA Finisher 9612 <Option> Permits sorting, grouping, punching or sort-stapling copies. - Page 26 2. System Overview Duplexing Document Feeder 9608 <Option> In addition to the automatic feeding of multiple originals, it can automatically turn over 2-sided originals for 1166O014AA making copies of both sides. Paper Feed Unit 9632 <Option> Holds up to 500 sheets of paper. 1166O009AA Paper Feed Unit 9635 <Option>...
-
Page 27: Copier Accessories
2-10 2. System Overview Copier Accessories 1166O240AB 1166O011AA 1166O215AC 1166O012AA Automatic Document Feeder Print Lamp : Lights up green when scanning. Lights up red when there is trouble. Document Guide Plate : Slide the guide plate to the size of the originals. Document Feed Tray : Load the originals face up on this tray. - Page 28 2-11 2. System Overview Shift Tray Shift Tray : Receives sorted copy sets by shifting. Job Tray Job Tray : Receives copied paper. Duplex Unit Lock Release Lever : Use to open the Duplex Unit for clearing a misfed sheet of paper. Drawer Drawer : Load the paper into these drawers.
-
Page 29: Outside The Copier
2-12 2. System Overview Outside the Copier 1166O017AB Control Panel : Set the various functions of the copier. p. 2-14 Non-Sort Exit Tray : Unsorted copies are fed out here. Power Switch : Use to turn the copier ON and OFF. p. -
Page 30: Inside The Copier
2-13 2. System Overview Inside the Copier 1166O018AA Pinch Lever : Pull up for clearing misfed paper. p. 5-16 Green Hooks : Use to slide out the Imaging Unit. p. 5-16... -
Page 31: Control Panel Keys And Indicators
2-14 3. Control Panel Keys and Indicators Control Panel Keys and Indicators Access 1166O238EB Touch Panel Interrupt Key • Shows various screens and messages. • Press to interrupt a current job with a p. 2-15 different one. Press it again to return to the previous job. -
Page 32: What Is The Touch Panel
2-15 3. Control Panel Keys and Indicators What is the Touch Panel? The Touch Panel is the screen through which you can select or register the various settings of the machine by touching the keys on the screen. * Some of the Touch Panel screens used in the Operator’s Manual may be different from what you actually will see on your machine. - Page 33 2-16 3. Control Panel Keys and Indicators Message Display Shows the current copier status, operating instructions, precautions and other data including the number of copies selected. 1170P154EB ex.) Add paper Basic Function / Key Display Shows the basic function keys that can be selected to set the corresponding basic function.
-
Page 34: Icons
2-17 3. Control Panel Keys and Indicators Icons Icon Description Copying Now copying. Printing Now printing. Print Waiting Processing the next print job. Receiving Data Receiving the data. Data remains Data remains in memory. Paper empty Add paper. p. 5-2 Toner is running out. -
Page 35: Turning On And Off And Initial Mode
2-18 Turning ON and OFF and Initial Mode Turning ON and OFF • Turning the Copier ON Press the Power Switch to the (ON) position. • Turning the Copier OFF Press the Power Switch to the (OFF) position. NOTE The Auto Shut OFF function will automatically shut down the copier a given period of time after the last activity. -
Page 36: Placing Originals
2-19 5. Placing Originals Using the Document Feeder The Document Feeder automatically feeds original sheets placed on the Document Feed Tray one by one. After the copy cycle has been completed, it automatically ejects the original onto the Document Exit Tray. - Page 37 2-20 5. Placing Originals Loading the Originals Slide the Document Guide Plate to the size of NOTES the originals. • The maximum number of originals that can be <Duplexing Document Feeder> loaded Duplexing Document Feeder: Up to 50 Automatic Document Feeder: Up to 70 •...
- Page 38 2-21 5. Placing Originals Using the Single Automatic Document Feeding Mode (SADF Mode) This is the mode in which you insert your originals one by one into the Duplexing Document Feeder to make a copy. When you insert the original into the Single Document Feed Tray, the copier automatically starts the copy cycle.
-
Page 39: Placing Originals On The Glass
2-22 5. Placing Originals Placing Originals on the Glass Different methods are used to place the original depending on its type. Use the procedure appropriate for your original. If you are using a Document Feeder, see p. 2-19 Sheet Originals Highly Transparent Originals <Using originals not suitable for the document <Using transparencies and translucent paper for... - Page 40 2-23 5. Placing Originals Making Copies from A Book Using Book Copy Mode <“Book” refers to an open bound original> Place the open book so that its top edge is at Instructions for Original Placement the rear of the copier and the center of the •...
-
Page 41: Mixed Orig. Detection
2-24 5. Placing Originals Mixed Orig. Detection The Mixed Original Detection function enables making copies automatically from originals of assorted sizes loaded on the Document Feeder. Legal Legal Letter Letter 11"X17" 11"X17" Auto Paper Letter Letter Legal 11"X17" Legal 11"X17" Auto Size 1166O265AA NOTE... -
Page 42: Auxiliary Functions
2-25 6. Auxiliary Functions Auxiliary Functions Panel Resetting Mode Check The Panel Reset key resets all control panel By pressing the Mode Check key on the control settings to default settings including the number of panel, you can either check for or change or store copies and zoom ratio. - Page 43 2-26 6. Auxiliary Functions Auto Panel Reset Auto Shut OFF If no key on the control panel is pressed within 60 The Auto Shut OFF function shuts down the sec. after a copy cycle has been completed or copier a given period of time after the copier has copying settings made, the Auto Panel Reset been used last.
- Page 44 2-27 6. Auxiliary Functions <Entering the Access Number> Access Number From the 10-key Pad, enter the access If an access number has been programmed, it number and press the Access Mode key. allows only particular persons to use the copier or a supervisor to keep track of the number of copies made by a particular department.
- Page 45 2-28 6. Auxiliary Functions To Stop Printing Press the Stop Key while data is being processed or printed out. The screen below appears and you can choose whether to delete the data or not. 1168P204CB...
-
Page 46: Chapter 3 Making Copies
Chapter 3 Making Copies... -
Page 47: Basic Copying Overview
1. Basic Copying Overview Basic Copying Overview One of the most basic copying jobs is to make full-size ( 1.000) copies of the original. • Place the original in position (step 1), set the number of copies to be made (step 8), and press the Start key (step 9). - Page 48 8. Setting the number of copies. • From the 10-Key Pad, set the desired number of copies to be made. The maximum number that can be set: 99 for DL260 999 for DL360 Useful Tip The maximum number of copies is not limited in the initial setting.
-
Page 49: Selecting The Paper
2. Selecting the Paper In the following pages, we explain how to select the copy paper. Basics Paper Touch to show a screen which allows you to select the copy paper. 1170P005EB Copy Paper Size Auto Paper In the Auto Paper mode, the copier automatically NOTES selects the paper of the optimum size according to •... - Page 50 2. Selecting the Paper Manual Selection Auto Drawer Switching The copy paper size can be set manually according If the drawer currently selected for use runs out of to your need. paper and there is another drawer loaded with paper of the same size and in the same direction, Touch Paper on the Basics screen and the...
- Page 51 2. Selecting the Paper Special Paper Setting If the symbol appears on the paper select key on the Touch Panel, it means that particular drawer has been designated for special paper. 1170P008EB The copier provides three different types of special paper setting, each having a specific purpose as detailed below.
-
Page 52: Manual Bypass Copying
2. Selecting the Paper Manual Bypass Copying • Use the Manual Bypass to make copies on paper not loaded in any drawer, or to copy onto OHP transparencies, thick paper, or any other special paper. • When using the Manual Bypass Tray, you can load only one sheet of copy paper at a time. Copy Paper that Can be Used for Manual Bypass Tray Types of Paper •... - Page 53 2. Selecting the Paper <Using Metric Size Paper> Select the desired copy paper size. When you want to use metric size paper, touch Metric on the screen given in step 4 and you have a screen that allows you to select a metric paper size.
- Page 54 2. Selecting the Paper <Using Nonstandard Size Paper> <Changing the Paper Size> Paper Bypass • When you use a nonstandard size paper, touch • Touch Custom Size on the screen given in step 4 and you have the following screen. 1170P011EB •...
-
Page 55: Selecting The Zoom Zoom Ratio
3-10 3. Selecting the Zoom Zoom Ratio Zoom In the following pages, we explain how to select the zoom ratio. When you touch on the Basics screen on the Touch Panel, a screen appears that allows you to set the zoom ratio. Set the zoom ratio according to your need. - Page 56 3-11 3. Selecting the Zoom For a Slightly Smaller Image Using Zoom Up/Down Keys This function lets you make a copy slightly Pressing the key changes the reduced in image size from that of the original. zoom ratio in 0.001 increments. You can hold down the key to change the ratio quickly.
- Page 57 3-12 3. Selecting the Zoom Using the 10-Key Pad You may use the 10-Key Pad to directly enter the zoom ratio. <Same ratio for X and Y> <Using the X / Y Zoom> Touch Custom Zoom Touch Custom Zoom 1170P020EB 1170P020EB X / Y Zoom Enter the desired zoom ratio from the 10-Key...
- Page 58 3-13 3. Selecting the Zoom Calling up a Ratio from Memory You can store some of the most frequently used zoom ratios in memory and recall them later as necessary. Custom Zoom Touch 1170P020EB From among the two ratios previously stored in memory, select the desired one.
- Page 59 3-14 3. Selecting the Zoom Storing a Ratio in Memory Custom Zoom Touch Useful Tips Example: 1.300 Press 1, 3, 0, and 0, in that order. 1149O160BA • To correct a ratio, press the key and then enter the correct one again. •...
- Page 60 3-15 3. Selecting the Zoom...
-
Page 61: Selecting The Finishing
3-16 4. Selecting the Finishing In the following, we explain about different finishing functions and setting procedures. Finishing When is touched on the Touch Panel, a screen appears that allows you to set a particular finishing function. Finishing Functions Non-Sort •... - Page 62 3-17 4. Selecting the Finishing Staple <Only when the Finisher or Mailbin Finisher is mounted> • This function is effective when making multiple copies from multiple originals. Copies are sorted or grouped into complete sets of the originals and then stapled. Touch Staple NOTE...
-
Page 63: Selecting The Finishing Function
3-18 4. Selecting the Finishing Selecting the Finishing Function Sort/Group Touch the desired finishing function key. Useful Tips • Shift Sorting The sorted copy sets are stacked in the same direction, but in a sawtooth manner by shifting the tray to the front or rear for each set. - Page 64 3-19 4. Selecting the Finishing Staple Touch the desired finishing function key. 1170P026EB Staple Touch 1170P027EB NOTES • Stapling is not possible in the Interrupt mode. • No Stapling takes place in Non-Sort mode. • Note the correct direction of the originals when making copies in the Staple Mode.
- Page 65 3-20 4. Selecting the Finishing Hole Punch Touch the desired finishing function key. Touch the desired hole-punching position. 1170P026EB 1170P030EB Hole Punch Touch Useful Tip If you do not select a hole-punching position, the copier automatically sets the Hole-Punch position according to the original feeding direction.
-
Page 66: Loading The Originals
3-21 4. Selecting the Finishing Loading the Originals Staple Note the correct direction of the originals if the copies are to be stapled in Staple Mode. Duplexing Document Feeder Automatic Document Feeder Original Glass Staple Position Staple Position Staple Position 1166O040AA 1166O041AB 1166O037AB... -
Page 67: Original Copy Types
3-22 5. Selecting the Original Copy Type In the following pages, we shall look at how to make the settings for the type of copy you want to make Orig. Copy from the type of original you have. When you touch on the Touch Panel, a screen appears that allows you to set the orig. - Page 68 3-23 5. Selecting the Original Copy Type <With Document Feeder> <Only for DL360 with Document Feeder> Select 1 1 [4in1] <accessed via Booklet> Select 2 1 [4in1] <accessed via Booklet> to copy 4 different 1-sided originals onto one side to copy 2 different 2-sided originals (4 pages) onto of a single sheet of paper.
- Page 69 3-24 5. Selecting the Original Copy Type Select Book/Separation 1 <accessed via Book> <With Duplex Unit> to make 1-sided page-by-page copies of an open Select Book/Separation 2 <accessed via Book> book. to make a 2-sided copy of an open book. Each page of the open book will be copied onto one side of the copy.
- Page 70 3-25 5. Selecting the Original Copy Type Precaution for 2-sided Original • When making copies from 2-sided originals with the Automatic Document Feeder, scan the first side of the original stack, then turn the stack over (from left to right) and load the stack into the tray to copy the other side.
-
Page 71: Selecting The Original Copy Type
3-26 5. Selecting the Original Copy Type Selecting the Original Copy Type Using 1 or 2 Originals Original Direction Load the Originals. Touch Select the Original Type. 1168P033CC Select the position of the original. 1168P031CC Select the desired copy type. 1168P034CC Enter Touch... - Page 72 3-27 5. Selecting the Original Copy Type Margin key for the original: Hold down the key until the When you’re going to make copies using 1 2 or desired margin width is reached. 1, first check to see if your original has a file margin in it.
- Page 73 3-28 5. Selecting the Original Copy Type Book Touch Standard Book Right Bound Position the book on the glass. Select the Original Type. <With Duplexing Document Feeder> • Touch Book/Separation 1170P039EB Separation Spreadsheet Touch 1168P037CC Book • Touch 1170P040EB If you want to erase the four edges or center, touch Book Erase 1170P038EB...
- Page 74 3-29 5. Selecting the Original Copy Type Frame Center Select the particular erase function Touch , then hold (“Book Erase”). down the key until the desired erase width is reached. Then, Enter touch 1170P042EB 1170P043EB Useful Tips You have a choice of the following three erase Useful Tip functions.
- Page 75 3-30 5. Selecting the Original Copy Type <To copy using Separation and 2-sided> Page Order • Touch 1170P048EB You have a choice of the following two page arrangements. Book Order 1155O637AA Standard 1155O638AA • Select the desired page arrangement. 1170P049EB Enter •...
- Page 76 3-31 5. Selecting the Original Copy Type 2-in-1 Original Separation <To separate a 1-sided 2-in-1 original> Load the Originals. Select the 1-sided copy type. 1166O225AB NOTE Make sure to set the originals lengthwise. 1170P092EB NOTES Touch Book/Separation • 2-sided copy, 2-in-1, 4-in-1 and Booklet Creation are not available for copying.
-
Page 77: Selecting The Density
3-32 6. Selecting the Density Image Density In the following pages, we explain how to set the exposure level for the image density. When you touch Density on the Touch Panel, a screen appears that allows you to set the exposure level for the image density. - Page 78 3-33 6. Selecting the Density NOTE If Auto Exposure is set when making copies in Photo Mode, the copier automatically switches the mode to Text Mode. Useful Tips • The exposure level in the Auto Exposure mode can be made either “Darker” or “Lighter” by using User’s Choice.
-
Page 79: Auxiliary Functions
3-34 7. Auxiliary Functions These pages explain about convenient functions offered as the Auxiliary functions and how to set these Auxiliary features. When the key on the Touch Panel is touched, the Auxiliary function menu screen appears. 1168P004CC 1168P001CD Cover <Only when a Document Feeder is mounted>... - Page 80 3-35 7. Auxiliary Functions Using the Cover Mode Load your originals into the document Touch the key for Cover Paper. feeder. Cover Touch 1170P058EB Select the drawer in which paper for the cover has been loaded. 1168P055CC Select the key for the front cover. 1170P059EB NOTE 1170P056EB...
-
Page 81: Page Insertion
3-36 7. Auxiliary Functions Page Insertion <Only for DL360 with a Duplexing Document Feeder> Page Insertion allows you to insert a special sheet of paper (e.g., color paper) into the copy set. Two different functions are available. Select the appropriate one according to your need. Functions Page Insertion <Copied Inserts>... - Page 82 3-37 7. Auxiliary Functions Specifying the Place for an Insert In the Page Insertion mode, you must specify where to place an insert by using Automatic Detection. Automatic Detection Put a sheet of paper of a different size from the originals at your desired places in the original set (for convenience, let us call this paper the insert marker), load the original set onto the duplexing document feeder and let the copier start the original count sequence.
- Page 83 3-38 7. Auxiliary Functions Using Page Insertion Put an insert marker into the desired place in Load the original set containing insert the original set. markers into the duplexing document feeder. Insert Marker Original Set Insert Marker 1166O072AB 1134O070AA Touch Page Insertion Example 1: To place a copied insert at the 2nd position from top.
- Page 84 3-39 7. Auxiliary Functions Touch the paper size key for Insert Paper. Press the Start Key to start the simultaneous Auto Detection sequence and scanning of the original set. *The document feeder starts feeding the originals loaded in it to detect the insert markers and to make copies.
-
Page 85: Ohp Interleaving
3-40 7. Auxiliary Functions OHP Interleaving When you make copies on transparencies, the OHP Interleaving function inserts copied or non-copied interleaves after each transparency. Two different functions are available. Select the appropriate one according to your need. Functions <Copied Interleaves> The copier copies onto OHP transparencies and, after each transparency, inserts a copied sheet of paper. - Page 86 3-41 7. Auxiliary Functions Using OHP Interleaving Load the originals. Touch the key for the Insert Paper. 1166O027AA 1166O023AB 1170P068EB NOTE Select the Insert Paper. If you make each copy through the Original Glass, start with the first page of the set. Touch OHP Interleaving 1170P064EB...
- Page 87 3-42 7. Auxiliary Functions Enter Select the paper source for OHP Touch transparencies. 1170P073EB 1170P071EB Useful Tip <When using the Manual Bypass Tray> Cancel Touch to cancel the settings made • Load an OHP transparency onto the and return to the initial Auxiliary screen. Manual Bypass Tray.
- Page 88 3-43 7. Auxiliary Functions...
-
Page 89: File Margin
3-44 7. Auxiliary Functions File Margin The copier provides a file margin along the leading edge for your ease in filing. There are two different ways available for making a file margin. Use the one that is most suited to your need. Functions The image of the original is shifted to the right to Copy... - Page 90 3-45 7. Auxiliary Functions Hold down the key until the desired margin width is reached. 1170P077EB Useful Tips • You can change the margin width in 1/16” increments within the range 0 ~ 3/4”. Cancel • Touch to cancel the settings made and return to the initial Auxiliary screen.
-
Page 91: Edge/Frame Erase
3-46 7. Auxiliary Functions Edge/Frame Erase The copier erases a margin of a set width along the four edges, or one edge, to erase shadows or other unwanted images. This feature is effective in erasing the communications record on a document received by fax. - Page 92 3-47 7. Auxiliary Functions Using a Particular Edge/Frame Erase Function Place the original. Useful Tips • You can change the erase width in 1/16” Edge/Frame Erase Touch increments within the range 1/4” to 3/4”. Cancel • Touch to cancel the settings made and return to the initial Auxiliary screen.
-
Page 93: Image Repeat
3-48 7. Auxiliary Functions Image Repeat The image of the original is repeatedly produced on the copy paper. The copier automatically calculates the number of images that can be printed based on the copy paper size and zoom ratio. 1155O050AA Selecting Image Repeat Load the original. - Page 94 3-49 7. Auxiliary Functions <Original Size is standard> Size Input • Touch in step 4. Select the size of Enter the original and touch 1170P083EB <Original Size is nonstandard> Size Input • Touch , then touch Custom Size in step 4. 1170P084EB •...
-
Page 95: Distribution
3-50 7. Auxiliary Functions Distribution A reference (distribution) number is assigned to each copy set and printed in the background of the copy. 1166O114AA Using Distribution Load the originals. Select the page on which to print the distribution number, First page only All pages either Distribution... -
Page 96: Small Original Adjustment
3-51 7. Auxiliary Functions Small Original Adjustment When your original is smaller than the copy paper or when you are making a reduction copy, Small Original Adjustment prevents the areas outside the original from being dirtied on the copy. You will not have a copy with black areas surrounding the image which is made with the Document Feeder raised. -
Page 97: Separate Scan
3-52 7. Auxiliary Functions Separate Scan Separate Scan enables the copier to scan a large set of originals in several parts. The Document Feeder can be loaded with up to 50 or 70 pages of a document. If you, however, divide a large document consisting of more than 70 pages so that each part contains 70 or fewer pages, it can still be scanned by the copier. -
Page 98: Using Memory Recall Memory Recall
3-53 8. Using Memory Recall Memory Recall After a print cycle has been completed, Memory Recall allows you to run another print cycle again using the same image data and copy settings as the previous one without having to reload the originals. Memory Recall After the first print cycle, touch on the Touch Panel to show a screen that allows you... -
Page 99: Selecting Job List
3-54 9. Selecting Job List Job List Job List When an optional Printer Controller is mounted, the key will appear on the Touch Panel. In the following, we explain about the useful functions and procedures in Job List. 1168P229CD Selecting Job List Checking / Delete a Job You can check for operational data and present Useful Tip... - Page 100 3-55 9. Selecting Job List Canceling the Lock Canceling the lock will release the data transmitted from a personal computer and put it in the print queue. Enter the password to cancel the lock. Job List Touch 1168P229CD Unlock Touch 1168P232CB Enter the 4-digit password using the 10-key pad.
- Page 101 3-56 9. Selecting Job List...
-
Page 102: Chapter 4 Using The Utility Mode
Chapter 4 Using the Utility Mode... -
Page 103: Settings In The Utility Mode
1. Settings in the Utility Mode Input and Setting Screens This chapter explains about the functions and setting screens that are available by using the Utility Key. User’s Choice Job Recall The copier can be set so that the most frequently Up to 10 different, frequently used copy job used settings are automatically selected in the programs can be stored in memory and recalled... - Page 104 1. Settings in the Utility Mode Admin. Management Allows the administrator of the copier to make settings for operating and maintaining the copier. “Settings in Admin. Management” p. 4-18 1168P105CB On Line <With an optional Printer Controller> Touch to highlight this key and enable the copier to receive data as a printer.
-
Page 105: Making The User's Choice Settings
2. Making the User’s Choice Settings The copier has been set so that most frequently used settings are automatically selected in the initial mode. User’s Choice allows you to select the default settings which are automatically selected in the initial mode according to your own needs. By setting defaults that are most frequently used, time and effort to make extra settings will be eliminated when the copier is turned ON or when Auto Panel Reset is activated. - Page 106 2. Making the User’s Choice Settings Memory Recall Original Copy Default Select whether to enable (“ON”) the function that Specify the original copy type automatically allows you to use the same image data of the copy selected when power is turned ON or panel reset. cycle that has just been completed or not (“OFF).
- Page 107 The initial setting is Set the time it takes the copier to enter the Energy Save mode in 1 min. increments. DL260: From 1 min. to 240 min. DL360: From 15 min. to 240 min. Density Priority The initial setting is “15 min.”...
- Page 108 2. Making the User’s Choice Settings Print Exposure Intelligent Sorting Select the print exposure level from the range -2 to Select whether to turn “ON” or “OFF” the function that automatically switches between Sort and Non-Sort, selecting Non-Sort if only a single The initial setting is “0”.
- Page 109 2. Making the User’s Choice Settings Making the User’s Choice Settings Press the Utility key. Touch the key of the desired User’s Choice function. For example, touch Output Priority 1166O243EA Touch User’s Choice 1168P135CC Touch Sort 1168P132CC Touch the key of the desired page of the menu, from For example, if you want to change the Output Priority from Non-Sort to Sort, touch...
-
Page 110: Meter Count
3. Meter Count Using Meter Count Meter Count allows you to check the total count of each of the following five counters. Total Counter 2-Sided Total Shows the total number of copies made since the Shows the number of 2-sided copies made. installation of the copier. -
Page 111: Job Memory Input And Job Recall
4-10 4. Job Memory Input and Job Recall Job Memory Input Up to 10 different, frequently used copy job programs can be stored in memory and recalled later as necessary. Storing a Job Set up the job you want to store in memory. Select any one of the 10 job number keys from marked with... - Page 112 4-11 4. Job Memory Input and Job Recall The job settings appear on the Touch Panel. 1168P116CB Useful Tip Backup To change the screen, touch Next After you have checked the settings, touch Enter Touch Exit 1168P117CB...
- Page 113 4-12 4. Job Memory Input and Job Recall Deleting a Job Program Press the Mode Check key. Touch the job number key from which you want to delete a job program. 1166O242EA Job Mem Input Touch 1168P119CB Useful Tip When appears in that key, it indicates that the job program has been deleted.
-
Page 114: Recalling A Job From Memory
4-13 4. Job Memory Input and Job Recall Recalling a Job from Memory Press the Utility key. Check the settings made and then touch Enter . The copier is set up for these setting and the Basics screen reappears. 1166O243EA Touch Copy Job Recall 1168P123CB... -
Page 115: Settings In User Management
4-14 5. Settings in User Management Setting the Confirmation Beep and Alarm Beep Confirmation Beep Alarm Beep The volume of the confirmation beep that can be The volume of the alarm beep that sounds when, heard when a control panel key is pressed may be for example, a paper misfeed occurs may be adjusted in the range between 0 (zero) and 5 adjusted in the range between 0 (zero) and 5... -
Page 116: Using The Scanner Dry Function
4-15 5. Settings in User Management Using the Scanner Dry Function During times of high humidity or when there are sudden rapid changes in humidity (especially when you are using a heater in winter), condensation can form on the surface of the PC Drum and Scanner resulting in blotchy copies. -
Page 117: Using The Toner Replenisher Function
4-16 5. Settings in User Management Using the Toner Replenisher Function The copier tends to exhaust the supply of toner rapidly when making a number of copies from an original with dark solid areas such as a photo. As a result, the image density of the copy will become lighter. In such a case, you can use Toner Replenisher to regain the normal image density quickly. -
Page 118: Panel Cleaning
4-17 5. Settings in User Management Panel Cleaning Test Print To clean the surface of the touch panel, use this function. p. 7-8 1168P188CB 1168P130CA Important Do not touch this key. This is for the Tech. Rep. to adjust this machine. See p. 4-3 for the printer test print. -
Page 119: Settings In Admin. Management
4-18 6. Settings in Admin. Management Admin. Management Mode The Admin. Management mode is for the administrator of your copier. When Admin. Management is selected, the message prompts you to enter the administrator number. NOTES • The administrator number is to be programmed by your Tech. Rep. Ask him/her for more details. •... -
Page 120: Functions Of Admin. Management
4-19 6. Settings in Admin. Management Functions of Adm in. M anagem ent Administrator Set You can set the Max. Copy Sets and Disable Auto Shut Off functions. Copy Track You can set the Account No., Total Count, Size Count, Copy Limit and Access Code functions. User Help This function cannot be used by this copier. -
Page 121: Administrator Set
4-20 6. Settings in Admin. Management Administrator Set Max. Copy Sets Limit the number of copies or copy sets that can be made per job from 1 to 99. The initial setting is “OFF.” Enter the Copy Limit Value from the 10-key Administrator Set To show the key on... - Page 122 4-21 6. Settings in Admin. Management Disable Auto Shut Off This function can disable the Auto Shut Off function. Select whether to enable (“Yes”) or disable (“No”) the Disable Auto Shut Off function. The initial setting is “No” (disable). Enter Touch Administrator Set To show the...
-
Page 123: Copy Track
4-22 6. Settings in Admin. Management Copy Track This function allows the administrator to keep track of the number of copies made in the Copier mode and the number of prints made in the Printer mode for each account. Select whether to turn “ON” or “OFF” the Copy Track function for “Copier” or “Printer” and select the Copy Track method, either “100 Accounts”... - Page 124 4-23 6. Settings in Admin. Management Setting Copy Track Initialize the Copy Track function data by To show the Copy Track key on the Enter touching Touch Panel, follow the steps given in “Setting Admin. Management.” p. 4-18 Copy Track Touch 1168P146CB NOTES...
- Page 125 4-24 6. Settings in Admin. Management Setting the Account Number You can change or program the Account Number only when “100 Accounts” is set. Copy Track To show the key on the Touch the key of the target account. Touch Panel, follow the steps given in “Setting Admin.
- Page 126 4-25 6. Settings in Admin. Management Programming the Access Code An access code can be programmed when “100 Accounts” is selected. Copy Track To show the key on the Touch the Access Code key of the target Touch Panel, follow the steps given in account.
- Page 127 4-26 6. Settings in Admin. Management Setting a Copy Limit for Each Account A limit for the number of copies made can be set for each account when “100 Accounts” is selected. Copy Track To show the key on the Touch the Copy Limit key of the target Touch Panel, follow the steps given in account.
- Page 128 4-27 6. Settings in Admin. Management Clearing Counters for Each Account A counter can be cleared for each account when “100 Accounts” or “1000 Accounts” is selected. It is also possible to clear all counters of all accounts at once. Copy Track To show the key on the...
- Page 129 4-28 6. Settings in Admin. Management...
-
Page 130: When A Message Appears
Chapter 5 When a Message Appears... -
Page 131: When The Message "The Current Paper Drawer Is Empty." Appears
1. W hen the M essage “The current Paper Drawer is empty.” Appears When the drawer currently selected for use runs out of paper, the message shown on the left appears. The current copy cycle is interrupted and you cannot start a new copy cycle. The blinking drawer has run out of paper. - Page 132 1. When the Message “The current Paper Drawer is empty.” Appears OHP/Card Slide the Drawer back in. Touch 1166O081AA 1170P157EC Change Touch on the 1st Drawer Paper Select screen. Useful Tip Card Select when labels have been loaded. Select the type of paper and touch Enter 1170P155EC Touch the key of the desired paper size.
- Page 133 1. When the Message “The current Paper Drawer is empty.” Appears <Using Metric Size Paper> <Using Nonstandard Size Paper> When you want to use metric size paper, touch • When you use a nonstandard size paper, touch Metric on the screen given in step 7 and you Custom Size on the screen given in step 7 have a screen that allows you to select a metric...
- Page 134 1. When the Message “The current Paper Drawer is empty.” Appears 2nd Drawer Paper Feed Unit PF-108 Slide out the drawer. Slide out the drawer. 1171U016AA 1171U016AA Load the paper stack into the Drawer so that Load the paper stack into the Drawer so that its front side faces up.
- Page 135 1. When the Message “The current Paper Drawer is empty.” Appears Paper Feed Unit PF-110 Slide out the drawer. Pinch the tabs on the Edge Guide and Trailing Edge Stop and slide them to the exact size of the paper loaded. 1166O082AA Press the Paper Lifting Plate down until it 1166O085AB...
- Page 136 1. When the Message “The current Paper Drawer is empty.” Appears <When turning the Paper Setting Dial to “User Set”> Turning the Paper Setting Dial to “User Set” accesses a screen from which you can choose an alternative paper size. 1170P184EA Touch the desired paper size and then touch Enter...
- Page 137 1. When the Message “The current Paper Drawer is empty.” Appears Large Capacity Cabinet Slide out the drawer. Load another paper stack into the left half of the drawer, front side face up. Press the leading edge of the paper stack tightly up against the left side of the Drawer.
- Page 138 1. When the Message “The current Paper Drawer is empty.” Appears...
-
Page 139: When The Message "Add Toner." Appears
It is recommended therefore that you replace the Toner as soon as possible. Call the Imagistics Copier/Printer Supply Line at 1-800-462-6797 to order. When toner has run out, the message shown below appears and you can no longer start a new copy cycle. - Page 140 5-11 2. When the Message “Add Toner.” Appears With the Seal on the Toner Bottle facing up, NOTES slowly peel off the Seal as illustrated. • Use ONLY the specified toner for this copier. Using any other toner could result in trouble. •...
-
Page 141: When The Message "Please Change Imaging Unit." Appears
5-12 3. When the Message “Please change Imaging Unit.” Appears The Imaging Unit life will expire within approx. 5000 images after the message on the left appears. After approx. 5000 images the machine will cease operation until a new Imaging Unit is installed. Please call your technical representative for a replacement Imaging Unit. - Page 142 5-13 3. When the Message “Please change Imaging Unit.” Appears Align the green labels on the new Imaging Unit with those on the rails in the copier, then slide the Imaging Unit into the copier. 1166O254AA Holding onto the green hooks of the Imaging Unit, push the Imaging Unit all the way into the copier until a click is heard.
-
Page 143: When The Message "Stapler Empty." Appears
5-14 4. When the Message “Stapler Empty.” Appears The message shown on the left appears when the staples are running out. Reload the Staple Cartridge with a new clip by following the procedure given below. 1170P165EC Reloading the Staple Cartridge Slide the Finisher/Mailbin Finisher away While pressing down the green lever, pull out from the copier. - Page 144 5-15 4. When the Message “Stapler Empty.” Appears Insert the new Staple Cartridge into the Slide the Finisher/Mailbin Finisher back Stapler Unit until it clicks into place. against the copier. 1166O176AA 1166O130AB Align the arrows and firmly push the Stapler Unit down into the well.
-
Page 145: When The Message "A Paper Misfeed Has Been Detected." Appears
5-16 5. W hen the M essage “A paper misfeed has been detected.” Appears If a paper misfeed occurs during a copy cycle, the message shown on the left appears and that particular copy cycle is stopped in the middle of operation. -
Page 146: Misfeed Clearing Procedures
5-17 5. When the Message “A paper misfeed has been detected.” Appears Misfeed Clearing Procedures Manual Bypass Tray Duplex Unit Unlock and open the Right Door. Open the Duplex Unit. 1166O180AA 1166O158AA Slowly and gently pull out the sheet of paper. CAUTION NEVER touch the electrical contacts inside the right door and underneath the Imaging... - Page 147 5-18 5. When the Message “A paper misfeed has been detected.” Appears Copier Open the right Side Panel and flip down the Reload the paper stack in the drawer and transparent paper guide. slide the drawer back into the copier. 1166O138AA 1171U020AA Slowly and gently pull out the sheet of paper.
- Page 148 5-19 5. When the Message “A paper misfeed has been detected.” Appears Slowly and gently pull out the sheet of paper. Close the Right Door. 1166O231AA NOTE Do not take out the Imaging Unit at this time. CAUTION The area around the Fusing Unit is very hot.
- Page 149 5-20 5. When the Message “A paper misfeed has been detected.” Appears Duplexing Document Feeder Open Misfeed Clearing Guide Remove the paper on the Original Glass and lower the Duplexing Document Feeder. 1166O256AA Unload the originals from the Duplexing 1166O147AA Document Feeder and gently pull out the Close Misfeed Clearing Guides original.
- Page 150 5-21 5. When the Message “A paper misfeed has been detected.” Appears Automatic Document Feeder Open the Misfeed Clearing Guide. Pulling up the Document Feed Tray, gently pull out the original. 1166O151AA 1166O162AA Unload the originals from the Automatic Document Feeder. Bring the tray and Misfeed Clearing Guide back down.
- Page 151 5-22 5. When the Message “A paper misfeed has been detected.” Appears Finisher and Mailbin Finisher Slide the Finisher/Mailbin Finisher away Open Misfeed Clearing Guide from the copier. 1166O168AA 1166O165AA CAUTION Open the Transport Unit Cover. Metallic parts inside the Misfeed Clearing Guide are very hot.
- Page 152 5-23 5. When the Message “A paper misfeed has been detected.” Appears Close Misfeed Clearing Guide Remove the sheet of paper. 1166O184AA 1166O172AA Raise Misfeed Clearing Guide Open Misfeed Clearing Guide remove the sheet of paper. 1166O173AA 1166O185AA Remove the sheet of paper and close Misfeed Close Misfeed Clearing Guide Clearing Guide Slide the Finisher/Mailbin Finisher back...
- Page 153 5-24 5. When the Message “A paper misfeed has been detected.” Appears Job Tray Unlock and open the Right Door. Gently pull out the sheet of paper. 1166O156AA 1166O158AA Close the Job Tray Door. CAUTION NEVER touch the electrical contacts inside the right door and underneath the Imaging Unit, as an electrostatic discharge may damage the copier.
- Page 154 5-25 5. When the Message “A paper misfeed has been detected.” Appears Shift Tray Unlock and open the Right Door. Gently pull out the sheet of paper. 1166O156AA 1166O158AA Close the Shift Tray Cover. CAUTION NEVER touch the electrical contacts inside the right door and underneath the Imaging Unit, as an electrostatic discharge may damage the copier.
-
Page 155: When A Staple Misfeed Occurs
5-26 6. When a Staple Misfeed Occurs Clearing the Staple Misfeed Slide the Finisher/Mailbin Finisher away Push up the guide of the Staple Cartridge and from the copier. pull out one staple sheet. 1166O165AA 1166O177AA Return the guide back to its original position. Press and turn the knob to open the cover at the rear of the Finisher. - Page 156 5-27 6. When a Staple Misfeed Occurs Press and turn the knob to lock the cover. NOTE After a staple misfeed has been cleared, the Staple Unit runs idly a maximum of about 10 stapling sequences without actually driving staples into paper. What the Staple Unit is doing is feeding a staple sheet to the required position.
-
Page 157: When A Size Error Message Appears
5-28 7. When a Size Error Message Appears Clearing a Size Error After clearing a paper misfeed, the size error message shown below may appear. If the paper size setting for a drawer does not agree with the actual paper size loaded in the drawer, a paper misfeed can occur. 1168P186CA 1168P187CA NOTE... - Page 158 5-29 7. When a Size Error Message Appears <Paper Feed Unit PF-110> Slide out the drawer. 1166O273AA Turn the Paper Setting Dial to the position corresponding to the current paper size loaded in the drawer. 1166O209EB Slide the Drawer back in. 1166O086AA...
-
Page 159: What Does Each Message Mean
5-30 8. What Does Each Message Mean? What does each message mean? Message Cause Action A malfunction was detected. The copier malfunctioned and Call and inform your Technical The SMART controller has is unable to make copies. Representative of the code called your Technical being shown on the Touch Representative. -
Page 160: Troubleshooting
Chapter 6 Troubleshooting... -
Page 161: When This Type Of Copy Is Produced
1. When This Type of Copy is Produced When this type of copy is produced Symptom Possible Cause Action The image is too light. The exposure level for the Auto Change the setting of “Auto Exposure mode is set at Exposure Level”... - Page 162 1. When This Type of Copy is Produced Symptom Possible Cause Action The copy has lines. The Original Glass is dirty. Wipe the Original Glass clean with a soft dry cloth. p. 7-8 The Original Pad is dirty. Wipe the Original Pad clean with a soft cloth dampened with alcohol.
-
Page 163: The Copier Is Not Functioning As Designed
2. The Copier is not Functioning as Designed The copier is not functioning as designed Symptom Check for Action The Touch Panel shows nothing. Is only the Start key lit up green? The copier is in the Energy Saver mode or the LCD Back-light is off. -
Page 164: Miscellaneous
Chapter 7 Miscellaneous... -
Page 165: Specifications
1. Specifications Specifications Copier DL260 DL360 Type Console/Desk Top Copier Platen Type Stationary Photo conductor Copying System Electrostatic Dry Powdered Image Transfer to Plain Paper Developing System Micro-Toning High-Grade System Fusing System Lamp-Heated Roller Resolution 600dpi Types of Original Sheets, Books and other three-dimensional objects Maximum Original Size : 11”... -
Page 166: Automatic Document Feeder
1. Specifications Duplexing Document Feeder 9608 Document Feeding System Standard Mode : 1-sided original, 2-sided original Mixed Original Detection Mode : 1-sided Mixed Original Detection 2-sided Mixed Original Detection Single Feeding Mode : 1-sided original Kinds of Original Plain paper 1-sided original Mode : 13-1/4 to 29-1/4 lbs. -
Page 167: Paper Feed Unit
1. Specifications Paper Feed Unit 9632 9635 Kinds of Paper Plain paper (16 to 24 lbs.), Recycled paper Paper Size 11” 17”L to Letter 11” 17” L to 5-1/2” 8-1/2”C Capacity 500 sheets (21-1/4 lbs.) 250 sheets (21-1/4 lbs.) Power Source Supplied from copier Power Consumption 10W or less... - Page 168 1. Specifications Finisher 9612 Types of Trays Top Offset Tray, Elevator Tray Modes Non-Sort Mode, Sort Mode, Group Mode, Staple Mode, Hole Punch Mode Kinds of Paper <Top Offset Tray> Non-Sort Mode • Plain paper (16 to 24 lbs.), Recycled paper •...
- Page 169 1. Specifications Mailbin Finisher 9730 Types of Trays Top Offset Tray, Elevator Tray, Mailbins (5 bins) Modes Non-Sort Mode, Sort Mode, Group Mode, Staple Mode and Hole Punch Mode Kinds of Paper <Top Offset Tray> Non-Sort Mode • Plain paper (16 to 24 lbs.), Recycled paper •...
-
Page 170: Shift Tray
1. Specifications Job Tray 9614 Type Stationary Number of Trays 2 Trays : Job Tray is the 1st tray. Copier exit tray becomes the 2nd tray. Mode Non-Sort Mode, Sort Mode and Group Mode Kinds of Paper <First Tray> • Plain paper (16 to 24 lbs.) <Second Tray>... -
Page 171: Care Of The Copier
2. Care of the Copier Cleaning Touch Panel Housing Panel Cleaning Mode enables you to clean the Wipe the surface of the housing clean with a soft Touch Panel when the Main Switch is ON. cloth dampened with alcohol. Press the Utility key and touch User Management 1166O097AA 1168P125CC... - Page 172 2. Care of the Copier Document Transport Belt Original Pad Open the Document Feeder. Raise the Document Feeder or Original Cover. Wipe the surface of the Document Transport Belt clean with a soft cloth dampened with Wipe the surface of the Original Pad clean alcohol.
-
Page 173: Function Combination Matrix
7-10 3. Function Combination Matrix Function Combination Matrix Function Set Last Basic Orig. Copy Paper Zoom Finishing Orig. Copy Function Set First Auto Paper Paper Feed Unit 1st Drawer (OHP/Card) Paper 1st Drawer (Plain) Manual Bypass Tray (OHP/Card) Manual Bypass Tray (Plain) Auto Size Zoom Optional Zoom... - Page 174 7-11 3. Function Combination Matrix Function Set Last Orig. Copy Density Auxiliary Other Copy Function Set First Auto Paper F F F F F D D Paper Feed Unit 1st Drawer (OHP/Card) Paper 1st Drawer (Plain) Manual Bypass Tray (OHP/Card) Manual Bypass Tray (Plain) Auto Size Zoom...
-
Page 175: Conditions For Combined Functions
7-12 3. Function Combination Matrix Conditions for Combined Functions : The functions can be used in combination with each other. : The functions cannot be set in combination. (The function set first takes precedence.) : The functions cannot be set in combination. (The function set last takes precedence.) : The functions can be set in combination. -
Page 176: Description Of Paper Size And Zoom Ratio Table
7-13 4. Description of Paper Size and Zoom Ratio Table Description of paper size and zoom ratio table Paper Size Name Size (Metric) Size (Inch) 297mm 420mm 11-3/4” 16-1/2” 257mm 364mm 10” 14-1/4” 210mm 297mm 8-1/4” 11-3/4” 182mm 257mm 7-1/4” 10”... - Page 177 7-14 Index Numeric Control Panel ..........2-14 Copy Paper Size ..........3-4 1 (2in1) 1 ............. 3-24 Copy Track ............. 4-22 100 Accounts ..........4-22 Copy Track Data ..........4-23 1000 Accounts ..........4-22 Cover .............. 3-34 10-key Pad ............. 2-14 Crisscross Grouping ........
- Page 178 7-15 Index Manual Bypass Copying ........3-7 Small Original Adjustment ......3-51 Manual Exposure ..........3-33 “Small” Originals ..........4-7 Margin ............3-27 Sort ..............3-16 Max. Copy Sets ..........4-20 Special Paper Setting ........3-6 Memory Recall ..........3-53 Specifications ...........7-2 Meter Count ............4-9 Staple ..............3-17 Misfeed Clearing Procedures ......5-17 Start Key ............2-14 Mixed Orig.
- Page 180 Imagistics International Inc. 100 Oakview Drive Trumbull, CT 06611 ©Imagistics International Inc. 2002 Printed in USA Part Number DL36000130 The information contained in this manual is subject to change without notice to incorporate improvements made to the products listed in this manual.
Need help?
Do you have a question about the DL260 and is the answer not in the manual?
Questions and answers