Visioneer Strobe 500 User Manual
Hide thumbs
Also See for Strobe 500:
- Getting started manual (17 pages) ,
- Started manual (17 pages) ,
- Datasheet (2 pages)
Table of Contents
Advertisement
Advertisement
Table of Contents
Troubleshooting

Related Manuals for Visioneer Strobe 500


Summary of Contents for Visioneer Strobe 500
- Page 1 Strobe 500 User’s Guide...
- Page 2 Information is subject to change without notice and does not represent a commitment on the part of Visioneer. The software described is furnished under a licensing agreement. The software may be used or copied only in accordance with the terms of such an agreement. It is against the law to copy the software on any medium except as specifically allowed in the licensing agreement.
- Page 3 “AS IS” AND YOU ARE ASSUMING THE ENTIRE RISK AS TO THE PRODUCT'S SUITABILITY TO YOUR NEEDS, ITS QUALITY AND ITS PERFORMANCE. IN NO EVENT WILL VISIONEER BE LIABLE FOR DIRECT, INDIRECT, SPECIAL, INCIDENTAL OR CONSEQUENTIAL DAMAGES RESULTING FROM ANY DEFECT IN THE PRODUCT OR FROM ITS USE, EVEN IF ADVISED OF THE POSSIBILITY OF SUCH DAMAGES.
-
Page 4: Table Of Contents
Detach or Attach the Visioneer Strobe 500 ........ - Page 5 ABLE OF ONTENTS Changing the Button Settings ..............46 Selecting Options for OneTouch .
- Page 6 OneTouch with Visioneer Acuity Technology ........
- Page 7 The Visioneer Strobe 500 Scanner Specifications ........
-
Page 8: Welcome
Your new Visioneer Strobe 500 scanner can quickly scan single-sided or double-sided stacks documents, and place their images on your computer. The Strobe 500 scanner can be removed from the docking station and taken on the road for mobile scanning. -
Page 9: What's In The Box
UIDE ’ S IN THE Before proceeding, check the contents of the box. If items are missing or damaged, contact the dealer where you purchased the scanner. Visioneer Strobe 500 Quick Install Guide Technical Support Card Scanner Docking Station USB Power Cord... -
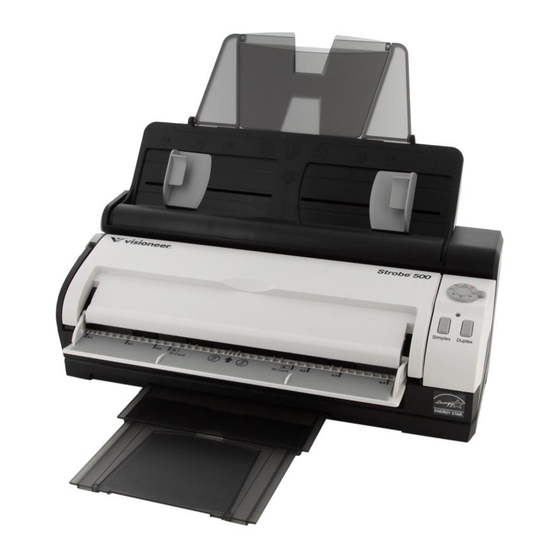
Page 10: The Visioneer Strobe 500 Scanner
ELCOME 500 S ISIONEER TROBE CANNER USB Port Power Port Cover Release Front Feed Tray Output Tray Paper Guides Input Tray Control Panel Universal Serial Bus (USB) port—Connects the scanner to the computer. Power jack—Connects the power cord to the scanner. Cover release—Opens the cover on the scanner. -
Page 11: System Requirements
500 S ’ ISIONEER TROBE CANNER UIDE YSTEM EQUIREMENTS Pentium 4 PC or AMD equivalent with: • A DVD-ROM drive • An available Universal Serial Bus (USB) port ® ® • Microsoft Windows operating system: • 32-bit Windows XP (Service Pack 1 and 2) •... -
Page 12: Documentation
ELCOME OCUMENTATION The following printed documentation is provided in the box: • Installation guide—abbreviated scanner setup and installation instructions. • Technical support card—contact information for technical support and customer service, and a brief overview of our standard product warranty. The following soft-copy documentation is available on the installation disc: •... - Page 13 500 S ’ ISIONEER TROBE CANNER UIDE...
-
Page 14: Scanner Setup
Connect the Scanner Power Cord on page 17 • Detach or Attach the Visioneer Strobe 500 on page 19 : please disregard any information about setting up the scanner with the docking station if you did not purchase the scanner with docking station combination box. After taking the scanner out of its box and plastic... -
Page 15: Unpack And Assemble The Scanner
500 S ’ ISIONEER TROBE CANNER UIDE NPACK AND SSEMBLE THE CANNER Remove the scanner from its protective foam and plastic bag. Remove the tape and protective foam strips from the scanner body and input tray. Lift the paper guide up from the scanner body. Push the tray back until it clicks in place. If the tray isn’t fully seated in position, paper feeding from the input tray may jam in the scanner. - Page 16 CANNER ETUP Tilt the scanner body towards the front and lift the scanner out of the Docking Station. Remove the tape and foam strip from the docking station. Place the scanner body back on the docking station. Detailed instructions for detaching and attaching the scanner are on page 19. Unfold the Input Tray and Extension from the paper guide.
- Page 17 500 S ’ ISIONEER TROBE CANNER UIDE Pull the output tray away from the bottom of the Docking Station, then flip open the output tray extension.
-
Page 18: Connect The Scanner Power Cord
CANNER ETUP ONNECT THE CANNER OWER You can power the scanner through the standard power cord to a wall outlet, or use the USB power cord to power the scanner through a USB port on the computer. ONNECT THE CANNER OWER TO THE Plug the power supply into the power port on the scanner. -
Page 19: Connect The Scanner Power To The Computer
If you do not have your USB power cable, you can order a new one by contacting our Customer Service department. Please refer to the Technical Support Card, included with your scanner, for our company contact information, or visit the Parts & Accessories page for your scanner at www.visioneer.com. -
Page 20: Detach Or Attach The Visioneer Strobe 500
CANNER ETUP ETACH OR TTACH THE ISIONEER TROBE The Strobe 500 scanner body can be removed from the Docking Station to be used as a mobile scanner. ETACH THE CANNER ODY FROM THE OCKING TATION Press and hold the release button on the side of the Docking Station. -
Page 21: Attach The Scanner Body To The Docking Station
500 S ’ ISIONEER TROBE CANNER UIDE TTACH THE CANNER ODY TO THE OCKING TATION Place the front of the scanner body in the front of the Docking Station. Tilt the scanner body into the Docking Station and press on the back of the scanner to lock it into the Docking Station. -
Page 22: Installation
N S T A L L A T I O N This chapter includes: • Before You Begin on page 22 • Install the Software and Connect the Scanner on page 23 • Register Your Scanner on page 28 • Installing Additional Applications on page 29 •... -
Page 23: Before You Begin
If you already have a scanner connected to your computer, it is recommended that you remove that scanner’s driver program prior to installing your Visioneer scanner. You can remove these programs from the Windows Control Panel. Please refer to the user manual provided with your other scanner hardware for instructions about removing the driver and software for that unit. -
Page 24: Install The Software And Connect The Scanner
NSTALLATION NSTALL THE OFTWARE AND ONNECT THE CANNER Start Microsoft Windows and make sure that no other applications are running. Insert the installation disc into your computer’s DVD-ROM drive. The disc automatically starts. The disc’s Main menu window opens. : If the disc does not start, check the following: •... -
Page 25: Installing The Scanner Driver
CANNER UIDE Make sure the boxes for Scanner Driver and Visioneer OneTouch are selected, as well as any other applications you want to install. : The software provided with your scanner may differ slightly from the list shown in the window. -
Page 26: Connect The Usb Cable And Turn On The Power
NSTALLATION On the Visioneer License Agreement window, read the license agreement. If you accept the terms, select I Agree then click Next. If you choose not to accept the license agreement, click Cancel. Click Close on the Installation Interrupted window. - Page 27 500 S ’ ISIONEER TROBE CANNER UIDE : If the plug does not attach easily, make sure that you are plugging it in correctly. Do not force the plug into either connection. Turn on the scanner power. The status light comes on and flashes indicating that the scanner is receiving power. Your computer recognizes that a scanner has been plugged into the USB port and automatically loads the appropriate software to run the scanner.
-
Page 28: Installing Visioneer Onetouch
Installation Complete window. OneTouch is the software needed for the buttons on the scanner to work. Click Next on the Welcome to the OneTouch Setup Wizard. On the Visioneer License Agreement window, read the license agreement. If you accept the terms, select I Agree then click Next. -
Page 29: Register Your Scanner
Press Enter on your computer’s keyboard or click the option on screen to go to the web address. When the Visioneer scanners web page loads click on Register Your Product. Fill in the registration form, all required fields have an asterisk (*). -
Page 30: Installing Additional Applications
NSTALLATION NSTALLING DDITIONAL PPLICATIONS Your scanner includes free, additional applications as described in the table below. Return to the disc’s Main menu and click Install products. Select the additional applications you want to install, then click Install now. Follow the instructions on the screen to install each of the additional applications. Software About the Software Nuance PaperPort®... -
Page 31: View The User Guides
When you’re finished, click Main menu to return to the Main menu window and click Exit. Remove the installation disc and store it in a safe place. That’s it! Installation is finished and your Visioneer scanner is ready to scan. -
Page 32: Loading Documents To Scan
O A D I N G O C U M E N T S T O C A N This chapter includes: • Scan from the Input Tray on page 32 • Scan from the Front Feed Tray on page 34 •... -
Page 33: Scan From The Input Tray
500 S ’ ISIONEER TROBE CANNER UIDE CAN FROM THE NPUT First, if the front feed tray is open, close it before scanning from the input tray. The paper will jam in the scanner if the front feed tray is open while scanning from the input tray. : Do not attempt to load documents into the Docking Station input tray while you have an item in the scanner fed in from the front. - Page 34 OADING OCUMENTS TO Load the documents into the scanner face down with the tops of the page inserted into the scanner. Turn the control dial to the setting you want to use to scan, align the number to the registration mark on the scanner.
-
Page 35: Scan From The Front Feed Tray
500 S ’ ISIONEER TROBE CANNER UIDE CAN FROM THE RONT Scan from the Front Feed tray when the scanner body is not attached to the Docking Station. When the scanner is attached to the Docking Station, you can still scan using the front feed tray for single items such as thick paper, embossed plastic cards, plastic identification cards, business cards, and other items. -
Page 36: Turn Autolaunch Off/On
OADING OCUMENTS TO Place an item face up, on the front feed tray, aligned to the registration marks on the tray and insert it into the front of the scanner. For one-sided scanning press the Simplex button. For two-sided scanning press the Duplex button. AUNCH AutoLaunch™... - Page 37 500 S ’ ISIONEER TROBE CANNER UIDE Click on the scanner icon to the right of the green buttons, in the title bar of the OneTouch button panel. Hardware icon Click on the Properties button in the hardware properties window. In the Application Settings tab, click on Turn on AutoLaunch™...
-
Page 38: Scan Using Autolaunch
OADING OCUMENTS TO SING AUNCH When you insert an item into the front feed tray, it is automatically scanned and the image is sent to a destination location or application on your computer, or to a network drive. Flip open the front feed tray from the scanner body. Turn the control dial to the setting you want to use to scan, align the number to the registration mark on the scanner. - Page 39 500 S ’ ISIONEER TROBE CANNER UIDE Place an item face up, on the front feed tray, aligned to the registration marks on the tray and insert it into the front of the scanner. The scanner pulls in the item, scans and ejects it out of the front. A scan progress window opens and the image(s) are sent to the selected application in the One Touch software for the currently selected control dial number.
-
Page 40: Scanning Interfaces
CANNING NTERFACES If you selected the recommended installation options, then you have several different options to scan with your Visioneer Strobe 500 scanner. • OneTouch and OneTouch AutoLaunch—To use the scanner’s AutoLaunch feature, simply insert a document in the scanner and it is automatically scanned using predefined settings from the OneTouch software. - Page 41 500 S ’ ISIONEER TROBE CANNER UIDE...
-
Page 42: Scanning And Configuring Onetouch
Scanning with Job Separation on page 106 • Scanning with Optical Character Recognition (OCR) on page 109 • Selecting OneTouch OmniPage OCR Options on page 113 • OneTouch with Visioneer Acuity Technology on page 122 500 S ’ ISIONEER TROBE CANNER UIDE... - Page 43 TROBE CANNER UIDE Based on the recommended full installation of the scanner driver and the Visioneer OneTouch software, OneTouch is your main scanning interface for using the scanner. The OneTouch buttons, on the scanner, mirror the OneTouch button panel on-screen.
-
Page 44: Default Onetouch Settings
CANNING AND ONFIGURING OUCH EFAULT OUCH ETTINGS When you installed the scanner, the software configured each OneTouch button with appropriate settings consisting of: a Destination Application, a Scan Configuration, and a File Format. The button names, such as Email or Copy, indicate the original factory settings for a button. You can change any of these settings. Please see Changing the Button Settings on page 46 for instructions. -
Page 45: Scan From The One Touch Button Panel
500 S ’ ISIONEER TROBE CANNER UIDE CAN FROM THE OUCH UTTON ANEL Scanning from the button panel on your computer’s screen works like pressing a button on the scanner. The scanner scans the item, then sends the image to the Destination Application indicated by the button’s icon. To scan from the One Touch Button panel: Load the documents into the scanner. - Page 46 CANNING AND ONFIGURING OUCH • Green arrows—click to cycle through the panel’s 3 views. • Scanner icon—click to open the scanner’s hardware properties. • Red “X”—click to close the One Touch panel. The Button View • Left-click on a Destination Application icon to start scanning. •...
-
Page 47: Changing The Button Settings
500 S ’ ISIONEER TROBE CANNER UIDE HANGING THE UTTON ETTINGS Click on the OneTouch icon. Right-click a button on the OneTouch Button Panel. The OneTouch Properties window opens. The One Touch Properties window will also open when you press, hold down for 3 seconds, and release a scanner button. - Page 48 CANNING AND ONFIGURING OUCH Place an item in the scanner and click the OneTouch button to start scanning. The scanner scans and sends the image to the selected destination, with the file format and scan configuration you specified. Properties button—displays a window for selecting properties for a destination. This button is disabled if the selected destination application does not have global configuration properties.
-
Page 49: Selecting Options For Onetouch
500 S ’ ISIONEER TROBE CANNER UIDE ELECTING PTIONS FOR OUCH Use the Options tab to configure how OneTouch works with the selected button, such as which destinations are available, or what the file name should be. Select Button—click the down arrow and select the button for which you want to modify the settings from the list. - Page 50 CANNING AND ONFIGURING OUCH • STI event forwarding is for using another application’s interface for scanning. The OneTouch Event Forwarding dialog box opens so you can select which application to use to continue scanning. Enable scanning to multiple destinations—select this option to allow for multiple destinations to be selected, in the destination list, on the OneTouch configuration tab.
- Page 51 500 S ’ ISIONEER TROBE CANNER UIDE • {MMM}—inserts the abbreviated 3-letter month (Aug). • {MMMM}—inserts the full name of the month (August). • {YY}—inserts the two-digit year (97). • {YYYY}—inserts the four-digit year (1997). • {h}—inserts the 12-hour clock hour without a zero added to single-digit time values (2). •...
-
Page 52: Scan Configurations
In the Scan Configuration Properties window, the Scan Settings, Page Settings, Advanced Settings, and Redaction Settings tabs are always available. When the Visioneer Acuity module is installed, the Acuity Settings tab will also be available for all destinations. -
Page 53: Scan Settings Tab
500 S ’ ISIONEER TROBE CANNER UIDE Based on the selected destination, additional settings tabs may also be available. If you see one of these additional settings tabs please refer to the appropriate section, as listed below, for instructions on configuring these destination specific options. -
Page 54: Page Settings Tab
CANNING AND ONFIGURING OUCH Contrast—the difference between the lighter and darker portions of the image. Increasing the contrast emphasizes the difference between the lighter and darker portions, decreasing the contrast de-emphasizes that difference. Key and Lock icon—if you want to lock the configuration, click the key icon to change it from a Key to a Lock. ETTINGS The options on the Page Settings tab will be available based on either the selected color mode (Black &... -
Page 55: Advanced Settings Tab
500 S ’ ISIONEER TROBE CANNER UIDE • Invert image—only available for Black&White Mode, this option reverses the black and whites of an image. Original Image Inverted Image • Skip blank originals—select this option to have the scanner detect if a blank page has been fed through the scanner, and remove it from the final file. -
Page 56: Redaction Settings Tab
CANNING AND ONFIGURING OUCH • Color saturation—the strength or purity of a color. This option is only available when the selected scan mode is Color. • Color hue—the color your eyes see as reflected from the image. This option is only available when the selected scan mode is Color. - Page 57 500 S ’ ISIONEER TROBE CANNER UIDE Side—click once on the word Front to show the Side option list. If you are using a simplex (one-sided) scanner, only the Front option will be available. If your scanner supports duplex (two-sided) scanning, the options Front, Back, and Both will be available in the list.
- Page 58 CANNING AND ONFIGURING OUCH Color—this color field shows the selected fill color for the redacted area(s). When the software removes the area you specify, it fills the area with the color you have selected here. To change the color, click the artist palette button to open the Windows color palette.
-
Page 59: File Formats
500 S ’ ISIONEER TROBE CANNER UIDE ORMATS The available file formats, in the Select format panel, are based on the selected destination for scanning. For example, if scanning to the destination Transfer to Storage, all file formats are available as the files are saved directly to a folder without opening any application. -
Page 60: Image Formats
CANNING AND ONFIGURING OUCH MAGE ORMATS Select an image file format for photos, artwork or other documents that you want to save as images. BMP and TIFF are standard image file formats generally used if you want to do additional image processing, such as photo touch-up or color correction. - Page 61 500 S ’ ISIONEER TROBE CANNER UIDE Right-click on the JPG icon to access the JP2 image format. When you select JP2, the format panel will change the JPG icon to the JP2 format icon. JPG—the *.jpg (joint photographic experts group) format is a common image format for transferring pictures electronically, such as posting to a website or sending via email, as JPG image files are smaller than BMP and TIFF files.
-
Page 62: Text Formats
CANNING AND ONFIGURING OUCH Right-click on the PDF format icon to change the image quality or select the option to make the scanned PDF file PDF-A compliant. PDF—the *.pdf (portable document format) image format is often used to create images of text pages. The image compression of PDF files creates relatively small file sizes when scanning multiple page files in color. - Page 63 500 S ’ ISIONEER TROBE CANNER UIDE Detailed information about these text file formats, and instructions for setting up the OCR options, are in the section Scanning with Optical Character Recognition (OCR) on page 109. To select a file type for the text format: Select the Destination Application.
-
Page 64: Configure Before Scan
CANNING AND ONFIGURING OUCH ONFIGURE EFORE You can set up the scanner so that, when you press a button or click it on the Button Panel, a different scanning interface opens before the scanning starts. You can then use the interface to change the Resolution, Scan Mode, and other settings. - Page 65 500 S ’ ISIONEER TROBE CANNER UIDE ANCELING A ONFIGURE EFORE Click Cancel in the scanning progress window. The following window will open asking if you want to cancel the entire job. • Yes—scanning stops and all pages scanned in this batch, up to this point, will be deleted. The TWAIN interface will close and you can restart your scan from the beginning.
-
Page 66: Open Scanned Document(S)
CANNING AND ONFIGURING OUCH CANNED OCUMENT Select the destination Open Scanned Document(s) to have the scanned document open automatically when scanning is complete. Supported file types—all file formats are available when scanning to the Open Scanned Document(s) destination. Note that text file formats are only available if an OCR module or application is installed. Please refer Text Formats on page 61 to see a list of text file formats that are available when OCR is installed. -
Page 67: Transfer To Storage
500 S ’ ISIONEER TROBE CANNER UIDE RANSFER TO TORAGE With Transfer to Storage, you can scan documents and save them in a folder in one step. Supported file types—since the files are saved directly to a folder on the computer or server, all file formats in OneTouch are available. -
Page 68: Setting The Folder From Windows
CANNING AND ONFIGURING OUCH • Click the New, Copy, or Edit button to open the Scan Configuration Properties window. Click on the Storage Options tab and use this window to set a configuration to scan to a different folder than the one selected in the Link Properties window. -
Page 69: Scanning To Multiple Folders
500 S ’ ISIONEER TROBE CANNER UIDE Hover the mouse cursor over the Set as scan destination option and the sub-menu will open to the right. Click on the setting you want the Storage location to be updated with. • For all configurations—select this option to have the storage location, in all scan configurations Storage Options tabs, updated to use this location. - Page 70 CANNING AND ONFIGURING OUCH Select Transfer to Storage as the Destination Application. Click the New button. The Scan Configuration Properties dialog box opens. To help you remember which folder it is, give the new configuration a name that indicates the folder name, such as “Business Receipts.
- Page 71 500 S ’ ISIONEER TROBE CANNER UIDE Select the folder you created for storing the scanned documents. 10. Click OK. The selected folder will now be set as the Storage location, such as “Business Receipts. ” 11. Click OK. The new configuration is now listed as a Transfer to Storage configuration. 12.
- Page 72 CANNING AND ONFIGURING OUCH 13. You will now have multiple configurations set up for the Transfer to Storage destination, and each configuration scans documents to separate folders. The new configurations apply to the Transfer to Storage Destination Application. 14. Now select a scanner button for each new configuration. Click Apply to set that button for that configuration.
-
Page 73: Burn To Cd-Rom
500 S ’ ISIONEER TROBE CANNER UIDE CD-ROM URN TO If you have a CD burner attached to your computer, you can scan directly from your scanner onto a CD. This feature is available only on computers running Windows version XP or later. Supported file types—since the files are going to be burned to a CD, all file formats in OneTouch are available. - Page 74 CANNING AND ONFIGURING OUCH When you are ready to burn the files to a CD, open the OneTouch Properties window, select Burn to CD and then click the Properties button. Make sure a blank CD is in the CD burner. Click the Burn to CD button.
-
Page 75: Printer Or Fax
500 S ’ ISIONEER TROBE CANNER UIDE RINTER OR The availability of printers and/or faxes in the OneTouch destination list depends on whether or not you have printers or faxes configured in Windows. Please refer to the Windows documentation, or your printer or fax documentation, for setting up printers and faxes. - Page 76 CANNING AND ONFIGURING OUCH • Fit to page, reduce image if necessary—if the scanned image is too big to be printed or faxed on a single page, the image will automatically be reduced to fit the page. • Actual size, crop image if necessary—if the scanned image is too big to be printed or faxed on a single page, the image will automatically be cropped around its edges to fit on the page.
-
Page 77: Paperport
500 S ’ ISIONEER TROBE CANNER UIDE APER In the OneTouch Properties window, select PaperPort as the Destination Application for scanning. Supported file types—all image file formats are available when scanning to PaperPort. The sPDF and nPDF text file formats are only available when the OmniPage software or OneTouch OmniPage module is installed. Please refer to Text Formats on page 61. - Page 78 CANNING AND ONFIGURING OUCH PaperPort OneTouch Link Properties Scan Configuration Properties window window - PaperPort tab Select the destination folder for Scanned Documents • Select a folder to send the scanned document(s) to when scanning to the PaperPort destination. The list of folders in this window are from the PaperPort Folder Manager. Use the PaperPort Folder Manager to add or delete folders, add other drives and network locations to this list.
-
Page 79: Sharepoint
500 S ’ ISIONEER TROBE CANNER UIDE HARE OINT The SharePoint destination link allows scans to be sent directly to a SharePoint site from OneTouch. Please contact your SharePoint site administrator for the server information you need to configure this link. Alternatively, have your site administrator or IT professional configure this link for you. -
Page 80: Sharepoint Link Log Viewer
CANNING AND ONFIGURING OUCH • The Destination folder would be shared documents • User account—input the user account name that has privileges to save files to the specified SharePoint site and Destination folder. • Password—input the password for the user account name you specified. •... - Page 81 500 S ’ ISIONEER TROBE CANNER UIDE Click on the Properties button to open the Log Viewer from the SharePoint OneTouch Link Properties window. There are no global configuration properties for the SharePoint destination application, all configuration is done using the Scan Configuration Properties window as described in the previous section.
-
Page 82: Ftp Transfer
CANNING AND ONFIGURING OUCH FTP T RANSFER The FTP Transfer destination link allows scans to be sent directly to an FTP server from OneTouch. Please contact your server administrator for the server information you need to configure this link. Alternatively, have your site administrator or IT professional configure this link for you. -
Page 83: Ftp Link Log Viewer
500 S ’ ISIONEER TROBE CANNER UIDE • Password—input the password for the user account name you specified. • Destination folder—input the folder path, on the remote FTP server, where you want the scanned documents sent. This path would appear in your web browser after the host name. For example, marketing/ shared documents/data sheets. -
Page 84: Smtp
CANNING AND ONFIGURING OUCH SMTP The SMTP destination link allows scans to be sent directly to an email address, through an SMTP server, from OneTouch. Please contact your server administrator for the server information you need to configure this link. Alternatively, have your site administrator or IT professional configure this link for you. -
Page 85: Smtp Link Log Viewer
500 S ’ ISIONEER TROBE CANNER UIDE • Use Windows Integrated Authentication—Select this option to use the Windows current user’s login name and password to send the message through the SMTP server. • Email to—input a valid recipient email address to receive the scanned document. If it is not a valid address the transfer will fail. - Page 86 CANNING AND ONFIGURING OUCH Click on the Properties button to open the Log Viewer from the SMTP OneTouch Link Properties window. There are no global configuration properties for the SMTP destination application, all configuration is done using the Scan Configuration Properties window as described in the previous section.
-
Page 87: Email Applications
500 S ’ ISIONEER TROBE CANNER UIDE MAIL PPLICATIONS Scanning to an email application, such as Outlook or Windows Mail, attaches the scanned image to a blank email message. You then fill in the recipient email address(es) and send the message. You need to have configured an email application before you can scan to it using OneTouch. -
Page 88: Email Properties
CANNING AND ONFIGURING OUCH MAIL ROPERTIES Use the Email Link Properties window to select a folder for storing a permanent copy of the scanned image, setting the color document options, and changing the email application that is in the OneTouch destination list. •... -
Page 89: Text Editors
500 S ’ ISIONEER TROBE CANNER UIDE DITORS Scanning to a text editing application, such as Microsoft’s Notepad or WordPad, automatically converts the text in the scanned image into editable text using Optical Character Recognition (OCR). Supported file types—the text file formats and destination applications are only available if an OCR module or application is installed. -
Page 90: Text Documents Properties
CANNING AND ONFIGURING OUCH OCUMENTS ROPERTIES ® These properties apply to Microsoft Word, Microsoft Excel , and any other text editing applications indicated by their icons in the list. • Add application—click this button to open the Add Text Based Link dialogue so you can add other text editing applications to OneTouch. -
Page 91: Adding Text Editor Applications To Onetouch
500 S ’ ISIONEER TROBE CANNER UIDE DDING DITOR PPLICATIONS TO OUCH To add another application to the list, click the Add application button. The Add Text Based Link dialog box opens. Click Browse to find the application you want to add to the list. When you select the application using the Browse button, Steps 1 and 2 on the dialog box are automatically filled in, and the application icon appears in Step 3. -
Page 92: Creating An Html Web Page From Your Scanned Documents
CANNING AND ONFIGURING OUCH When you are done making changes in this window, click the Add button to accept the changes and close the window. Click OK on the Link Properties window. Click Refresh on the OneTouch Properties window and the new application should now be available. HTML W REATING AN AGE FROM... -
Page 93: Still Image Client
500 S ’ ISIONEER TROBE CANNER UIDE TILL MAGE LIENT If you want to specify an application to use for scanning at the start of the process, you can use event forwarding. Supported file formats—you cannot select a file format when scanning to the Still Image Client as the destination application is not selected until after you start scanning. - Page 94 CANNING AND ONFIGURING OUCH A dialog box opens for you to select the application to use for scanning. Select the application you want in the box and click OK. Now the application you selected opens and you can continue scanning using that application’s interface. Technical Note If the scanner scans and sends an image to an application without prompting you to choose an application to run, the control panel options for your scanner’s events are automatically set to run a specific program when an event...
-
Page 95: Image Editors
500 S ’ ISIONEER TROBE CANNER UIDE MAGE DITORS Image editors include Microsoft Paint and other drawing and graphics applications. Supported file formats—the available file formats are based on the selected destination application. For example, you can scan to Microsoft’s Paint application as a BMP, GIF, PNG, or JPG, but not as TIFF or JP2 as Paint cannot open those two file types. -
Page 96: Image Documents Properties
CANNING AND ONFIGURING OUCH MAGE OCUMENTS ROPERTIES These properties apply to Microsoft Paint and other image processing applications. • Add application—click this button to open the Add Simple Image Link dialogue so you can add other image editing applications to OneTouch. •... -
Page 97: Adding Image Editor Applications To Onetouch
500 S ’ ISIONEER TROBE CANNER UIDE DDING MAGE DITOR PPLICATIONS TO OUCH To add another application to the list, click the Add application button. The Add Simple Image Link dialog box opens. Click Browse to find the application you want to add to the list. When you select the application using the Browse button, Steps 1 and 2 on the dialog box are automatically filled in, and the application icon appears in Step 3. -
Page 98: Pdf Applications
CANNING AND ONFIGURING OUCH PDF A PPLICATIONS PDF destinations are applications that can open and/or edit the Adobe PDF file format. Supported file types—applications in the PDF destination group support the *.pdf file format. When the OmniPage module or software is installed, OneTouch includes an option to scan as sPDF or nPDF. Selecting either of these two formats still creates a *.pdf file, but the “s”... - Page 99 500 S ’ ISIONEER TROBE CANNER UIDE Click on one of the default text editors such as WordPad. Click on the Properties button. To add another application to the list, click the Add application button. The Add Text Based Link dialog box opens.
- Page 100 CANNING AND ONFIGURING OUCH In Step 4 of the dialog box, select Adobe PDF format and Adobe searchable PDF. Adobe PDF format—select this option if you are adding a PDF viewing or editing application to the list. This PDF format is an image format only, it will not recognize the document using OCR, and you will not be able to search or edit the text in the final file.
-
Page 101: Send To Application
500 S ’ ISIONEER TROBE CANNER UIDE END TO PPLICATION The Send to Application link allows you to select any application on your computer as the scan destination. Supported file types—all file formats in OneTouch are available when scanning to this destination. After you configure the link, as described below, make sure you select a file format that the application can open. - Page 102 CANNING AND ONFIGURING OUCH To configure a destination application for the Send to Application link: Send to Application OneTouch Link Send to Application Scan Configuration Properties window Properties window Click Browse to open the Windows file browser and navigate to the location of the application’s executable (*.exe) file.
- Page 103 500 S ’ ISIONEER TROBE CANNER UIDE Configure advanced features—select this option to change the default settings for this link. Only advanced users and application developers should modify these settings. Send to Application OneTouch Link Send to Application Scan Configuration Properties window Properties window •...
-
Page 104: Scanning To Multiple Destinations
CANNING AND ONFIGURING OUCH CANNING TO ULTIPLE ESTINATIONS Scanning to multiple destinations works the same as when scanning to a single destination, OneTouch simply distributes the final scan to several destinations. This option is enabled separately for each OneTouch button. Open the OneTouch Properties window and click on the Options tab. - Page 105 500 S ’ ISIONEER TROBE CANNER UIDE If any of the destinations you select have global configuration properties, the Properties button at the bottom of the Selected destinations list will be enabled for you to configure the destination options. Click on the Properties button to open the OneTouch Link Properties window to configure the destinations.
- Page 106 CANNING AND ONFIGURING OUCH Select the scan configuration you want to use for scanning in the Select configuration list. Click on the Edit button to open the Scan Configuration Properties window to configure any destination specific scanning options. Each destination that has per-scan configuration properties will be represented by its configuration tab in the OneTouch Scan Configuration Properties window.
-
Page 107: Scanning With Job Separation
500 S ’ ISIONEER TROBE CANNER UIDE CANNING WITH EPARATION Use job separation to have OneTouch create a new file each time a separator is detected when scanning a multiple page batch. For example, if you want to scan financial statements from several different banks, you can place a stack of statements in the scanner and OneTouch will separate each statement into a different file based on your selected job separator. - Page 108 CANNING AND ONFIGURING OUCH Click on the option Use job separator when scanning multiple pages. Select one of the two job separation options: When a blank page is detected—a new file will be created after a blank page is fed through the scanner. The blank page is discarded from the scanned image and the new file starts with the next page in the document stack.
- Page 109 500 S ’ ISIONEER TROBE CANNER UIDE The options on the Page Settings tab, in the Scan Configuration Properties window will affect the job separation options as described below: Skip blank originals • The Sensitivity you set for this feature is the one that is used when scanning. The sensitivity level you set in the Options tab will be ignored.
-
Page 110: Scanning With Optical Character Recognition (Ocr)
: Visioneer recommends that all OCR processing use the original factory settings for OCR scanning that came with your scanner. When scanning with other settings, use at least 300 dpi for the resolution. If the original documents are of poor quality or have a small type font, 400 dpi can be used as the maximum resolution. -
Page 111: Text Formats
500 S ’ ISIONEER TROBE CANNER UIDE ORMATS You select the text format option by clicking on the text icon on the OneTouch Properties window. This is the text format icon. This example of the text format icon is sPDF. Selecting the text format option also selects OCR processing as an automatic step for scanning. - Page 112 CANNING AND ONFIGURING OUCH Right-click on the text format icon. Example menu for the TEXT Example menu for the TEXT format format when the Destination when the Destination Application is Application is Microsoft Word. a Storage location. Choose the file type that you want for the text format. Your selection of a file type pertains only to the Destination Application currently selected on the OneTouch Properties window.
- Page 113 500 S ’ ISIONEER TROBE CANNER UIDE Normal PDF—the.pdf file format used by Adobe Acrobat. This format converts scanned text into a PDF with the text ready for editing in a PDF editing program. Additional options are available on the menu for the sPDF and nPDF text formats. The three image quality settings are: •...
-
Page 114: Selecting Onetouch Omnipage Ocr Options
CANNING AND ONFIGURING OUCH OCR O ELECTING OUCH PTIONS The software you installed for your scanner includes a set of advanced OCR options integrated with OneTouch. : The OCR options apply globally to all the OneTouch Destination Applications that perform OCR. For example, if you select the OCR options for Adobe Acrobat, they also apply to WordPad. -
Page 115: The Ocr Tab
500 S ’ ISIONEER TROBE CANNER UIDE OCR T The options shown on the OCR tab window are for spellchecking scanned text, replacing missing or unrecognized characters, and setting the speed and quality levels of the OCR processing. - Page 116 CANNING AND ONFIGURING OUCH Choose the options you want from the OCR window. Languages in Document—click on the language(s) in list that correspond to the languages in the documents to be scanned. You can click on multiple languages. These are the languages that will be recognized during the OCR process.
-
Page 117: Creating Your Own Dictionaries
Type each word you want in your new dictionary, followed by a carriage return. Make sure to spell the words correctly as they will be used for spellchecking. Here is an example of what the text file might look like: Visioneer OneTouch OmniPage... - Page 118 CANNING AND ONFIGURING OUCH The User Dictionary Files window opens and shows the available dictionaries. MyDictionary is an example of a user dictionary. Click Add New. The Add New User Dictionary window opens. Click the drop-down arrow for Files of type and choose Text Files (.txt). 10.
-
Page 119: Editing User Dictionaries
500 S ’ ISIONEER TROBE CANNER UIDE 11. The text file now appears on the list of user dictionaries that you can use for spellchecking. 12. Select a dictionary and click Set As Current to set it as the current dictionary for spellchecking. The label [current] is added to the name. - Page 120 CANNING AND ONFIGURING OUCH To import a list of words from another text file, click Import. The Import Contents of User Dictionary window opens. Select the file that has the words you want to add to your user dictionary. Importing will add the entire list of words in a file to the user dictionary. Click Import.
-
Page 121: The Format Tab
500 S ’ ISIONEER TROBE CANNER UIDE ORMAT The options on the Format tab window are for setting the input and output formats for the scanned documents. Click the Format tab and choose the options you want for both the input and output formats. Input Format Options •... - Page 122 CANNING AND ONFIGURING OUCH • Retain fonts and paragraphs—this output format retains the font and paragraph styling, including graphics and tables without columnized text, but does not retain layout formatting. If the document is being scanned as an Excel spreadsheet, each detected table or spreadsheet becomes a separate worksheet, while other content is placed on the last worksheet.
-
Page 123: Onetouch With Visioneer Acuity Technology
OneTouch scan settings to produce the best quality images. This section explains how to use the Visioneer Acuity features when choosing new scan settings for your scanner. The Acuity options appear on the Scan Configuration Properties window that you use to create a new scan configuration for your scanner. - Page 124 Edit button. Click the Acuity Settings tab to see the new Acuity settings. Choose the Visioneer Acuity options for the scan configuration. Click the drop-down arrow to choose the type of Acuity settings to use for the new scan configuration. The options are: •...
- Page 125 500 S ’ ISIONEER TROBE CANNER UIDE • Auto detect color—Determines if a document contains color or not and produces the appropriate scanned image. Typically, Auto Color Detect is used when you have a stack of pages to scan, some color and others not.
- Page 126 CANNING AND ONFIGURING OUCH When a scan configuration includes Acuity options, the OneTouch Panel and the OneTouch Properties window both show the Acuity icon as a reminder. The Acuity icon on the top of the OneTouch Panel and on the scan configuration remind you that the scan will use the Acuity settings.
-
Page 127: Hardware Properties And Interface Behavior
Right-click on the One Touch icon and choose Show Hardware from the pop-up menu. The Hardware Properties dialog box opens and shows information about your Visioneer scanner. Click the Properties button. -
Page 128: Device Settings
CANNING AND ONFIGURING OUCH EVICE ETTINGS Please refer to Device Settings on page 149 RIVER ETTINGS Please refer to Driver Settings on page 151... - Page 129 500 S ’ ISIONEER TROBE CANNER UIDE...
-
Page 130: Scanning From Twain And Wia
T W A I N C A N N I N G F R O M A N D W I A This chapter includes: • Accessing the Scanner Interface on page 130 • Scanning on page 131 • Using the Preview Window on page 133 •... -
Page 131: Accessing The Scanner Interface
Visioneer OneTouch: Open the Visioneer OneTouch properties window and under the configuration list select Configure Before Scan. Click on OK to save the changes and close Visioneer OneTouch. The next time you scan using that button, the scanner interface will open for you to set the scan options and start scanning. -
Page 132: Scanning
: Visioneer Acuity must be installed for the image processing options, described in this document, to be available in the interface for your scanner. Only features that are appropriate for your scanner will be enabled after Visioneer Acuity is installed. - Page 133 500 S ’ ISIONEER TROBE CANNER UIDE You can also click on the Preview button to open the preview dialogue for you to scan a preview image and set custom scan regions. : You can lock or unlock the scanner’s interface from the driver configuration options for your scanner. The instructions for changing this setting are in the Driver Settings section of this guide.
-
Page 134: Using The Preview Window
TWAIN CANNING FROM SING THE REVIEW INDOW Clicking the Preview button will display the preview window for the scanner interface. Use the preview option if you want to scan and display a sample image that reflects the current settings in the main interface. After the preview is displayed, you can then adjust the settings in the main interface until you are happy with how the sample image looks. - Page 135 500 S ’ ISIONEER TROBE CANNER UIDE Click Show main UI to bring the main scanner interface in front of the preview window for you to adjust the scan settings. There are some settings in the main interface, such as brightness and contrast, which will immediately update the preview image after you adjust the setting.
-
Page 136: Scan Regions
TWAIN CANNING FROM When you scan, any settings you adjusted are automatically saved to the Last used settings preset. These settings are not retained in a preset until you click Save in the main interface to save the settings to the current preset, or save them to a new preset using the Save as dialogue. - Page 137 500 S ’ ISIONEER TROBE CANNER UIDE Move or resize region 1 until the sample image area you want is within the scan region. Resize the region by clicking on one edge of the region outline and dragging the mouse. Move the region by clicking in the region then dragging the mouse.
- Page 138 When Visioneer Acuity is installed, you can create multiple scan regions for each image scanned. The maximum number of scan regions you can create when Visioneer Acuity is installed may vary between scanner models.
-
Page 139: Move, Resize, Or Delete Regions
500 S ’ ISIONEER TROBE CANNER UIDE ESIZE ELETE EGIONS Moving regions – to move a region, place your mouse cursor over the region you want to move. The region will highlight indicating that it is the active region under the mouse cursor. Click on the region and drag the mouse to move the region. -
Page 140: Reordering Regions
TWAIN CANNING FROM Deleting regions – to delete a region, place your mouse cursor over the region you want to delete. The region will highlight indicating it is the active region under the mouse cursor. Right-click on the region and select the delete option from the menu. -
Page 141: Clear All Regions
500 S ’ ISIONEER TROBE CANNER UIDE Make this the first region – select this option to set the region number to 1. This option is not available if the region you right-clicked on is already at position 1. After selecting this option, all other regions will have their number update automatically as appropriate. -
Page 142: Document Source Configuration
TWAIN CANNING FROM OCUMENT OURCE ONFIGURATION Some options in the interface may be grayed out and cannot be selected. Grayed out options are either not appropriate for the current scanner, the software needed to enable the feature is not installed, the feature is dependent on another setting in the scanner's interface. - Page 143 500 S ’ ISIONEER TROBE CANNER UIDE • Duplex—select this option to scan both sides of the item in the scanner. Note that if you deselect the Back side options in the source configuration list, this option will automatically deselect. Click the drop down menu to select the scanning options you want to use.
- Page 144 TWAIN CANNING FROM To set the scanner options individually for each source: Click the drop down menu and deselect Sources identical. Select the color mode you want for the first source. Click the top of the menu to collapse the list. Select the options in the scanner interface that you want to use for the first source.
- Page 145 500 S ’ ISIONEER TROBE CANNER UIDE Click the top of the menu to collapse the list. Select the options in the scanner interface that you want to use for the second side. Tip: Save the changes to a Preset when you are done selecting options for each source. Please refer to Presets more information.
-
Page 146: Summary
TWAIN CANNING FROM UMMARY The Summary area displays some of the basic scan options selected in the interface. Clicking on one of the links will open the area of the interface where the setting is located. -
Page 147: Presets
500 S ’ ISIONEER TROBE CANNER UIDE RESETS A preset contains all features in the scanner interface, including color mode, resolution, paper size, and so on. You can create, import, export, and delete presets. After presets have been added to the interface, click the drop down menu and select an option from the list. -
Page 148: Exporting Presets
TWAIN CANNING FROM Type an new name for the preset in the name field and then click on OK in the dialogue. To delete a preset: Click the drop menu under Presets and select the preset you want to delete. Click the right pointing arrow button and select Delete. - Page 149 500 S ’ ISIONEER TROBE CANNER UIDE Click on the browse button next to the Destination folder field to open a file browsing window. Browse to a location and select the folder where you want the preset file to be saved. Click on Choose. Make sure to choose a location where you will be able to easily find the file.
-
Page 150: Importing A Preset
TWAIN CANNING FROM Click on Export. If you selected multiple presets to be exported, a file will be created for each preset you selected. : the software will look for duplicate preset names. If you see a notification indicating that a preset with the same name already exists, select one of the options on-screen to continue. - Page 151 500 S ’ ISIONEER TROBE CANNER UIDE Browse to the location where the preset file is saved. If you want to import multiple presets, click on each preset name. You may need to hold down the Ctrl (Control) key on your keyboard, while clicking on each preset name, to select multiple presets.
-
Page 152: Document Settings
TWAIN CANNING FROM OCUMENT ETTINGS • Main panel—this panel contains the most commonly used scan settings. When the Basic source configuration mode is selected, this is the only panel available. Change to the Advanced source configuration mode to enable the other panels which are also described in this section. The Document settings section when the Basic document source configuration mode is selected. -
Page 153: Disabled Options In This Section
500 S ’ ISIONEER TROBE CANNER UIDE ISABLED PTIONS IN THIS ECTION Some options in the interface may be grayed out and cannot be selected. Grayed out options are either not appropriate for the current scanner, the software needed to enable the feature is not installed, the feature is dependent on another setting in the scanner's interface. -
Page 154: Main Panel Options
TWAIN CANNING FROM ANEL PTIONS Some of the options in this panel may have advanced adjustment options on a different panel in this section. When the Advanced configuration mode is selected, an icon will appear next to those features which have adjustment options on another tab. - Page 155 500 S ’ ISIONEER TROBE CANNER UIDE • Text document (for OCR) forms, letters, memos, or spreadsheets – 300 dpi • Business cards or other items with small print – 300 dpi • Color page with graphics or color photographs – 150 dpi •...
- Page 156 TWAIN CANNING FROM OCUMENT Select Long document to enable support of paper sizes up to the scanner maximum. After you select this option make sure you input the page length for your document in the custom input field, located below the Document size selection list.
-
Page 157: Advanced Panel Options
500 S ’ ISIONEER TROBE CANNER UIDE The following image shows a cheque scanned in duplex mode without Merge two sides enabled, and the same cheque scanned with Merge two sides enabled. When Merge two sides is not enabled, side 1 and side 2 of the cheque are saved in two separate files (IMG_0001 and IMG_0002 respectively). - Page 158 TWAIN CANNING FROM LANK RIGINALS Select this option to have the scanner detect if a blank page has been fed through the scanner, and remove it from the final file. Typically you might use this option when scanning a stack of two-sided pages which have a number of blank sides.
- Page 159 500 S ’ ISIONEER TROBE CANNER UIDE Compress transfers Select this option to have the scanner compress the image in Gray and Color scans. This reduces the file size and allows for faster image transfer from the scanner to the computer. Once the compressed image is on the computer, scanner’s driver will then uncompress the image, and perform any image processing functions that have been selected in the scanning interface.
- Page 160 TWAIN CANNING FROM From the Windows Control Panel Click on the Driver settings tab. Select Enable user compression and Remember compression. Note that if these two options are grayed out and you cannot select them, then these options are not available for your scanner.
-
Page 161: Image Enhancements
500 S ’ ISIONEER TROBE CANNER UIDE MAGE NHANCEMENTS Click on the Image Enhancements icon to select options applicable to what type of image processing you want applied for the items being scanned. • Main panel—this panel contains the most commonly used scan settings. Some of the options in this panel may have adjustment options on the other panels in this section. -
Page 162: Disabled Options In This Section
TWAIN CANNING FROM ISABLED PTIONS IN THIS ECTION Some options in the interface may be grayed out and cannot be selected. Grayed out options are either not appropriate for the current scanner, the software needed to enable the feature is not installed, the feature is dependent on another setting in the scanner's interface. -
Page 163: Main Panel Options
500 S ’ ISIONEER TROBE CANNER UIDE ANEL PTIONS Some of the options in this panel may have advanced adjustment options on a different panel in this section. When the Advanced configuration mode is selected, an icon will appear next to those features which have adjustment options on another tab. - Page 164 TWAIN CANNING FROM Brightness works in conjunction with Contrast for image enhancement. When you are adjusting the brightness level to improve the scanned image quality, try adjusting the contrast level as well. The contrast level is the range between the lightest and darkest parts of the image. For example, if you scanned a document with notes written in pencil, you may have to decrease the brightness level to get the handwritten notes to appear in the scanned image.
- Page 165 500 S ’ ISIONEER TROBE CANNER UIDE Adjusting the contrast level is based on how you want the image to appear and there is no standard to adhere to. Contrast works in conjunction with brightness for image enhancement, when decreasing the brightness level, the overall image becomes darker, in which case you may want to increase the contrast level so that the differences between the lighter and darker portions of the image are clearer.
- Page 166 TWAIN CANNING FROM AMMA Gamma is the tone curve and starting point for image enhancement. Move the slider left or right to darken or lighten the image. As you raise or lower the Gamma value, the values at which Brightness and Contrast affect the image are changed.
- Page 167 500 S ’ ISIONEER TROBE CANNER UIDE For example, you might choose this option if you are scanning pages that have been printed from newspaper microfilm. Newspaper microfilm reverses black and white so that when viewed on a monitor, the text is white and the paper is black.
- Page 168 TWAIN CANNING FROM EPTH EDUCTION The Bit depth reduction options are only available when scanning in black and white. Click the drop down menu and select an option from the list. Threshold and Dynamic threshold Threshold enables you to set what level of light or dark to look for on a page. When scanning in black and white, everything on the page is set to either white pixels or black pixels in the final image.
-
Page 169: Color Processing Panel Options
500 S ’ ISIONEER TROBE CANNER UIDE Bayer dither scan - Close up OLOR ROCESSING ANEL PTIONS The options in this panel are for setting how the scanner should process colors in specific color modes. OLOR ROPOUT Color dropout tells the scanner and software to remove a specific color from the image. You can choose either Red, Green, or Blue, or define a custom color, to be dropped out of an image. -
Page 170: Advanced Panel Options
TWAIN CANNING FROM • More precise—this option removes a range of colors closest to the pure color selected or defined in the custom fields. For example, pure red has an R/G/B value of 255/0/0. Selecting Red indicates that the scanner should look for a range of RGB reds close to pure red and remove them from the image. - Page 171 500 S ’ ISIONEER TROBE CANNER UIDE Radius—this is the size of the area that is evaluated for stray dots. Number—this is the maximum number of dots within the radius that should be considered a speckle. If this number of dots are in the circle, the dots will not be considered a speckle and remain in the image. If there are less than this number of dots in the circle, the dots are considered a speckle and removed from the image.
- Page 172 Automatically detect and adjust the white level using the leading edge of the scanned item. This is a feature that uses the scanner for processing and it is available whether or not Visioneer Acuity is installed. However, please note that there will be a black line at the top of each image. This is where the scanner starts the image capture as the reference point for it to detect and set the background as white in the image.
-
Page 173: Driver Configuration
500 S ’ ISIONEER TROBE CANNER UIDE RIVER ONFIGURATION Use the Driver configuration section to configure the add-on modules, select interface options, and view the scanner hardware properties. When the Advanced configuration mode is selected, a scanner panel option will be available for you to change any hardware settings that may be available for your scanner. -
Page 174: Scanner Configuration
TWAIN CANNING FROM CANNER ONFIGURATION The scanner configuration tab shows the hardware information for your scanner. • Enable the detection of excessive document skew—when selected, scanning will stop if the scanner detects that an item is being fed through at too great of an angle. •... -
Page 175: Hardware Properties And Interface Behavior
500 S ’ ISIONEER TROBE CANNER UIDE ARDWARE ROPERTIES AND NTERFACE EHAVIOR You can use the scanner’s properties page to keep track of scanner maintenance, change some of the hardware options, configure the scanner interface behavior, and adjust application options that may be available for your scanner. -
Page 176: Driver Settings
TWAIN CANNING FROM • Serial number—the scanner’s unique identification number. • LLD version—the scanner’s base driver version. This is not the One Touch software revision, TWAIN or WIA driver versions. • Driver version—this is the version of the scanner’s TWAIN driver. AINTENANCE OUNTERS •... - Page 177 500 S ’ ISIONEER TROBE CANNER UIDE ENERAL • Lock settings—this option prevents the user from making changes to the options in the scanner interface. When the interface opens, only the scanning Presets will be available for a user to select and use for scanning.
-
Page 178: Application Settings
TWAIN CANNING FROM PPLICATION ETTINGS OUCH ETTINGS • Turn on AutoLaunch™ for front-feed scanning—select this option to have the scanner automatically start scanning when an item is inserted in the front of the scanner. • Function—select the One Touch function number that you want to use for automatic front-feed scanning. Select Current to always use the current function number shown on the scanner display. - Page 179 500 S ’ ISIONEER TROBE CANNER UIDE...
-
Page 180: Maintenance
188 • Uninstalling Your Scanner on page 191 • The Visioneer Strobe 500 Scanner Specifications on page 192 • The Visioneer Strobe 500 Parts List on page 194 This section contains information about maintenance, troubleshooting, uninstalling, scanner specifications, and spare parts. -
Page 181: Safety Precautions
500 S ’ ISIONEER TROBE CANNER UIDE AFETY RECAUTIONS When servicing the scanner you should take the following precautions to ensure your safety and prevent damage to the scanner. Do These • Wear protective gloves when cleaning the scanner with Isopropyl rubbing alcohol. Rubbing alcohol may irritate sensitive skin. -
Page 182: Clearing Paper Jams
AINTENANCE LEARING APER If your scanner stops scanning due to a paper jam in the Automatic Document Feeder, a warning dialog box opens after a few moments. Pull the ADF cover release on the top of the scanner body to open the Automatic Document Feeder cover. Remove the jammed paper and close the cover. -
Page 183: Cleaning The Scanner
500 S ’ ISIONEER TROBE CANNER UIDE LEANING THE CANNER Cleaning the inside of the scanner helps to keep your scanner operating at optimum performance. You should clean the inside of the scanner at least once a week or after 5,000 pages have been scanned. If you are getting frequent paper jams, multiple pages feeding at the same time, or if you’re seeing lines in the scanned image, it is time to clean the scanner. -
Page 184: Cleaning The Docking Station
AINTENANCE Wipe clean all of the rollers in the scanner. Be careful not to snag the cloth on the paper sensor. Paper Sensor Rollers (located in both the body of the scanner and under the scanner lid). Close the cover when you’re finished. LEANING THE OCKING TATION... - Page 185 500 S ’ ISIONEER TROBE CANNER UIDE Press down on the two latches on the back of the docking station and lower the rear cover. Wipe the feed roller from side to side. Rotate the roller to clean its entire surface. Wipe the ADF pad from top to bottom.
-
Page 186: Replace The Adf Pad Assembly
ADF is an indication that the pad is wearing thin. You received a replacement pad in the original scanner box, and you can also order a new one. See The Visioneer Strobe 500 Parts List on page 194 for ordering information. -
Page 187: Replacing The Roller Assembly
500 S ’ ISIONEER TROBE CANNER UIDE EPLACING THE OLLER SSEMBLY After extended use, the roller may wear out and may need to be replaced. It is a user- replaceable part and can be reordered. Frequent paper jams are a symptom of a worn roller assembly. A worn roller can cause documents to feed in skewed at an angle, or multiple pages to feed at the same time. - Page 188 AINTENANCE Insert the right end of the roller into its housing socket in the scanner. Align the lock tab, on the orange lock flange, with the slot in the scanner. Rotate the lock tab into the slot on the scanner. 10.
-
Page 189: Troubleshooting
OneTouch options, and you need to remove those other drivers and re-install your Visioneer Strobe 500 scanner. Please see the documentation that you received with the other scanner for the steps to remove its driver programs. - Page 190 AINTENANCE Problem: The paper jams the ADF. To reduce the number of paper jams, smooth and straighten the paper before scanning, and adjust the guides to the paper size. Paper fed into the ADF at an angle can cause the feed mechanism to jam. If paper jams are occurring more frequently, try cleaning the roller with a soft cloth dampened with Isopropyl rubbing alcohol.
-
Page 191: Error Light Troubleshooting Codes
IGHT ROUBLESHOOTING ODES The status light indicates the current state of the scanner. Descriptions of the most common patterns are listed below. Contact Visioneer Technical Support if you experience a different blinking pattern. ORMAL PERATION • Steady green: indicates the scanner is ready to scan. -
Page 192: Uninstalling Your Scanner
In the scenario described here, when you want to uninstall Visioneer Acuity make sure you select and uninstall Visioneer Acuity. If you uninstall one of the entries labeled as an “asset” you will still need to uninstall the main Visioneer Acuity utility. -
Page 193: The Visioneer Strobe 500 Scanner Specifications
500 S ’ ISIONEER TROBE CANNER UIDE 500 S ISIONEER TROBE CANNER PECIFICATIONS Optical resolution 600 dpi Bit depth 24-bit color, 8-bit grayscale, 1-bit bitonal (black & white) Maximum item size 8.5" x 36" Minimum item size 3.5" x 2" Scan method Duplex Automatic Document Feeder (Docking Station) Duplex Single Sheet Fed (Front Feed Tray) - Page 194 - 32-bit XP (Service Pack 2 or 3) - 32-bit or 64-bit Vista (Service Pack 1 or 2) - 32-bit or 64-bit 7 - 32-bit or 64-bit 8 Scanner Drivers TWAIN, WIA Bundled Software Visioneer OneTouch Nuance PaperPort® Nuance OmniPage® Nuance PDF Converter...
-
Page 195: The Visioneer Strobe 500 Parts List
’ ISIONEER TROBE CANNER UIDE 500 P ISIONEER TROBE ARTS Please use the following part names and numbers when ordering replacements for your Visioneer Strobe 500 scanner. Part Name Part Number Docking Station 85-0533-000 ADF Pad 57-0130-000 Roller Assembly 57-0113-000... -
Page 196: Index
NDEX csv file format, 111 N D E X Delete button, 47 Despeckle, 162, 169 Destination Application Actual size, 75 text file format, 110 Add Application, 90, 96, 98 Destination application, 43, 48, 58, 66, 76 ADF pad assembly Burn to CD, 72 replace, 185 Email application properties, 87 Advanced device settings, 75... - Page 197 NDEX Microsoft Internet Explorer, 91 Microsoft Outlook, 48 Gamma, 55, 165 Microsoft Paint, 48, 95 Grayscale, 141, 142, 163, 165, 167 Microsoft Word, 46, 48, 89, 109 Grayscale mode, 52 Minimize Size, 60, 61 Mirror image, 166 Missing Character, 115 Module Configuration, 172 Halftone Pattern, 167 Moiré...
- Page 198 NDEX Select configuration, 46 Properties, 52 Page Settings tab, 53 Select destination, 48 Page size, 154 Select format, 46 paper jam, 181, 186 Send to Application, 100 Paper size, 53 Show all destinations, 48 PaperPort, 29 Show Hardware, 126 Show Progress Window, 49 Image quality and file size, 60, 61 Sides identical, 143 PDF applications, 48...
- Page 199 NDEX White Level, 171 Word Document, 111 xls file format, 111...
- Page 200 I N T E L L I G E N T S C A N N I N G S O L U T I O N S 05-0794-200 Copyright ©2013 Visioneer, Inc.
Need help?
Do you have a question about the Strobe 500 and is the answer not in the manual?
Questions and answers