Advertisement
OPERATOR'S MANUAL
OPERATOR'S MANUAL
G
AIN
C
RUNCH
1
B
P
C
RUNCH
RE-
B
RIGHT
SHAPE
B
OOST
I
NPUT
G
AIN
L
EAD
B
L
EAD
B
OOST
SAVAGE
special edition
Please, first read this manual carefully!
T
REBLE
ASS
M
IDDLE
T
REBLE
B
AL ANCE
T
.B
.
R
AL
A
CTIVE
T
REBLE
ASS
M
IDDLE
T
REBLE
B
A L ANCE
R
OUGH /
S
MOOTH
C
C
1
LEAN
RUNCH
R
EVERB
P
RESENCE
A
V
V
OLUME
OLUME
C
D
LEAN
EPTH
C
RUNCH
1
B
OOST
M
IDI
M
ODE
C
RUNCH
2
L
EAD
R
EVERB
M
ASTER
A
V
OLUME
V
OLUME
C
RUNCH
2
L
EAD
P
RESENCE
B
SAVAGE
special edition
P
D
S
R
RES.
EPTH
PEAKER
EVERB
A / B
B
OOST
A / B
A
CTIVE
S
TANDBY
M
ASTER
B
M
ASTER
C
HANNEL
T
RIODE /
A / B
1 / 2
P
ENTODE
P
OWER
Advertisement
Table of Contents

Related Manuals for Engl Savage Special Edition


Summary of Contents for Engl Savage Special Edition
- Page 1 OPERATOR'S MANUAL OPERATOR'S MANUAL REBLE LEAN RUNCH RUNCH IDDLE REBLE EVERB RESENCE RESENCE AL ANCE OLUME OLUME SAVAGE special edition RUNCH LEAN EPTH RES. EPTH PEAKER EVERB RIGHT SHAPE OOST CTIVE RUNCH OOST A / B OOST A / B CTIVE TANDBY OWER...
- Page 2 This amp is the product of a concentrated effort; all of us here at ENGL invested all our experience and innovative ideas in the design and construction of this amp.You are now the owner of one of these...
-
Page 3: Handling And Care
LED, as well as selectable 4, 8 and 16 Z speaker outputs for numerous cabinet connection options. Yet another handy tool is the "ENGL Impedance Test and Cable Check System": This unique feature helps you to check speakers´ impedances and cables equipped with 1/4" plugs! -
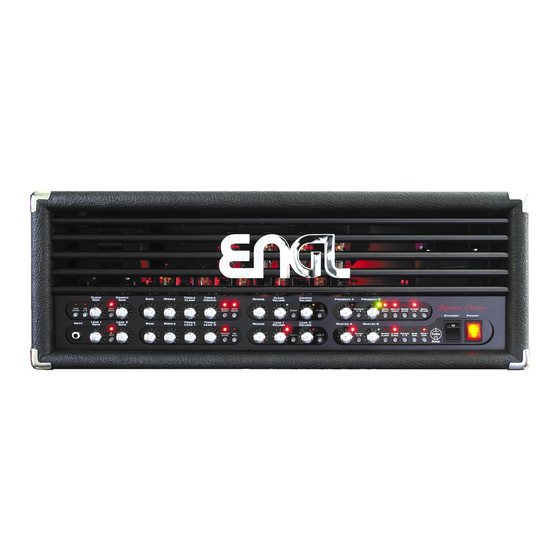
Page 4: Front Panel
FRONT PANEL Explanation: *MCH 1 (Main Channel 1) Pushbuttons/Controls marked with *MCH 1 are assigned to Main Channel 1 and are only active in this channel. *MCH 2 (Main Channel 2) Pushbuttons/Controls marked with *MCH 2 are assigned to Main Channel 2 and are only active in this channel. - Page 5 99 MIDI memory locations, assign polychannels 1-8 via the interface and control another ENGL device equipped with an MIDI Interface Port; e.g. an ENGL rack stereo power amp, type 930 (-> for a stereo setup!).
- Page 6 17 DEPTH BOOST *P.A.Section; Boosts the bottom end in the power amp; this pushbutton is assigned to the Presence A control. Tip: (see section 16, Tip!) 18 PRESENCE A/B *P.A.Section; Switches between Presence A and Presence B; the active Presence control is identified by the illuminated LED next to the respective control.
- Page 7 26 LEAD *MCH 2; Controls the amount of distortion in the Lead mode; the Gain (23) and Lead controls are used to define the relationship between the Crunch and Lead signals. CAUTION: Extremely high gain and volume levels in the Crunch and Lead mode can produce strong feedback.
- Page 8 36 MASTER A *P.A.Section; Master volume A for power amp output. Tip: The two Master volume controls offer a few practical applications: adjust two different volume levels in the poweramp and assign them to the four channels and the Rough and Smooth modes. Another application is a combination with the two poweramp operating modes Triode and Pentode: Set the desired volume level with one Master for the Pentode mode.
-
Page 9: Rear Panel
Ensure replacement fuses bear identical ratings (refer to the table)! 45 MIDI INTERFACE PORT You can connect the ENGL MIDI Interface to this jack (Sub D, 25 pins) and then execute channel selection functions (13), (34), (39), Rough/Smooth mode (31) selection, Presence A/B (18) switching, Master A/B (37) switching, speaker A/B (21) switching, Reverb Active (22) and Triode/Pentode mode (40) via MIDI. - Page 10 FX device itself. With this application, you will find it very comfortable to control the amp via MIDI and the ENGL MIDI Interface: All of the amp's MIDI functions can be switched at the same time with the MIDI FX processor's effects via a MIDI footpedal! 51 SEND Signal output for the Master Loop or Main Channel 1´s FX Loop (Depending on FX Loop Status...
- Page 11 61 CABLE RETURN Connect one end of a cable with 1/4" plugs to this jack, the other end to jack 62. Only Mono cables can be tested with this feature. Tip: This test circuit is a very useful tool: You are able to test speaker cables as well as guitar cables and patch cables (only the mono wire is tested!) for FX device connections.
- Page 12 70 LEVEL Signal level control for the frequency-corrected line output; use it to match the amp’s signal level at the Line output to the mixing console or recorder’s input. Tip: The Line Out's output level is influenced by the following factors: 1. in the PREAMP setting, by the input level (Gain, Crunch, Lead), the Volume control settings for the various channels and to some degree by voicing control settings.
-
Page 13: Impedance Selector
76 IMPEDANCE SELECTOR Impedance selector for the poweramp outputs A and B. Set the required impedance: 4, 8 or 16 ohms. The selected impedance values are identical at Output A and Output B! If necessary use a screwdriver for the adjustment. -
Page 14: Technical Data
Technical Data Rated power: 100 W Power Outlet Impedances : 4, 8 or 16 ohms Minimum Input level: - 40 dB Maximum Input Level: - 3 dB Effects loop: SEND - 10 dB (average), - 3 dB (max.) RETURN dB (max.) LINE output: dB (max.) Levels are based on 0db =>... - Page 15 DO NOT OPEN ! 16 z CABLES TO THESE JACKS, < 4 z 12 z >16 z SAVAGE special edition - TYPE 660 220-240 V 2,5 A TYPE AND RATING ! ENSURE THEY ARE NOT RISK OF ELECTRIC SHOCK !
Need help?
Do you have a question about the Savage Special Edition and is the answer not in the manual?
Questions and answers