Table of Contents
Advertisement
Operator's Manual
Oxygen Conserving
Dealer: This manual MUST be given to the end
user.
User: Before using this cylinder, read this
manual and save for future reference.
For more information regarding
Invacare products, parts, and services,
please visit www.invacare.com
HomeFill
Cylinder
HF2PCL6
HF2PC9
HF2PCL4
™
Advertisement
Table of Contents

Related Manuals for Invacare HomeFill HF2PCL6


Summary of Contents for Invacare HomeFill HF2PCL6
- Page 1 Oxygen Conserving Cylinder HF2PCL6 HF2PC9 HF2PCL4 Dealer: This manual MUST be given to the end user. User: Before using this cylinder, read this manual and save for future reference. For more information regarding Invacare products, parts, and services, please visit www.invacare.com...
- Page 2 DAMAGE MAY OCCUR. ACCESSORIES WARNING Invacare products are specifically designed and manufactured for use in conjunction with Invacare accessories. Accessories designed by other manufacturers have not been tested by Invacare and are not recommended for use with Invacare products. NOTE: Updated versions of this manual are available on www.invacare.com. HomeFill Part No 1112648 ™...
-
Page 3: Table Of Contents
TABLE OF CONTENTS TABLE OF CONTENTS SPECIAL NOTES ............4 RECEIVING INSPECTION ..........5 INTENDED USE ............5 SECTION 1—GENERAL GUIDELINES ......6 Operating Information.....................6 Maintenance ........................8 SECTION 2—FEATURES ..........9 SECTION 3—TYPICAL PRODUCT PARAMETERS ..10 SECTION 4—INSPECTION AND COMPRESSOR INTERFACE ..............11 Cylinder Prefill Inspection..................11 Connecting/Disconnecting the Cylinder to/from the Compressor.. -
Page 4: Special Notes
SPECIAL NOTES SPECIAL NOTES Signal words are used in this manual and apply to hazards or unsafe practices which could result in personal injury or property damage. Refer to the following table for definitions of the signal words. SIGNAL WORD MEANING DANGER Danger indicates an imminently hazardous situation which, if not avoided, will result in death or serious injury. WARNING Warning indicates a potentially hazardous situation which, if not avoided, could result in death or serious injury. -
Page 5: Receiving Inspection
RECEIVING INSPECTION CAUTION “Caution: Federal law restricts this device to sale by or rental or on the order of a physician, or any other practitioner licensed by the law of the state in which he/she practices to use or order the use of this device.” RECEIVING INSPECTION Remove product from package and inspect for damage. If there is any damage, DO NOT use. Contact your dealer/ Home Care equipment provider. INTENDED USE To store, regulate, and deliver supplemental oxygen to patients who may have difficulty extracting oxygen from the air they breathe. It is for patients who would normally receive the oxygen via a nasal cannula. The device delivers USP 93% oxygen at a number of different flow/pulse settings. It is intended to be used as an oxygen saving device that may reduce the drying out of the airways. Part No 1112648 HomeFill ™... -
Page 6: Section 1-General Guidelines
This section contains important information for the safe operation and use of this product. Operating Information Only personnel instructed and trained in the use of the HomeFill O2 Conserving Cylinder should operate this product. Product contains magnetic, ferrous material that may affect the results of an MRI. Be sure all connections are tight and leak free. DO NOT autoclave. DO NOT gas sterilize with ethylene oxide. DO NOT clean with aromatic hydrocarbons. DO NOT immerse product in any kind of liquid. Store product in a clean area when not is use. Only use Invacare Corporation HF2PCL6 carrying bag, HF2PC9 carrying bag, or HF2PCL4 carrying bag. NEVER smoke in an area where oxygen is being administered. ALWAYS confirm prescribed dose before administering to patient and monitor on a frequent basis. DO NOT use if dirt or contaminants are present on or around cylinder, valve, product or connecting devices. HomeFill Part No 1112648 ™... - Page 7 SECTION 1—GENERAL GUIDELINES NEVER use near any type of flame or flammable/explosive substances, vapors or atmosphere. ALWAYS follow ANSI and CGA standards for Medical Gas Products and Flowmeters (E‐7) and Oxygen Handling (G‐4). NO OXYGEN is delivered when the pointer is aligned with “Off”. DO NOT block the outlet fitting or kink the cannula when the product is in use, this may damage the unit. The use of this device is limited to the oxygen patient. Cylinders MUST be used only by the oxygen patient and are not to be distributed to any other individual for any purpose. This product is NOT to be used by patients who breathe through their mouths. DO NOT use oils, greases, organic lubricants or any combustible materials on or near this product. Wash and dry hands properly prior to usage. DO NOT allow oil from your hands or other sources to come into contact with the compressor coupling or bottle fittings. These substances may become flammable in the presence of oxygen and cause injury. Avoid touching the bottle fitting whenever possible. Example of items to avoid are hand creams or lotions, cooking oils, suntan oils or sunblocks and similar oily products. If you use these types of products, wash your hands prior to using the HomeFill unit. If the bottle fitting should come in contact with such substances it should be cleaned off with a damp cloth prior to connecting it to the compressor. NEVER oil or lubricate the compressor coupler or bottle fittings. NEVER use any penetrating oil or lubricant such as ® ® WD‐40 or 3‐in‐1 oil . If connection difficulty is experienced verify that the bottle fitting is being inserted straight down into the compressor coupler. If continued difficulty is experienced contact your supplier for assistance. Part No 1112648 HomeFill ™...
-
Page 8: Maintenance
SECTION 1—GENERAL GUIDELINES DO NOT use a humidifier with this product. DO NOT allow cylinders to tip or fall. Secure gas cylinders so they cannot fall. Ensure cylinder is always in upright position. DO NOT store cylinders near sources of heat or flame. This product is equipped with a relief valve. If you hear a loud hissing or popping sound coming from the product, discontinue use of product, turn the flow selector to the “Off” position, and contact your dealer/Home Care equipment provider. DO NOT use while sleeping without consulting your healthcare provider. This product is designed to operate with a standard single lumen, adult oxygen nasal cannula with a maximum length of seven feet. The cannula is for single patient use only. Cannula MUST be installed on outlet connection prior to use. DO NOT place the unit under clothing while in use. When this product is in use a small amount of oxygen is vented. Wearing the unit under clothing may saturate fabrics with oxygen and cause them to burn rapidly if exposed to sparks or flame. It may take several hours for oxygen levels in fabrics to return to normal. Maintenance DO NOT use a liquid leak detector to test for leaks. DO NOT attempt to repair product. HomeFill Part No 1112648 ™... -
Page 9: Section 2-Features
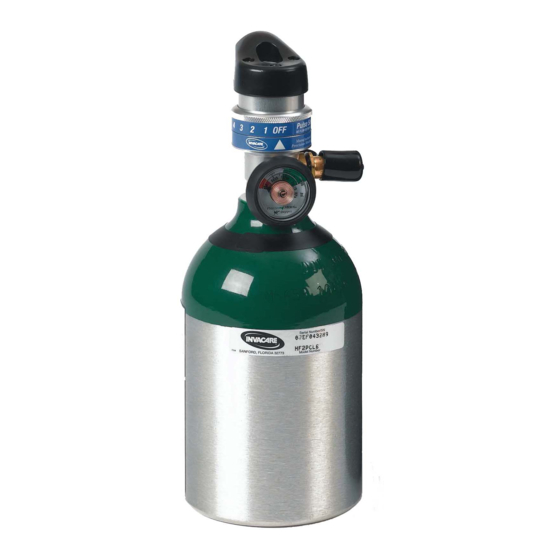
SECTION 2—FEATURES SECTION 2—FEATURES DANGER This product is not intended as a life‐sustaining or life‐supporting device. Outlet Connection Cannula Flow Dial Cylinder Fill Port Cylinder Gauge FIGURE 2.1 Product Diagram Part No 1112648 HomeFill ™... -
Page 10: Section 3-Typical Product Parameters
PRESSURE: 50 psig 50 psig DIMENSIONS: HF2PCL6: Weight 4.3 lbs (1.95 kg) 4.1 lbs (1.86 kg) HF2PCL6: Overall Length 11.1 in (28 cm) 10.9 in (27.7 cm) HF2PCL6: Diameter 4.4 in (11.1 cm) 4.4 in (11.1 cm) HF2PC9: Weight 5.3 lbs (2.4 kg) 5.1 lbs (2.31 kg) -
Page 11: Section 4-Inspection And Compressor Interface
SECTION 4—INSPECTION AND COMPRESSOR INTERFACE SECTION 4—INSPECTION AND COMPRESSOR INTERFACE NOTE: Refer to the HomeFill Compressor Owner’s Manual for compressor operating instructions. Cylinder Prefill Inspection WARNING All cylinders MUST be inspected before attempting to fill; otherwise, injury or damage may occur. NEVER smoke in an area where oxygen is being administered. NEVER use near any type of flame or flammable/explosive substances, vapors or atmosphere. NOTE: For this procedure, refer to FIGURE 4.1. The Hydrostatic Testing Date Aluminum cylinders MUST undergo testing every five years. WARNING DO NOT fill cylinders that have not been tested in the past five years. Otherwise, serious personal injury may result. Contact your dealer for replacement. Part No 1112648 HomeFill ™... - Page 12 SECTION 4—INSPECTION AND COMPRESSOR INTERFACE External Examination 1. Examine the outside of the cylinder for the following conditions, and replace the cylinder if they exist: • Dents or dings • Arc Burns • Oil or Grease • Any other signs of damage that might cause a cylinder to be unacceptable or unsafe for use. 2. Examine the cylinder for evidence of fire or thermal damage. Evidence includes charring or blistering of the paint, or other protective coating or heat sensitive indicator. If fire or thermal damage is found, replace the cylinder. 3. Inspect the cylinder fillport for the following, and replace if found: • Debris, oil or grease • Noticeable signs of damage • Signs of corrosion inside the valve • Signs of excessive heat or fire damage HomeFill Part No 1112648 ™...
- Page 13 Secure cylinder during storage and use. No smoking in cylinder area. Keep away from heat, flame and spark. Keep out of reach of children. DO NOT drop. Filling of this gas is performed by Invacare HomeFill oxygen system Only. Cylinders that have been refinished and/or exposed to elevated temperatures must be hydrostatically tested before filling.
-
Page 14: Connecting/Disconnecting The Cylinder To/From The Compressor
SECTION 4—INSPECTION AND COMPRESSOR INTERFACE Connecting/Disconnecting the Cylinder to/from the Compressor Connecting the Cylinder to the Compressor WARNING NEVER use tools of any kind to connect/disconnect the cylinder and the compressor. Otherwise, severe injury and/or damage may occur. DO NOT drop oxygen cylinders. Use two hands when handling/transporting oxygen cylinders. Otherwise, injury or damage may occur. DO NOT use a liquid leak detector to test for leaks. NOTE: For this procedure, refer to FIGURE 4.2 and FIGURE 4.3. 1. Examine the cylinder gauge. If the cylinder pressure is less than 1500 psig., proceed to STEP 2 (FIGURE 4.3). NOTE: If the cylinder pressure is greater than 1500 psig., DO NOT attempt to top off this cylinder. It may not fill. 2. Set the regulator flow dial on the cylinder to OFF (FIGURE 4.3). 3. Remove the cylinder and connector fillport covers (if present). CAUTION DO NOT connect the outlet (cannula) connection to the HomeFill unit, otherwise the conserving cylinder will not work properly. - Page 15 SECTION 4—INSPECTION AND COMPRESSOR INTERFACE NOTE: If the outer ring (sleeve) is in the UP position (GREEN dots not visible), the connector fillport will not be able to accept the cylinder fillport. Pushing DOWN momentarily will reset the connector fillport (GREEN dots visible) to accept the cylinder fillport. PUSH Outer Ring (Sleeve) DOWN Connector Fillport GREEN Dots BEFORE COUPLING CYLINDER, PUSH DOWN ON SLEEVE UNTIL GREEN DOTS ARE VISIBLE. FIGURE 4.2 Resetting Connector Fillport 5. Grasp the cylinder/regulator assembly in the area behind the cylinder gauge (FIGURE 4.3). 6. Position the cylinder in the compressor cradle (FIGURE 4.3).
- Page 16 SECTION 4—INSPECTION AND COMPRESSOR INTERFACE Compressor Cylinder/Regulator Assembly Cylinder Fillport Connector Fillport Outer Ring (Sleeve) Cylinder Gauge PULL UP Regulator Regulator Cylinder Flow Dial Cylinder Outlet (Cannula) Gauge Connection Cylinder Fillport Power Switch Compressor Cradle Outer Ring Connector (Sleeve) Fillport NOTE: Fillport covers not shown for clarity.
- Page 17 SECTION 4—INSPECTION AND COMPRESSOR INTERFACE Disconnecting the Cylinder from the Compressor WARNING NEVER use tools of any kind to connect/disconnect the cylinder and the compressor. Otherwise, severe injury and/or damage may occur. NOTE: For this procedure, refer to FIGURE 4.4. 1. Press the compressor power switch to the Off (O) position. 2. Grasp the cylinder/regulator assembly in the area behind the cylinder gauge. 3. With the other hand, grasp the outer ring (sleeve) of the connector fillport and push DOWN. 4. Lift up on the cylinder/regulator assembly to remove from the connector fillport. Cylinder/Regulator Assembly PUSH DOWN Cylinder Gauge Outer Ring Cylinder (Sleeve) Compressor Fillport Connector Fillport FIGURE 4.4 Disconnecting the Cylinder from the Compressor Part No 1112648...
- Page 18 SECTION 4—INSPECTION AND COMPRESSOR INTERFACE 5. When the cylinder fillport is disconnected from the connector fillport, release the outer ring (sleeve) of the connector fillport and use two hands to remove the cylinder from the compressor cradle. 6. Place the fillport covers onto the connector and cylinder fillports. NOTE: The fillport covers should be used whenever cylinders are not being filled. HomeFill Part No 1112648 ™...
-
Page 19: Section 5-Operating Instructions
SECTION 5—OPERATING INSTRUCTIONS SECTION 5—OPERATING INSTRUCTIONS WARNING NEVER smoke in an area where oxygen is being administered. NEVER use near any type of flame or flammable/explosive substances, vapors or atmosphere. NOTE: For this procedure, refer to FIGURE 5.1. 1. Prior to each use, inspect product for visible damage. DO NOT use if any damage is found. NOTE: If for any reason, any label becomes illegible or lost, contact your dealer/Home Care equipment provider. 2. Be sure regulator is in the “Off” position. Align “Off” with the indicating pointer. 3. Position the cylinder so the oxygen cylinder valve outlet is pointing away from the user and any other person(s). WARNING DO NOT direct flow of oxygen at any person, or flammable material when adjusting the flow dial. 4. Attach a standard adult single lumen oxygen nasal cannula, no longer than seven feet to the product’s outlet according to the cannula manufacturer’s instructions. DO NOT use pediatric, low flow nasal cannulas or oxygen masks with this product. NOTE: A unit without cannula attached may pulse if set at position 1‐5. Part No 1112648 HomeFill ™... - Page 20 Health Care provider or cannula manufacturer. Refer to FIGURE 5.1. 6. Turn dial until indicating FIGURE 5.1 Cannula pointer is aligned with Placement the prescribed setting. WARNING When pointer on contents gauge enters red zone, it is recommended to refill the cylinder on the Invacare HomeFill Compressor. NO OXYGEN is delivered in between settings. To obtain desired flow, the indicating pointer must align with a specific number on the dial. To avoid injury to patient, ALWAYS confirm prescribed setting before administering to patient and monitor flow on a frequent basis. Only use Invacare Corporation HF2PCL6 carrying bag, the HF2PC9 carrying bag, or the HF2PCL4 carrying bag. 7. Breathe through the nose and feel a pulse of oxygen as you inhale. NOTE: When on a pulse setting, there is flow or a pulse only at the beginning of each breath. If you do not feel the pulse at the beginning of each breath, check the setting. NOTE: Because each patient’s breathing pattern is different and the environment varies, it may be difficult to feel some low setting pulses. HomeFill Part No 1112648 ™...
-
Page 21: Section 6-Maintenance
SECTION 6—MAINTENANCE SECTION 6—MAINTENANCE 1. After each use, clean exterior of the product with a dry, lint free cloth only. 2. Store product in a clean area free from grease, oil, and other sources of contamination. CAUTION DO NOT use cleaning solutions. DO NOT immerse product in any kind of liquid. All repairs MUST be done by Invacare Corporation. Part No 1112648 HomeFill ™... -
Page 22: Section 7-Cylinder Fill Times
Concentrator Flow Rate to Patient: Filling (Platinum 5 up to 3 L/min. and Platinum 10 up to 5 Times L/min) HF2PC9 HF2PCL4 HF2PCL6 NORMAL 2 hr 20 min 60 min 1 hr 25 min MAXIMUM 2 hr 45 min 1 hr 20 min... -
Page 23: Limited Warranty
Upon receiving notice of an alleged defect in a product, Invacare will issue a serialized return authorization. It shall be the responsibility of the purchaser to pack the product(s) or part(s) in an appropriate manner to avoid shipping damage and return the product(s) or part(s), at the purchaser’s expense, to... - Page 24 THE DEFECTIVE PRODUCT PURSUANT TO THE TERMS CONTAINED HEREIN. THE APPLICATION OF ANY IMPLIED WARRANTY WHATSOEVER SHALL NOT EXTEND BEYOND THE DURATION OF THE EXPRESS WARRANTY PROVIDED HEREIN. INVACARE SHALL NOT BE LIABLE FOR ANY CONSEQUENTIAL OR INCIDENTAL DAMAGES WHATSOEVER.