
Related Manuals for Kenwood TK-7108


Summary of Contents for Kenwood TK-7108
-
Page 1: Instruction Manual
INSTRUCTION MANUAL VHF FM TRANSCEIVER TK-7108 UHF FM TRANSCEIVER TK-8108 KENWOOD CORPORATION © B62-1664-10 (M) 09 08 07 06 05 04 03 02 01... -
Page 2: Thank You
THANK YOU! We are grateful you chose KENWOOD for your personal mobile applications. We believe this easy-to-use transceiver will provide dependable communications to keep personnel operating at peak efficiency. KENWOOD transceivers incorporate the latest in advanced technology. As a result, we feel strongly that you will be pleased with the quality and features of this product. -
Page 3: Table Of Contents
CONTENTS UNPACKING AND CHECKING EQUIPMENT ........1 ..............1 UPPLIED CCESSORIES PREPARATION .................. 2 ................2 OOLS EQUIRED ............... 2 OWER ABLE ONNECTION .............. 3 NSTALLING THE RANSCEIVER ORIENTATION ..................4 ................... 4 RONT ANEL .................... 5 ISPLAY ..................5 ANEL BASIC OPERATIONS ................ -
Page 4: Unpacking And Checking Equipment
UNPACKING AND CHECKING EQUIPMENT Note: The following unpacking instructions are for use by your KENWOOD dealer, an authorized KENWOOD service facility, or the factory. Carefully unpack the transceiver. We recommend that you identify the items listed in the following table before discarding the packing material. If any items are missing or have been damaged during shipment, file a claim with the carrier immediately. -
Page 5: Preparation
Note: The following preparation instructions are for use by your KENWOOD dealer, an authorized KENWOOD service facility, or the factory. -
Page 6: C Onnection
NSTALLING THE RANSCEIVER For passenger safety, install the transceiver securely, using the supplied mounting bracket, so the transceiver will not break loose in the event of a collision. 1 Mark the position of the holes in the dash by using the mounting bracket as a template. -
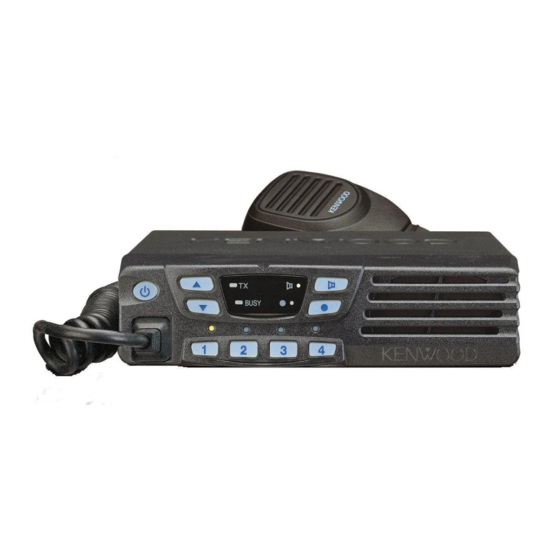
Page 7: Orientation
ORIENTATION RONT ANEL q w e q q q q q (Power) switch Press to switch the transceiver ON. Press and hold for approximately 1 second to switch the transceiver OFF. w w w w w ▲ key Press to increase the volume level. e e e e e ▼... -
Page 8: Display
ISPLAY e l i t t i y l t e l i s t i v i t e l i s t i v i t y l t ANEL Antenna connector External speaker jack Power input connector... -
Page 9: Basic Operations
BASIC OPERATIONS ON/ OFF WITCHING OWER Press the switch to switch the transceiver ON. Press and hold the switch for approximately 1 second to switch the transceiver OFF. DJUSTING THE OLUME Press the ▲ key to increase the volume and the ▼ key to decrease the volume. ELECTING A HANNEL Select your desired channel by pressing a key from 1 to 4. -
Page 10: Scan
SCAN To activate the Scan function, press the key programmed as Scan On/ Off. • The indicator next to the programmed key flashes (“ ” or “ ”). When a signal is detected on a channel, the Scan indicator stops flashing. At this time, both the Scan indicator and the Busy indicator light. -
Page 11: Dtmf Calls
DTMF CALLS Note: To make DTMF calls, you must have an optional microphone with a DTMF keypad. ANUAL IALLING Press and hold the PTT switch, then enter the digits on the microphone keypad. • You can enter the digits 0 ~ 9, A ~ D, , and #. -
Page 12: Code Squelch (Id Code)
CODE SQUELCH (ID CODE) Code Squelch is enabled or disabled by your dealer. This function turns the transceiver squelch OFF only when it receives the DTMF code that has been set up in your transceiver. Transceivers that do not transmit the correct code will not be heard. -
Page 13: Advanced Operations
ADVANCED OPERATIONS (TOT) IMER The purpose of the Time-out Timer is to prevent any caller from using a channel for an extended period of time. If you continuously transmit for a period of time that exceeds the programmed time, the transceiver will stop transmitting and an alert tone will sound. -
Page 14: Emergency Operation
MERGENCY PERATION Press and hold the key programmed as Emergency to enter Emergency Mode. • The transceiver will beep unless your dealer has activated “Secret” Emergency Mode. • The channel will switch to the pre-programmed emergency channel. While in “Secret” Emergency Mode, the Busy indicator lights every 10 seconds. When your signal has been acknowledged, the Busy indicator will light 2 times every 10 seconds.