
Related Manuals for Allied Telesis AT-2701FXa/SC


Summary of Contents for Allied Telesis AT-2701FXa/SC
- Page 1 AT-2701 Series Adapters Fiber Fast Ethernet Adapters AT-2701FXa/SC AT-2701FXa/ST AT-2701FTXa/SC AT-2701FTXa/ST Installation and User’s Guide 613-001847 Rev. A...
- Page 2 Telesis, Inc. be liable for any incidental, special, indirect, or consequential damages whatsoever, including but not limited to lost profits, arising out of or related to this manual or the information contained herein, even if Allied Telesis, Inc. has been...
- Page 3 European Union Restriction of the Use of Certain Hazardous Substances (RoHS) in Electrical and Electronic Equipment This Allied Telesis RoHS-compliant product conforms to the European Union Restriction of the Use of Certain Hazardous Substances (RoHS) in Electrical and Electronic Equipment. Allied Telesis ensures RoHS conformance by requiring supplier Declarations of Conformity, monitoring incoming materials, and maintaining manufacturing process controls.
- Page 4 Translated Safety Statements Important: The indicates that a translation of the safety statement is available in a PDF document titled “Translated Safety Statements” posted on the Allied Telesis website at: www.alliedtelesis.com/support/.
-
Page 5: Table Of Contents
Contents Preface ....................................7 Safety Symbols Used in this Document..........................8 Contacting Allied Telesis ................................9 Chapter 1: Overview ................................11 Description....................................12 SC Fiber Optic Adapter ..............................13 ST Fiber Optic Adapter..............................13 Twisted Pair Copper Port ..............................13 LED ....................................14 Model Naming Conventions..............................15 Features ....................................16 Supported Operating Systems .............................17 Accessing Documents ................................18... - Page 6 Contents Chapter 5: Modifying Advanced Properties ........................57 Overview ....................................58 Guidelines..................................58 Supported Advanced Properties............................58 Accessing Advanced Properties ............................60 Early Tx Threshold................................62 Network Address (LAA) ................................63 Guidelines for Assigning a Locally Administered Address.....................63 Assigning the Network Address (LAA)...........................63 PCI PME ....................................65 Speed/Duplex ..................................67 Speed/Duplex (100Mb Fiber)..............................68 Speed/Duplex (Copper) ................................69 Vlan Id....................................70...
-
Page 7: Preface
Fiber Fast Ethernet Network Adapter cards. The adapter cards included in this series are: AT-2701FXa/SC AT-2701FXa/ST AT-2701FTXa/SC AT-2701FTXa/ST The Preface contains the following sections: “Safety Symbols Used in this Document” on page 8 “Contacting Allied Telesis” on page 9 ... -
Page 8: Safety Symbols Used In This Document
Preface Safety Symbols Used in this Document This document uses the following conventions: Note Notes provide additional information. Caution Cautions inform you that performing or omitting a specific action may result in equipment damage or loss of data. Warning Warnings inform you that performing or omitting a specific action may result in bodily injury. -
Page 9: Contacting Allied Telesis
AT-2701 Series Fast Ethernet Adapter Installation Guide Contacting Allied Telesis If you need assistance with this product, you may contact Allied Telesis technical support by going to the Support & Services section of the Allied Telesis web site at www.alliedtelesis.com/support. You can find links for... - Page 10 Preface...
-
Page 11: Chapter 1: Overview
Chapter 1 Overview This chapter provides an introduction to the Allied Telesis AT-2701 series Fast Ethernet network adapter cards and contains the following sections: “Description” on page 12 “Model Naming Conventions” on page 15 “Features” on page 16 ... -
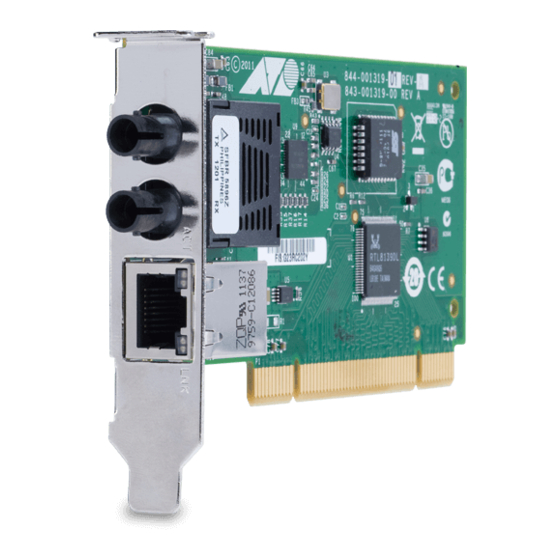
Page 12: Description
AT-2701FTXa A dual port adapter card equipped with fiber optic and copper connectors. Using the copper interface, the card operates at 10 or 100 Mbps. The AT-2701 series includes the following models: AT-2701FXa/SC AT-2701FXa/ST AT-2701FTXa/SC AT-2701FTXa/ST ... -
Page 13: Sc Fiber Optic Adapter
AT-2701 Series Fast Ethernet Adapter Installation Guide SC Fiber Optic The AT-2701FXa/SC and AT-2701FTXa/SC adapter cards are equipped with a 100BASE-FX port with the SC adapter. Adapter The SC adapter is shown in Figure 2. Figure 2. SC Fiber Optic Adapter To connect the SC adapter to a network cable, you must have a fiber optic network cable with the SC connector. -
Page 14: Led
Overview The AT-2701FXa model comes with a single combination LED that indicates both the link status and activity status. The AT-2701FTXa model comes with two LED’s. One LED indicates the link status for either the copper or fiber port; the other indicates the activity status for the port with the valid link. -
Page 15: Model Naming Conventions
AT-2701 Series Fast Ethernet Adapter Installation Guide Model Naming Conventions The hardware features of the AT-2701 series adapter cards represented by the letters and numbers in the model names. The conventions for the AT-2701 adapter cards are identified in Figure 5. Figure 5. -
Page 16: Features
Overview Features The following list shows the features of the AT-2701 series adapter cards: One 100BASE-FX with an SC or ST fiber optic adapter PCI version 2.2 interface Pre-Execution Environment (PXE) 2.1 Remote Boot Wake on LAN (WOL) ... -
Page 17: Supported Operating Systems
AT-2701 Series Fast Ethernet Adapter Installation Guide Supported Operating Systems The following list shows the supported operating systems for the AT-2701 series adapter cards: Windows 7 Windows XP Linux Note To install driver software for Windows 7 and Windows XP, see Chapter 3, “Installing the Driver Software for Windows”... -
Page 18: Accessing Documents
1. Open a web browser, such as Internet Explorer or FireFox, on your system and enter the following: http://www.alliedtelesis.com/ The Allied Telesis home page is displayed. 2. Enter “2701” in the search box and press the enter key. 3. Select the product model of your AT-2701 series adapter card. -
Page 19: Contents Of Your Shipment
The AT-2701 series adapter card is not shipped with a software driver CD. You must download the driver software for Windows from the Allied Telesis website. See Chapter 3, “Downloading the Driver Software for Windows” on page 35. For Linux systems, see Chapter 4, “Configuring the Ethernet Interface for Linux Systems”... -
Page 20: Warranty Registration
Warranty Registration Allied Telesis hardware products are covered under limited warranties. All Allied Telesis warranties are subject to and provided only on the terms and conditions set out in the Allied Telesis Limited Warranties listed on the Allied Telesis website at http://alliedtelesis.com/support/warranty. -
Page 21: Chapter 2: Installing The Hardware
Chapter 2 Installing the Hardware This chapter contains the following sections: “System Requirements” on page 22 “Reviewing Safety Precautions” on page 23 “Pre-Installation Checklist” on page 25 “Replacing the Bracket” on page 26 “Installing a Network Adapter Card” on page 28 ... -
Page 22: System Requirements
Installing the Hardware System Requirements Before installing the AT-2701 Series Fiber Fast Ethernet Network Adapter cards, make sure your system meets the requirements listed below: PC with one of the following operating systems installed: – Windows XP – Windows 7 –... -
Page 23: Reviewing Safety Precautions
Note indicates that a translation of the safety statement is available in a PDF document titled “Translated Safety Statements” posted on the Allied Telesis website at www.alliedtelesis.com/ support/software/. Warning Do not stare into the laser beam. Warning This is a “Class 1 LED product”. - Page 24 Installing the Hardware Warning The module is being installed in a system that operates with voltages that can be lethal. Before you remove the cover of your system, you must observe the following precautions to protect yourself and to prevent damage to the system components. –...
-
Page 25: Pre-Installation Checklist
1. Check that your computer has an appropriate open PCI slot. 2. Verify that your system is using the latest BIOS. 3. When you download the driver software from the Allied Telesis website, record the path to where the driver file resides on your system. -
Page 26: Replacing The Bracket
Installing the Hardware Replacing the Bracket The AT-2701 series adapter card is shipped with the low-profile bracket attached to the adapter. Depending on your system, you may need to replace the bracket attached to your adapter card. The following procedure describes how to remove the low-profile bracket from the adapter card and replace it with the standard bracket. - Page 27 AT-2701 Series Fast Ethernet Adapter Installation Guide Figure 7. Fastening Screws onto Standard Bracket...
-
Page 28: Installing A Network Adapter Card
Installing the Hardware Installing a Network Adapter Card The following instructions apply to installing an AT-2701 series adapter card in most systems. Refer to the manuals that were supplied with your system for details about performing these tasks on your particular system. To install the network adapter card, perform the following procedure: 1. - Page 29 AT-2701 Series Fast Ethernet Adapter Installation Guide 3. Select an empty, non-shared PCI slot and remove the faceplate. Keep the faceplate in a safe place. You may need it for future use. See Figure 9. Figure 9. Removing the Faceplate From PCI Slot Note If you cannot locate or know how to find a PCI slot, refer to the documentation that came with your system.
- Page 30 Installing the Hardware Figure 10. Inserting the Network Adapter Card Caution Do not use excessive force when seating the card, as this may damage the system or the adapter card. If the card resists seating, remove it from the system, realign it, and try again. 6.
- Page 31 AT-2701 Series Fast Ethernet Adapter Installation Guide 9. Power the system on. Note If you installed the adapter card in Windows XP system before installing the driver software, the Found New Hardware Wizard launches automatically. For more information, see Chapter 3, “Installing the Driver Software for Windows”...
-
Page 32: Connecting The Network Cables
Installing the Hardware Connecting the Network Cables The AT-2701 series network adapter card is equipped with the SC or ST fiber optic adapter. To connect a network cable to the adapter, perform the following procedure: 1. Prepare a fiber optic cable with an appropriate connector to your adapter. -
Page 33: Chapter 3: Installing The Driver Software For Windows
Chapter 3 Installing the Driver Software for Windows This chapter describes how to install driver software for the AT-2701 series adapter onto your operating system. It contains the following topics: “Overview” on page 34 “Downloading the Driver Software for Windows” on page 35 ... -
Page 34: Overview
Installing the Driver Software for Windows Overview When you install the AT-2701 series adapter on your computer, your next step is to install driver software for the adapter onto your Windows operating system. You can install driver software using Device Manager or using the silent installation method. -
Page 35: Downloading The Driver Software For Windows
Downloading the Driver Software for Windows The AT-2701 series adapter is not shipped with a software driver CD. You must download driver software from the Allied Telesis website. To download driver software, do the following: 1. Open a web browser, such as Internet Explorer or FireFox, on your system and enter the following: http://www.alliedtelesis.com/support/software... - Page 36 Installing the Driver Software for Windows Figure 13. Specifying the Folder for Unzipped Files 7. Specify the location of the folder and click Extract. 8. Record the location of the folder.
-
Page 37: Accessing The Device Manager
AT-2701 Series Fast Ethernet Adapter Installation Guide Accessing the Device Manager When you install or update the driver software for AT-2701 series adapter, you must first access Device Manager. The procedures for accessing Device Manager are slightly different among Windows operating systems. To access Device Manager on your operating system, follow one of the procedures below: “Accessing Device Manager on Windows 7,”... -
Page 38: Accessing Device Manager On Windows Xp
Installing the Driver Software for Windows Figure 15. Device Manager Window on Windows 7 Accessing Device To access Device Manager on Windows XP, do the following: Manager on 1. Right-click the My Computer icon on the desktop and select Windows XP Properties. - Page 39 AT-2701 Series Fast Ethernet Adapter Installation Guide 2. Select the Hardware Tab. The Hardware page is shown in Figure 17. Figure 17. Hardware Page on Windows XP 3. Click Device Manager. The Device Manager window opens. Your AT-2701 series adapter is detected as a Realtek device or Ethernet Controller as shown in Figure 18.
-
Page 40: Installing The Driver Software For Windows
Installing the Driver Software for Windows Installing the Driver Software for Windows Once you physically install the AT-2701 series adapter, the system detects the new hardware and creates an entry in Device Manager when the Windows operating system first boots up. Shortly after you log in, you need to install the driver software for your adapter card. - Page 41 AT-2701 Series Fast Ethernet Adapter Installation Guide 3. Select Update Driver Software. The Update Driver Software window pops up as shown in Figure 20. Figure 20. Update Driver Software Window on Windows 7 4. Select Browse my computer for driver software. The Update Driver Software window prompts you to enter the location of the driver folder as shown in Figure 21.
-
Page 42: Installing The Driver Software On Windows Xp
Installing the Driver Software for Windows 5. Specify the location of the driver software. See “Downloading the Driver Software for Windows” on page 35 for details. 6. Click Next. The confirmation message shown in Figure 22 on page 42 appears when the driver software is successfully updated. - Page 43 AT-2701 Series Fast Ethernet Adapter Installation Guide Figure 23. Ethernet Controller on Windows XP 3. Select Update Driver. The Hardware Update Wizard window pops up as shown in Figure 24. Figure 24. Hardware Update Wizard 1 4. Select No, not this time.
- Page 44 Installing the Driver Software for Windows 5. Click Next. The Hardware Update Wizard prompts you to select one of two options as shown in Figure 25 Figure 25. Hardware Update Wizard 2 6. Select Install from a list or specific location (Advanced). 7.
- Page 45 AT-2701 Series Fast Ethernet Adapter Installation Guide Figure 26. Hardware Update Wizard 3 8. Specify the location of the driver software. 9. Click Next. The confirmation message is displayed as shown in Figure 27. Figure 27. Hardware Update Wizard 4 10.
-
Page 46: Updating The Driver Software For Windows
Device Manager detects and lists. Device Manager lists your adapter card as Allied Telesis AT-2701FxXv2 100Mb Fiber Ethernet once you installed the driver software. Before you installed the driver software, Device Manager lists your adapter as Ethernet Controller or a Realtek device. -
Page 47: Updating The Driver On Windows Xp
To install the driver software for the AT-2701 series adapter onto the Windows XP, do the following: Driver on Windows XP 1. Access Device Manager. See “Accessing Device Manager on Windows XP” on page 38. 2. In the Device Manager window, right-click Allied Telesis AT- 2701FxX(a) Fast Ethernet Adapter. - Page 48 Figure 26 on page 45. 8. Specify the location of the driver software that you downloaded from Allied Telesis website. 9. Click Next. The confirmation message is displayed as shown in Figure 27 on page...
-
Page 49: Performing The Silent Installation
Note You can apply the silent installation method only to Microsoft certified drivers. The drivers that Allied Telesis provides for the AT- 2701 series adapters are all Microsoft certified. Use a command line utility called Driver package Installer (DPInst) for the silent installation. -
Page 50: Viewing Supported Dpinst Options
Installing the Driver Software for Windows 7. Change the directory to the folder where the dpinst utility and the driver files reside. 8. Install the driver in the silent mode by entering the following command: > dpinst /S Note Adding the /S switch to the dpinst command suppresses the display of wizard pages, user dialog boxes, and other user intervention requests. -
Page 51: Chapter 4: Configuring The Ethernet Interface For Linux Systems
Chapter 4 Configuring the Ethernet Interface for Linux Systems This chapter provides procedures for configuring Ethernet interfaces for AT-2701 series adapters on Linux systems and contains the following sections: “Overview” on page 52 “Configuring an Ethernet Interface on Linux Systems” on page 53 ... -
Page 52: Overview
Configuring the Ethernet Interface for Linux Systems Overview When you use the AT-2701 series fiber optic adapter on a PC with the Linux system, you must configure the Ethernet interface for the fiber optic port. Note If you install the AT-2701FTXa model and use the copper port, no changes in the Ethernet interface are necessary. -
Page 53: Configuring An Ethernet Interface On Linux Systems
AT-2701 Series Fast Ethernet Adapter Installation Guide Configuring an Ethernet Interface on Linux Systems This section provides how to set the speed and duplex mode to the Ethernet interfaces of AT-2701 series fiber optic adapters. The following is the general instructions for Ubuntu and Red Hat Linux distributions. For other distributions of Linux, consult documentation for your systems. -
Page 54: Configuring An Ethernet Interface On Red Hat
Configuring the Ethernet Interface for Linux Systems 6. Save the /etc/network/interfaces file. 7. Reboot your Linux system. 8. Verify that your AT-2701 series adapter is running 100 Mbps in the full- duplex mode by entering the following command: ethtool eth The command output should display: Advertised Auto-Negotiation is No Speed is 100... - Page 55 AT-2701 Series Fast Ethernet Adapter Installation Guide ############################## DEVICE="eth " NM_CONTROLLED="yes" ONBOOT=yes xx:xx:xx:xx:xx:xx HWADDR= TYPE=Ethernet BOOTPROTO=dhcp DEFROUTE=yes PEERDNS=yes PEERROUTES=yes IPV4_FAILURE_FATAL=yes IPV6INIT=no NAME="auto eth " ETHTOOL_OPTS="autoneg off speed 100 duplex full" ############################## Note Replace "eth " with the name of the Ethernet interface that you obtained in step 2 and with the hardware xx:xx:xx:xx:xx:xx...
- Page 56 Configuring the Ethernet Interface for Linux Systems...
-
Page 57: Chapter 5: Modifying Advanced Properties
Chapter 5 Modifying Advanced Properties This chapter includes the following topics: “Overview” on page 58 “Accessing Advanced Properties” on page 60 “Early Tx Threshold” on page 62 “Network Address (LAA)” on page 63 “PCI PME” on page 65 ... -
Page 58: Overview
Modifying Advanced Properties Overview The AT-2701 series adapter allows you to modify advanced properties to meet your requirements. To access the advanced properties, you must access Device Manager, then go to each advanced property page. Guidelines Here are the guidelines to modifying the advanced properties: To change the advanced property settings, you must have ... - Page 59 AT-2701 Series Fast Ethernet Adapter Installation Guide Table 3. Advanced Properties per Model (Continued) Model Advanced Properties Windows XP AT-2701FXa “Early Tx Threshold” on page 62 “Network Address (LAA)” on page 63 “Speed/Duplex” on page 67 “Vlan Id” on page 70 ...
-
Page 60: Accessing Advanced Properties
“Accessing Device Manager on Windows 7” on page 37 “Accessing Device Manager on Windows XP” on page 38 2. In the Device Manager window, double-click Allied Telesis AT- 2701FxX(a) Fast Ethernet. The properties window pops up as shown in Figure 30. Figure 30. Properties Window... - Page 61 AT-2701 Series Fast Ethernet Adapter Installation Guide 3. Click the Advanced tab. The Advanced Properties window opens as shown in Figure 31. Figure 31. Advanced Properties Window...
-
Page 62: Early Tx Threshold
Modifying Advanced Properties Early Tx Threshold The Early Tx Threshold property allows you to control the FIFO buffer threshold. The system starts transmitting the data when the FIFO buffer reaches the amount specified as the Early Tx Threshold. To change the value of Early Tx Threshold, do the following: 1. -
Page 63: Network Address (Laa)
AT-2701 Series Fast Ethernet Adapter Installation Guide Network Address (LAA) The Network Address (LAA) allows you to replace the MAC address originally assigned to the adapter with a user-defined address. The user- defined address that you assign to the adapter is called a locally administered address (LAA). - Page 64 Modifying Advanced Properties Figure 33. Network Address (LAA) Page 3. In the Value text box, enter a locally administered address for the AT-2701 series adapter card. By default, no locally administered address is assigned. For more information, see “Guidelines for Assigning a Locally Administered Address”...
-
Page 65: Pci Pme
AT-2701 Series Fast Ethernet Adapter Installation Guide PCI PME The PCI PME (Power Management Event) property enables the Wake-on- LAN (WOL) function to wake the adapter up from a low-power mode, based on the settings of the “Wake on Magic Packet” and “Wake on Pattern Match”... - Page 66 Modifying Advanced Properties 3. Select one of the following options: Enable — The adapter wakes up from a low-power mode according to the settings of the Wake on Magic Packet and Wake on Pattern Match properties. Note When the Wake on Magic Packet and Wake on Pattern Match properties are both disabled, the adapter stays in a low-power mode.
-
Page 67: Speed/Duplex
AT-2701 Series Fast Ethernet Adapter Installation Guide Speed/Duplex The Speed/Duplex property sets the link speed and duplex mode of the adapter. To change the Speed/Duplex property, do the following: 1. Access the Advanced Properties. See “Accessing Advanced Properties” on page 60. 2. -
Page 68: Speed/Duplex (100Mb Fiber)
Modifying Advanced Properties Speed/Duplex (100Mb Fiber) The Speed/Duplex (100MB Fiber) property sets the link speed and duplex mode for the optic fiber adapter. To change the Speed/Duplex (100MB Fiber) property, do the following: 1. Access the Advanced Properties. See “Accessing Advanced Properties” on page 60. 2. -
Page 69: Speed/Duplex (Copper)
AT-2701 Series Fast Ethernet Adapter Installation Guide Speed/Duplex (Copper) The Speed/Duplex (Copper) property sets the link speed and duplex mode for the twisted pair copper interface. To change the Speed/Duplex (Copper) property, do the following: 1. Access the Advanced Properties. See “Accessing Advanced Properties”... -
Page 70: Vlan Id
Modifying Advanced Properties Vlan Id The Vlan Id property allows you to specify a VLAN ID on your network to the adapter. The adapter adds the value of the VLAN ID to a frame in the VLAN tag before transmitting the frame. To change the value of the Vlan Id, do the following: 1. -
Page 71: Wake-On-Lan
AT-2701 Series Fast Ethernet Adapter Installation Guide Wake-on-LAN The Wake-on-LAN feature enables the network adapter to wake up from a low-power mode when the adapter receives a network wake-up frame. To enable or disable the Wake-on-LAN feature, do the following: 1. -
Page 72: Wake On Magic Packet
Modifying Advanced Properties Wake on Magic Packet The Wake on Magic Packet property specifies a condition when the adapter wakes up from a low-power mode. The adapter wakes up when relieving a Magic Packet, if the Wake on Magic Packet and PCI PME properties are enabled. - Page 73 AT-2701 Series Fast Ethernet Adapter Installation Guide 3. Select one of the following options: Enable — The adapter wakes up from a low-power mode when receiving a Magic Packet when the PCI PME property is enabled. Disable — The adapter stays in a low-power mode when receiving ...
-
Page 74: Wake On Pattern Match
Modifying Advanced Properties Wake on Pattern Match The Wake on Pattern Match property specifies a condition when the adapter wakes up from a low-power mode. The adapter wakes up when a packet matches the wake patterns specified in the operating system, if the Wake on Pattern Match and PCI PME properties are enabled. - Page 75 AT-2701 Series Fast Ethernet Adapter Installation Guide 3. Select one of the following options: Enable — The adapter wakes up from a low-power mode when receiving a packet that matches one of the patterns specified in the operating system when the PCI PME property is enabled. Disable —...
- Page 76 Modifying Advanced Properties...
-
Page 77: Chapter 6: Uninstalling The Driver Software
Chapter 6 Uninstalling the Driver Software This chapter describes how to uninstall the driver software for the AT-2701 series network adapters. This chapter contains the following topics: “Overview” on page 78 “Uninstalling the Driver Software Using Device Manager” on page 79 ... -
Page 78: Overview
Here are the guidelines to uninstalling the driver software from your system: You must have Administrator privileges to remove the driver software. Before uninstalling the Allied Telesis device, capture all of the Advanced Property settings for later use. The properties are lost during the uninstall process. -
Page 79: Uninstalling The Driver Software Using Device Manager
See “Accessing the Device Manager” on page 37. 3. In the Device Manager window, expand the Network Adapters folder. 4. Right-click Allied Telesis AT-2701FxX(a) Fast Ethernet. The shortcut menu appears. See Figure 28 on page 47. Figure 42. Device Uninstall Window 5. -
Page 80: Uninstalling The Driver Software Silently
Uninstalling the Driver Software Uninstalling the Driver Software Silently You can apply the silent installation method to uninstall the driver. Uninstall the driver without user-intervention, perform the following steps: 1. Open a command prompt window with administrator privileges. 2. Change the directory to the folder where the dpinst utility and the driver files reside. -
Page 81: Chapter 7: Troubleshooting
Chapter 7 Troubleshooting This chapter describes troubleshooting procedures. It contains the following sections: “Checking the Port LED on the Adapter” on page 82 “Troubleshooting Checklist” on page 83 “Testing Network Connectivity” on page 84 ... -
Page 82: Checking The Port Led On The Adapter
Troubleshooting Checking the Port LED on the Adapter The AT-2701 series adapter comes with one or two LED’s, depending on the model. You can use the status of the port LED for troubleshooting. The AT-2701FXa model comes with a single combination LED that indicates both the link status and activity status. -
Page 83: Troubleshooting Checklist
AT-2701 Series Fast Ethernet Adapter Installation Guide Troubleshooting Checklist The following checklist provides recommended actions to take to resolve problems installing the AT-2701 series network adapter card or running it in your system. Warning Before opening the cabinet of your system for removing or inserting the adapter card, review all precautions outlined under “Reviewing Safety Precautions”... -
Page 84: Testing Network Connectivity
Troubleshooting Testing Network Connectivity This section describes how to test network connectivity for Windows and Linux networks. Note When you are using the fiber optic port, both the adapter and the switch must be set to the same speed and duplex mode. When you are using the copper port, set both the adapter and switch to Auto- Negotiation or the same speed and duplex mode. -
Page 85: Linux
AT-2701 Series Fast Ethernet Adapter Installation Guide Figure 44. Command Window with ipconfig/all displayed 4. Type ping <IP address> from the command line, then press Enter. The network connectivity information is displayed, as shown in Figure 45. Figure 45. Command Window with ping displayed Linux To verify that the Ethernet interface is up and running, run 'ifconfig' to check the status of the Ethernet interface. - Page 86 Troubleshooting To ping an IP host on the network to verify connection has been established, perform the following procedure. 1. From the command line, type ping <IP address>. 2. Press Enter. The command displays the packet send/receive status.
-
Page 87: Appendix A: Specifications
Appendix A Specifications Physical Specifications Dimensions: 12.5 cm x 6.4 cm (4.9 in. x 2.5 in.) Environmental Specifications Operating Temperature: 0°C to 40°C (+32°F to +104°F) Storage Temperature: -25°C to +70°C (-°13F to +158°F) Relative Humidity: 5% to 90% (non-condensing) Power Specifications Signaling Voltage: 3.3 / 5V... -
Page 89: Appendix B: Cleaning Fiber Optic Connectors
Appendix B Cleaning Fiber Optic Connectors This appendix provides how to clean fiber optic connectors and consists of the following sections: “Overview” on page 90 “Cleaning Using a Cartridge-Type Cleaner” on page 91 “Cleaning Using a Swab” on page 93 ... -
Page 90: Overview
Overview The fiber optic connector consists of a fiber optic plug and its adapter. The end of the fiber optic cable is held in the core of the ferrule in the plug as shown in Figure 46. Light signals are transmitted through the core of the fiber. -
Page 91: Cleaning Using A Cartridge-Type Cleaner
AT-2701 Series Fast Ethernet Adapter Installation Guide Cleaning Using a Cartridge-Type Cleaner Fiber optic cartridge cleaners are available from many vendors and are typically called “cartridge cleaners,” as shown in Figure 48. Figure 48. Cartridge Cleaner Note Do not use compressed air or aerosol air to clean a fiber optic connector. - Page 92 Note Rub the ferrule tip on the cleaning surface in one direction only. 3. When you reach the end of the cleaning surface, pick up the ferrule tip, rotate and place it at the top and rub downwards at least 2 times. Caution Failing to pick up the ferrule tip when you reach the bottom of the cleaning surface can result in static electricity that can damage the...
-
Page 93: Cleaning Using A Swab
AT-2701 Series Fast Ethernet Adapter Installation Guide Cleaning Using a Swab Specially treated swabs (stick cleaners) are available for cleaning inside connector adapters or hard-to-reach ferrule tips. These swabs, often referred to as “lint free” or “alcohol free” swabs, are available from many vendors. - Page 94 3. If a fiber inspection scope is available, use the scope to inspect the connector to make sure that it is clean. 4. Reconnect the cable to the port or protect the ferrule tip with a dust cap.
Need help?
Do you have a question about the AT-2701FXa/SC and is the answer not in the manual?
Questions and answers