Table of Contents
Advertisement
Quick Links
Advertisement
Table of Contents
Troubleshooting

Subscribe to Our Youtube Channel
Related Manuals for Garmin 130


Summary of Contents for Garmin 130
- Page 1 ® 2-way radio & personal navigator owner’s manual...
- Page 2 Information in this document is subject to change without notice. Garmin reserves the right to change or improve its products and to make changes in the content without obligation to notify any person or organization of such changes or improvements.
- Page 3 Main Pages and the Option Menus, along with some basic unit operations to familiarize you with your new Rino 130 right out of the box. Read the Quick Start Guide first. This Owner’s Manual describes the Main Pages of the Rino 130 and their options in detail.
-
Page 4: Table Of Contents
Informational Picture ... 18 GPS Status ... 18 Radio Transmission Status ... 18 Mark Waypoint’s Indicators ... 19 Using the Rino 130 Radio Features ... 20 Peer-to-Peer Positioning ... 20 New Contact Page Overview ... 20 Sending a Location ... 23 Map Page ... - Page 5 Finding a Last Found Place ... 61 Weather Radio ... 62 Sending a Note ... 63 Using a Goto ... 64 Rino 130 Owner’s Manual ® Routes Page ... 65 Creating and Using a Route ... 65 Editing a Route ... 66 Adding or Editing from the Route Map Page ...
- Page 6 Interface Information ... 112 FCC Compliance Information ... 113 FCC Licensing Information ... 114 Limited Warranty ... 115 Software License Agreement ... 117 Product Registration ... 117 Contact Garmin ... 117 Warnings and Cautions ... 118 Index ...121 Rino 130 Owner’s Manual ®...
-
Page 7: Getting To Know Your Rino 130
10-character name and graphic symbol. The active track log stores up to 10,000 points and allows you to save up to 20 tracks with 250 points per track. The Rino 130 has seven buttons that allow the user to quickly access all of the unit’s functions. -
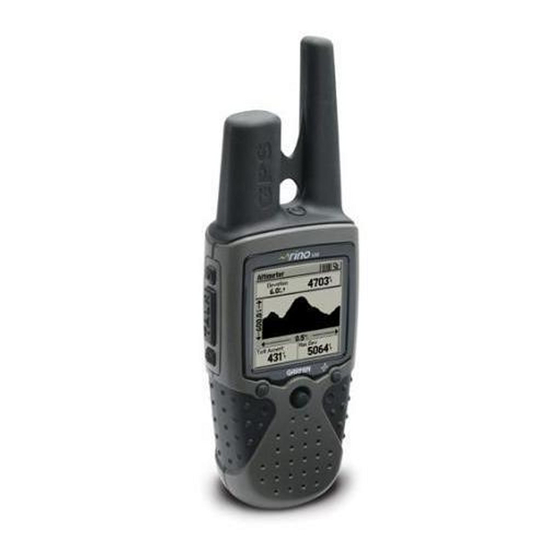
Page 8: Front Of The Rino 130
Front of the Rino 130 Power button: • Press and hold to turn the unit On/Off • Press to adjust contrast and backlighting Call button: • Press to send out Call Tone • Sends position when released (if enabled) Talk button: •... -
Page 9: Back Of The Rino 130
Back of the Rino 130 2-way FRS/GMRS Antenna Belt Clip Connector Mount Headset Connector with Weather cap Mount Alignment Notches Rino 130 Owner’s Manual ® GPS Antenna External Power And Data Connector with Weather cap Battery Compartment D-Ring Battery Compartment Cover... -
Page 10: Main Display Pages
Main Display Pages All of the information you need to operate the Rino 130 can be found on six default main pages (or display screens). Simply press and release the Page button to cycle through the Radio Page, Map Page, Navigation Page, Altimeter Page, Trip Computer, and Main Menu Page. -
Page 11: Operating The Rino 130
Operating the Rino 130 For best results, you should initialize the GPS receiver in your Rino 130 unit before you use it the first time. See page 7 for instructions on initializing the unit. For most accurate results, the compass and altimeter should also be calibrated. -
Page 12: Status Bar Overview
Peer-To-Peer On/Location Ready to Send Keylock On Alarm Clock On GPS On, Position Ready GPS On, Position Not Ready Compass On (Press and hold the Zoom key to turn the compass on/off) Weather Alert On Rino 130 Owner’s Manual ®... -
Page 13: Unit Operation
Radio Page Initializing the Rino 130 To take full advantage of all of the Rino 130 features, the GPS receiver must be initialized. The initialization process allows the Rino 130 to receive and store satellite information and begin using the satellites for navigation. -
Page 14: Using My Id And Symbol Fields
To initialize the unit: 1. Take the Rino 130 outside where it has an unobstructed view of the sky and turn it on. 2. The unit begins to search for satellite signals. “Tracking Satellites” is displayed while the unit is initializing. - Page 15 Because not all the selections can fit in the window, a slider bar on the right side indicates your current position in the list. Rino 130 Owner’s Manual ® Changing the user symbol TIP: Hold the Thumb Stick Up or Down to scroll through the list more quickly.
-
Page 16: Setting The Channel And Squelch Code
Setting the Channel and Squelch Code The Rino 130 has a total of 22 channels (not including GMRS repeater channels) and 38 squelch codes to select from using the Channel and Code fields. Channels 1–14 are for FRS, 15–22 are for GMRS channels (disabled by default in U.S. - Page 17 See the “Appendix” for a table listing all of the 38 Squelch Codes and their frequencies. As you change the main channels, the Rino 130 remembers the last channel/squelch code combination that you were using. For example, you may set the unit channel to 5 and squelch code to 21, then change the main channel to 8 and squelch code to 2.
-
Page 18: Scanning And Monitoring
(or if you transmit), it stops on that channel/squelch code for a few seconds, then continues scanning. When the Rino 130 is scanning and it receives an incoming signal, the Rino 130 automatically decodes the Squelch Code used by the incoming signal. The Rino 130 then uses that Squelch Code when it transmits back to that unit. - Page 19 3. To select all channels or clear all channels, highlight either the Select All or Clear All buttons and press the Thumb Stick In. Rino 130 Owner’s Manual ® 4. To Scan Current Codes, highlight the Option Menu and press the Thumb Stick In. Choose the desired setting and press the Thumb Stick In.
-
Page 20: Radio Page Option Menu
Radio Page Option Menu The Radio Page Option Menu allows you to customize aspects of your Rino 130, such as setting up the radio, programming call and ring tones, and setting up a scanlist. Setup Radio The Setup Radio option displays the Radio Setup Page. - Page 21 You must obtain a license to operate on GMRS channels 15–22 in the U.S. Rino 130 Owner’s Manual ® Repeater Channel—(U.S. versions only) Use this option to turn On/Off GMRS repeater channels 15R–22R. This option is only available when GMRS is enabled. GMRS repeater channels are not available in Rino units sold in Canada.
-
Page 22: Setup Tones
Setup Tones Page Setup Scanlist Refer to “Scanning and Monitoring” for complete information about this feature and the options in this page. Setup Scanlist Page Rino 130 Owner’s Manual ®... -
Page 23: Use Weather Radio
The audio is unmuted when the Weather Radio is on so that you can listen to weather broadcasts. Rino 130 Owner’s Manual ® Change the Weather Radio channel in the same manner as changing the FRS/GMRS radio channel. There are seven Weather Radio channels (1 through 7) available. -
Page 24: Turn Radio/Gps On/Off
When a Weather Alert tone is detected, the Rino 130 automatically turns on the Weather Radio and broadcasts the Weather Alert if you are not actively transmitting or receiving on the radio. The volume changes to 3/4 the maximum when a Weather Alert is broadcast. Select Disable Weather Alert to turn off this feature. -
Page 25: Mark Waypoint's Indicators
GPS and FRS/GMRS Radio On; Position not ready; Transmitting on GMRS GPS and FRS/GMRS Radio On; Position transmitted Rino 130 Owner’s Manual ® GPS and FRS/GMRS Radio On; Ready to transmit Position; Receiving transmission GPS and FRS/GMRS Radio On; Ready to transmit Position;... -
Page 26: Using The Rino 130 Radio Features
Refer to the “Features” section for information on all of the features of the Rino 130. Peer-to-Peer Positioning The Rino 130’s most unique feature is being able to send its location to another Rino, which is called Peer-to- Peer positioning. With peer-to-peer positioning enabled (see the “Setup Radio”... - Page 27 The Rino 130 can manage up to 50 contacts at any time. Each time that you receive a signal from a contact, your map is updated showing their new position. A Track Log of their movement is created and shown on your map (see the “Track Logs”...
- Page 28 To view a contact on the Map Page: 1. From the Contact Review Page, highlight Map and press the Thumb Stick In. 2. Press the Page button when done to return to the Contact Review Page. Rino ® 130 Owner’s Manual...
-
Page 29: Sending A Location
To send a location, highlight the Option Menu from the Waypoint Review Page and press In. Rino 130 Owner’s Manual ® To send a location: 1. Press the Thumb Stick In and hold it until the Shortcuts Menu is displayed. -
Page 30: Map Page
In many instances the map displays an Accuracy Circle surrounding the Position Icon. The Rino 130 uses both map resolution and GPS accuracy in defining your location to a point within the circle. The smaller the circle, the more accurate your location. - Page 31 (other than the Map Page) to open the Map Page. Press Up to Zoom Out; press Down to Zoom In Rino 130 Owner’s Manual ® To change scales on the Map Page: 1. Press the Z (Zoom) button to open the Zoom window.
-
Page 32: Map Page Options
Map Page Options Map Page options allow a variety of operating and custom features for your Rino 130. The Map Page options are: Highlight an option then press the Thumb Stick In to select. Map Page Option Menu Pan Map—Allows you to move the Panning Arrow (Map Pointer) about on the map. -
Page 33: Using The Pan Map Option
2. Select Find ‘N Go to display items. Select the category you wish to search (waypoints, contacts, etc.), then select Near Map Pointer from the pop- up list. The Rino 130 then searches for the items nearest the location of the map pointer instead of your actual location. -
Page 34: Programming The Data Fields
Changing Data Fields Data Field Options Thee data field options apply to the Map Page data fields and the Trip Computer data fields. For definitions of these all data fields used in the Rino 130, refer to the “Appendix.” Bearing Course... -
Page 35: Setting Up The Map
Rino 130 Owner’s Manual ® 3. Press Left, then Up or Down on the Thumb Stick to highlight an item on the list. Press Right to return to the sub-page buttons. -
Page 36: Map Features Setup
Points of Interest, Waypoints, Street Label, and Land Cover—Off, Auto, or 20 ft–500 miles, sets the maximum scale at which that feature should appear on the screen. Some types of data display only at certain zoom scales. Rino 130 Owner’s Manual ®... -
Page 37: Text Setup
Thumb Stick In to display the Panning Arrow. Ref displays under the arrow. Rino 130 Owner’s Manual ® 2. Use the Thumb Stick to move about on the Map Page until you reach the point to which you want to measure. -
Page 38: Navigation Page
Bearing Pointer and Compass Ring. The Bearing Pointer always points directly to the destination, no matter what your current location might be. The Compass Ring displays your heading. Rino Straight Line Distance to Destination Times to Destination Selectable Data Fields 130 Owner’s Manual ®... - Page 39 Destination is selected. The Compass Ring displays your heading Rino 130 Owner’s Manual ® while you are moving, but the data fields to the right of the page will not display any destination related data, such as Estimated Time of Arrival.
-
Page 40: Navigation Page Options
2. Select the desired option from the list and press the Thumb Stick In. The list of data field choices may be found on page 28 and definitions may be found in the “Appendix.” Rino ® 130 Owner’s Manual... -
Page 41: Using Sight 'N Go
3. Hold the Rino 130 at eye level and line up the two sighting marks on the case with the distant object. Press the Thumb Stick to Lock Direction. - Page 42 In. until you manually turn it On again. Sometimes, however, when you turn the Compass On, the Rino 130 overrides the Compass and uses the GPS receiver to track your heading. The criteria for switching between the Compass and the GPS is customized on the Heading Setup Page (see section “Heading Setup Page”).
-
Page 43: Altimeter Page
It can also display the ambient pressure. Rino 130 Owner’s Manual ® Profile Field is located in the center of the page and can be configured to display either elevation or ambient... -
Page 44: Altimeter Page Options
Calibrate Altimeter—Increases the accuracy of the altimeter. You must know your elevation or pressure to allows you to select calibrate the altimeter. Restore Defaults—Returns the Altimeter Page to the original factory settings (defaults). Altimeter Page Option Menu Rino 130 Owner’s Manual ®... -
Page 45: Viewing Pressure/Elevation Plots
You can set the Zoom Ranges for elevation, distance, or time when you display the View Elevation Plot. You may Rino 130 Owner’s Manual ® change the ranges for the vertical distance and the time. Ranges for View Pressure Plot are fixed at 6.8 millibars and 12 hours. -
Page 46: Viewing Points
Thumb Stick In to place a check mark in the box next to a selected item. 3. Move to the Apply button and press the Thumb Stick In to reset the data fields. Rino 130 Owner’s Manual ®... -
Page 47: Calibrating The Altimeter
Calibrating the Altimeter Because the Rino 130 relies on the Barometric pressure to determine the elevation and the pressure at any given elevation can fluctuate, you can calibrate the altimeter to increase its accuracy. You must know the elevation or pressure at your current location, information you can obtain from a map or other reliable source. -
Page 48: Trip Computer Page
Reset—Clears recorded data from the page to begin recording new data. Big/Small Numbers—Changes the display from seven small data fields to two large data fields. Restore Defaults—Returns the Trip Computer Page to the original factory settings (defaults). Selecting a data field Rino 130 Owner’s Manual ®... -
Page 49: Main Menu Page
Main Menu Page Using the Main Menu The Main Menu allows access to many features and pages in the Rino 130. Please refer to the “Features” section for a complete description of the items accessed through the Main Menu. Rino 130 Owner’s Manual... - Page 50 Games Page—Games are provided as an entertainment feature. Many of the items in the Main Menu Page are discussed in-depth in the “Features” section. Refer to the specific section for more information. Rino 130 Owner’s Manual ®...
-
Page 51: Main Menu Options
Menu item Up or Down using the Thumb Stick. When the desired position is displayed and press the Thumb Stick In. Rino 130 Owner’s Manual ® 3. To insert a new page, highlight the page you wish to insert it before and press In. Select Insert, then choose a page from the list and press the Thumb Stick In. -
Page 52: Shortcuts Menu
Rino 130. Weather Radio—Toggles between the Weather Radio and the FRS/GMRS Radio. Send Note—Sends a note to other Rino 130 users. Enable Keylock—Enables keylock so buttons are not inadvertently pushed. Press and hold the Page button to unlock the buttons. -
Page 53: Waypoints
‘N Go Menu are two common pages for creating and editing waypoint. You can also create a waypoint using the Map Page. The Rino 130 holds up to 500 waypoints. Mark Waypoint Page The Mark Waypoint Page allows you to mark and record your current location as a waypoint and appears with a graphic name block (man with a flag) that displays... -
Page 54: Creating Waypoints
Thumb Stick to change to the Location field. Press In and enter the new coordinates using the on-screen numerical keyboard. Highlight and press OK when finished. 3. You may also change the waypoint name and/or symbol or add notes. Rino ® 130 Owner’s Manual... -
Page 55: Projecting A Waypoint
Enter the new bearing or distance, then highlight OK and press In to finish. Project Waypoint Page Rino 130 Owner’s Manual ® Editing a Waypoint A waypoint or contact can be edited to add notes or change the map symbol, name, coordinates, or elevation. - Page 56 2. Open the Option Menu at the top of the page, select Save As Waypoint. 3. Press the Thumb Stick In to save the item to the Waypoints List. 4. Highlight Save As Waypoint and press the Thumb Stick In. Rino ® 130 Owner’s Manual...
-
Page 57: Find 'N Go
Page Menu button to display the Main Menu. 2. Highlight the Find ‘N Go icon and press the Thumb Stick In. Rino 130 Owner’s Manual ® Find ‘N Go Menu Categories are listed in two different ways: By Name and Nearest. -
Page 58: Finding A Waypoint
Finding a Waypoint Waypoints that you have created and stored in the Rino 130 can be found by selecting the Waypoint option from the Find ‘N Go Menu. You can find a waypoint from the list of waypoints using the By Name or Nearest options as explained on the previous page. - Page 59 find. Entering a waypoint name to find By Name Rino 130 Owner’s Manual ® 3. Select OK when you are finished entering the name. The waypoint list opens with the name closest to the name you entered on the top.
-
Page 60: Finding A Contact
Finding a Contact Contacts that you have received in the Rino 130 can be found by selecting the ‘Contacts’ option from the Find ‘N Go Menu. Contact List To find a contact: 1. From the Find ‘N Go Menu, highlight Contacts and press the Thumb Stick In. -
Page 61: Finding A City
Near Map Pointer appears in place of the Nearest option. Rino 130 Owner’s Manual ® 2. If using find By Name, begin spelling the name of the city by using the keyboard. When you have entered enough characters to define the name,... -
Page 62: Finding An Exit
(to other Rino users), Project Waypoint, Save as a Waypoint, Set Proximity (alarm), Add to Route, View Sun & Moon (reports for that waypoint), or View Hunt & Fish (reports for that waypoint). Rino ® to access 130 Owner’s Manual... -
Page 63: Finding A Point Of Interest
• Entertainment • Manmade Places • Shopping Rino 130 Owner’s Manual ® In many instances, these categories are subdivided into types, such as in the instance of Food & Drink. When you select Food & Drink from the list of categories, you are... - Page 64 (to other Rino users), Project Waypoint, Save as a Waypoint, Set Proximity (alarm), Add to Route, View Sun & Moon (reports for that waypoint), or View Hunt & Fish (reports for that waypoint). Rino ® to access 130 Owner’s Manual...
-
Page 65: Finding An Address Or Intersection
2. Highlight the Number field and use the keyboard for entering numbers. Entering an Address Rino 130 Owner’s Manual ® 3. Move to the Street field using the Thumb Stick. 4. Press the Thumb Stick In to display the Select Street Name list. - Page 66 Thumb Stick In to display the Information Page for the intersection. Use the on-screen buttons at the bottom of the page to Goto, view the item on the Map, OK to close, or use the Option Menu for other choices. Rino ® 130 Owner’s Manual...
-
Page 67: Finding A Last Found Place
Places option from the Find ‘N Go List and then press it In. Last Found Places Page Rino 130 Owner’s Manual ® 2. Press Up or Down on the Thumb Stick to highlight the desired sub-page button, which will display the options list for that sub-page (Points of Interest, Cities, Waypoints/Contacts or Intersections) to the left. -
Page 68: Weather Radio
You can then turn the Weather Radio off and continue normal FRS/GMRS radio operations. When a Weather Alert is detected, the Rino 130 will break into any FRS/GMRS transmission to automatically turn on the Weather Radio and broadcast that alert. Select Disable Weather Alert to turn off that feature. -
Page 69: Sending A Note
Sending a Note You may send a note to other Rino 130 users. When you send a note, it appears along the bottom of the display on every Rino 130 user who is using the same Channel and Squelch Code that you are using. The Send Note feature... -
Page 70: Using A Goto
To stop navigation, select the on-screen Option Menu button at the top of the Navigation or Map Page. Select Stop Navigation, then press the Thumb Stick In. Viewing a Goto on the Map Page Rino 130 Owner’s Manual ®... -
Page 71: Routes Page
Route navigation allows you to create a sequence of intermediate waypoints that leads you to your final destination. The Rino 130 stores 20 routes, each with up to 50 waypoints. A route can be created and modified from the Route Page, and waypoints can be added to a route from the Find ‘N Go Menu. -
Page 72: Editing A Route
Stick In to access the Option Menu. 2. Highlight the Reverse Route option and then press the Thumb Stick In to reverse the order of waypoints in the list. To change the route back to the original order, repeat this process. Rino ® 130 Owner’s Manual... - Page 73 1. From the Route Page, select the on-screen page Option Menu button and press the Thumb Stick In to access the Option Menu. Rino 130 Owner’s Manual ® 2. Select Restore Defaults and then press the Thumb Stick In to restore factory settings. To review a route point: 1.
- Page 74 Stick In to select the waypoint. 3. Use the Thumb Stick to move the point up or down in the list. Press the Thumb Stick In to leave the waypoint in the new list order. Rino ® 130 Owner’s Manual...
-
Page 75: Adding Or Editing From The Route Map Page
Thumb Stick In to display the Information Page for the new point. Rino 130 Owner’s Manual ® 5. Press the on-screen Use button to return to the map page and then press the Thumb Stick In again to place the new waypoint. -
Page 76: Navigating A Route
Navigation Page. 3. Move to the Map Page to view the route and your current location. 4. Begin moving, watching directional information on the Navigation Page or your progress on the Map Page. Route Navigation Rino ® 130 Owner’s Manual... -
Page 77: Stopping Navigation
2. Use the Thumb Stick to highlight the desired option and press In to select that option for the selected data field. Rino 130 Owner’s Manual ® Changing the Route Data Fields Data field Options for Route Page • Distance to Point •... -
Page 78: Tracks Page
Tracks Page The Rino 130 draws an electronic bread crumb trail on the Map Page as you travel along. This bread crumb trail is the Track Log. The Track Log contains information about points along its path, including time, and position. -
Page 79: Using The Tracback Feature
(or another Rino user’s path) without marking any waypoints. When you are ready to return to where you started, the Rino 130 takes you back by following the Track Log that you left behind. You can save a total of 20 tracks in the unit memory. The Track Log starts recording as soon as the unit gets a satellite location fix and the Track Log feature is turned on. -
Page 80: Setting Up The Track Log
Thumb Stick In. You can highlight the Record Method and Interval fields and press the Thumb Stick In to display their options. Interval options change to accommodate the Record Method choices. Rino ® 130 Owner’s Manual... -
Page 81: Proximity Page
1. Use the Thumb Stick to highlight an empty space on the Proximity list and press the Thumb Stick In to display the Find ‘N Go screen. Rino 130 Owner’s Manual ® Highlight an item from the list and press the Thumb Stick In to open the item. -
Page 82: Satellite Page
The stronger the signal, the taller the signal bar. Skyview Graphic Center dot - 90° above the horizon 90° Inner ring- 45° above the horizon Outer ring - the horizon 45° Rino 130 Owner’s Manual ®... -
Page 83: Waas
Rino 130 Owner’s Manual ® Because the Rino 130 relies on satellite signals to provide you with navigational guidance, the unit’s view of the sky determines how fast you achieve navigational status. GPS signals do not travel through heavy objects or people: For best results, keep the unit in clear view of the sky. -
Page 84: Satellite Page Options
New Location—If you are more than 600 miles (from where you last used the unit), select the New Location and then the Use Map options to approximate your location. This gives the unit reference information and speeds satellite acquisition. Satellite Page Option Menu Rino 130 Owner’s Manual ®... - Page 85 2. Use the Thumb Stick to highlight the Use With GPS Off option and then press it In. The Rino 130 stops tracking satellites and should not be used for navigation. However, the next time you turn the unit on, it returns to Normal GPS operation.
-
Page 86: Setup Pages
Setup Pages The Setup Pages allow you to customize the Rino 130 to your personal preferences. You can choose time settings, units of measure, display backlighting and contrast settings, heading measurement, interface options and system operating mode. By highlighting the icons on the Setup Menu and then pressing the Thumb Stick In, you can display the Setup Page for each of the menu items. -
Page 87: Units Setup Page
5. Highlight a time zone from the list and then press the Thumb Stick In. Rino 130 Owner’s Manual ® 6. If you choose Other, you must enter a UTC offset value. 7. The correct time displays at the bottom of the page. -
Page 88: Loran Td Format
fields, highlight the field, press the Thumb Stick In. When done, highlight Save and press In. For more information on Loran TDs, you may download Garmin’s Loran TD Position Format Handbook from the Garmin web site at http://www.garmin.com/support/ userManual.jsp. Rino 130 Owner’s Manual... -
Page 89: Display Setup Page
If necessary, you also may choose the User datum for custom designed grids. Rino 130 Owner’s Manual ® NOTE: The User datum is based on a WGS-84-Lo- cal datum and is an advanced feature for unlisted or custom datums. -
Page 90: To Adjust The Contrast
1. Press the Page button or the Menu icon open the Main Menu. 2. In the Main Menu, scroll down and select Setup. 3. Select the Heading icon to open the Heading Setup page. Heading Setup Page Rino 130 Owner’s Manual ®... -
Page 91: Interface Setup Page
GPS compass uses the North Reference setting to create a bearing. Switch to Compass Heading when Below–Enter the desired speed for the Rino 130 to switch from using GPS to using the compass for guidance. For more than…—Enter a time limit to switch to the compass. - Page 92 RTCM SC-104 format and simple ASCII text output of location and velocity information. None—Provides no interfacing capabilities. If Garmin DGPS or RTCM In/NMEA Out format is selected, additional fields are provided to control a Garmin differential beacon receiver (e.g. GBR 23) directly from your unit.
-
Page 93: System Setup Page
Unit I.D. Number. Software updates and instructions for downloading are available from the Garmin Web site (www.garmin.com). Rino 130 Owner’s Manual ® Choose one of the four GPS options other than Normal to significantly save battery power. -
Page 94: Calendar
In to display the pop-up Menu (containing New Note, View Sun & Moon, and View Hunt & Fish). 2. Highlight and select New Note to begin entering text from the keyboard. Rino 130 Owner’s Manual ®... - Page 95 Press OK when you are finished editing the note. Editing a note Rino 130 Owner’s Manual ® To delete notes by week: 1. Choose Delete Notes... from the Option Menu 2. From the Older Than... window, choose the desired option and press the Thumb Stick In.
-
Page 96: Alarm Clock
2. Choose On or Off and press the Thumb Stick In. When the alarm sounds, a brief tone is heard (unless Message Beep is Off under System Setup) and “Alarm Clock” appears on the screen. Press the Thumb Stick In to acknowledge the alarm. Rino 130 Owner’s Manual ®... -
Page 97: Calculator
The memory is cleared either manually or when you turn off the Rino 130. To access the Calculator: 1. Press the Page button or the Menu icon open the Main Menu. -
Page 98: Stopwatch
You can enter a specific lap distance by selecting Set Lap Distance. To return to manually marking each lap, open the Option Menu and select the Lap by Button Press option. Stopwatch Page Rino 130 Owner’s Manual ®... -
Page 99: Sun & Moon
Thumb Stick In to display Use Current Time and then press the Thumb Stick In. Rino 130 Owner’s Manual ® To set the location: 1. Highlight the Location field and then press the Thumb Stick to display the New Location options list. -
Page 100: Hunt & Fish
Use the map pointer to identify the desired location and then press In on the Thumb Stick. If you choose Use Find ‘N Go Menu follow instructions for using the Find ‘N Go Menu. Rino 130 Owner’s Manual ®... -
Page 101: Area Calculator
2. In the Main Menu, scroll down and select the Area Calculator icon. To calculate the area: 1. Be sure the Rino 130 has a GPS fix. 2. Press Start when you are ready to begin. 2. Begin walking or traveling the perimeter (edge) of the area you want to measure. -
Page 102: Games
To adjust the Grid Size or Square Size: 1. Highlight the Grid Size or Square Size field and press In on the Thumb Stick. 2. Choose the desired size and press In. 3. Highlight Start and press In to begin the game. Rino 130 Owner’s Manual ®... -
Page 103: Waypoint Bomber
(that person loses). Waypoint Bomber Rino 130 Owner’s Manual ® HINT: Mark stationary objects such as trees and poles, and drop a bomb when an opposing player is near that object! Adjust the rules to your liking! •... -
Page 104: Clothesline
A scoreboard keeps track of your wins and losses. Press Page anytime during the game for further instructions, to turn the sound On/Off, or to quit. Beast Hunt Rino 130 Owner’s Manual ®... -
Page 105: Appendix
FRS is intended for use throughout the United States, its territories and possessions. It may also be used in Canada. FRS is not approved outside of these areas and Rino 130 Owner’s Manual ® may interfere with local government communication frequencies (fire, police, etc.). -
Page 106: Frs Limitations
462 MHz frequency. Refer to the “Frequency Charts” for a complete list of each channel’s frequency. GMRS repeater channels are not approved for use by the Canadian government, so they are disabled on Rino 130 units sold in Canada. Rino 130 Owner’s Manual... -
Page 107: Specifications
Display: 1.4” H x 1.4” W (3.6 cm x 3.6 cm) 60 x 160 pixels, high-contrast LCD Performance GPS Receiver: WAAS Enabled, Differential-ready, 12 parallel channel Rino 130 Owner’s Manual ® Acquisition time: Approx. 15 seconds (warm start) Approx. 45 seconds (EZinit/cold start) Approx. 5 minutes (First Time/AutoLocate Update Rate: 1/second, continuous GPS Accuracy: <15 meters (49 ft) RMS, 95% typical... -
Page 108: Radio
With optional Garmin Differential Beacon Receiver Input (such as Garmin GBR 23). The temperature rating for the Rino 130 may exceed the usable range of some batteries. Alkaline batteries can rupture at high temperatures. External power can only be applied using the Garmin Auto Power Adapter or PC Interface Cable with Auto Power Adapter. -
Page 109: Accessories
Accessories To obtain accessories, see your local dealer or visit the Garmin web site at www.garmin.com. 12-volt Adapter Cable—Provides unit power from an automobile cigarette lighter. 2.5 to 3.5 mm Jack Adapter—Allows you to use 3rd party headsets with your Rino unit. -
Page 110: Transferring Mapsource Data
Find features and mapping capability. The Rino 130 accepts up to 24 MB of map data from most MapSource products. It is not possible to transfer 3rd party maps into Garmin products. - Page 111 PC serial port. 3. Connect the remaining cable connector to the back of the Rino 130 by orienting the slot on the connector with indexing bar on the back of the unit. Then, slide the connector in place. Be sure that the cable is pushed all the way into the back of the unit.
-
Page 112: Gps Troubleshooting Guide
Access the Tracks Page, highlight the On button and press the Thumb Stick In. Use the Map Page Setup Page to reduce map clutter or change the map scale. Highlight the on-screen button and then press the Thumb Stick In. Rino 130 Owner’s Manual ®... -
Page 113: Radio Troubleshooting Guide
Too many unwanted conversations being heard. Interference or static. Cannot transmit location. None of the keys except Talk will work. Rino 130 Owner’s Manual ® Probable Cause Talk key may not be fully depressed FRS/GMRS Radio feature may not be on. -
Page 114: Frs Frequency Chart
Squelch Codes and manufacturers can be located on the Internet. NOTE: For use in countries outside of the U.S. or Canada, please check with that govern- ment for any restrictions on FRS or GMRS use. Rino 130 Owner’s Manual ®... -
Page 115: Gmrs Frequency Chart
462.6500 462.6750 462.7000 462.7250 467.5500 467.5750 467.6000 467.6250 467.6500 467.6750 467.7000 467.7250 Rino 130 Owner’s Manual ® Receive Frequency (MHz) Channel Description 462.5500 GMRS Primary 1 462.5750 GMRS Primary 2 462.6000 GMRS Primary 3 462.6250 GMRS Primary 4 462.6500 GMRS Primary 5 462.6750... -
Page 116: Data Field Definitions
Location (selected)—The lat/lon of point defined on map. (Trip Computer Page Only.) Maximum Ascent—The maximum ascent rate in feet per minute. (Altimeter Page Only.) Maximum Descent—The maximum descent rate in feet per minute. (Altimeter Page Only.) Rino 130 Owner’s Manual ®... - Page 117 Time of Day—The time for the selected time zone. To Course—The compass direction you must go in order to get back to the original course. Rino 130 Owner’s Manual ® Trip Odometer—A running tally of distance travelled since last reset.
-
Page 118: Interface Information
/or a second GPS receiver. The NMEA 0183 version 3.0 interface format is supported by the Rino 130 and enables the unit to drive up to three NMEA devices. NMEA 0183 Version 3.0 Approved Sentences:... -
Page 119: Fcc Compliance Information
FCC Compliance Information The Rino 130 complies with Part 15 of the FCC regulations and with Canadian RSS-210 and ICES-003 for Class B digital devices. Operation of this device is subject to the following conditions: (1) This device may not cause harmful interference, and (2) this device must accept any interference received, including interference that may cause undesired operation. -
Page 120: Fcc Licensing Information
FCC Licensing Information The Rino 130 two-way radio operates on General Mobile Radio Service (GMRS) frequencies regulated by the Federal Communications Commission (FCC) in the United States. Operation on the GMRS frequencies is subject to additional rules as specified in 47 CFR Part 95. -
Page 121: Limited Warranty
Limited Warranty This Garmin product is warranted to be free from defects in materials or workmanship for one year from the date of purchase. Within this period, Garmin will at its sole option repair or replace any components that fail in normal use. - Page 122 Should you ever encounter a problem with your unit, please take it to an authorized Garmin dealer for repairs. The Rino 130 is fastened shut with screws. Any attempt to open the case to change or modify the unit in any way will void your warranty and may result in permanent damage to the equipment.
-
Page 123: Software License Agreement
® Product Registration Help us better support you by completing our online registration today! Have the serial number of your Rino 130 handy and connect to our Web site (http://www.garmin.com). Look for the Product Registration link on our Home page. -
Page 124: Warnings And Cautions
Use the Rino 130 at your own risk. To reduce the risk of unsafe operation, carefully review and understand all aspects of this Owner’s Manual—and thoroughly practice operation using the... - Page 125 Non-Ionizing Radiation Protection (ICNIRP) 1996. Those standards were based on comprehensive and periodic evaluations of the relevant scientific literature. For example, over 130 scientists, engineers, and physicians from universities, government health agencies, and industry reviewed the available body of research to develop the ANSI Standard (C95.1).
- Page 126 Blasting Areas—To avoid interfering with blasting operations, turn your radio OFF when in a “blasting area” or in areas posted: “Turn off two-way radio.” Obey all signs and instructions. Potentially Explosive Atmospheres—Turn your radio OFF and do not remove your battery when you are in any area with a potentially explosive atmosphere.
-
Page 127: Index
Battery Type, Changing 87 Bearing 32 Data Fields 28, 34, 40, Bearing Pointer 32, 34, 64 BlueChart 104 Rino 130 Owner’s Manual ® Definitions 110 For Route Page 71 Data Transfer 105 Defaults 4, 26, 34, 38, 42, 67, 87... - Page 128 Delete 67 Changes 37 Edit 66 Plot 38, 39 Navigate 70 View Plot 39 Remove waypoints 66 Project Waypoint 35, 49, Restore defaults 67 52, 53, 54, 55, 56, Reverse 66 Review 67 Proximity alarms 75 Rino 130 Owner’s Manual ®...
- Page 129 Track Up 30, 78, 79 Sky View 76 Transmit Location 20, 23 Specifications 101 Trip Computer Page 42 Squelch codes 10, 99 Rino 130 Owner’s Manual ® Two-way Radio 1, 99, 114 UHF 99 Units Page 81 56, 58 Unlock Buttons 5, 46...
- Page 132 For the latest free software updates (excluding map data) throughout the life of your Garmin products, visit the Garmin web site at www.garmin.com. © Copyright 2003–2005 Garmin Ltd. or its subsidiaries Garmin International, Inc. 1200 East 151 Street, Olathe, Kansas 66062, U.S.A.
Need help?
Do you have a question about the 130 and is the answer not in the manual?
Questions and answers