Garmin 530 Owner's Manual
2-way radio & gps
Hide thumbs
Also See for 530:
- Basic operations (4 pages) ,
- Template (1 page) ,
- Owner's manual (88 pages)
Table of Contents
Advertisement
Advertisement
Table of Contents
Troubleshooting

Related Manuals for Garmin 530


Summary of Contents for Garmin 530
- Page 1 Rino 520/530 ® 2-way radio & GPS owner’s manual...
- Page 2 Information in this document is subject to change without notice. Garmin reserves the right to change or improve its products and to make changes in the content without obligation to notify any person or organization of such changes or improvements.
- Page 3 520 and Rino 530 features are noted throughout the Quick Start Guide and the Owner’s Manual. The Rino 530 contains all of the features of the Rino 520 with the addition of a seven channel NOAA weather receiver with weather alert, an electronic compass, and barometric...
-
Page 4: Warnings And Cautions
Use the Rino 520/530 at your own risk. To reduce the risk of unsafe operation, carefully review and understand all aspects of this Owner’s Manual. When in actual use, carefully compare... - Page 5 ANSI Standard (C95.1). The design of your radio complies with the FCC guidelines (and those standards). Rino 520/530 Owner’s Manual ® For body-worn and face-held operation, this radio demonstrates compliance and meets the FCC RF exposure guidelines for uncontrolled exposure (general population) when used with approved accessories supplied with or designed for this product.
- Page 6 (such as propane or butane); areas where the air contains chemicals or particles, such as grain, dust, or metal powders; and any other area where you would normally be advised to turn off your vehicle engine. Rino 520/530 Owner’s Manual ®...
- Page 7 Please read and observe the following instructions. WARNING: For use in vehicles, it is the sole responsibility of the owner/operator of a vehicle with the Rino 520/530 installed to place and secure the device so it will not interfere with the vehicle operating controls and safety devices, obstruct the driver’s view...
-
Page 8: Table Of Contents
Turn Radio/GPS On/Off ... 18 Status Window ... 18 GPS Status ... 18 Radio Transmission/Reception Status ... 18 Using the Rino 520/530 Radio Features ... 20 Peer-to-Peer Positioning ... 20 New Contact Page Overview ... 20 Sending a Location ... 23 Map Page ... - Page 9 Finding a Point of Interest ... 58 Finding an Address or Intersection ... 60 Recent Finds ... 62 Using Go To Navigation ... 63 Rino 520/530 Owner’s Manual ® Tracks Page ... 64 Using the TracBack Feature ... 65 Setting up the Track Log ... 67 Using Track Profiles ...
- Page 10 Radio Frequency Charts ... 106 Data Field Definitions ... 109 Interface Information ... 111 FCC Compliance Information ... 112 FCC Licensing Information ... 113 Limited Warranty ... 114 Software License Agreement ... 116 Product Registration ... 116 Index ...117 Rino 520/530 Owner’s Manual ®...
-
Page 11: Getting To Know Your Rino 520/530
American basemap that includes Interstate and State Highways and Exit Information. The Rino uses compatible MapSource 520/530 can display up to 56 MB of a variety of detailed map data. Some of the mapping options that are compatible with the Rino 520/530 include City Select, MetroGuide, Topo, Fishing Hot Spots, and BlueChart local dealer or the Garmin Web site (www.garmin.com) for... -
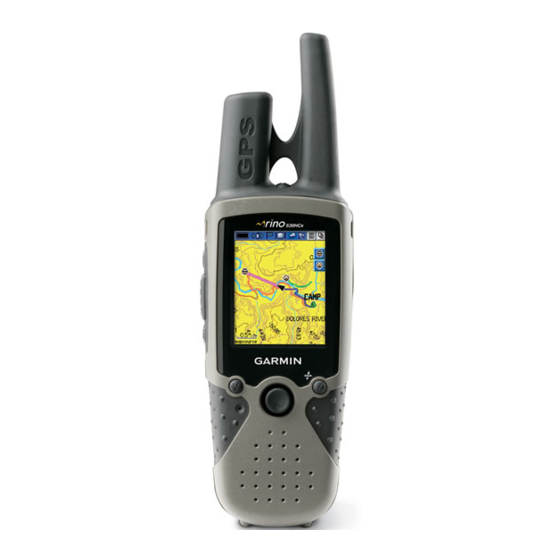
Page 12: Front Of The Rino 520/530
• From any other page, press to display Map Page and press again to open Zoom control • Press and hold to turn the electronic compass On/Off (Rino 530 only) Microphone: • Hold unit 3-4 inches away when talking Rino 520/530 Owner’s Manual... -
Page 13: Back Of The Rino 520/530
Back of the Rino 520/530 2-way FRS/GMRS Antenna Mini USB Port with Weather Cap Headset Connector with Weather Cap Battery Charger Contacts Lower - Wrist Strap Attachment Point Rino 520/530 Owner’s Manual ® GPS Antenna Upper - Wrist Strap Attachment Point... -
Page 14: Main Display Pages
Main Display Pages All of the information you need to operate the Rino 520/530 can be found on five default main pages (four for the Rino 520). Simply press and release the Page/Quit button to cycle through the Radio Page, Map Page, Active Route Page*, Compass Page, Altimeter Page (Rino 530 only), and Main Menu Page. -
Page 15: Operating The Rino 520/530
Operating the Rino 520/530 For best results, you should initialize the GPS receiver in your Rino 520/530 unit before you use it the first time. page 7 for instructions on initializing the unit. The compass and altimeter contained in the Rino 530 should also be calibrated. -
Page 16: Status Bar Overview
Alarm Clock On GPS On, 3D Position Fix Speaker Muted Weather Alert On (Rino 530 only) You can adjust the backlight level by pressing the POWER key and releasing, then tap the POWER key or press the Thumb Stick Up/Down to cycle through buttons. -
Page 17: Unit Operation
® Radio Page Initializing the Rino 520/530 To take full advantage of the Rino 520/530 features, the GPS receiver must be initialized. The initialization process allows the Rino 520/530 to receive and store satellite information and begin using the satellites for navigation. -
Page 18: Using Name And Symbol Fields
To initialize the unit: 1. Take the Rino 520/530 outside where there is an unobstructed view of the sky and turn it on. 2. The unit begins to search for satellite signals. A Satellite Signal graph is displayed on the Radio page or you can get more detailed information by accessing the Satellite Page from the Main Menu. - Page 19 fit in the window, a slider bar on the right side indicates your current position in the list. Rino 520/530 Owner’s Manual ® TIP: Hold the Thumb Stick Up or Down to scroll through the list more quickly. Once you reach the end...
-
Page 20: Setting The Channel And Code
Setting the Channel and Code The Rino 520/530 has a total of 22 channels (not including GMRS repeater channels) and 38 codes to select from using the Channel and Code fields. Channels 1–7 and 15-22 are GMRS channels, 8-14 are FRS channels, and 15R–22R are GMRS repeater channels... -
Page 21: Adjusting The Volume And Squelch Level
“Appendix” for a table listing all of the 38 Codes and their frequencies. As you change channels, the Rino 520/530 remembers the last channel/code combination that you were using. For example, you may set the unit channel to 5 and code to 21, then change the channel to 8 and code to 2. -
Page 22: Scanning And Monitoring
520/530 is scanning and it receives an incoming signal, the Rino 520/530 automatically decodes the Code used by the incoming signal. The Rino 520/530 then uses that Code when it transmits back to that unit. However, if you transmit when the scan has not paused, the transmission uses the channel set before scanning. -
Page 23: Radio Page Option Menu
Scanlist Page Radio Page Option Menu The Radio Page Option Menu allows you to customize aspects of your Rino 520/530, such as setting up the radio, programming call and ring tones, and setting up a scanlist. Rino 530 option only... -
Page 24: Setup Radio
Send Location—Enables/disables the peer-to-peer positioning feature. See the “Peer-to-Peer” section for more on this feature. Allow Polling—Enables/disables your Rino 520/530’s ability to respond to a polling request from another Rino. GMRS Power—Use this to set the power level used to transmit GMRS channels (1-7, 15-22 and repeater channels 15R-22R, if applicable) 1/2 watt is used for FRS channels 7-15. - Page 25 VOX setting should be used in noisy environments. Setting the VOX level to 5 Rino 520/530 Owner’s Manual ® is recommended for most environments, but it may be necessary to adjust the level to achieve the desired voice trigger level.
-
Page 26: Setup Tones
A “Set Quiet Mode” is available to mute all tones using the Option Menu. Setup Scanlist Refer to “Scanning and Monitoring” for complete information about this feature and the options in this page. Setup Scanlist Page Rino 520/530 Owner’s Manual ®... -
Page 27: Use Weather Radio
Use Weather Radio Available for the Rino 530 only, the Weather Radio provides a constant update of the weather conditions. The Weather Alert feature further enhances the Weather Radio by automatically detecting any weather alert tones if you are not actively transmitting or receiving with the radio. -
Page 28: Turn Radio/Gps On/Off
When a Weather Alert tone is detected, the Rino 520/530 automatically turns on the Weather Radio and broadcasts the Weather Alert if you are not actively transmitting or receiving on the radio. The volume changes to 3/4 the maximum when a Weather Alert is broadcast. Select Disable Weather Alert to turn off this feature. -
Page 29: Radio Page Status Indicators
Set to a weather channel and waiting to Receiving a weather broadcast You are transmitting on an FRS channel You are transmitting on an GMRS channel Rino 520/530 Owner’s Manual ® Radio Status Radio feature Off you can transmit Transmit Power at 1/2 watt... -
Page 30: Using The Rino 520/530 Radio Features
This section reviews some of the advanced radio features. Refer to the “Features” section for information on all of the features of the Rino 520/530. Peer-to-Peer Positioning The Rino 520/530’s most unique feature is being able to send its location to another Rino, which is called Peer-to- Peer positioning. - Page 31 The Rino 520/530 can manage up to 50 contacts at any time. Each time you receive a signal from a contact, your map is updated showing their new position. A Track Log of their movement is created and shown on your map (see the “Track Logs”...
- Page 32 Stick In to start entering data, up to 30 characters. For other fields, highlight the field and press the Thumb Stick In to start changing the data. 3. Highlight OK and press the Thumb Stick In when done. Contacts List Contact Details Page Rino 520/530 Owner’s Manual ®...
-
Page 33: Sending A Location
To send a location, highlight the Option Menu from the Waypoint Review Page, select Send Location, and press In. Rino 520/530 Owner’s Manual ® To send a location: 1. Press the Thumb Stick In and hold it until the Shortcuts Menu is displayed. -
Page 34: Map Page
Call button polls the contact. In many instances the map displays an Accuracy Circle surrounding the Position Icon. The Rino 520/530 uses both map resolution and GPS accuracy in defining your location to a point within the circle. The smaller the circle, the more accurate your location. - Page 35 Press the Z (Zoom) button from any page (other than the Map Page) to open the Map Page. Rino 520/530 Owner’s Manual ® To change scales on the Map Page: 1. Press the Z (Zoom) button to open the Zoom window.
-
Page 36: Map Page Options
Map Page Options Map Page options allow a variety of operating and custom features for your Rino 520/530. The Map Page options are: Map Page Option Menu Pan Map—Allows you to move the Panning Arrow (Map Pointer) about on the map. Refer to the “Using the Pan Map Option”... -
Page 37: Using The Pan Map Option
Thumb Stick In to display the Shortcuts Menu. 2. Select Find to display items. Select the category you wish to search (waypoints, contacts, etc.). The Rino 520/530 then searches for the items nearest the location of the map pointer instead of your actual location. -
Page 38: Programming The Data Fields
Data Field Options Thee data field options apply to the Map Page data fields and the Trip Computer data fields. For definitions of all data fields used in the Rino 520/530, refer to the “Appendix.” Changing Data Fields Guidance text The Guidance Text option displays upcoming intersections, points, or direction to navigate. -
Page 39: Setting Up The Map
2. Press Right or Left on the Thumb Stick to highlight the desired sub-page button, which displays the options for that sub-page. Rino 520/530 Owner’s Manual ® 3. Press Up or Down on the Thumb Stick to highlight an item on the list. Press Right to return to the sub-page buttons. -
Page 40: General Setup
Map Points, User Waypoints, Street Label, and Land Cover—Off, Auto, or 20 ft–500 miles, sets the maximum scale at which that feature should appear on the screen. Some types of data display only at specific zoom scales. Rino 520/530 Owner’s Manual ®... -
Page 41: Text Setup
“Appendix.” Marine Setup Show—Options for categories are On, Off, and Auto. Rino 520/530 Owner’s Manual ® Measuring Distance To use the Measure Distance option: 1. Select Measure Distance from the Option Menu and then press the Thumb Stick In to display the Panning Arrow. -
Page 42: Compass Page
“Appendix.” The Compass Ring functions as a magnetic compass when you are stationary (Rino 530 only). When you are moving, the heading is controlled by the GPS receiver (based upon settings customized in the Heading Setup Page). - Page 43 Compass Ring displays your heading while you are moving, but the data fields at the top of the page will not display any destination related data, such as Estimated Time of Arrival. Rino 520/530 Owner’s Manual ® CDI Scale Compass Page with Course Pointer and Course Deviation Indicator (CDI) Scale active.
-
Page 44: Compass Page Options
Show Data Fields—Toggles to display data fields on the right side of the display or removing the data fields Calibrate Compass—Calibrates the electronic compass. Follow the on-screen instructions. Rino 530 feature only. Restore Defaults—Returns options and data field choices to factory designations. -
Page 45: Using Sight 'N Go
3. Hold the Rino 530 at eye level and line up the two sighting marks on the case with a distant object. Press the Thumb Stick In to Lock Direction. - Page 46 On again. To turn the compass on and off: • Press and hold the Zoom (Z) button. A message appears on the screen indicating that the compass has been turned on or off. Rino 520/530 Owner’s Manual ®...
-
Page 47: Altimeter Page
Altimeter Page Available for the Rino 530 only, the Altimeter Page provides the current elevation, rate of ascent/descent, a profile of elevation changes over distance or time, or a profile of pressure changes over time. The Altimeter Page’s Option Menu allows you to select from a... -
Page 48: Altimeter Page Options
Calibrate Altimeter—Increases the accuracy of the altimeter. You must know your elevation or pressure to calibrate the altimeter. See page 41 for detailed instructions on calibration. Restore Defaults—Returns the Altimeter Page to the original factory settings (defaults). Rino 520/530 Owner’s Manual ®... -
Page 49: Viewing Pressure/Elevation Plots
3. To clear the plot and start a new one, you must clear the Track Log. Rino 520/530 Owner’s Manual ® Adjusting the Zoom Ranges You can set the Zoom Ranges for elevation, distance, or time when you display the View Elevation Plot. You may change the ranges for the horizontal and vertical scales. -
Page 50: Pan Plot
In to place a check mark in the box next to a selected item. 3. Move to the Apply button and press the Thumb Stick In to reset the data fields. Rino 520/530 Owner’s Manual ®... -
Page 51: Calibrating The Altimeter
Calibrating the Altimeter Because the Rino 530 relies on the barometric pressure to determine the elevation and the pressure at any given elevation can fluctuate, you can calibrate the altimeter to increase its accuracy. You must know the elevation (from a map point or other reliable data) or the pressure... -
Page 52: Main Menu Page
Main Menu Page The Main Menu provides access to additional Rino 520/530 feature pages. The pages listed below provide enhancements to Rino 520/530 operation. Press the Page button to cycle to the Main Menu or select it from the Main Page button at the top of each main page. -
Page 53: Satellite Page
Accuracy and Location Overhead Satellite Map Signal Strength Bars Satellite Page Rino 520/530 Owner’s Manual ® Sky View Graphic The Sky View graphic represents a view looking up at the sky from your current location showing satellites and their assigned numbers. The outer ring represents the horizon around you. -
Page 54: Waas
To learn more about the WAAS System, refer to the Federal Aviation Administration Web site faa.gov/). Because the Rino 520/530 relies on satellite signals to provide you with navigational guidance, the unit’s view of the sky determines how fast you achieve navigational status. -
Page 55: Satellite Page Options
Display Color Options—You have two color options for displaying the satellite array and signal strength bars, ‘Single’ or ‘Multicolor.’ Rino 520/530 Owner’s Manual ® New Location—If you are more than 600 miles (from where you last used the unit), select the New Location and then the Use Map options to approximate your location. - Page 56 2. Use the Thumb Stick to highlight the Use With GPS Off option and then press it In. The Rino 520/530 stops tracking satellites and should not be used for navigation. However, the next time you turn the unit on, it returns to Normal GPS operation.
-
Page 57: Trip Computer Page
Stick In to select a new data field choice. By selecting the information options that you prefer and arranging them in Rino 520/530 Owner’s Manual ® a desired order on the page, you can customize the Trip Computer Page to meet your navigation needs. -
Page 58: Waypoints
Main Menu, Panning from the Map page, the “Save” option from Map Point Review page, and the “Save as Waypoint” option on the Contact Review page. The Rino 520/530 can store up to 500 waypoints. Mark Waypoint Page The Mark Waypoint Page allows you to mark and record your current location as a waypoint. -
Page 59: Creating Waypoints
Thumb Stick In to display a prompt for a location or information page for a map item Rino 520/530 Owner’s Manual ® 2. A prompt asks you if you want to save the location as a Waypoint. Press Yes and the Waypoint Page displays, automatically assigning a number to the waypoint. -
Page 60: Averaging A Waypoint
You can also delete a waypoint or contact. To edit a waypoint: Use the Find Menu to display the waypoint/contact or highlight it on the Map Page and press the Thumb Stick In. Rino 520/530 Owner’s Manual ® Enter Distance... - Page 61 “Move” displays beneath the panning arrow. Deleting a Waypoint Moving a Waypoint Rino 520/530 Owner’s Manual ® 4. Use the panning arrow to drag the waypoint to the new location and then press the Thumb Stick In to place it.
-
Page 62: Find
They can be found by name or by those nearest to your current location. If you are using Rino compatible Garmin MapSource detailed mapping data, the list of Find locations is expanded to include categories for Points of Interest, Street Addresses, and Intersections. -
Page 63: Finding A Waypoint
Finding a Waypoint Waypoints that you have created and stored in the Rino 520/530 can be found by selecting the Waypoint option from the Find Menu. You can Find a waypoint from the list of waypoints using the Nearest current location, By... -
Page 64: Finding A Geocache
Finding a Geocache The Find Geocache feature allows you to view and navigate to geocache locations you created using your Rino or downloaded from your computer. For more information about geocaching, visit the Garmin web site www.garmin.com/outdoor/geocaching/. Rino 520/530 Owner’s Manual... -
Page 65: Finding A Contact
3. Change the symbols if desired and select “Yes” or “No” for calendar entry, then use the Close button. Finding a Contact Contacts that you have received in the Rino 520/530 can be found by selecting the Contacts icon from the Find Menu. To Find a contact: 1. -
Page 66: Finding A City
3. With the Information Page displayed, you can select Go To, Map, or Save options. 4. Press the Option Menu button to access Find Nearest Cities List additional features. Rino 520/530 Owner’s Manual ®... -
Page 67: Finding An Exit
A field at the bottom of the page indicates distance and bearing to the exit. Scroll through the list to highlight the desired exit. Rino 520/530 Owner’s Manual ® 3. Press the Thumb Stick In to display the Information Page for that exit. This page contains the exit description with a list of available services near that exit along with the distance and bearing. -
Page 68: Finding A Point Of Interest
Once you have selected an item, you can display the Information Page for that item. You can then use the on- screen buttons to Go To or view the location on the Map; or use the Option Menu for more choices. Rino 520/530 Owner’s Manual ®... - Page 69 Here, Change Reference, Set Proximity (alarm), Add to Route, View Sun & Moon (tables for that waypoint), View Hunt & Fish (tables for that waypoint) or Map Information. Rino 520/530 Owner’s Manual ® All POI’s By Name POI’s By Category...
-
Page 70: Finding An Address Or Intersection
Go To, view the item on the Map, Save to save as a waypoint, or use the Option Menu for other choices. Highlight the Main Page Menu button and press In to close. Entering a Street Number Address Matches Rino 520/530 Owner’s Manual ®... - Page 71 4. Repeat the process for the second street name. When the second street has been entered, a search for matches begins. Rino 520/530 Owner’s Manual ® 5. Highlight the best match and then press the Thumb Stick In to display the Information Page for the intersection.
-
Page 72: Recent Finds
Delete to permanently remove that item. Access the Options Menu for other choices. Recent Finds List Recent Finds Page To clear the list, access the Options Menu to display the “Remove All” option. Rino 520/530 Owner’s Manual ®... -
Page 73: Using Go To Navigation
“Off Road” immediately projects a line to your destination. Rino 520/530 Owner’s Manual ® 4. The Map page is displayed where you can observe your movements and a navigation line indicating the path from your current location to your destination. -
Page 74: Tracks Page
Track Log. The Track Log contains information about points along its path, including time, and position. The Rino 520/530 uses this information to allow you to navigate using the saved track. You may also save tracks from other Rino users as they communicate with you. -
Page 75: Using The Tracback Feature
(or another Rino user’s path) without marking any waypoints. When you are ready to return to where you started, the Rino 520/530 takes you back by following the Track Log that you left behind. You can save a total of 20 tracks in the unit memory. The Track Log starts recording as soon as the unit gets a satellite location fix and the Track Log feature is turned on. - Page 76 “Select the point you want to TracBack to.” 2. Use the panning arrow to select the desired point and press the Thumb Stick In to enable. 3. Use the Map Page or the Compass Page to navigate the Track. TracBack Rino 520/530 Owner’s Manual ®...
-
Page 77: Setting Up The Track Log
Once you have saved a track, you not only have a record of the path you traveled but an altitude profile as well. (Rino 530 Only) To view a Track Profile: 1. With the Saved Track Page for Track Log Setup... -
Page 78: Routes Page
Route navigation allows you to create a sequence of intermediate waypoints that leads you to your final destination. The Rino 520/530 stores 20 routes, each with up to 50 waypoints. A route can be created and modified from the Routes Page, and waypoints can be added to a route from the Find Menu. -
Page 79: Editing A Route
When you see the prompt “Do you really want to remove all waypoints from the route?”, select Yes. Rino 520/530 Owner’s Manual ® Route Options To reverse the route: 1. From the Route Page, select the on-screen page Option Menu button and press the Thumb Stick In to access the Option Menu. - Page 80 1. Select the row where you want the new point inserted before. Press the Thumb Stick In. 2. Highlight Insert and press the Thumb Stick In to display the Find Menu and select a new waypoint, city, exit, point of interest, etc. Rino 520/530 Owner’s Manual ®...
- Page 81 Route Waypoints List and press the Thumb Stick 2. Highlight Remove and press the Thumb Stick In to remove the waypoint from the list. Rino 520/530 Owner’s Manual ® To change a route point: 1. Select the waypoint that you want to change from the Route Waypoints List and press the Thumb Stick In.
-
Page 82: Adding Or Editing From The Route Map Page
4. Select “Yes” save as a waypoint to view the waypoint information page. Close the page to save and view it on the map. 5. Press the Thumb Stick In to place the new route point. Use the Page/Quit button to exit. Rino 520/530 Owner’s Manual ®... -
Page 83: Setting Up Routing Methods
2. Use the Thumb Stick to highlight the Setup Icon and then press it In to open the Setup Menu. Rino 520/530 Owner’s Manual ® 3. Select Routing and press the Thumb Stick In to open the Routing Setup Page. -
Page 84: Navigating A Route
To view the preview page for any turn on a route: Road Use the Thumb Stick to highlight (Point-to- a turn on the Page and then Point) press In to display the preview page for that turn. Rino 520/530 Owner’s Manual ®... -
Page 85: Highway Page
1. While on an active route, press the Page/Quit button or the Main Page button to access the Main Menu. Rino 520/530 Owner’s Manual ® 2. Highlight the Highway Page icon from the Main Menu and press the Thumb Stick In to observe your path of travel displayed on the highway graphic. -
Page 86: Setup Pages
Setup Pages The Setup Pages allow you to customize the Rino 520/530 to your personal preferences. You can choose time settings, units of measure, display backlighting and timeout settings, heading measurement, interface options and system operating mode. By highlighting the icons on the Setup Menu and then pressing the Thumb Stick In, you can display the Setup Page for each of the menu items. -
Page 87: Radio Setup Page
Garmin Web site (www.garmin.com). Choose one of the GPS options other than Normal to significantly save battery power. The Battery Saver mode reduces the rate of satellite signal position updating and the GPS Off option stops satellite signal reception altogether. -
Page 88: Tones Setup Page
In. Select Remove and press the Thumb Stick In. Map Setup Page This setup page has six sections and allows you to customize the way the map page displays. (See page 29 for detailed instructions.) the Page Sequence Rino 520/530 Owner’s Manual ®... -
Page 89: Routing Setup Page
Geocache Setup The Geocache Page setup allows you to find and record items hidden at geographic locations. Refer to the Garmin web site for information on how to download geocache locations from the internet, www. garmin.com/outdoors/geocache/. To setup the Geocache feature: 1. -
Page 90: Time Setup Page
5. Highlight a time zone from the list and then press the Thumb Stick In. 6. If you choose Other, you must enter a UTC offset value. 7. The correct time displays at the bottom of the page. Rino 520/530 Owner’s Manual ®... -
Page 91: Units Setup Page
The default position format, ‘hddd°mm. mmm’ displays the latitude and longitude in degrees and minutes and is most commonly used. Rino 520/530 Owner’s Manual ® LORAN TD Format When creating new waypoints using LORAN TD coordinates, you must set the correct LORAN chain number and secondary stations in the Setup TD field... - Page 92 For more information on Loran TDs, you may download Garmin’s Loran TD Position Format Handbook from the Garmin web site at http://www.garmin.com/support/ userManual.jsp. Map Datum—Offers a selection of nearly all map datums in common use. Every map is based on a map datum (a reference model of the earth’s shape) and is...
-
Page 93: Heading Setup Page
520/530 Owner’s Manual ® Switch to compass heading when below–Enter the desired speed for the Rino 530 to switch from using GPS to using the compass for guidance. for more than…—Enter a time limit to switch to the compass. When you travel at the speed entered above for the time entered here, the Rino 530 switches from GPS to the compass. -
Page 94: Altimeter Setup
Stick In to display the setup page. 4. Use the on-screen keyboard to begin entering your message in the Welcome Message field. 5. Highlight OK and the press the Thumb Stick In to finish. Welcome Page Rino 520/530 Owner’s Manual ®... -
Page 95: Interface Setup Page
NMEA devices, a DGPS beacon Interface Setup Page receiver, a personal computer, etc. To use non-Garmin data formats, you must use the RS232 to Mini USB interface cable described in the Accessories section of this manual. Refer to your Garmin Dealer or the Garmin web site (www.garmin.com) for... - Page 96 RTCM SC-104 format and simple ASCII text output of location and velocity information. None—Provides no interfacing capabilities. If Garmin DGPS or RTCM In/NMEA Out format is selected, additional fields are provided to control a Garmin differential beacon receiver directly from your unit.
-
Page 97: Proximity Waypoints
2. With the Name field highlighted, press the Thumb Stick In to display the Find Menu. Rino 520/530 Owner’s Manual ® 3. Select a waypoint from the Waypoints List or from any other group of map points and press the Thumb Stick In to display the Information Page for that item. -
Page 98: Calendar
2. Highlight and select Add Point to access the Find Menu. 3. Select a point from one of the categories in the Find Menu and press the Thumb Stick In to add it to the Calendar Page for that date. Rino 520/530 Owner’s Manual ®... - Page 99 4. Select from Older Than...1 Week, 2 Weeks, 3 Weeks, 4 Weeks or Remove All and the press the Thumb Stick In. Rino 520/530 Owner’s Manual ® To remove a selected point: 1. In the calendar, select the desired date using the Thumb Stick to display the calendar date page.
-
Page 100: Alarm Clock
Off. When the Alarm Clock Page “Set Time” arrives, the unit switches on and sounds the alarm beep. Press the Thumb Stick In to silence the alarm. Rino 520/530 Owner’s Manual ®... -
Page 101: Calculator
The memory is cleared either manually or when you turn off the Rino 520/530. To access the Calculator: 1. Press Page/Quit button or the Main Page button to access the Main Menu. -
Page 102: Stopwatch
You can enter a specific lap distance by selecting Set Lap Distance. To return to manually marking each lap, open the Option Menu and select the Lap by Button Press option. Rino 520/530 Owner’s Manual ®... -
Page 103: Sun & Moon
Option Menu and press the Thumb Stick In to display Use Current Time and then press the Thumb Stick In. Rino 520/530 Owner’s Manual ® To set the location: 1. Highlight the Location field and then press the Thumb Stick In to display the New Location options list. -
Page 104: Hunt & Fish
fishing. Be certain that they are not in conflict with state and local game laws, which may vary from location to location. It is your responsibility to know and abide by these laws. Rino 520/530 Owner’s Manual ®... -
Page 105: Games
Open at the bottom of the screen and press the Thumb Stick In. Play by yourself or race against others. Press Page/Quit to exit at any time. Rino 520/530 Owner’s Manual ® To adjust the Grid Size or Square Size: 1. Highlight the Grid Size or Square Size field and press In on the Thumb Stick. -
Page 106: Nibbons
A scoreboard keeps track of your wins and losses. Press Page/Quit anytime during the game for further instructions, to turn the sound On/Off, or to quit. Rino 520/530 Owner’s Manual ®... -
Page 107: Assimilation
Wait 30 seconds between attempts. Press Call to view the score and Page to quit the game. Rino 520/530 Owner’s Manual ® Waypoint Bomber In this GPS game, it is good to stay on the move! Two or more players attempt to “bomb”... -
Page 108: Appendix
Rino Rino Rino Rino Rino Rino Rino 520/530 Owner’s Manual 520/530 Owner’s Manual 520/530 Owner’s Manual 520/530 Owner’s Manual 520/530 Owner’s Manual 520/530 Owner’s Manual 520/530 Owner’s Manual ® ®... -
Page 109: Frs Limitations
462 MHz frequency. Refer to the “Frequency Charts” for a complete list of each channel’s frequency. GMRS repeater channels are not approved for use by the Canadian government, so they are disabled on Rino 520/530 units sold in Canada. -
Page 110: Specifications
Approx. 45 seconds AutoLocate Approx. 5 minutes ™ 1/second, continuous Performs to specifications to 6 g’s NMEA 0183, RTCM 104 (for DGPS corrections) and RS-232 for PC interface. Requires RS232 Cable Accessory (not included). Quad-helix Rino 520/530 Owner’s Manual ®... -
Page 111: Battery Life
Subject to proper user calibration. Subject to accuracy degradation to 100m 2DRMS under the U.S. DoD-imposed Selective Availability program. With optional Garmin Differential Beacon Receiver Input (such as Garmin GBR 23). 5, 5, 90 Duty Cycle - 5% receive with audio unmuted, 5%... -
Page 112: Standard Accessories Provided With The Unit
Bicycle Mount—Allows you to mount your Rino on a handlebar. (Not shown) Neck Lanyard—Allows you to carry the Rino around your neck. (Not shown) A/C or D/C Power To obtain accessories, see your local dealer or visit the Garmin web site at Adapter Connector www.garmin.com. -
Page 113: Transferring Mapsource Data
520/530 Owner’s Manual ® 9. WorldMap Map data transfer requires the use of a PC, a Garmin MapSource Data Disk, and the PC Interface Cable with USB port connector supplied with this unit. Follow instructions for data transfer in the MapSource User’s Manual. -
Page 114: Radio Troubleshooting Guide
Shut off other devices or move to a different area. Move to a location with a clear view of the sky. Enable Send Location. Wait 30 seconds between location transmission. Enable GPS. Hold the Page/Quit button for 5 seconds to release key lock. Rino 520/530 Owner’s Manual ®... -
Page 115: Gps Troubleshooting Guide
Cannot see the panning arrow on the Map Page easily. Cannot exit a menu or page by moving the Thumb Stick to the Left. Rino 520/530 Owner’s Manual ® Probable Cause Battery exhausted. AA Batteries may be installed backwards. You are pressing and releasing the Power button. -
Page 116: Radio Frequency Charts
462.7000 462.7250 Channel Description FRS-8 FRS-9 FRS-10 FRS-11 FRS-12 FRS-13 FRS-14 GMRS Primary 1 GMRS Primary 2 GMRS Primary 3 GMRS Primary 4 GMRS Primary 5 GMRS Primary 6 GMRS Primary 7 GMRS Primary 8 Rino 520/530 Owner’s Manual ®... -
Page 117: Weather Radio Frequency Chart
162.400 WX 2 162.475 WX 3 162.425 WX 4 162.450 WX 5 162.500 WX 6 162.525 WX 7 Rino 520/530 Owner’s Manual ® Receive Frequency (MHz) 462.5500 462.5750 462.6000 462.6250 462.6500 462.6750 462.7000 462.7250 Channel Description NOAA 1 (Weather Radio) - Page 118 Tone Controlled Squelch System (CTCSS) differences in some radios. Some of the tones on one radio may not be available on other radios. Charts showing the different Squelch Codes and manufacturers can be located on the Internet. Rino 520/530 Owner’s Manual ®...
-
Page 119: Data Field Definitions
Ascent-Maximum—The maximum ascent rate in feet per minute. (Altimeter Page Only.) Ascent-Total—The total distance ascended. (Altimeter Page Only.) Barometer—Ambient pressure relative to sea level. (Rino 530 Altimeter Page Only.) Bearing—The direction from your current location to a destination. Course—The direction from your starting location to a destination. - Page 120 Odometer—A running tally of distance travelled, based upon the distance between second-by-second position readings. Off Course—The distance left or right you are from the original course (path of travel). Pointer—Indicates the direction to the next destination. Speed—Display rate of travel in miles per hour, kilometers per hour, or nautical miles per hour.
-
Page 121: Interface Information
See also the “MapSource Setup” section of this Appendix for information on using the Rino 520/530 with MapSource. The input/output lines on your Rino 520/530 unit can be made RS232 compatible by using the optional RS232 PC Interface Cable accessory available from Garmin, in order... -
Page 122: Fcc Compliance Information
FCC Compliance Information The Rino 520/530 complies with Part 15 of the FCC regulations and with Canadian RSS-210 and ICES-003 for Class B digital devices. Operation of this device is subject to the following conditions: (1) This device may not cause harmful interference, and (2) this device must accept any interference received, including interference that may cause undesired operation. -
Page 123: Fcc Licensing Information
FCC Licensing Information The Rino 520/530 two-way radio operates on General Mobile Radio Service (GMRS) frequencies regulated by the Federal Communications Commission (FCC) in the United States. Operation on the GMRS frequencies is subject to additional rules as specified in 47 CFR Part 95. -
Page 124: Limited Warranty
Limited Warranty This Garmin product is warranted to be free from defects in materials or workmanship for one year from the date of purchase. Within this period, Garmin will at its sole option repair or replace any components that fail in normal use. - Page 125 The Garmin Rino 520/530 has no user-serviceable parts. Should you ever encounter a problem with your unit, please take it to an authorized Garmin dealer for repairs. The Rino 520/530 is fastened shut with screws. Any attempt to open the case to change or modify the unit in any way will void your warranty and may result in permanent damage to the equipment.
-
Page 126: Software License Agreement
America. Product Registration Help us better support you by completing our online registration today! Have the serial number of your Rino 520/530 handy and connect to our Web site (http://www.garmin.com). Look for the Product Registration link on our Home page. -
Page 127: Index
Current location Basemap Battery icon Data Fields Battery Life Definitions Bearing Data Transfer Bearing Pointer 32, 34 Defaults BlueChart Rino 520/530 Owner’s Manual ® 70, 76 Delete Waypoint Descent 37, 109 DGPS Editing Routes Waypoints Electronic Compass Elevation 37, 38, 39... - Page 128 5, 48 Show Data Fields Sight ‘N Go 34, 35 Signal Strength Sky View Specifications Squelch codes 10, 98 Status Bar Overview Status Indicators Stopwatch Stop Navigation 26, 34 Sun & Moon 53, 59, 93 Rino 520/530 Owner’s Manual ®...
- Page 129 20, 23 Zoom Trip Computer Page Ranges Two-way Radio 1, 98, 113 Altimeter Page Units Page 78, 81 Unlock Buttons Vibrate Voice Operated Transmission Rino 520/530 Owner’s Manual ® 44, 76 1, 100 48, 49 17, 63 25, 30 38, 39...
- Page 132 For the latest free software updates (excluding map data) throughout the life of your Garmin products, visit the Garmin web site at www.garmin.com. © Copyright 2006 Garmin Ltd. or its subsidiaries Garmin International, Inc. 1200 East 151 Street, Olathe, Kansas 66062, U.S.A.
Need help?
Do you have a question about the 530 and is the answer not in the manual?
Questions and answers