Table of Contents
Advertisement
Quick Links
Download this manual
See also:
User Manual
Overview
See safety information included with the device for
warnings and precautions.
NOTE: To maximize battery life, plug in and charge the
navigation unit for the first two hours of use.
NOTE: Use the
Reset button
(located on the
back of the device)
to restore factory
settings and restart
the device.
To Power the Device:
On Press and hold the Power Key for two seconds.
(Device powers on in five seconds.)
Off Press and hold the Power Key for five seconds.
To Enter or Return from Standby Mode:
Press and release the Power Key.
Install the Mount
Note: Follow all local regulations governing the placement of
the mount.
Select an area with a line of sight to the sky and GPS satellites
to ensure reliable GPS information.
Clean and dry the mounting area.
1
Remove the suction cup protective film.
2
Adjust the angle of the mount using the thumbscrew and
3
slide the mount into the cradle.
Pull the suction cup lever up to release suction.
4
Place and hold the mount suction cup against the
5
mounting surface.
Press the suction cup lever down until it snaps into place.
6
Angle the bottom of the TND device into the cradle and
7
align the two slots on the bottom of the device into the
two ridges on the cradle.
Press the top of the device toward the cradle until you
8
hear the upper clip latch into place.
Enter Truck Information
Tap Truck Tools > Truck Info.
1
On the left,
tap on an
option
Tap and to view all options.
2
Tap the option button to be changed.
3
Enter new truck information settings.
4
Tap Back to save changes.
5
View Timers and Logs
Countdown timers are controlled by the Driver Status (Driving,
On Duty, or Off Duty) selected on the Main Menu.
Tap Truck Tools > Timers and Logs
1
Redefining Truck Navigation
Quick Start Guide
Power Key
Battery Power Indicator
Bright Red: Device is plugged
in and the battery is charging.
Bright Green: Device is
plugged in and the battery
is fully charged.
Light Green: Device is
in Standby Mode.
On the right,
enter settings
for the option
TND
700
TM
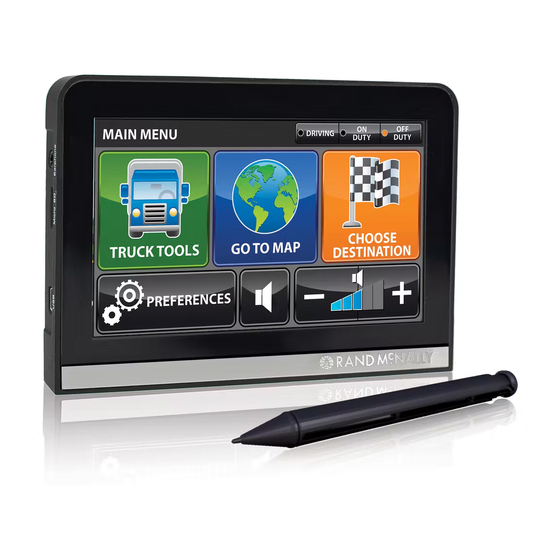
Main Menu
8
1
5
Enter truck information and access truck-specific use tools
1
Show location on the map and view navigation instructions
2
Change driver status
3
Choose a destination
4
Select TND and route preferences
5
6
Mute the speaker
7
Adjust speaker volume
GPS Signal Indicator
8
Plug the power cord into the device and the vehicle's
9
12-volt power source.
Adjust the navigation device so that it can be easily seen
10
and does not block the driver's line of sight.
Note: Do not place
the mount in an airbag
deployment area.
Tap the Timers tab to view timers,
2
odometer readings, and times.
Tap the Logs tab to view a list of states.
3
Tap on a state to view individual logs.
4
3
2
4
6
7
Advertisement
Table of Contents

Related Manuals for Rand McNally intelliroute TND 700


Summary of Contents for Rand McNally intelliroute TND 700
-
Page 1: Main Menu
Redefining Truck Navigation Quick Start Guide Overview Main Menu See safety information included with the device for warnings and precautions. NOTE: To maximize battery life, plug in and charge the navigation unit for the first two hours of use. Power Key NOTE: Use the Battery Power Indicator Reset button Bright Red: Device is plugged (located on the in and the battery is charging. back of the device) to restore factory Bright Green: Device is settings and restart plugged in and the battery the device. is fully charged. Enter truck information and access truck-specific use tools Light Green: Device is in Standby Mode. Show location on the map and view navigation instructions To Power the Device: Change driver status On Press and hold the Power Key for two seconds. -
Page 2: Find An Address
Tap the Device Settings tab. Tap the option button to be changed. Tap and to view device options. Enter the new settings for the option. Tap the option button to be changed. Tap Back to save changes. Enter the new settings for the option. IMPORTANT! Use TND Dock On the computer: Click Install Rand McNally TND Dock using Use Rand McNally TND Dock to register your device and to the program provided on the device. receive software upgrades, construction updates and access additional features. NOTE: Features require internet connection and Windows compatible PC. Turn on your TND and allow it to power up. Connect your TND to your computer using the USB cable. Click View License Agreement, then click Accept Follow on-screen instructions to complete installation. Find More Information Once installed, the Rand McNally IntelliRoute TND 700 User Guide can be accessed from a button in TND Dock.
Need help?
Do you have a question about the intelliroute TND 700 and is the answer not in the manual?
Questions and answers