
Subscribe to Our Youtube Channel
Related Manuals for Bose VIDEOWAVE® II ENTERTAINMENT SYSTEM


Summary of Contents for Bose VIDEOWAVE® II ENTERTAINMENT SYSTEM
- Page 1 Operating Guide Guía del usuario Guide d’utilisation ® IDEO NTERTAINMENT YSTEM...
- Page 2 TAB 8 TAB 7 TAB 6 TAB 5 TAB 4 TAB 3 TAB 2 English MPORTANT AFETY NFORMATION Please review the important safety information in your VideoWave ® Entertainment System Setup Guide before using your system. This will help you operate your system properly and safely.
-
Page 3: Table Of Contents
Interacting with source guides and menus ..® Play Bose demonstration ....Program Language ..... . - Page 4 Cleaning the product enclosures ... . ® Play Bose demonstration ....Limited warranty ......
-
Page 5: Welcome
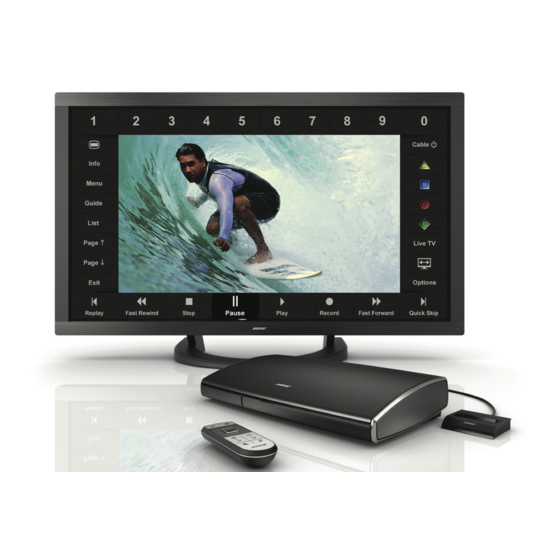
Welcome Product Overview ® ® The VideoWave system features an HD monitor, and Thank you for choosing the Bose VideoWave comes with a control console, a remote control, and entertainment system for your home. a dock for iPod. By now, your system should be successfully set up ®... -
Page 6: System Overview
TAB 8 TAB 7 TAB 6 TAB 5 TAB 4 TAB 3 TAB 2 English NTRODUCTION System overview • You only see the controls you need. For example, when you are watching a television program on your cable set-top box and you touch the click pad, the ®... -
Page 7: Bose ® Click Pad Remote Control Overview
TAB 3 TAB 4 TAB 5 TAB 6 TAB 7 TAB 8 NTRODUCTION ® Bose click pad remote control overview Power on/off Source selection Turns the system on/off including Selects connected devices from the connected devices. source menu. See “Turning the system on/off” on See “Selecting a source”... -
Page 8: Control Frame Overview
Image view control (page 18). Source and system options menu (page 23) and Bose Demonstration (page 24) Playback controls used for sources such as DVR, DVD, CD, and MP3 players.* *For more information on using these controls, refer to the owner’s guide that came with the source you have selected to use. - Page 9 English TAB 2 TAB 3 TAB 4 TAB 5 TAB 6 TAB 7 TAB 8 NTRODUCTION Click pad overview TOUCH GLIDE Place your thumb on the click pad Glide your thumb along the click to see the control frame. pad to highlight a control. CLICK Press down on the click pad to select the highlighted...
- Page 10 Fortunately, we’ve made the process easy, and it’s available for free from Bose. Please see “Performing a system update” on page 34 for more information.
-
Page 11: Turning The System On/Off
System is shutting down in 10 seconds until power is restored due to an error. If the problem persists, To turn off the system, including the connected contact Bose. See the contact sheet source, press the power button. included with your system... -
Page 12: Selecting A Source
TAB 8 TAB 7 TAB 6 TAB 5 TAB 4 TAB 3 TAB 2 English ASIC YSTEM PERATION Selecting a source Note: You can also move the highlight up and down the list of sources using the up and down From the SOURCE menu, you can select any of your navigation buttons. -
Page 13: Controlling The Volume
English TAB 2 TAB 3 TAB 4 TAB 5 TAB 6 TAB 7 TAB 8 ASIC YSTEM PERATION Controlling the volume Moving through channels Press volume plus (+) Press CH or CH or minus (–) to raise or move up or down lower the volume. -
Page 14: Control Frame Overview
Image view control (page 18). Source and system options menu (page 23) and Bose Demonstration (page 24). Playback controls used for sources such as DVR, DVD, CD, and MP3 players.* *For more information on using these controls, refer to the owner’s guide that came with the source you have selected to use. -
Page 15: Selecting Source Controls
English TAB 2 TAB 3 TAB 4 TAB 5 TAB 6 TAB 7 TAB 8 ONTROLLING OURCES Selecting source controls 2. Glide your thumb along the click pad to highlight the control you want. 1. Place your thumb anywhere on the click pad to activate the control frame, which provides on- screen controls for the source you are using. -
Page 16: Entering Channel Numbers
TAB 8 TAB 7 TAB 6 TAB 5 TAB 4 TAB 3 TAB 2 English ONTROLLING OURCES Entering channel numbers 3. After selecting the last digit, wait for the queue to shift the numbers to the left, indicating that they are being sent to the source. -
Page 17: Interacting With Source Guides And Menus
English TAB 2 TAB 3 TAB 4 TAB 5 TAB 6 TAB 7 TAB 8 ONTROLLING OURCES Interacting with source guides 1. Select the Guide or Menu control in the control frame. The selected function appears within the and menus control frame. -
Page 18: Changing The Image View
TAB 8 TAB 7 TAB 6 TAB 5 TAB 4 TAB 3 TAB 2 English PECIAL UNCTIONS Changing the image view Video muting Select the image view control in the control When you want to enjoy listening to music without frame to display a menu of video formatting being distracted by video, or if you just want to choices. -
Page 19: Selecting The Ipod Source
English TAB 2 TAB 3 TAB 4 TAB 5 TAB 6 TAB 7 TAB 8 SING THE OURCE Selecting the iPod source Controlling iPod 1. Please be sure to dock your iPod. It will not appear Use the click pad remote and the playback controls on in the SOURCE menu until you dock it. - Page 20 TAB 8 TAB 7 TAB 6 TAB 5 TAB 4 TAB 3 TAB 2 English ONTROL ONSOLE VERVIEW Headphone output Accepts stereo headphones with a 3.5 mm stereo plug. Volume level is set by the volume buttons on the remote control or control console. Control buttons Source Setup...
-
Page 21: Usb Ource
English TAB 2 TAB 3 TAB 4 TAB 5 TAB 6 TAB 7 TAB 8 USB S SING THE OURCE Viewing photos Photo viewing controls Photo files in a .jpg or .jpeg format can be displayed Use the click pad remote control and control frame from a USB flash drive. -
Page 22: Nputs
TAB 8 TAB 7 TAB 6 TAB 5 TAB 4 TAB 3 TAB 2 English HDMI™ I SING THE RONT NALOG NPUTS Connecting to the front analog A/V inputs The front analog A/V and HDMI inputs are provided for temporarily connecting sources such as digital and video cameras. - Page 23 The instructions on the next two pages explain how to do this. If you need help, please call Bose Customer Service. Refer to the list of contact numbers included with your system.
-
Page 24: Changing Settings
Program Language Highlighted option Play Bose ® demonstration Select a track for language Track 1 Selected Plays the Bose audio/video demonstration. After setting completion you are returned to the source Channel Number you were using. Control Frame Sounds Video Settings... -
Page 25: Program Language
English TAB 2 TAB 3 TAB 4 TAB 5 TAB 6 TAB 7 TAB 8 HANGING OURCE AND YSTEM PTIONS Program Language Video Settings Selects an alternate audio track, such as a Secondary Provides video presets for dark, normal, and bright Audio Program (SAP), when it is available. -
Page 26: Motion Smoothing
TAB 8 TAB 7 TAB 6 TAB 5 TAB 4 TAB 3 TAB 2 English HANGING OURCE AND YSTEM PTIONS Gamma and color adjustments Note: Movies will appear to be more natural and lifelike Note: We recommend that these adjustments be made when motion smoothing is on. -
Page 27: Changing Your System Setup
® demonstration Note: To exit the Unify menu at any time or cancel the Plays the Bose audio/video demonstration. After function you started to use, press the source select completion you are returned to the Unify menu. button on the remote, or the Setup button on the... -
Page 28: Source Setup
Internet connection, system software • Change the name of a connected device updates from Bose can be downloaded to the USB • Set up the remote control drive that is included with your system. Be sure to carefully follow the instructions displayed on the •... -
Page 29: Customizing The Control Frame
English TAB 2 TAB 3 TAB 4 TAB 5 TAB 6 TAB 7 TAB 8 HANGING YSTEM ETUP Customizing the control frame 3. Using the navigation pad on the click pad remote, select or remove controls for the selected device: •... -
Page 30: Installing The Ir Emitter
TAB 8 TAB 7 TAB 6 TAB 5 TAB 4 TAB 3 TAB 2 English HANGING YSTEM ETUP Installing the IR emitter External In order to control external sources like a set-top box source or DVD player, the control console is designed to transmit infrared (IR) signals to them. -
Page 31: Controlling The System Using A Third-Party Remote
English TAB 2 TAB 3 TAB 4 TAB 5 TAB 6 TAB 7 TAB 8 HANGING YSTEM ETUP Controlling the system using a Third-party VideoWave system third-party remote remote function function A third-party remote, such as your set-top box remote, TV power on/off ®... -
Page 32: Troubleshooting
• Make sure batteries are in the remote (see page 35). • Reset the system. See “Resetting the system” on page 33. The Bose remote does not • You may need to update your system. See “Performing a system update” on page 34. -
Page 33: Pairing The Remote With The Console
English TAB 2 TAB 3 TAB 4 TAB 5 TAB 6 TAB 7 TAB 8 ROUBLESHOOTING Problem What to do Intermittent audio dropouts • Use the composite video cable included with your system for this coaxial digital audio connection. heard on a coaxial digital audio Refer to “Source setup”... -
Page 34: Performing A System Update
Unify ® menu. 2. Using the remote navigation buttons, select Update. 3. Follow the instructions on the screen. Contacting customer service For additional help in solving problems, contact Bose ® Customer Service. See the address sheet included in the carton. -
Page 35: Care And Maintenance
English TAB 2 TAB 3 TAB 4 TAB 5 TAB 6 TAB 7 TAB 8 ARE AND AINTENANCE Replacing the batteries Cleaning A low-battery message appears on the monitor when Be sure to adhere to the following instructions for the remote batteries need replacing. When replacing cleaning the outside surfaces of the product, especially them, be sure to replace both batteries with new ones. -
Page 36: Cleaning The Product Enclosures
TAB 8 TAB 7 TAB 6 TAB 5 TAB 4 TAB 3 TAB 2 English ARE AND AINTENANCE Cleaning tough marks and smudges WARNING: To avoid the risk of electric shock, make sure 1. Turn the system off and disconnect the monitor your hands are dry before unplugging your system from, power cord from the wall receptacle. -
Page 37: Limited Warranty
& other worldwide patents issued & pending. Bose. Failure to do so will not affect your limited warranty. DTS, the DTS Symbol and DTS+the DTS Symbol are registered trademarks &... - Page 38 Please complete and retain for your software programs included in this product, please mail your records: written request to: Licensing Manager, Mailstop 6A2, Bose Corporation, The Mountain, Framingham, MA 01701-9168. Bose VIDEOWAVE model: Corporation will distribute such source code to you on a disc for...
- Page 39 VideoWave system and to improve product design in the future. Special equipment is required to read the data stored by the product data logger and such data can only be retrieved by Bose if your VideoWave system is returned to Bose for service or as returned merchandise.
- Page 40 ©2012 Bose Corporation, The Mountain, Framingham, MA 01701-9168 USA AM353022 Rev.01...
Need help?
Do you have a question about the VIDEOWAVE® II ENTERTAINMENT SYSTEM and is the answer not in the manual?
Questions and answers