
Related Manuals for Kuppersbusch ekv6800.1m


Summary of Contents for Kuppersbusch ekv6800.1m
- Page 1 EKV 6800.1M EKV 6800.1M ISTRUZIONI DI USO E DI MONTAGGIO USE AND ASSEMBLY INSTRUCTIONS INSTRUCTIONS DE MODE D'EMPLOI ET D'ENTRETIEN BEDIENUNGS-UND MONTAGEANLEITUNG INSTRUCCIONES DE EMPLEO Y DE MONTAJE...
-
Page 2: Technical Characteristics
Congratulations , upon the wise choice you have made by purchasing the EKV 6800.1M model. Please read the information in this manual carefully before you operate the coffee machine. Here you will find important indications regarding your safety and the care and maintenance of the appliance that will allow you satisfactory use over a long term. -
Page 3: Table Of Contents
HOW TO MAKE CAPPUCCINO ....51 INDEX 7.10 DISPENSING HOT WATER ..... .52 TECHNICAL CHARACTERISTICS . -
Page 4: Description
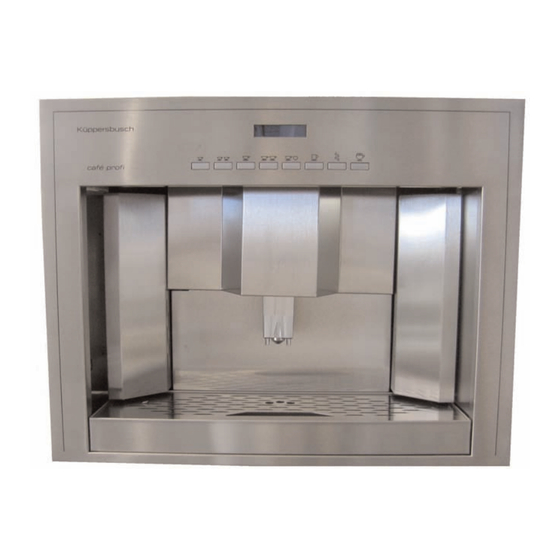
DESCRIPTION Fig. 1 1 Adjustment valve 7 Drawer for coffee grounds 13 Display 2 Milk suction tube 8 Hot water pipe 14 Coffee bean container 3 Coffee dispenser 9 LED lighting key 15 Ground coffee container 4 Milk container compartment 10 ON/OFF key 16 Water tank 5 Removable coffee cup compartment... -
Page 5: Keyboard Description (Standard Configuration)
KEYBOARD DESCRIPTION (Standard configuration) 1 Espresso key 2 Espressos key 1 White coffee key 2 White coffees key Decaffeinated coffee, Wash cycle Long coffee Hot water dispensing Cappuccino Fig. 2 LCD display EKV 6800. 1M INTERNAL DESCRIPTION 1 Microswitch for outer door 2 Inside door open 3 Cappuccino maker air adjustment 4 Cappuccino maker with tubes... -
Page 6: Safety Instructions
SAFETY INSTRUCTIONS ☞ ☞ ried out by a qualified electrician who This appliance must only be used as Parts of the packaging can be harm- must ensure that the electric power described in this handbook. The ful to children. Danger of suffocation! of the system is sufficient to absorb manufacturer shall not be liable for Keep packaging out of the reach of... - Page 7 ☞ ☞ understood the contents of this To avoid dangerous overheating, To increase ventilation to the handbook. make sure the supply cord is fully machine, make an opening of at least uncoiled. 300 x 100 mm in the back of the hous- ☞...
-
Page 8: Transport And Handling
TRANSPORT AND HANDLING MACHINE HANDLING IDENTIFICATION CAUTION CAUTION Always quote the machine serial number in all RISK OF IMPACT RISK OF POLLUTION communications manufacturer, OR CRASHING Küppersbusch. During all handling operations, the operator must ensure that there are no persons, objects or property in the handling area. -
Page 9: Preliminary Operations
PRELIMINARY OPERATIONS WARNING • Take the appliance out very slowly and in CAUTION order to guarantee maximum safety, make RISK OF POLLUTION sure that no people or things are below it. The water hardness must be less then Do not dispose of packaging in the environ- 4°... -
Page 10: Switching On
The LCD will then light up and read as follows: NOTE: The maximum outlet pressure from the pressure reducing valve MUST NOT exceed 1.5 bars. To switch the machine on definitively, press the “ENTER” key: Fig. 16 • Connect one end of the Teflon pipe (diam. 4 mm) to the machine, inserting it firmly into Fig. -
Page 11: Switching Off
SWITCHING OFF To switch off the machine, proceed as follows: • Hold the “ENTER” key down for 5 seconds with the machine switched on: • The LCD will read as follows: • To switch the machine off fully, press the main switch and turn it to the “OFF”... -
Page 12: Assembly Instructions For Qualified Persons
ASSEMBLY INSTRUCTIONS FOR QUALIFIED PERSONS • The unit housing the built-in coffee machine • Place the metal plate in position in the top INSTRUCTIONS FOR must be suitably fixed to the floor or wall in part of the coffee machine housing so that it BUILT-IN ASSEMBLY the room. -
Page 13: Number Of Spacer Plates
• The machine is supplied with 6 metal plates • To prevent the machine from overheating, WARNING (thickness 1 mm) that are to be placed make an opening in the back of the unit of at between the guide and the sides of the unit. least 300 mm x 100 mm, to allow air to cir- Only pour coffee beans into the container. -
Page 14: Technical Data
TECHNICAL DATA COFFEE MACHINE CLASS I RATED VOLTAGE 230V ELECTRICAL 1800W INPUT 1.8KW (ready for con- CONNECTION nection) POWER CORD 1.2m / 47,24 inc APPLIANCE 594X440X464mm DIMENSIONS 23,39X17,32X18,27inc (L X D X H) COMPARTMENT 560X550X450mm DIMENSIONS 22,05X21,65X17,72inc (L X D X H) NET WEIGHT 52Kg / 114Lb. -
Page 15: Adjustments To Be Made By A Qualified Technician Only
ADJUSTMENTS TO BE MADE BY A QUALIFIED TECHNICIAN ONLY GRINDING CAPPUCCINO MAKER MILK FLOW ADJUST- ADJUSTMENT ADJUSTMENT MENT (Temperature (FOAM AMOUNT AND Regulation) WARNING DENSITY) NOTE: this adjustment is possible even with the machine switched on. NOTE: this adjustment is possible even with Always remove the drip compartment the machine switched on. -
Page 16: Use
• When the desired temperature is reached STANDARD CONFIGURATION the display will show the following message: NOTE: The starting time is about 3 minutes. NOTE: The appliance is endowed with a secu- Fig. 18 rity system that will stop the machine after about 1.5 minutes of constant functioning of the pump (to avoid pump 1 Dispenses 1 cup of espresso coffee... -
Page 17: Height-Adjustable Coffee Dispenser
• Press the desired coffee delivery key once. HEIGHT-ADJUSTABLE HOW TO MAKE TWO COFFEE DISPENSER COFFEES To avoid spraying liquids, the height of the dis- • Position one cup under each nozzle. penser can be adjusted by hand to adapt it to any type of cup. -
Page 18: Preparing Decaffeinated Coffee In Powder 51 7.8 Preparing Long Coffee
Leave the cup under the dispensers until the The display will read: • The coffee is being made message appears on the display. Leave the cup under the dispensers until the message appears on the display. Then press the key for the type of coffee required and the display will read as follows (example): HOW TO MAKE DECAF-... -
Page 19: Dispensing Hot Water
• The display will read as follows: 7.10 WARNING D D I I S S P P E E N N S S I I N N G G H H O O T T RISK OF SCALDING W W A A T T E E R R When hot water is being dispensed, never This provides delivery of hot water for brewing allow the nozzle to come into contact with... -
Page 20: Programming
PROGRAMMING PROGRAMMING Entering the programming function gives Functions that can “ONLY” be accessed from access to all of the USER and TECHNICIAN LEGENDA the TECHNICIAN mode. mode functions. This operation may ONLY be per- NOTE: Can be performed with machine on. formed by a Specialist Technician. -
Page 21: Exiting Programming
2. PRODUCT NAME: EXITING PROGRAMMING CYCLE A beverage name is assigned to each single PROGRAMMING USER MODE key (no. indicates the number of the rele- 1. CUMULATIVE TOTAL To quit the programming mode, it is sufficient to vant key.) The names are pre-set in the fac- open the door and close it again. - Page 22 3. WATER VOLUME CC 5. MILK TIME 7. PROGRAM. ON/OFF By pressing the ENTER key the sub- This is used to program the automatic Press the ENTER key to access the submenu. menus can be accessed. This allows you to program the milk deliv- switching ON/OFF for the machine, only The doses of water to be used for each ery time.
-
Page 23: Programming Cycle
8. ENERGY SAVING 10. PREINFUSION TECHNICIAN MODE This is used to set the time after which the Press the ENTER key to access the sub- PROGRAMMING CYCLE machine enables the energy-saving device, menu. while still keeping the water tank at working When keys 2 and 4 are pressed, this pro- To access the functions that can only be pro- temperature. - Page 24 12. GROUNDS NUMBER 14. CLEAN WARNING 17. GRINDER SETTING Press the ENTER key to access the sub- Press the ENTER key to access the sub- Press the ENTER key to access the sub- menu. This allows you to program the menu.
- Page 25 19. STEAM TEMPERAT. 22. WATER FILTER The following table shows the correspondence between the hardness setting and the number Press the ENTER key to access the sub- Press the ENTER key to access the sub- of litres of water consumed after which the “DE- menu.
- Page 26 • Press the ENTER key; • When the machine has finished the 2 litres • The machine will begin to suck up the solu- (0,53 gal) taken from the container, the dis- tion from the tank and at the same time, to play will again read: expel hot water from the nozzle.
-
Page 27: Special Machine Scaling Functions
SPECIAL MACHINE SCALING FUNCTIONS until the display reads: HANDLING MANUAL RESETTING THE COFFEE DELIVERY CLEANING FILTER GROUP LITRE COUNTER This function makes it possible to activate the This function allows you to reset the total motor manually forming the automation of the amount of water used. -
Page 28: Cleaning And Maintenance
CLEANING AND MAINTENANCE 10.1 CAUTION CLEANING THE WORK AREA: CLEANING THE OUT- RISK OF INTOXICATION. • Remove the drip container. SIDE OF THE MACHINE • Remove the grille over the drip container. Follow the instructions for use supplied We recommend that you read this chapter with •... -
Page 29: Cleaning The Delivery Unit And The Milk Foamer
10.2 In order to execute the washing procedure pro- • Press the following key: CLEANING THE DELIV- ceed as follows: ERY UNIT AND THE • Position a container with water beside the MILK FOAMER machine. NOTE:Follow the instructions on the label •... -
Page 30: Reinstating An Interrupted Washing Cycle
10.3 REINSTATING AN INTERRUPTED WASH- ING CYCLE • Should the washing cycle be interrupted by electricity failure, when the appliance is next turned on the unit will be in rest position and the display will read: Fig. 53 • Disconnect all the tubes attached to it. •... -
Page 31: Standard Setting Table
STANDARD SETTING TABLE BEVERAGE WATER VOLUME GRINDING TIME MILK TIME PRE-BREWING TAMPING NUMBER (cc) (sec) (sec) Ristretto 2 Ristretto Espresso 2 Espresso Caffè 2 Caffè Caffe Creme 2 Caffe Creme Cappuccino Big Cappuccino Macchiato Caffellatte Milk Hot Water Steam Grounds number Milk cleaning warning Clean warning Group setting... -
Page 32: Machine Functions Messages
MACHINE FUNCTIONS MESSAGES DISPLAY CAUSA EFFECT SOLUTION NOTE GROUNDS DRAWER FULL Grounds drawer full. The Keys delivering coffee based Pull out the grounds drawer number of coffee grounds in drinks are blocked. and empty it into a garbage the drawer has reached the bag. - Page 33 IDISPLAY CAUSE EFFECT SOLUTION NOTE WASHING CYCLE The set number of cycles The message will appear on Do a washing cycle (see paragraph WASHING THE IS NEEDEDGIO programmed before washing, the display but the machine DELIVERY UNIT AND MILK has been exceeded. will continue to deliver drinks.
-
Page 34: Machine Block Alarm Messages
MACHINE BLOCK ALARM MESSAGES DISPLAY CAUSE EFFECT SOLUTION NOTE UPPER PISTON MOTOR During the group handling The control unit will halt what- Open and close the machine If the alarm reappears GROUP ALARMORE phase, the upper piston ever cycle is on by turning off door. - Page 35 DISPLAY CAUSE EFFECT SOLUTION NOTE CLEANING FILTER The volume counter has Coffee will not be delivered; Regenerate cleaning filter This alarm will not halt ALARM reached the number of litres the dose will not be halted or salts. To erase the alarm see delivery.
Need help?
Do you have a question about the ekv6800.1m and is the answer not in the manual?
Questions and answers