Table of Contents
Advertisement
Advertisement
Table of Contents

Related Manuals for Kuppersbusch EKV 6200.0E


Summary of Contents for Kuppersbusch EKV 6200.0E
- Page 1 Built-in automatic coffee machine EKV 6200.0E EKV 6500.0E...
- Page 2 Service Manual: H6-52-01 Responsible: Dieter Rutz KÜPPERSBUSCH HAUSGERÄTE AG Email: dieter.rutz@kueppersbusch.de Tel.: +49 209 401-732 Customer Service Fax: +49 209 401-743 Postfach 100 132 Date: 11.06.2013 45801 Gelsenkirchen...
-
Page 3: Table Of Contents
Safety ..........................4 Technical data (date: 16.10.2009).................. 5 General........................5 Installation........................6 Installation instructions ..................6 EKV 6200.0E assembly dimensions ..............6 Installation ......................7 Your appliance at a glance .................... 9 Button functions ......................12 Test programmes ......................13 EKV 6200.0E....................... -
Page 4: Safety
Service Manual Safety Danger! Repairs may only be carried out by a qualified electrician! Improper repairs can be extremely dangerous for the user. It is essential that you observe the following instructions in order to prevent electric shocks: • The casing and the frame may be live in the event of faults! Prior to repairs, disconnect the appliance from the mains! •... -
Page 5: Technical Data (Date: 16.10.2009)
Service Manual Technical data (date: 16.10.2009) General This service manual serves to give specific information on the functioning of the appliances indicated in the title to customer service technicians who already have the required technical knowledge to be able to repair coffee machines. Dimensions Micro reed water level sensor Height... -
Page 6: Installation
• The automatic coffee machine must be installed a safe distance from other heat sources such as home appliances in order to prevent an excessive rise in temperature. EKV 6200.0E assembly dimensions Nur zum internen Gebrauch... -
Page 7: Installation
Service Manual Installation Please note: From June 2013: Changing of the usual fixing screws equipment into torx and added 8 spacers Remove the coffee machine from the packaging and check to ensure that it is not damaged; if it is, do not install it but contact the dealer. - Page 8 Service Manual Fasten the connection cable with the corresponding clip. The connection cable must be long enough to be able to pull the appliance out easily to fill up the coffee bean holder. The appliance must be properly earthed. The electrical connection is to be carried out by a professional electrician on observation of the instructions supplied by the manufacturer and in accordance with valid local regulations.
-
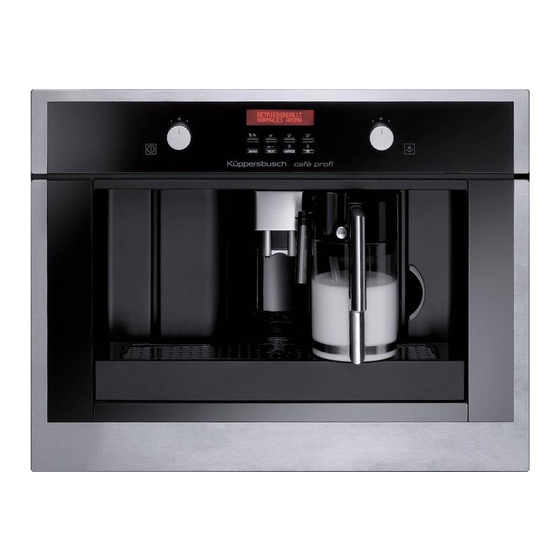
Page 9: Your Appliance At A Glance
Service Manual Your appliance at a glance „ & Coffee pourer ON/OFF switch Plain text display Input keys Selector switch for milk froth Hot water discharge pipe Fresh water tank Drip tray Coffee grounds box Drip tray display Drip tray grid Nur zum internen Gebrauch... - Page 10 Service Manual Milk froth dispenser nozzle Cleaning button Milk container Lamps Door micro switch Brewing unit lock Coffee grounds box micro switch Nur zum internen Gebrauch...
- Page 11 Service Manual Features • Programming for 3 different cup sizes • Pourer for 1 or 2 cups • Real cappuccino function (removable milk container) • Option of using coffee beans or ground coffee • Height-adjustable coffee pourer • Lamps • Brewing pressure of approx.
-
Page 12: Button Functions
Service Manual Button functions The electronic touch buttons can be used to select various drinks at the push of a button. The buttons are assigned in the factory. The individual buttons can be assigned to other drinks. Factory pre-setting ON/OFF Coffee selector button Espresso selector button Plain text display... -
Page 13: Test Programmes
Service Manual Test programmes EKV 6200.0E 6.1.1 Test programme: Components Please proceed as follows to access this test programme: Press and hold buttons Insert the plug. • Press button to switch on the coffee boiler heating element. • Press button to switch on the fan and the lights. - Page 14 Service Manual 6.1.2 Test programme: Display Please proceed as follows to access this test programme: Press and hold buttons Insert the plug. The corresponding button number will be show each time the different buttons are pressed. • When you turn the left button, the display will show 9 and 10. •...
- Page 15 Service Manual 6.1.3 Test programme: Quantity metered Please proceed as follows to access this test programme: Press and hold buttons Insert the plug. The display will show • the number of cups of coffee made • the water consumption in litres When button is pressed the display will show •...
-
Page 16: Ekv 6500.0E
Service Manual EKV 6500.0E 6.2.1 Test programme: Components Please proceed as follows to access this test programme. Switch the appliance into the standby mode with button A21. Open the service door and press and hold buttons C2, C7 and C10 simultaneously. The display will show “Select Test”. - Page 17 Service Manual 6.2.2 Test programme: Display Please proceed as follows to access this test programme. Switch the appliance into the standby mode with button A21. Open the service door and press and hold buttons C2, C7 and C10 simultaneously. The display will show "Select Test". Press button C 2.
-
Page 18: Water Flow Diagram
Service Manual Water flow diagram Outlet solenoid valve Coffee heating element Steam heating element Temperature sensor Temperature sensor Water pump Coffee dispenser Solenoid valve for steam and hot water Discharge pipe Water flow metre Water tank Nur zum internen Gebrauch... -
Page 19: Accessing The Individual Components
Service Manual Accessing the individual components Removing and installing the brewing unit Unlock here Attention! The brewing unit may not be removed when the coffee machine is switched on. Do not attempt do remove the brewing unit with force since this may damage the coffee machine. -
Page 20: Removing The Shelves
Service Manual Removing the shelves The shelves on the left and right can each be removed with three screws. Removing the back appliance casing Loosen the 8 screws and remove the back casing. Nur zum internen Gebrauch... -
Page 21: Removing The
Service Manual Removing the front cover Loosen the 3 screws and remove the front cover. Accessing the reed switch (water tank) Reed switch, 2-pole Nur zum internen Gebrauch... -
Page 22: Accessing The Flow Metre
Service Manual Accessing the flow metre Removing the pump Take off the two rubber mounts and remove the pump. Nur zum internen Gebrauch... -
Page 23: Removing The Top Cover
Service Manual Removing the top cover Loosen the 4 screws and remove the top cover. Removing the continuous flow heater (water) Loosen the 2 screws and remove the continuous flow heater. Nur zum internen Gebrauch... -
Page 24: Removing The Continuous Flow Heater (Coffee Water)
Service Manual 8.10 Removing the continuous flow heater (coffee water) Loosen the 4 thread screws and remove the continuous flow heater. Attention! The counternuts have not been tightened and will fall downwards! Attention! Disconnect the brewing unit micro switch! Nur zum internen Gebrauch... -
Page 25: Removing The Brewing Group Motor
Service Manual 8.11 Removing the brewing group motor Loosen the 3 screws and remove the holder. Remove the brewing group motor. The motor is installed in reverse order. Nur zum internen Gebrauch... -
Page 26: Removing The Electronic Unit
Service Manual 8.12 Removing the electronic unit Loosen the 5 screws and remove the electronic unit. Attention! There is no exchangeable fine-wire fuse here! 8.13 Accessing the micro switch in the door Nur zum internen Gebrauch... -
Page 27: Accessing The Micro Switch In The Drip Tray
Service Manual 8.14 Accessing the micro switch in the drip tray 8.15 Accessing the top micro switch in the brewing unit motor unit Micro switch contact closed in the idle position. Nur zum internen Gebrauch... -
Page 28: Accessing The Lower Micro Switch In The Brewing Unit Motor Unit
Service Manual 8.16 Accessing the lower micro switch in the brewing unit motor unit Micro switch contact open in the idle position. 8.17 Accessing the sensor electronics in the brewing unit motor Loosen the 2 screws and remove the sensor electronic unit. Nur zum internen Gebrauch... -
Page 29: Accessing The Coffee Holder
Service Manual 8.18 Accessing the coffee holder 8.18.1 Opening the grinder cover Loosen the 2 screws and remove the grinder cover. Loosen the 4 screws and remove the coffee holder. 8.19 Working on the front panel and the electric controls Remove all the screws and pull the front panel off slightly. - Page 30 Service Manual Pull the group connectors off and completely remove the front panel. Loosen both screws and remove the control electronics. Loosen both screws and remove the electric controls. Loosen both screws in each case to remove the control switches. Nur zum internen Gebrauch...
-
Page 31: The Grinder - Setting
Service Manual The grinder - setting Remove the coffee bean holder, the black finder and the button. Turn the white shaft clockwise until it stops. Pull out the top part of the grinder. Check whether the white gasket is positioned as in the illustration. - Page 32 Service Manual You can now change the setting: • Turn the toothed wheel clockwise*, to set a fine grinding (fine ground coffee) or • anti-clockwise**, to set a coarse grinding (coarse ground coffee). (*) Before making an adjustment you will need to mark the starting position of the metal ball, which you can extend through the holes in the white rings, as a reference mark.
-
Page 33: Cleaning And Care
Service Manual Cleaning and care Please read the corresponding section in the operation instructions. Do not use steam and/or pressure cleaning machines to clean the appliance! The appliance may be seriously damaged and put your life at risk. Risk of burning! Make sure the appliance has cooled down, at least until it is only slightly warm, before you clean it. -
Page 34: Finding Faults
Service Manual Finding faults Faults must always be distinguished as being customer complaints or technical faults. The majority of customers complain that: • the coffee has a poor flavour or it is not creamy enough • the coffee is cold •... - Page 35 Service Manual 11.1.3 Insufficient frothing At least one functional component will be defect in the case of poor frothing. This may, for example, be a broken solenoid valve. Check the following components: 1. Coupler and/or milk frother and hoses Check whether there is is still any “hardened“ residual milk in the appliance and remove it. This is the most frequent cause of poor frothing.
- Page 36 Service Manual 8. Please also check the following: 1. ALWAYS clean the appliance with the holder installed. 2. Take out the hose and remove any residual milk that may have been deposited on the connector. Also clean the opening on the other coupling. 4.
-
Page 37: Technical Faults
Service Manual 11.2 Technical faults An error message will be shown in the event of a technical fault. This may be one of the following: • General alarm • Grinder setting too fine, set the grinder • Fill up with coffee beans •... - Page 38 Service Manual If an error message is shown when the motor has already been running for a short time, please check the following: Check the top and bottom limit switches and replace them if necessary. Top limit switch Bottom limit switch Check the connection on the main board of the sensor board and replace it if necessary.
- Page 39 Service Manual If the error message is shown after approx. 6 minutes when the appliance is heating up and if the display shows “appliance heating up, please wait”, the fault may lie with the boiler temperature. Check to see whether the boiler/s has/have reached the specified temperature.
- Page 40 Service Manual 11.2.2 Grinder setting too fine, set the grinder This error message can be shown for the following reasons. Air in the water cycle Set the grinder at a slightly higher setting - ONLY WHEN THE MOTOR IS RUNNING! Check whether the water tank has been properly installed and pour a little water into the tank through the hot water delivery pipe to unblock the pipes.
- Page 41 Service Manual 11.2.3 Fill up with coffee beans This error message can be shown in the display for several reasons: The motor is running, but it is making strange noises (running freely). In this case you will have to rectify the mechanical cause (little stones or another foreign object between the grinder discs).
-
Page 42: Circuit Diagram
Service Manual Circuit diagram Sensore Reed Reed Sensor Sensore Temp. Caldaia IFD IFD Boiler Temp. Sensor Sensore temperatura Caffè CoffeeTemperature Sensor Sensore di Hall Hall sensor Flussimetro Water flow meter Scheda filtro motore Motor Filter board Motore Gruppo infusore Infuser Group motor Motore Macinino Grinder Motor Motore Asp.vapore...
Need help?
Do you have a question about the EKV 6200.0E and is the answer not in the manual?
Questions and answers