Holux GPSport 245 User Manual
Hide thumbs
Also See for GPSport 245:
- Specifications (1 page) ,
- Handleiding (48 pages) ,
- Quick manual (4 pages)
Table of Contents
Advertisement
Advertisement
Table of Contents

Related Manuals for Holux GPSport 245


Summary of Contents for Holux GPSport 245
- Page 1 GPSport 245 User’s Guide...
-
Page 2: Safety Precautions
Warranty Information The GPSport 245 is warranted to be free from defects in material and functions for a period of one year from the date of purchase. If there is a product failure within this period (under normal conditions), a replacement will be provided at no charge to the customer. -
Page 3: Rf Exposure Warning
Federal Communications Commission (FCC) Statement This equipment has been tested and found to comply with the limits for a Class B digital device, pursuant to Part 15 of the FCC Rules. These limits are designed to provide reasonable protection against harmful interference in a residential installation. - Page 4 instructions and the antenna(s) used for this transmitter must be installed to provide a separation distance of at least 20 cm from all persons and must not be co-located or operated in conjunction with any other antenna or transmitter. End-users and installers must be provided with antenna installation instructions and transmitter operating conditions for satisfying RF exposure compliance.
-
Page 5: Table Of Contents
ATTERY Using the AC Charger .................6 ................7 NSTALLING OUNT PC ...................9 ONNECTING TO A .................. 10 RIVER INSTALLATION USING THE GPSPORT 245 ................. 13 ................13 URNING ON THE YSTEM ................13 URNING OFF THE YSTEM ......................13 ..................13 N SCREEN DISPLAY .................... - Page 6 Auto Power Off ..................31 System ......................32 ....................36 NITIAL SETUP TROUBLESHOOTING ................39 SPECIFICATIONS ..................42...
-
Page 7: Getting Started
HOLUX GPSport 245 Getting Started Congratulations on purchasing the GPSport 245. The GPSport 245 is a compact, lightweight device with GPS finder and calorie calculation designed for sporting use, plus GPS coordinates record storage to calculate CO emissions saved and calories expended from not driving. -
Page 8: Unit Overview
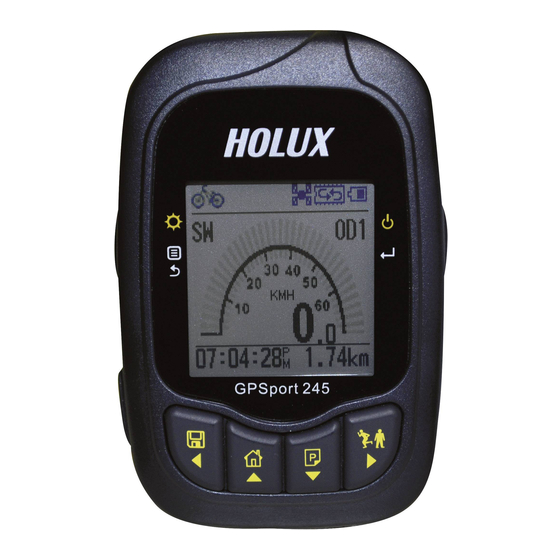
HOLUX GPSport 245 Unit Overview Front View Backlight Enter/Power button Menu LCD Screen Right button Left button Up button Down button Rear View Mounting slot... -
Page 9: Buttons
HOLUX GPSport 245 Left View Mini USB Port Buttons Use the Buttons for basic functions. Name Icon Function Enter/Power Inputs commands or turns the unit on and button off. Backlight Activates the backlight, main menu or Menu exits the submenu. - Page 10 HOLUX GPSport 245 button/Place Press to move up within the menu Finder select one item, or to engage the ‘Place Finder’ function. Down Press to move down within the menu button/page select one item, or to display the next page or navigational setting.
-
Page 11: Accessories
HOLUX GPSport 245 Accessories Check the box for the following supplied accessories. If any is missing, contact your supplier immediately. GPSport 245 USB cable Quick Guide AC adapter plug Warranty Card CD Rom Bike mount kit... -
Page 12: Charging The Battery
HOLUX GPSport 245 Charging the Battery Using the AC Charger 1. Plug the mini USB plug of the AC charger into the mini USB port on the top of the handset. 2. Plug the AC charger into a wall outlet. -
Page 13: Installing Bike Mount
HOLUX GPSport 245 Installing Bike Mount You can install the bike mount and the GPS on the left or right side of the handlebar or on the stem. 1. Attach the bracket to the bracket holder. 2. Thread the two cable ties through the slots of the bracket holder. - Page 14 HOLUX GPSport 245 3. Place the rubber pad under the bike mount and attach the bike mount securely to the bike stem using the two cable ties. 4. Slide in the GPS on top of the bike mount until it snaps into place.
-
Page 15: Connecting To Apc
HOLUX GPSport 245 Connecting to a PC 1. Connect the mini USB plug (smaller) of the USB cable to the mini USB port on the top of the system. 2. Connect the USB plug (larger) or the USB cable to a USB port on... -
Page 16: Driver Installation
HOLUX GPSport 245 Driver installation 1. Insert the provided installation CD into the computer’s CD drive. The introductory screen appears automatically. If the screen does not appear, open the Autorun.exe file on the CD. 2. Click Next to begin the installation. The License Agreement screen opens. - Page 17 HOLUX GPSport 245 4. To install the driver in the default location, click Next. The Ready to Install the Program screen opens. Or, to change the location, click Change, type the location, then click Next. The Ready to Install the Program screen opens.
- Page 18 HOLUX GPSport 245 6. Click Install to start driver installation or click Change Install Location to change installation folder. 7. Installation is done. Click OK to continue. 8. Click Finish to exit the wizard.
-
Page 19: Using The Gpsport 245
HOLUX GPSport 245 Using the GPSport 245 Turning on the System Press and hold the Power button until the opening screen appears on the LCD screen. Turning off the System Press the Power button until the LCD screen turns off. - Page 20 HOLUX GPSport 245 Meter: displays speed meter that simulates an analog meter that are commonly seen in most vehicles. user may also set larger font size, or configure the screen to display speed + travel time, speed + current time, or...
- Page 21 HOLUX GPSport 245 Calorie information: displays lap calorie and today calorie consumed. Earth Friendliness: displays the carbon emissions saved and trees planted from not using a motor vehicle on a single trip. Place Finder: Press to display the direction and distance to the stored coordinates.
- Page 22 HOLUX GPSport 245 Inside the coordinate page, use the Down button to edit the coordinate name. During the editing function, use the Up/Down/Left/Right button to edit the name; English letters only. Press the Enter button to enter the ‘set coordinates’...
- Page 23 HOLUX GPSport 245 Coordinates Display During the ‘Return to Point’ function, press to display the current coordinates and the specified coordinates from the Finder list. 在 Use the Left/Right button to switch between points in the Finder list. Press the Enter button to edit...
-
Page 24: Status Icons
HOLUX GPSport 245 User B uses the Finder function to record the location of his or her hotel during a trip. After sightseeing, user B presses to easily find the location of and return to his or her hotel. Status icons Status icons show sport mode, auto flip page, POI, backlight, satellite status, memory mode, and battery information. - Page 25 HOLUX GPSport 245 Satellite mode icons: indicates satellites is fixed indicates the device is trying to fix the satellites Memory status icons: Memory mode: indicates the memory is in overwrite mode. Full stop mode: indicates the remaining memory capacity. Battery status icons:...
-
Page 26: Functions And Operations
HOLUX GPSport 245 Functions and Operations Read this section to learn how to set up and use the GPS. Quick Setup User-friendly Quick setup function allows you to quickly setup most common settings. Press the Menu button to enter Main Menu and choose Quick Setup to begin setup. -
Page 27: History
HOLUX GPSport 245 Odometer: Press to move to the odometer you choose. Press the Enter button to confirm and save. Quick setup is now completed. Press Enter to start. History History function allows you to review log status for earth... - Page 28 HOLUX GPSport 245 Earth Friendliness Displays carbon savings and trees planted information. Odometer Displays Odometer 1, Odometer 2 and the total mileage. Resetting each of Odometer 1 or 2 does not affect the total mileage. Record History indicates which record the user is currently viewing.
- Page 29 HOLUX GPSport 245 To write-protect specific records: 1. To write-protect an entry: press the Enter button once for confirmation page, and again to confirm. 2. To unlock write-protect: when the screen shows , press the Enter button to unlock.
-
Page 30: Alert
HOLUX GPSport 245 Alert The Alert function can be set for Time, Speed, Distance and Reset Alert. The asterisk on the right side indicates this option has been set. To set alerts: 1. Press the Menu button to enter Main Menu. - Page 31 HOLUX GPSport 245 To setup Distance Alert: Press the Left/Right button to move to left/right. ii. Press the Up/Down button to adjust the value. The following indicators will appear on the message bar: • (appears only when the pre-determined time is due) •...
-
Page 32: Calorie
HOLUX GPSport 245 Calorie Calorie function contains Sport Mode and Weight submenus. Setup Sport Mode Choose the Sport mode for calorie calculation. 1. Use the Up/Down button to move to the desired mode. 2. Press the Enter button to confirm and save. -
Page 33: Setting
HOLUX GPSport 245 Setting The Setting function contains 2 submenus: General and System. General General submenu contains Speed Meter, Set Backlight, Auto Flip Page, Log Interval, Log Auto Start, Memory Mode, Auto Power Off. Speed Meter: Use the Up/Down button to select display mode. - Page 34 HOLUX GPSport 245 The default setting displays speed + timer. If the Speed Meter is not displayed, in Display Type, other display configurations are available for selection.
- Page 35 HOLUX GPSport 245 Set Backlight: 1. Press the Select button to enter the menu. 2. Use the Up/Down button to select the desired setting. 3. Press enter to confirm setting. Auto Flip Page: 1. Use the Up/Down button to move to the desired time interval or Manual for manual page flip.
- Page 36 1. Overwrite: When the 4MB memory capacity has been reached, GPSport 245 will continue to record and overwrite the oldest information on the memory. 2. Full Stop: When the 4MB memory capacity has been reached, GPSport 245 will stop recording.
-
Page 37: Auto Power Off
HOLUX GPSport 245 Auto Power Off 1. Use the Up/Down button to move to the desired time interval or Manual for Auto Power Off. 2. Press the Enter button to confirm and save. -
Page 38: System
HOLUX GPSport 245 System System submenu allows you to Delete All Log, setup Time Format, setup Time Zone, setup Unit, setup Language, GPS Cold Start, LCD Contrast, Odometer, Reset CO and Reset Device. Delete All Log: 1. Select Delete All Log. - Page 39 HOLUX GPSport 245 Setup Time Zone 1. Choose your time zone. 2. Use the Up/Down button to move to the desired time zone. 3. Press the Enter button to confirm and save. Setup Unit Choose the type of units to display on the screen.
- Page 40 HOLUX GPSport 245 chip to shorten fix time. LCD Contrast Choose the LCD Contrast on the screen. 1. Use the Up/Down button to move to the desired LCD Contrast value. 2. Press the Enter button to confirm and save. Edit Odometer...
- Page 41 HOLUX GPSport 245 Edit Otometer 1 / 2 Odometer can be edited manually. Press Left/Right button to move the cursor. Press Up/Down button to increase or decrease the number.。 Reset CO Reset ‘CO savings’ and ‘Trees planted’ values. Reset Device Reset device to the factory setting.
-
Page 42: Initial Setup
HOLUX GPSport 245 Initial setup When you reset the device, the initial setup menu will appear on the screen. Follow the step-by-step procedures to setup the common settings in the device: LCD Contrast, Language, Unit, Time format, Time zone, Auto flip page, Weight, and Sport mode. - Page 43 HOLUX GPSport 245 2. Press the Enter button to confirm and save. Setup Time Format Choose the time format to display. 1. Use the Up/Down button to move to 12:00:00 or 24:00:00. 2. Press the Enter button to confirm and save.
- Page 44 HOLUX GPSport 245 Setup Weight Input your weight for calorie calculation. 1. Use the Left/Right button to move the cursor to the digit you want to edit. 2. Press the Up button to increase value or the Down button to decrease value.
-
Page 45: Troubleshooting
HOLUX GPSport 245 Troubleshooting Use this section to solve problems with your GPS. If you are unable to find solve a problem, contact your supplier or a qualified technician. Problem Solution Power Cannot start Insufficient battery charge, please connect to the adapter and restart system. -
Page 46: Normal Care And Maintenance
HOLUX GPSport 245 Normal Care and Maintenance To ensure the unit’s normal operation and extended life span, please note the following while using and storing: Do not drop the unit If violently impacted or shocked, serious damage may be caused. - Page 47 HOLUX GPSport 245 device in a cool and dry place. For long-term storage, keeping the unit in a dry box is recommended. Please do not keep the product in the following environments: Unventilated and humid locations. In a car window that is exposed to excessive amounts of sunlight.
-
Page 48: Specifications
HOLUX GPSport 245 Specifications Chipset: MTK 3318 Cold start: 36 sec GPS chip Warm start: 33 sec Hot start: 1 sec Update Rate: <1 second continuously Dimension 81.7x 54x 22 mm <72g Weight Battery Rechargeable 1050 mAh Li-lon Battery Six buttons: Menu/ESC, Left, Up, Down,...
Need help?
Do you have a question about the GPSport 245 and is the answer not in the manual?
Questions and answers