Holux GPSport 260 User Manual
Hide thumbs
Also See for GPSport 260:
- User manual (93 pages) ,
- Quick manual (4 pages) ,
- User manual (89 pages)
Table of Contents
Advertisement
Quick Links
Advertisement
Table of Contents

Related Manuals for Holux GPSport 260


Summary of Contents for Holux GPSport 260
- Page 1 HOLUX GPSport 260 GPSport 260 User’s Guide...
-
Page 2: Safety Precautions
Warranty Information The GPSport 260 is warranted to be free from defects in material and functions for a period of one year from the date of purchase. If there is a product failure of within this period (under normal conditions), a replacement will be provided at no charge to the customer. - Page 3 Holux Technology, Inc. Copyright© 2008 Holux Technology, Inc. All Rights Reserved. Federal Communications Commission (FCC) Statement This equipment has been tested and found to comply with the limits for a Class B digital device, pursuant to Part 15 of the FCC Rules.
-
Page 4: Rf Exposure Warning
HOLUX GPSport 260 CAUTION Any changes or modifications not expressly approved by the grantee of this device could void the user's authority to operate this equipment. This device complies with Part 15 of the FCC Rules. Operation is subject to the... -
Page 5: Table Of Contents
NSTALLING OUNT PC................15 ONNECTING TO A ................16 RIVER INSTALLATION Using the GPSport 260 ................. 19 Turn on system power..............19 Turn off system power..............19 Menu....................19 Status Icons..................19 Sport Mode ..................22 Plot Mode ..................24 Multi Finder.................. - Page 6 HOLUX GPSport 260 Normal Care and Maintenance............. 41 Specifications ..................43...
-
Page 7: Getting Started
HOLUX GPSport 260 Getting Started Thank you for purchasing the GPSport 260. The GPSport 260 is a compact and lightweight device designed for sporting use. It is equipped with GPS tracking to calculate the amount of CO emissions reduced and the amount of calories consumed by not driving. -
Page 8: Unit Appearance
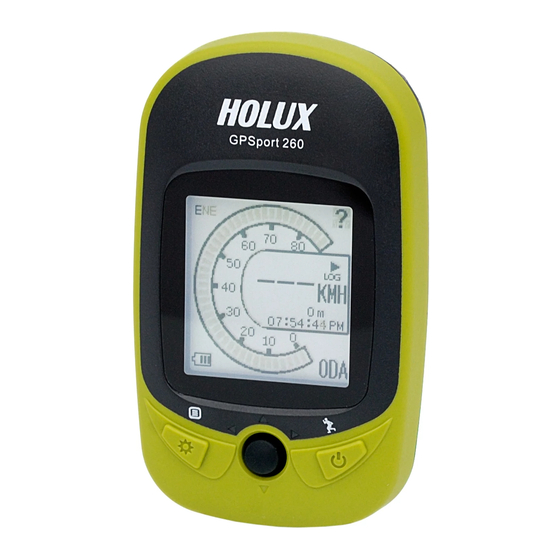
HOLUX GPSport 260 Unit Appearance Front View 1.8’’ LCD screen Backlight Enter/ Menu Power/ Exit Pause Up/ Down/ Right/ Left button... -
Page 9: Button
HOLUX GPSport 260 Rear View Mini USB Port Button Basic button functions Name Icon Function Power button Turn unit on or off. Menu Exit menu. Exit Cursor buttons Use Up, Down, Left and Right to select an option. Press the Enter button in the... -
Page 10: Accessories
HOLUX GPSport 260 Accessories Please make sure the following accessories are included in the box. Please contact your supplier immediately if there are any missing items. GPSport 260 USB cable Quick Guide AC Adapter Warranty Card CD-ROM Bicycle Mounting Kit... - Page 11 HOLUX GPSport 260...
-
Page 12: Charging The Battery
HOLUX GPSport 260 Charging the Battery Using the AC Charger Plug the mini USB plug of the AC charger into the mini USB port on the top of the handset. Plug the AC charger into a wall outlet. When charging, the Power indicator shows . -
Page 13: Installing Bike Mount
HOLUX GPSport 260 Installing Bike Mount You can install the bike mount and the GPS on the left or right side of the handlebar or on the stem. 1. Attach the bracket to the bracket holder. 2. Thread the two cable ties through the slots of the bracket holder. - Page 14 HOLUX GPSport 260 3. Place the rubber pad under the bike mount and attach the bike mount securely to the bike stem using the two cable ties. 4. Slide in the GPS on top of the bike mount until it snaps into place.
-
Page 15: Connecting To Apc
HOLUX GPSport 260 Connecting to a PC Connect the mini USB plug (smaller) of the USB cable to the mini USB port on the top of the system. Connect the USB plug (larger) or the USB cable to a USB port on... -
Page 16: Driver Installation
HOLUX GPSport 260 Driver installation 1. Insert the provided installation CD into the computer’s CD drive. The introductory screen appears automatically. If the screen does not appear, open the Autorun.exe file on the CD. 2. Click Next to begin the installation. The License Agreement screen... - Page 17 HOLUX GPSport 260 3. Read the agreement, click I accept the terms of the license agreement, then click Next. The Destination Folder screen opens. 4. To install the driver in the default location, click Next. The Ready to Install the Program screen opens. Or, to change the location, click Change, type the location, then click Next.
- Page 18 HOLUX GPSport 260 Click Install to start driver installation or click Change Install Location to change installation folder. 7. Installation is done. Click OK to continue. 8. Click Finish to exit the wizard.
-
Page 19: Using The Gpsport 260
LCD. Turn off system power Hold down the Power button until the LCD shuts off. Menu The GPSport 260 offers 9 operating modes. Use the cursor buttons to cycle through the options. Press OK to enter the selected mode. - Page 20 HOLUX GPSport 260 Sport mode icons: Bicycle mode Running mode Walking mode Vehicle mode Track Log icons: Track currently being logged Track currently not being logged Compass icons: The black arrow points north The compass needs calibrating Backlight icon: Backlight is on...
- Page 21 HOLUX GPSport 260 Device currently attempted to acquire satellite fix Memory mode icons: Overwrite: Memory now in Overwrite mode Full Stop: Show % of remaining memory Battery status icons: Battery fully charged Battery now charging Battery has been charged Low battery warning...
-
Page 22: Sport Mode
HOLUX GPSport 260 Sport Mode In Sport mode, the Left and Right buttons can be used to cycle between different pages of information. Dashboard: Displays the speedometer (simulates the analog dashboard seen in most transportation). The user can customize the text to display including speed + travel time, speed + current time, or speed + distance. - Page 23 HOLUX GPSport 260 Altitude: Displays change in altitude. Calories: Displays calories consumed per lap and total calories consumed today. Carbon Saving: Displays amount carbon dioxide emissions avoided or number of trees planted by not driving for one journey.
-
Page 24: Plot Mode
HOLUX GPSport 260 Plot Mode Plot mode can show a graph of the track log. It can also show the track in real time. View Plot Displays the graph for altitude versus time. Use the up and down buttons to zoom in and out. -
Page 25: Multi Finder
HOLUX GPSport 260 Multi Finder Multiple Finder mode can show the direction to the start of the track and lead you back to the starting point; alternatively, enter the coordinates for the destination to be guided by direction and distance. -
Page 26: Pedometer Mode
HOLUX GPSport 260 Show Displays the coordinates of current location and the destination. Pedometer Mode Pedometer mode counts and records the number of steps taken. Self Training Mode The user can set a target value to reach in Self Training mode. -
Page 27: Follow Course Mode
Tracks can be downloaded from the PC to the GPSport 260. List Displays the tracks currently stored on the GPSport 260 as well as the total distance of each track. Track details: distance, time, maximum speed, average speed, calories, altitude, carbon reduction, trees planted, and the number of check points in that track. - Page 28 HOLUX GPSport 260 Reverse Course Reverse the order of check points in one track Example: Go from the track's finish to the starting point instead.
-
Page 29: Weather Forecast Mode
HOLUX GPSport 260 Weather Forecast Mode Weather Forecast Displays sunrise/sunset time, temperature and air pressure. The sunrise/sunset time, temperature and forecasted weather in three hours' time for the current location. Air pressure trend over time... -
Page 30: History Mode
HOLUX GPSport 260 History Mode History shows track details Displays total number of tracks. Tracks can also be set as Favorite. Track List records track time and distance. Favorite The statistics for all tracks or favorites. - Page 31 HOLUX GPSport 260 Track statistics. Use the left and right buttons to cycle between different intervals (1 day, 2 days… etc.)
-
Page 32: Setting Mode
HOLUX GPSport 260 Setting Mode Various setting information Setting Menu Quick Setup Item 1 – set Sport mode Bicycle Mode: Calculate calories consumed while cycling Running mode: Calculate the calories consumed while running Walking mode: Calculate the calories consumed while walking... - Page 33 HOLUX GPSport 260 Quick Setup Item 2 – set user weight Quick Setup Item 3 – total distance Set Alert Different types of alert can be set. Use the cursor buttons to set the values.
- Page 34 HOLUX GPSport 260 Tick the Enable option below to activate the alarm. Sensor calibration Calibrate barometer Use GPS to calculate the correct altitude. Manually enter the correct altitude.
- Page 35 HOLUX GPSport 260 Calibrate compass Step 1: Place GPSport 260 on a level surface Step 2: Horizontally rotate the GPSport 260 Step 3: Vertically rotate the GPSport 260 compass will displayed calibration was successful.
- Page 36 HOLUX GPSport 260 Other Settings General Settings General settings include the Speed Meter, Backlight, Auto Flip Page, Memory Mode and Auto Power Off. Set Speed Meter Set the information for the Speed Meter to display Set Backlight Set how long the backlight should be on for...
- Page 37 HOLUX GPSport 260 Auto Flip Page Set number of seconds between auto page flips Memory Mode Overwrite: Automatically write over old memory when track log is full Full Stop: Stop recording when track log is full Auto Power Off Set how long after GPS signal is lost before automatically powering off.
- Page 38 HOLUX GPSport 260 The Signal page shows the name and strength of satellite signals currently being picked up. System Settings System settings include Time Format, Time Zone, Unit, Language, LCD Contrast, Odometer, Delete all log and Reset Device. Set Time Format Select time format to display.
- Page 39 HOLUX GPSport 260 Set Unit Select unit of measurement to display. Set Language Select display language. Set LCD Contrast Select LCD contrast Set Odometer Select total distance to set Odometer Reset sets odometer back to zero. The total distance can also be edited using the Up, Down, Left and Right buttons.
- Page 40 HOLUX GPSport 260 Reset Device Reset device to factory default...
-
Page 41: Normal Care And Maintenance
HOLUX GPSport 260 Normal Care and Maintenance To ensure the unit’s normal operation and extended life span, please note the following while using and storing: Keep dry This product is not waterproof. If it comes into contact with water spray or is submerged it will seriously damage the components, resulting in irreversible damage. - Page 42 HOLUX GPSport 260 Using the stylus The LCD screen is easily scratched; please use only the stylus for operation. Do not use any other sharp objects on the screen to avoid damaging the LCD screen. Cleaning the screen Using a soft clean cloth to wipe the screen is recommended; do not use ordinary tissue to wipe the screen.
-
Page 43: Specifications
HOLUX GPSport 260 Specifications Chipset: MTK 3329 Cold Start: 36 sec GPS Chip Warm Start: 33 sec Hot Start: 1 sec Refresh Rate: < 1 second continuously Dimensions 81.7x 54x 22 mm <72g Weight Battery Rechargeable 1050 mAh lithium battery...
Need help?
Do you have a question about the GPSport 260 and is the answer not in the manual?
Questions and answers