Table of Contents
Advertisement
Quick Links
Advertisement
Table of Contents

Related Manuals for Epson IP-100


Summary of Contents for Epson IP-100
- Page 1 Color Ink Jet Printer Setup and Direct Printing Guide 4010389 XXX-00...
- Page 2 CORPORATION. The information contained herein is designed only for use with this EPSON printer. EPSON is not responsible for any use of this information as applied to other printers. Neither SEIKO EPSON CORPORATION nor its affiliates shall be liable to the purchaser of...
-
Page 4: Table Of Contents
Plain paper (A4, A6, 4 x 6 inch)..... . . 2-5 EPSON special media ....... 2-5 Print area . - Page 5 Loading A6 paper ........3-5 Loading EPSON Photo Paper (4 x 6 inch) ....3-7 Loading PC Cards .
- Page 6 Ink cartridges ........A-2 EPSON special media ....... A-2...
- Page 7 Index...
-
Page 8: Safety Instructions
Safety Instructions Important Safety Instructions Read all of these instructions before using your printer. Also be sure to follow all warnings and instructions marked on the printer. Do not block or cover the openings in the printer cabinet. Do not insert objects through the slots. Take care not to spill liquid on the printer. -
Page 9: A Few Precautions
Unplug the printer and refer servicing to qualified service personnel under the following conditions: The power cord or plug is damaged; liquid has entered the printer; the printer has been dropped or the cabinet damaged; the printer does not operate normally or exhibits a distinct change in performance. -
Page 10: When Handling The Ink Cartridges
When handling the ink cartridges Keep ink cartridges out of the reach of children, and do not drink the ink. If ink gets on your skin, wash it off with soap and water. If it gets in your eyes, flush them immediately with water. Do not shake an ink cartridge;... -
Page 11: Warnings, Cautions, And Notes
Place the printer near a wall outlet where the plug can be easily unplugged. Note for French-speaking users: Placez l’imprimante près d’une prise de contacte où la fiche peut être débranchée facilement. Warnings, Cautions, and Notes Warnings must be followed carefully to avoid bodily injury. Cautions must be observed to avoid damage to your equipment. -
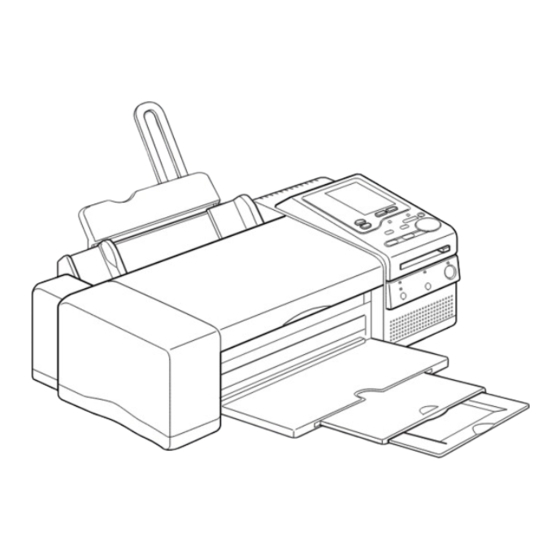
Page 12: Printer Parts And Functions
Printer Parts and Functions paper support extension paper support printer cover edge guides output tray sheet feeder output tray extension input switch volume adjust lever serial interface connector power cord parallel interface connector... - Page 13 replacement position for ink cartridges control panel, top PC card slot control panel, front print head ink cartridge clamps Control panel, front See the next page for information on the functions of the buttons and lights.
- Page 14 Buttons Button Function Turns the printer on and off. Power Loads or ejects paper if pressed and released within 2 seconds. Resumes printing if pressed and released after a paper Load/Eject out error. Moves the print head to the ink cartridge replacement position if pressed for 3 seconds while the B Black Ink or Color ink light is flashing or on.
- Page 15 Control panel, top Display: Shows the items and settings you Menus button: change with the buttons on the front Move the cursor to the item you control panel. want to set on the display. Frame button: Allows you to select the optional frames and turn on or off the frame print.
-
Page 16: Direct Printing Or Printing With A Computer
Chapter 1 Setting Up Your Printer Direct Printing or Printing with a Computer ....1-2 Attaching the Paper Support ....... 1-2 Plugging in the Printer . -
Page 17: Direct Printing Or Printing With A Computer
Direct Printing or Printing with a Computer You can use this printer to print photos directly with a PC card or with a computer. Set up the printer first, referring to this chapter. For direct printing, see the rest of this guide to find information about daily operation, maintenance, and troubleshooting. -
Page 18: Plugging In The Printer
Plugging in the Printer 1. Make sure that the printer is turned off. It is off when the P Power button protrudes slightly from the surface of the control panel. 2. Check the label on the back of the printer to make sure the voltage required by the printer matches that of the electrical outlet you will be plugging it into. - Page 19 Note: Do not open the ink cartridge packages until just before you install them, or the ink may dry up. Use the ink cartridges packed with your printer the first time you install ink cartridges, otherwise the printer may not charge the ink properly.
- Page 20 3. Lift up the ink cartridge clamps. 4. Open the ink cartridge packages that came with your printer. Remove only the yellow tape seals from each cartridge. Black ink cartridge Color ink cartridge Caution: Remove the yellow tape seals from the cartridges before installing them;...
- Page 21 5. Place the cartridges gently into their holders with the labels face-up. The color ink cartridge, which is larger, goes on the right and the black goes on the left. Do not press down on the cartridges. Note: Install both ink cartridges. If either of the cartridges is not installed, the printer will not work.
- Page 22 7. Press the Maintenance button. The printer moves the print head and begins charging the ink delivery system. The ink charging process may take about one minute to complete, during which time the Power light flashes and the printer produces a variety of mechanical sounds. These sounds are normal.
- Page 23 Setting Up Your Printer...
- Page 24 Plain paper (A4, A6, 4 x 6 inch) ......2-5 EPSON special media....... . . 2-5 Print area .
-
Page 25: What You Can Do With This Printer
What You Can Do with This Printer This printer can print out photographs in the following types of prints. Photo prints You can print photographs stored on your digital camera’s removable media. This printer simply makes it quick and easy. All you need to do is to load paper and a PC card in the printer, make settings on the display, and press the Start Print button. - Page 26 Index prints All of your digital photographs on the PC card can be printed out as an index on a single sheet of paper. This format is convenient for checking the number of a specific photograph or creating a table of contents for an album. See “Printing Index Print” on page 3-16.
- Page 27 You can print 16 photo stickers. To make settings for stickers, see “Making Settings on the Display” on page 2-8. Note: Using the optional PC card which includes colorful frames, you can print out photographs inside your favorite frame. Contact your EPSON dealer. Direct Printing Introduction...
-
Page 28: Available Paper
EPSON special media EPSON provides special paper that are formulated for the ink used on EPSON ink jet printers. EPSON recommends you to use media distributed by EPSON to ensure high-quality results. Before loading special paper distributed by EPSON, read the instruction sheets packed with your special media first and keep the following in mind. - Page 29 Note: When printing images through a computer, you can use more various media types and sizes using the printer software for IP-100 packed with your printer. See online User’s Guide for more information. The availability of special media varies by country.
-
Page 30: Print Area
Media names Size Product Characteristics available code EPSON Photo S041106 Allows you to cut to any shape Quality Self you want after printing and Adhesive peel off your printout and stick Sheet it on most surfaces. EPSON Photo S041144 This media is divided into 16... -
Page 31: Making Settings On The Display
This item is for selecting the type of paper to print on. Photo Paper: Print on EPSON Photo Paper. Ink Jet Paper: Print on EPSON Photo Quality Ink Jet Card, EPSON 360 dpi Ink Jet Paper, or EPSON Photo Quality Glossy Paper. Plain Paper: Print on plain paper. Note: When you select Sticker for FORMAT Layout, you cannot select PAPER Type. - Page 32 Print a photograph eight times or eight different photographs on a single sheet of A4 paper. Print on EPSON Photo Stickers 16. Print crop marks to tear off photos. This setting Crop is available only when you select A4 for Size Marks and 4 x 6, L, or Card for Layout.
- Page 33 4. Size The FORMAT Size setting is automatically selected depending on the PAPER Size and FORMAT Layout settings. PAPER Size FORMAT Size Full size Approx. 258 x 182 mm 2 images* Approx. 182 x 131 mm Full size 2 images* Approx.
- Page 34 Note: The print area sizes noted above specify the size of a single image. The print area size for EPSON Photo Stickers 16 or 4 x 6 Photo Paper is the size before peeling off or removing the perforated margines. After peeling off or removing the perforated margins the size of the printed image is slightly smaller.
-
Page 35: Selecting The Input Switch
7. Quality This item is for selecting the quality of photoprint. Note: The Quality settings are available depending on the PAPER Type settings. High: Prints with a good balance between speed, quality, and cost. Draft: Prints fast, saving ink. This setting is good for draft-printing. - Page 36 1. Turn the printer off and open the side cover. Set the Input switch to INT. 3. Turn the printer on. Printing from the Macintosh To connect to a Macintosh computer and print, set the Input switch to EXT. 1. Turn the printer off and open the side cover. 2.
- Page 37 2-14 Direct Printing Introduction...
- Page 38 Loading A6 paper ........3-5 Loading EPSON Photo Paper (4 x 6 inch) ....3-7 Loading PC Cards .
-
Page 39: Loading Paper
Loading Paper Loading A4 paper When you load A4 size plain paper and the following EPSON special media, follow the steps below. Note: Read the instruction sheets packed with your EPSON special media before loading paper. EPSON 360 dpi Ink Jet Paper... - Page 40 2. Lower the output tray and slide out the extension. Pressing the part of the output tray will release it from the printer. 3. Fan a stack of paper; then tap it on a flat surface to even the edges. Printing Photo Directly with PC Cards...
- Page 41 Quality Glossy Paper EPSON Photo 1 sheet at a See instruction Quality Self time sheet packed required Adhesive with the paper Sheet * Use Loading Support Sheet is packaged with your EPSON special paper. Printing Photo Directly with PC Cards...
-
Page 42: Loading A6 Paper
Read the instruction sheets packed with your EPSON special media before loading paper. EPSON Photo Quality Ink Jet Card EPSON Photo Stickers 16* * Before loading Photo Stickers 16, also see “Loading EPSON Photo Stickers 16” on page 3-7. Printing Photo Directly with PC Cards... - Page 43 EPSON Photo Quality Ink 30 sheets including the Required Jet Card support sheet EPSON Photo Stickers 16 1 sheet at a time Required * Use Loading Support Sheet is packaged with your EPSON special paper. Printing Photo Directly with PC Cards...
-
Page 44: Loading Epson Photo Paper (4 X 6 Inch)
Loading EPSON Photo Paper (4 x 6 inch) EPSON Photo Paper (S041134) is perforated around the margins so you can trim your printed images to look like 4 6 inch (102 152 mm) photographs. - Page 45 Load the paper printable side up with the perforated margins positioned as shown in the illustration. loading position Use flat, undamaged paper. If the paper or the Loading Support Sheet is curled, flatten it before loading to avoid paper feeding problems. Always place the included Loading Support Sheet under the stack of Photo Paper, but do not print on it.
- Page 46 Note: The outside edge of your image might be cut off when you remove the perforated margins. 17 mm (0.67 in.) trimmed size 6 mm (0.24 in.) printed image size 3 mm (0.12 in.) 3 mm 6 mm Cut or tear the paper at the perforation only after printing. Do not cut, tear, or fold the paper before printing.
-
Page 47: Loading Pc Cards
The PC card adapter for SmartMedia is available on the market. Some storage media and PC card adapters are not compatible with IP-100. Contact your EPSON dealer for detailed information on the availability of the storage media and PC card adapters. -
Page 48: Loading Pc Cards
Loading PC cards Load the PC card into the PC card slot as follows: 1. Insert the storage media into the PC card adapter. For CompactFlash cards For SmartMedia 2. Load the PC card into the printer’s card slot. Load the card with the u mark up. Caution: Slide the PC card horizontally into the slot with the insert mark up. -
Page 49: Ejecting Pc Cards
Ejecting PC cards 1. Check that the Processing light is not on or flashing. Processing • • • Caution: Do not eject PC cards or turn off power to the printer while the printer is processing (reading or writing) data. Data can be lost. -
Page 50: Printing All Photographs On The Pc Card
3. The PC card will pop out far enough for you to pull it out. Printing All Photographs on the PC Card All of the photographs on the PC card can be printed out in a specified number of copies. This is the default mode when a PC card is loaded into the printer. - Page 51 Note: As soon as you load the PC card, if the All light starts flashing and Camera appears next to Photo No., the Photo No., Copies, and other settings are already set on the camera side. For more information, see “Printing with the camera’s settings” on page 3-15. 2.
- Page 52 5. Press the Start Print button. When you make the above settings, the photos will be printed one by one on the paper. If you want to print all the photos on a single sheet, see “Printing all photos on a single sheet” on page 3-15.
-
Page 53: Printing Index Print
Printing Index Print All photographs on a PC card can be printed out as an index on a single sheet of paper in the specified number of copies. The Index mode is subdivided into super high and draft modes. Note: Before starting printing, set paper and a PC card containing digital photographs in the printer. - Page 54 Quality and Enhanced settings are changeable only when the Normal Index mode is selected. Type Photo Paper Size When selecting paper size 4. Press the Change Settings buttons to make settings. For details on the settings, see “Making Settings on the Display”...
-
Page 55: Printing Selected Photos
Printing Selected Photos It is possible to select one specific photograph from the PC card and print it out in a specified number of copies. When you want to print with a different photo in the same PC card continuously, see “Printing continuously different photos” on page 3-20. - Page 56 3. Press the Menus buttons until the cursor moves to the item you want to set. Type Photo Paper Size When selecting paper size Note: The Size setting in the PAPER menu determines what Layout setting in the FORMAT menu is available, so you should always make the Size setting first.
-
Page 57: Printing A Selected Range Of Photos
Printing continuously different photos To print different photos in the same PC card continuously, follow the instructions below. Load the same size paper as before. While printing, repeat steps 2 to 5 as described on page 3-18. Printing a Selected Range of Photos It is possible to select a continuous range of photographs on the PC card and print them one after another. - Page 58 3. Press the Menus button to move the cursor to Copies, then press the Change Settings buttons to select the photo number for the To. Photo No. • • • From Photo No. Copies Note: This printer sorts photos in chronological order. The photo numbers may be different from the storage numbers in the digital camera.
-
Page 59: Changing The Internal Settings
6. Press the Start Print button. The photographs in the selected range are printed out one after another. Printing the selected range of photographs on a single sheet Load an A4 size sheet of paper, and select A4 for PAPER Size and either 2L/4x6 , or Card for Layout. - Page 60 0.5 mm increments: horizontal max. 2.5 mm. Select negative values to move the position left or positive values to move it right. This setting is valid only for A4 and stickers (EPSON Photo Stickers 16). 3-23 Printing Photo Directly with PC Cards...
-
Page 61: Restoring The Internal Settings To Default
Item Set No. Setting Voice Helps you with voice guidance guidance as well as the button operation sound. Helps you only with the button operation sound. Note: When you press the Cancel button in the Internal Settings mode, the changed settings are all ignored, and the last settings are valid. -
Page 62: Chapter 4 Using Filters And Frames
Chapter 4 Using Filters and Frames Printing Photos with Special Effects ......4-2 Printing Photos with Frames ....... 4-4 Printing a list of frames . -
Page 63: Printing Photos With Special Effects
Printing Photos with Special Effects You can manually adjust the image of your photographs. 1. Press the Filter button. The Filter light starts flashing and Effect No. appears next to Photo No. on the display. Photo No. • • • Effect No. - Page 64 Effect Effect Monotone yellow–green High contrast Monotone yellow Darker Monotone brown Slightly darker Monotone pink Slightly brighter Monotone orange Brighter Monotone red Sharp Monotone purple Sharper Art color–punk Vivid Art color–metal More vivid Art color–earth Sepia Cooler colors Monochrome Warmer colors Cooler Lighter skin tone monochrome...
-
Page 65: Printing Photos With Frames
With the optional PC card including colorful frames, photographs can be printed out as miniature stickers inside colorful frames. Note: This option is not available in some districts. Contact your EPSON dealer. To print photos with the frames included in the optional PC card, you may need A6 size paper divided into 16 small stickers. - Page 66 1. Load the optional PC card which includes colorful frames into the printer’s card slot. The Frame light automatically starts flashing and Frame No. appears next to Copies on the display. If you do not see Frame No., press the Frame button. Frame Photo No.
- Page 67 Note: The selected Frame No. is retained until the printer is turned off. If you press any buttons other than the Change Settings buttons while selecting the Frame No., the current number becomes valid and the printer turns on the Frame mode. 3.
-
Page 68: Printing A List Of Frames
Printing a list of frames You can print the list of frames stored in the optional PC card which includes frames. 1. Load the optional PC card including colorful frames in the card slot. 2. Set A6 paper in the sheet feeder. 3. - Page 69 Using Filters and Frames...
- Page 70 Chapter 5 Maintenance and Transportation Replacing Ink Cartridges ........5-2 Checking the Print Head Nozzles .
-
Page 71: Replacing Ink Cartridges
Obtain a replacement color ink cartridge (S020110). Replace the empty color ink cartridge. Caution: EPSON recommends the use of genuine EPSON ink cartridges. Other products not manufactured by EPSON may cause damage to your printer not be covered by EPSON's warranties. - Page 72 To replace an ink cartridge using the printer’s control panel, follow these steps. 1. Make sure the printer is on. The Power light should be on, but not flashing. (Determine which cartridge needs to be replaced as indicated by the B Black Ink and A Color Ink light.) 2.
- Page 73 4. Lift up the clamp that holds the cartridge you want to replace as far as it will go. The cartridge will rise partly out of the cartridge holder. The illustration shows color ink replacement. To replace black ink, lift up only the smaller clamp on the left.
- Page 74 6. Remove the ink cartridge from its protective bag. Next, remove only the yellow tape seal from the cartridge. Black ink cartridge Color ink cartridge Caution: You must remove the yellow tape seal from the cartridge. Leaving the tape on when you install the cartridge will permanently damage it.
- Page 75 8. Press the ink cartridge clamp down until it locks in place. The illustration shows color ink replacement. To replace black ink, press down the smaller clamp on the left. Caution: Once you install the cartridges, do not open their clamps again until you replace the ink cartridges.
-
Page 76: Checking The Print Head Nozzles
Checking the Print Head Nozzles If you find that the printed image is unexpectedly faint or dots in the printed image are missing, you may be able to solve these problems by checking the print head nozzles with the printer’s control panel buttons. - Page 77 The printer prints a nozzle check pattern. Here is a typical printout: The above sample is in black and white, but the actual test prints in color (CMYK). 3. Press the P Power button to turn off the printer after it finishes printing the nozzle check pattern.
-
Page 78: Cleaning The Print Head
Cleaning the Print Head If you find that the printed image is unexpectedly faint or dots in the printed image are missing, you may be able to solve these problems by cleaning the print head with the printer’s control panel button, which ensures that the nozzles are delivering ink properly. -
Page 79: Aligning The Print Head
Caution: Never turn off the printer while the Power light is flashing. Doing so may damage the printer. 3. When the Power light stops flashing, print a few lines from a document to confirm that the head is clean and to reset the cleaning cycle. - Page 80 2. Press the Change Settings button to select 10 next to Photo No. on the display. Photo No. Copies 3. Load A4 or wider paper in the sheet feeder. 4. Press the Start Print button to print the alignment sheet. 5.
-
Page 81: Cleaning The Printer
8. Press the Start Print button. After the print head alignment is set, the number next to Copies changes to 0 automatically. 9. Press the P Power button to turn the printer off. If you could not find the best alignment pattern at step 5, repeat the procedures from step 3 until you obtain the best result. -
Page 82: Transporting The Printer
Caution: Never use alcohols or thinners to clean the printer; these chemicals can damage the components as well as the case. Be careful not to get water on the printer mechanism or electronic components. Do not use a hard or abrasive brush. Do not spray the inside of the printer with lubricants;... - Page 83 6. Repack the printer and power cord in the original box. 7. Keep the printer level during transport. 5-14 Maintenance and Transportation...
- Page 84 Chapter 6 Troubleshooting Error Indicators ......... . 6-2 Unable to Print Photos .
-
Page 85: Error Indicators
Error Indicators You can identify many common printer problems with the lights on your printer’s control panel. If your printer stops working and the lights are on or flashing, use the following table of panel light patterns to diagnose the problem, then follow the recommended corrective measures. -
Page 86: Troubleshooting
Lights Problem and Solution Ink Out (black ink cartridge) The black ink cartridge Replace the black ink is empty. cartridge with a new one (S020093). See “Replacing Ink Cartridges” on page 5-2. Ink Low (color ink cartridge) The color ink cartridge Obtain a replacement color is nearly empty. - Page 87 Display Error Action indication Printer internal Turn the printer off. After a adjustments. few seconds, turn it on again. If the error is not cleared, contact your dealer. System error. Turn the printer off. After a few seconds, turn it on again. If the error is not cleared, contact your dealer.
-
Page 88: Unable To Print Photos
Unable to Print Photos Note: If you encounrer problems while using the printer with your computer, see “Problem Solver” in the Online Guide. Check that power is ON Check that the power card is plugged into the electrical outlet. Unable to start printing or make settings Check that the PC card is properly loaded in the printer’s card slot. -
Page 89: The Frame Mode Cannot Be Set
The Frame mode cannot be set Check that the PC card containing the frame data has been properly inserted in the printer’s card slot. Unable to print parts of a photograph Check the Trimming setting. When Trimming is set, the photograph is trimmed to fit in the print area. -
Page 90: Check That The Adjust Lever Is Properly Set
Check that the adjust lever is properly set If ink smears on thick paper, set the adjust lever to the + position. 1. Open the printer’s side cover. 2. Slide the adjust lever to the + position. Note: After printing on thick paper, be sure to return the adjust lever to the 0 position. -
Page 91: Check If The Ink Has Run Out
Check if the ink has run out To check the amount of ink remaining in the cartridge, follow the steps below: 1. Hold down the Index button while the printer is turned on. 2. Press the Change Settings buttons and select the number of the ink cartridge to check. -
Page 92: Where To Get Help
For United Kingdom and the Republic of Ireland Users If you purchased your printer in the UK or in the Republic of Ireland, EPSON (UK) Limited provides a range of customer services and technical support. World Wide Web If you can connect to the Internet and have a Web browser, you can access our Web site at http://www.epson.co.uk. - Page 93 To use Faxon EPSON, call 01442 227332 in the UK or 0044 1442 227332 from the Republic of Ireland using a touch-tone phone. You will be asked to follow a simple routine to register your document request.
- Page 94 Arranging for faulty EPSON products to be repaired within the warranty period A full list of EPSON Customer and Warranty Support services is available on the technical support section of our World Wide Web pages at http://www.epson.co.uk/support/ and on Faxon EPSON Faxback service in document number 5085.
- Page 95 For Australian Users EPSON Australia wishes to provide you with a high level of Customer Service. As well as the user’s guide, we provide the following sources for obtaining information: EPSON FAXBACK EPSON FAXBACK will fax you the latest specifications and pricing for most EPSON products offered in Australia.
- Page 96 EPSON Helpdesk EPSON Helpdesk is provided as a final backup to make sure our clients have access to advice. Operators on the Helpdesk can aid you in diagnosing hardware and software problems. They can also advise you on the latest EPSON products and where the nearest dealer or service agent is located.
- Page 97 (852) 2585-4399 Fax: (852) 2827-4383 For Philippines Users To obtain technical support as well as other after sales services, users are welcome to contact the EPSON Philippines Representative Office at the telephone and fax numbers below: Phone: (632) 813-6552 Fax:...
- Page 98 Chapter 7 For Use with a Computer System Requirements ........7-2 For PCs .
-
Page 99: System Requirements
System Requirements For PCs ® ® To use your printer, you need Microsoft , Windows ® ® Windows 98, or Windows NT 4.0, and a shielded, twisted-pair parallel cable. Your computer should also meet the following system requirements: Minimum system Recommended system i486/25 MHz for Windows 95 and NT 4.0 Pentium or higher... - Page 100 Applicable computer models (as of April 1, 1998) Macintosh LC475, LC575, LC630 Macintosh Quadra Series Macintosh Centris Series Macintosh PowerBook™ Series (PowerBook 190, 520, 540, 550 or later) Macintosh PowerBook Duo 280, 2300C/100 Macintosh Performa 475, 575, 588, 630, 5210 or later Power Macintosh Series Environment Minimum system...
-
Page 101: Using The Printer With A Pc
Using the Printer with a PC Connecting the printer To connect the printer to your computer using the built-in parallel interface, you need a shielded, twisted-pair parallel cable. Follow these steps to connect your printer. 1. Make sure both the printer and computer are turned off. 2. -
Page 102: Installing The Printer Software
Installing the printer software After connecting the printer to your computer, you need to install the software included on the “Printer Software for EPSON IP-100” CD-ROM shipped with your printer. Printer software components Your printer software includes: Printer driver The printer driver is the software that runs, or “drives,” your printer. - Page 103 Installation time varies depending on your computer. EPSON Status Monitor 2 installation starts automatically. Click Cancel if you do not want to install this utility. If you want to install it later, see “Checking Printer Status and Managing Print Jobs for Windows”...
-
Page 104: Using The Printer With A Macintosh
Using the Printer with a Macintosh Connecting the printer To use the printer’s built-in serial interface, you will need an Apple System Peripheral-8 cable. Follow these steps to connect the printer: 1. Make sure both your printer and Macintosh are switched off. 2. -
Page 105: Installing The Printer Software
Installing the printer software After connecting the printer to your Macintosh, you are ready to install the printer software included in the “Printer Software for EPSON IP-100” CD-ROM shipped with your printer. Your printer software includes: EPSON Printer Driver Package IP-100 This is the printer driver software that runs your printer. - Page 106 1. Turn on your Macintosh and insert the software CD in the CD-ROM drive. 2. The EPSON printer software disk opens automatically. 3. When the Installer icon appears, double-click the icon. 4. After the initial screen appears, click Continue. The following dialog box appears.
-
Page 107: Selecting Your Printer In The Chooser
5. If you want to install all of the printer software included on your printer software CD-ROM, make sure the Install Location box shows the correct disk drive and click Install. 6. If you are low on disk space, select Custom Install from the pop-up menu and click Serial Driver Package. - Page 108 When background printing is on, you can use your Macintosh while it is preparing a document for printing. You must turn on background printing to use the EPSON Monitor3 utility to manage print jobs. 4. Close the Chooser.
-
Page 109: Loading Paper
Loading Paper Follow these steps to load plain paper in the printer. You can also print on ink jet paper, photo-quality glossy film or paper, photo paper, transparencies, envelopes, index cards, and adhesive sheets. For details on using such media, see “Printing on Special Paper”... - Page 110 2. Lower the output tray and slide out the extension. Next, slide the left edge guide so that the distance between the edge guides is slightly wider than the width of your paper. edge guide output tray output tray extension 3.
- Page 111 4. Load the stack of paper with the print side up and the right edge of the paper resting against the right side of the sheet feeder. Then slide the left edge guide against the edge of the paper. edge guide right printable side up under the arrow mark, edge guide left.
-
Page 112: Printing Your First Page For Windows
Follow these steps to print the README file: 1. Click Start, point to Programs, point to Epson (for Windows 95, and 98) or EPSON Printers (for Windows NT 4.0), and then click EPSON IP-100 Readme. 2. Click Print on the File menu. The Print dialog box appears. - Page 113 8. Click Close, OK, or Print to print. You may need to click a combination of these buttons. While printing, the EPSON Progress Meter will appear, showing the printing progress and the status of your printer. For details, see “Checking Printer Status and Managing Print Jobs for Windows”...
-
Page 114: Printing Your First Page For Macintosh
Follow these steps to print the README file: 1. Insert the printer software CD. 2. Open the EPSON folder and double-click the README file. 3. Choose Page Setup from the File menu. This brings up the dialog box shown below. - Page 115 Media Type and Ink settings you make. 11. Click Print to start printing. Congratulations! Your EPSON printer is now fully setup and ready to help you create wonderful printouts. For further information about your printer, see the online User’s Guide. For details about the printer software, see online help.
-
Page 116: Appendix A Options And Consumable Products
Ink cartridges........A-2 EPSON special media....... . . A-2... -
Page 117: Interface Cables
S020093 Color ink cartridge S020110 EPSON special media Most plain paper works well in your printer. In addition, EPSON offers specifically designed media for ink jet printers to meet most high-quality printing needs. EPSON 360 dpi Ink Jet Paper (A4) - Page 118 EPSON Photo Quality Ink Jet Card (8 10”) S041122 EPSON Photo Quality Self Adhesive Sheet (A4) S041106 EPSON Ink Jet Note Cards A6 S041147 (with envelopes) EPSON Ink Jet Greeting Cards 5 8” S041148 (with envelopes) EPSON Ink Jet Greeting Cards 8 10”...
- Page 119 Options and Consumable Products...
- Page 120 Options, A-2 to A-3 Output tray, 5 Output tray extension, 5 Edge guides, 5 Effect, 4-3 Enhancement, 2-12 Paper Enlargements on A4 paper, 2-4 loading, 3-2 to 3-9, 7-12 to 7-14 EPSON Status Monitor 2, 7-5 size, 2-8 Error indicators, 6-2 to 6-4...
- Page 121 Paper support, 5 attaching, 1-2 Quality, 2-12 Paper support extension, 5 Quick Select buttons, 8 Parallel interface connector, 5 PC card, 3-10 ejecting, 3-12 loading, 3-11 Range button, 8, 3-20 PC card slot, 6 Photo No., 2-11 Photo print, 2-2 Photo stickers, 2-4 Select Photo buttons, 8 Power cord, 5...
- Page 122 Color Ink Jet Printer Setup and Direct Printing Guide Printed in Japan 99.XX-XX...
Need help?
Do you have a question about the IP-100 and is the answer not in the manual?
Questions and answers