Dacor RENAISSANCE RR30NS Use & Care Manual
With induction cooktop
Hide thumbs
Also See for RENAISSANCE RR30NS:
- Installation instructions manual (21 pages) ,
- Use and care manual (32 pages) ,
- Planning manual (5 pages)
Advertisement
Quick Links
The Life of the Kitchen?
U SE AND
CARE
MANUAL
RENAISSANCE
® ELECTRIC
RANGE
WITH
INDUCTION
COOKTOP
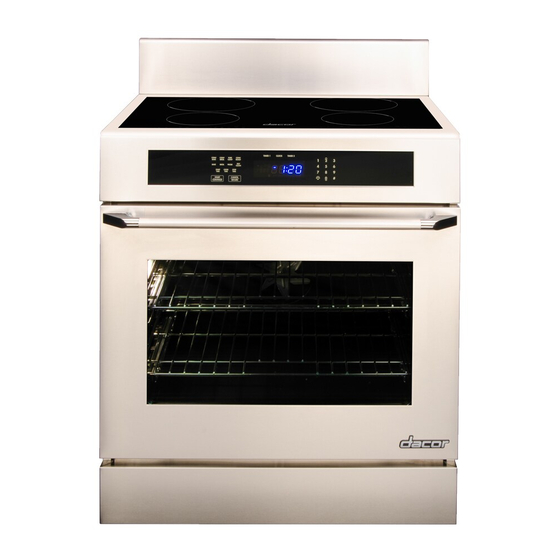
Models:
RR3ONS[-C],
RR3ONFS[-C],
RR3OIVIS[-C]
and RR3ONIFS[-C]
Style varies,
model
RR30NFS
shown
Table
of
Contents
Important Safety Instructions ................................................
1
Getting to Know Your Range ...............................................
4
Operating the Cooktop .......................................................
7
Operating the Oven ...........................................................
9
Care and CJeaning ..........................................................
20
Before You Call for Service ................................................
25
Parts and Accessories .......................................................
27
Warranty and Service ......................................................
27
Warranty Card ....................................................
Back Cover
/........
Pa_ No. 105911
Rev C
Advertisement

Subscribe to Our Youtube Channel
Related Manuals for Dacor RENAISSANCE RR30NS


Summary of Contents for Dacor RENAISSANCE RR30NS
- Page 1 MANUAL U SE AND CARE The Life of the Kitchen? RENAISSANCE ® ELECTRIC RANGE WITH INDUCTION COOKTOP Models: RR3ONS[-C], RR3ONFS[-C], RR3OIVIS[-C] and RR3ONIFS[-C] Style varies, model RR30NFS shown Table Contents Important Safety Instructions ..........Getting to Know Your Range ..........Operating the Cooktop ............
- Page 2 Thank you for choosing Dacor for your home. We are a company built by families for families and we are dedicated to serving yours. We are confident that your new Dacor product will deliver a high level of performance and enjoyment for many years to come.
- Page 3 Use common sense and caution when installing, maintaining or operating this or any other appliance. Always contact the Dacor Customer Service Team about problems or situations that you do not understand. Safety Symbols and Labels p bracket Rear leg...
- Page 4 nstrucfions GeneraJ SaferZ Precautions To reduce the risk of fire, electric shock, serious injury or death when using your range, follow basic safety precautions, including the following: ]DANGER WARNING To avoid the possibility of explosion Do not hang flammable or heat sensitive objects IMPORTANT: or fire,...
- Page 5 Clean and maintain the range regularly instructed in this manual. Keep the entire range, At Dacor, we continuously improve the quality and per- ventilation filters and range hoods free of grease that could catch fire. formance of all our products.
- Page 6 Getti ng to Know You rRang Parts of the Oven (below oven floor) (at bottom of door) Control panel The control panel consists of keys and a display. Use the control panel to control all the oven's features (sometimes called modes), Self clean latch The self clean...
- Page 7 Getting to Know Your Range Cooking mode keypad Select the type of cooking you want to perform by pressing one of the cook- ing mode keys. Also includes the SELl = CLEAN and PROBE keys. TIMER keys Use the TIMER :1 and TIMER 2 keys to time an event.
- Page 8 "6". HIGH Key: Touch this key to jump directly to "H" power level. *The Dacor induction power management feature regu- lates the amount of power one side (left or right) O°lvlAI draw at the same time. If you set both controls...
- Page 9 Wipe the cooktop with a clean, damp sponge and dry. Apply Dacor Cooktop Cleaning Cr_me, according the Care and Cleaning section. Make sure the cooktop surface is clean and dry. During the first uses of the cooktop,...
- Page 10 If you have set the clock to 24 hour time, the keypad will allow you to enter military time when setting clock. Dacor recommends turning the oven on for one hour at 500°F to burn off any residual oils used during Setting the Temperature Scale manufacturing process.
- Page 11 WARNING food. They are great for heavier foods and the optional Dacor baking stone. To install a GlideRack oven rack: racks when the oven is COOl, If you must reposition rack When the oven is hot;...
- Page 12 Operating Your Oven the Temperature Adjust the racks to the appropriate level. (after you press START. CONTINUE) Determine the best cooking mode for the type of food Press the key for the current cooking mode. The cur- to be cooked. Select from the following: rent cooking mode appears...
- Page 13 (such as cooking time, rack position, or temperature) and repeat the con- racks, Dacor recommends using one of the convection vection test. [f necessary, continue adjusting one recipe modes. See the following pages.
- Page 14 Convection Roast Understanding the Various Oven Your range's convection roast mode uses a combination Cookin Modes (con the convection fan and heat sources above and below the food. It is best for rib roasts, turkeys, chickens, etc. Pure Convection Roasting Tips The uniform air circulation...
- Page 15 Your range offers two broiJ modes: Timers Broil Convection Broil []_ WARNING Broiling is a quick and flavorful way to prepare many foods, including steaks, chicken, chops, hamburgers fish. []_ WARNING Your range is equipped with 2 built-in timers BroiJ SSS"_ You can use both of them at the same time.
- Page 16 Features If you want to set the oven to automatically turn itself or off at a later time, you can use the delay timed fea- tures. Adjust the racks to the appropriate level. Put the food in the oven. Press the key for the desired cooking mode (except broil or convection...
- Page 17 Things to Know About Sabbath Mode Other Things to Know About DeJayed Timed Cooking The CANCEL. SECURE key on your oven remains active so that you can turn off the Sabbath feature When the oven is in delay timed mode: turn off the oven.
- Page 18 Allow the oven to preheat, Excessive browning the Meat Probe occur if the meat is placed in the oven during preheat mode (when "PRE='" appears on the display). When you cook foods like roasts and poultry, the internal Once the oven has preheated ("PRE="...
- Page 19 CONTINUE. GROUND MEAT AND MEAT MIXTURES FRESH BEEF', VEAL, AND LAMB Medium rare 145°F Medium 165°F Dacor recommends that you use one of the timers to time Well Done 170°F the process. Dehydrating Tips Chicken/turkey, whole (temp taken in thigh) 180°F...
- Page 20 Thick, frozen casseroles such as lasagna will not defrost well in your oven. Instead, defrost accord- ing to the food manufacturer's suggestions. You may SoMng DiscoJoration ProbJems also defrost casseroles in the refrigerator overnight. You should leave the food in its original container To prevent darkening...
- Page 21 #1, #3 and #5 with the oven set to Pure Convection mode. Turn pans on the racks so that the long sides run left to right, as you face them. Your Dacor GliderRack oven racks are good for cook- ing heavy food items. You can pull them...
- Page 22 Your Oven's Self Clean Feature About the Self Clean Cycle • The oven will run better and produce better baked goods when it is clean. During self cleaning, the oven is heated to very high temperatures which burn off any deposits on the surfaces of the oven.
- Page 23 (see diagram). use the oven. Let the surface cool and remove any residue. Apply Dacor Cooktop Cleaning Cr_me (see follow- Ifthe oven is in the middle of the self clean process, the door will unlock when the oven has cooled down ing page).
- Page 24 Rinse and dry with a soft, Apply Dacor Cooktop Cleaning Cr&me. lint-free cloth. You may also use Dacor Stainless Steel Cleaner. Use it according to the directions on the package. • Scratches Scratches cannot be removed.
- Page 25 Convection Filter Meat Probe WARNING The convection filter is located in the back of the oven chamber. Clean the filter regularly. If you allow it to become clogged, the oven's convection cooking modes WARNING will not work properly. You also need to remove the filter during the self clean cycle.
- Page 26 If the light does not work, before replacing it, please consult the Problem Solu- tion Guide on page 25. • Replace the light bulb only with Dacor part number 107112. See page 27 for ordering information. IMPORTANT...
- Page 27 Problem Solution Guide-Cooktop Problem May Be Cause d By Nothing works. Range not connected to electrical Have an electrician connect range to properly wired electrical connection, power, Power is off. Turn power on at circuit breaker panel or fuse box, Check for tripped circuit breaker or blown...
- Page 28 ..... L Iif0r Service" Problem Solution Guide-Oven (cont. Oven will not heat. Press CANCEL, SECURE. Follow instructions Oven setting not correct. in Operating the Oven section. Oven set for delay timed cooking. Oven will turn on automatically at preset time. Press CANCEL, SECURE to return...
- Page 29 Use this number ordering additional racks, covered under warranty. Dacor full sized cookie sheets maximize oven rack baking capabilities by utilizing the total usable rack space. To order parts and accessories, contact your Dacor dealer or visit www.everythingdacor.com.
- Page 30 U.S.A. ORIGINAL PURCHASE. IN NO EVENT SHALL DACOR BE OUTSIDE THE FIFTY STATES OF THE U.S.A., THE LIABLE FOR INCIDENTAL EXPENSE OR CONSEQUENTIAL DISTRICT OF COLUMBIA AND CANADA: DAMAGES. IN THE EVENT DACOR PREVAILS...
- Page 31 NO POSTAGE NECESSARY IF MAILED IN THE UNITED STATES BUSINESSREPLYMAIL FIRST-CLASS MAIL PERMITNO 1600 CITY OF INDUSTRY CA POSTAGEWILLBE PAIDBYADDRESSEE DACOR ATTN WARRANTYPROCESSINGDEPT PO BOX 90070 CITYOF INDUSTRYCA 91715-9907 Ihh,,,,llh,,h,,Ihhhhh,hh,lh,,h,,h,hll...
- Page 32 IMPORTANT: Your warranty will not be activated until you activate it online or return this form to Dacor.If you have purchased more than one Dacor product, please return all forms in one envelope or activate the warranty for each product online.
Need help?
Do you have a question about the RENAISSANCE RR30NS and is the answer not in the manual?
Questions and answers