TRENDnet TEW-714TRU User Manual
N150 wireless travel router
Hide thumbs
Also See for TEW-714TRU:
- Datasheet (3 pages) ,
- Quick install manual (17 pages) ,
- Quick installation manual (17 pages)
Table of Contents
Advertisement
Quick Links
Advertisement
Table of Contents

Subscribe to Our Youtube Channel
Related Manuals for TRENDnet TEW-714TRU


Summary of Contents for TRENDnet TEW-714TRU
- Page 1 TEW-714TRU User’s Guide © Copyright 2013 TRENDnet. All rights reserved.
-
Page 2: Table Of Contents
Setup Wizards ������������������������������������������������������������������������������������7 Router Mode ������������������������������������������������������������������������������������� 7 WISP Mode ��������������������������������������������������������������������������������������� 9 Repeater Mode ������������������������������������������������������������������������������� 13 Locate Your Router Properly �������������������������������������������������������������17 Wireless Performance Considerations �������������������������������������������� 17 System configuration ������������������������������������������������������������������������18 System Management and Default Settings ������������������������������������ 18 © Copyright 2013 TRENDnet. All rights reserved. -
Page 3: Product Overview
Product Overview Product Overview Features TRENDnet’s N150 Wireless Travel Router, model TEW-714TRU, is a flexible travel router for on the go professionals. Router mode turns a wired Internet connection into a wireless network. Repeater and WISP modes leverage an existing wireless network. Connect a USB storage drive to share content across the wireless network. -
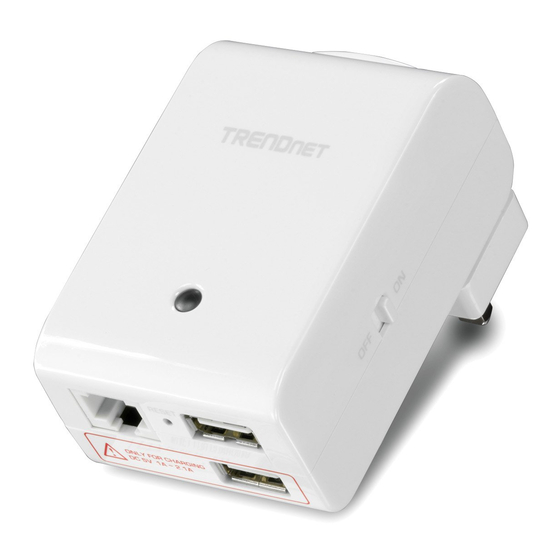
Page 4: Front Panel
Charge Port TEW-714TRU has a built-in Reset Button universal power adapter. Reset Button Push and hold for 2 seconds to reset TEW-714TRU Simply choose the type of plug that matches the Powered off or LED system boot up Euro Plug... -
Page 5: Side View
Switch Button Selection Switch is located on the bottom of the TEW-714TRU. You can find default SSID, wireless key, administrator account name, and administrator password Turn on TEW-714TRU network and file there. The default static management IP is 192.168.10.1 . -
Page 6: General Setups
Read this section for complete instructions on how to fine tune your TEW-714TRU . ���������������������������������������� page 18 * Router Switch: If you want TEW-714TRU works as a charger only, you can switch off the router File Sharing: To download picture from your camera or share documents in a meeting, simply plug in your flash drive to the USB File Share Port. -
Page 7: Web Management
Preset label with preset information on package Switch the TEW-714TRU wireless router on and then plug into a wall socket� Search for available wireless connections in your computer network settings. The default SSID of TEW-714TRU is shown on the preset label and the device label�... - Page 8 TEW-714TRU User’s Guide General Setups Open a web browser and enter http://TEW-714TRU to access the web administration page. If you have a static IP set on your PC, please open a web browser and enter http://192.168.10.1 The TEW-714TRU login page will appear.
-
Page 9: Setup Wizards
Plug TEW-714TRU into a wall socket� Choose the power plug suitable to your traveling area. Slide in the power plug. Push it firmly until it clicks. - Page 10 Search for available wireless connections in your computer network When your computer prompts you for the wireless key, you settings. The default SSID of TEW-714TRU is shown on the preset can push the WPS button on TEW-714TRU to send the wireless label and the device label�...
-
Page 11: Wisp Mode
TEW-714TRU to WISP (Wireless ISP) mode to network your devices. - Page 12 Search for available wireless connections in your computer network When your computer prompts you for the wireless key, you settings. The default SSID of TEW-714TRU is shown on the preset can push the WPS button on TEW-714TRU to send the wireless label and the device label�...
- Page 13 TEW-714TRU User’s Guide Setup Wizards Open a web browser and enter http://TEW-714TRU to access the Click on the Basic tab, then click the Wizard button to begin the web administration page. WISP setup wizard. Read the description and then click on Next�...
- Page 14 If you don’t see the wireless network you want to join, click Site Survey to search the network again. Or, you can skip this step and enter your network information manually. The TEW-714TRU will reboot and connect to the Internet� © Copyright 2013 TRENDnet. All rights reserved.
-
Page 15: Repeater Mode
If you are experiencing weak wireless connection and want to extend button to “Repeater” position. the wireless range, you may want to setup the TEW-714TRU in Repeater mode to extend the wireless range. The TEW714TRU’s repeater mode can be easily setup. It copies the same wireless security setup from your access point. - Page 16 Search for available wireless connections in your computer network pairing process on access point or router, you can copy the wireless settings. The default SSID of TEW-714TRU is shown on the preset settings by pushing WPS buttons in this step. Otherwise, skip this label and the device label�...
- Page 17 TEW-714TRU User’s Guide Setup Wizards Open a web browser and enter http://TEW-714TRU to access Click on the Basic tab, then click the Wizard button to begin the the web administration page. Repeater setup wizard. Read the description and then click on Next�...
- Page 18 If you don’t see the wireless network you want to join, click Site Survey to search the network again. Or, you can skip this step and enter your network information manually. The TEW-714TRU will reboot and connect to the Internet� © Copyright 2013 TRENDnet. All rights reserved.
-
Page 19: Locate Your Router Properly
Adjust the wireless power setting on your router if you have more than one wireless network. Covering only the range necessary. Covering more than necessary may cause wireless interference and slow down the networks� © Copyright 2013 TRENDnet. All rights reserved. -
Page 20: System Configuration
System configuration System Management and Default Settings If you have a brand new TEW-714TRU or if you just reset your TEW- 714TRU to factory defaults by pressing and holding the reset button for over 2 seconds while it is powered on, your TEW-714TRU has the... -
Page 21: Setup Wizard
TEW-714TRU User’s Guide System Configuration Setup Wizard The TEW-714TRU has three different setup wizards that switch based Select DHCP and then click Next� on the position of the network mode switch. To use the setup wizard in a certain network mode, push the power button to the “ON“ position and the Network Mode button to the mode you want�... - Page 22 IP Address : Specify an IP address IP Subnet Mask : Specify a subnet mask for the IP address Default Gateway : Default route for TEW-714TRU First DNS Address : Primary DNS server address Second DNS Address : Secondary DNS server address...
- Page 23 Click the Basic tab and then click Wizard button to enter to Router setup wizard. Read the description and then click Next� The TEW-714TRU will reboot and connect to the Internet� Select PPPoE (ADSL) and then click Next� © Copyright 2013 TRENDnet. All rights reserved.
- Page 24 (default: 5 minutes) Click Apply to end the wizard. User Name : PPPoE account user name The TEW-714TRU will reboot and connect to the Internet� Password : PPPoE account password Verify Password : Enter the same password again to verify that your password was entered correctly.
- Page 25 You can choose Manual Setup to skip site survey. Choose this option if you have a hidden SSID that isn’t broadcasting. Click Next and skip the next step, then go to step 4. © Copyright 2013 TRENDnet. All rights reserved.
- Page 26 Click the Basic tab and then click Wizard button to enter Repeater setup wizard. Read the description and then click Next� The TEW-714TRU will reboot and connect to the Internet� Choose Automatic Setup to search for available wireless connections automatically. Click Next�...
- Page 27 If you don’t see the wireless network you want to join, click Site Survey to search the network again. Or, you can skip this step and enter your network information manually. The TEW-714TRU will reboot and the router is setup properly © Copyright 2013 TRENDnet. All rights reserved.
-
Page 28: Basic Network Status
TEW-714TRU User’s Guide System Configuration Basic Network Status Basic Wireless Network This page shows the TEW-714TRU’s basic information. The status is Wireless Settings automatically updated every few seconds. Set up your wireless name, channel and security settings in this page. Select the SSID you want to set up, change the value and then click Apply to commit the changes. - Page 29 Select Enable or Disable button. This is None (SSID): the SSID broadcast feature� When this No wireless security� Anyone can access the TEW-714TRU option is set to Enable, your wireless and Internet without password. network name is broadcast to anyone within wireless signal range�...
- Page 30 WPA key renewal Specify how often the wireless key interval : should be renegotiated. Shorter time intervals are more secure, but cause more overhead.(default: 3600 seconds/ 1 hour) © Copyright 2013 TRENDnet. All rights reserved.
- Page 31 You only need to press a button on both the wireless client This summary shows WPS settings of TEW-714TRU. You and the TEW-714TRU, and the WPS will do the rest for you� can generate a new AP PIN by click Generate� Or, you can click Reset to change the WPS settings back to default.
-
Page 32: File Sharing
Simply plug in your flash drive to the File Share Port, and you can create Make sure you are connecting to the TEW-714TRU correctly an instant file sharing folder between your devices. Open a web browser and enter http://TEW-714TRU or the host name that you setup in to access administration page. File Share... - Page 33 Refresh, the file list will be refreshed immediately� Eject Disk: Before you remove the flash drive from the The TEW-714TRU will recognize the USB storage in a couple of USB port, please click Eject Disk� Wait for seconds. Reload your web page to access your files.
- Page 34 Open your File Explorer Enter two backward slashes followed by the TEW-714TRU’s host name in the directory field� The default host name is TEW-714TRU� With the default host name, enter \\tew-714tru (case insensitive) Enter smb:// followed by the TEW-714TRU host name in the directory field�...
- Page 35 Enter your host name as the FTP server address and enter your user information to connect to TEW-714TRU USB storage. The default host name is TEW-714TRU. With the default host name, please enter tew-714tru (case insensitive) as the host name. Enter one of the user name and password to login to FTP.
-
Page 36: Advanced Settings
TEW-714TRU User’s Guide Advanced Settings Advanced Settings Administrator Router Status This page shows the TEW-714TRU’s detailed working status Wireless Mode : This refers to the wireless operation mode, not the network mode� Band : Shows the wireless is working on N only, G only, B only, BG mixed, or BGN mixed mode. - Page 37 Advanced Settings Time Zone Setting Wireless Client List The Time Zone Setting allows your TEW-714TRU maintain accurate This page shows all wireless clients connected to this TEW-714TRU. system logs� MAC Address : List the MAC address of wireless client NTP Settings AID : Association ID.
- Page 38 TEW-714TRU User’s Guide Advanced Settings System Log Statistics This page allows users to view a running log of the TEW-714TRU’s This page allows users to view system performance with key statistic events and activities. numbers� Clear : Click this button to clear up the log Refresh : Click this button to refresh the log ©...
- Page 39 Full administrative access to modify all TEW- 714TRU settings and read/write access to attached storage devices Power user: View, not edit, the TEW-714TRU’s basic settings with read/write access to attached storage devices Guest: View, not edit, basic TEW-714TRU settings with read only access to attached storage devices ©...
- Page 40 TRENDnet may periodically release firmware upgrades that might add features or fix problems associated with your TRENDnet model and version. To find out if there is a firmware upgrade available for your device, please check your TRENDnet model and version using the link�...
-
Page 41: Advanced Setups
Apply : Click this button to apply the change Cancel : Click this button to abandon the change Hostname : The host name is the name TEW-714TRU’s identity on a network. If you change your host name, you have to change the web access or file access directory name. - Page 42 Setup your Internet access with DHCP, fixed IP or PPPoE IP Address : Specify an IP address Subnet Mask : Specify a subnet mask for the IP address Default Gateway : Default route for TEW-714TRU Primary DNS Server Primary DNS server address Secondary DNS...
- Page 43 0 means redial immediately if the connection was dropped. (default: 60 seconds) On Demand Mode: With this mode, TEW-714TRU will try to connect PPPoE service when the traffic is going to the Internet. It will drop the connection after a period of time if there’s no traffic going to...
- Page 44 TEW-714TRU User’s Guide Advanced Settings IPv6 Settings The TEW-714TRU can perform IPv6 static routing. Enable IPv6 static routing and enter the routing information. LAN IP/Prefix : Specify LAN IPv6 address and its network size WAN IP/Prefix : Specify WAN IPv6 address and its...
-
Page 45: Advanced Wireless Settings
Or, select auto letting performance in noisy networks and TEW-714TRU select MCSs dynamically� preventing hidden nodes from degrading the performance. Specify a value between 0 and 2347� The default value is 2347 © Copyright 2013 TRENDnet. All rights reserved. - Page 46 Enabling packet aggregate will increase data throughput. However, it may cause jitters or delays in real-time communication. Apply : Click this button to apply the change Cancel : Click this button to abandon the change © Copyright 2013 TRENDnet. All rights reserved.
-
Page 47: Troubleshooting
TEW-714TRU User’s Guide Troubleshooting Troubleshooting Situation: I enterd http://192.168.10.1 but I am not able to access the unit. Situation: I enterd http://tew-714tru but I am not able to access the unit. What should I do? What should I do? Solution: Solution: Please enter the default IP address (192.168.10.1) to login. -
Page 48: Federal Communication Commission Interference Statement
This device complies with Part 15 of the FCC Rules. Operation is subject to the following two conditions: (1) This device may not cause harmful interference, and (2) this device must accept any interference received, including interference that may cause undesired operation. © Copyright 2013 TRENDnet. All rights reserved. -
Page 49: Europe - Eu Declaration Of Conformity
Electromagnetic compatibility and Radio spectrum Matters (ERM); ElectroMagnetic Compatibility (EMC) standard for radio equipment and services; Part 17: Specific conditions for 2,4 GHz wideband transmission systems and 5 GHz high performance RLAN equipment © Copyright 2013 TRENDnet. All rights reserved. - Page 50 Directive 1999/5/EC, 2006/95/EC, and 2009/125/EC. requisitos essenciais e outras disposições da Directiva 1999/5/CE, [Portuguese] 2006/95/CE e 2009/125/CE� Por medio de la presente TRENDnet declara que el TEW-714TRU Español cumple con los requisitos esenciales y cualesquiera otras [Spanish] Slovensko...
-
Page 51: Limited Warranty
RMA service must have the RMA number marked on the outside of return packages and look for the desired TRENDnet product to access to the GPL Code or LGPL Code. and sent to TRENDnet prepaid, insured and packaged appropriately for safe shipment. - Page 52 TEW-714TRU User’s Guide Warranty © Copyright 2013 TRENDnet. All rights reserved.
Need help?
Do you have a question about the TEW-714TRU and is the answer not in the manual?
Questions and answers