Table of Contents
Advertisement
OPERATOR'S MANUAL
FRYMASTER BIRE14/MRE14 SERIES
4
E
ELECTRIC FRYER
This equipment chapter is to be
FOR YOUR SAFETY
installed in the Fryer Section of the
Do Not Store or use gasoline or other
Equipment Manual.
flammable vapors and liquids in the
vicinity of this or any other appliance.
MANUFACTURED
BY
P.O. BOX 51000
SHREVEPORT, LOUISIANA 71135-1000
PHONE: 1-318-865-1711
TOLL FREE: 1-800-551-8633
1-800-24 FRYER
FAX: 1-318-219-7135
TABLE OF CONTENTS
WARRANTY STATEMENT................................................................................................... Page i
INTRODUCTION................................................................................................................... Page 1-1
INSTALLATION INSTRUCTIONS ....................................................................................... Page 2-1
OPERATING INSTRUCTIONS ............................................................................................. Page 3-1
OPERATING THE BUILT-IN FILTRATION SYSTEM........................................................... Page 4-1
PREVENTIVE MAINTENANCE ............................................................................................ Page 5-1
OPERATOR TROUBLESHOOTING..................................................................................... Page 6-1
Frymaster L.L.C., 8700 Line Avenue 71106, 5489 Campus Drive 71129
P.O. Box 51000, Shreveport, Louisiana 71135-1000
PHONE 318-865-1711
FAX 318-219-7135
SERVICE HOTLINE 1-800-24-FRYER
APRIL 2006
PRINTED IN THE UNITED STATES
*8196151*
Advertisement
Table of Contents
Troubleshooting

Related Manuals for Frymaster BIRE14 Series


Summary of Contents for Frymaster BIRE14 Series
-
Page 1: Table Of Contents
OPERATING INSTRUCTIONS ... Page 3-1 OPERATING THE BUILT-IN FILTRATION SYSTEM... Page 4-1 PREVENTIVE MAINTENANCE ... Page 5-1 OPERATOR TROUBLESHOOTING... Page 6-1 Frymaster L.L.C., 8700 Line Avenue 71106, 5489 Campus Drive 71129 P.O. Box 51000, Shreveport, Louisiana 71135-1000 PHONE 318-865-1711 FAX 318-219-7135... - Page 2 DIRECTLY FROM FRYMASTER DEAN, OR ANY OF ITS AUTHORIZED SERVICE CENTERS, AND/OR THE PART BEING USED IS MODIFIED FROM ITS ORIGINAL CONFIGURATION, THIS WARRANTY WILL BE VOID. FURTHER, FRYMASTER DEAN AND ITS AFFILIATES WILL NOT BE LIABLE FOR ANY CLAIMS, DAMAGES OR EXPENSES INCURRED BY THE CUSTOMER...
- Page 3 Adequate means must be provided to limit the movement of this appliance without depending on or transmitting stress to the electrical conduit. A restraint kit is provided with the fryer. If the restraint kit is missing contact your local Frymaster Factory Authorized Service Center (FASC) for part number 826-0900.
-
Page 4: Warranty Statement
(Applies to fryers manufactured after December 1, 2003, only.) If a frypot develops a leak within ten years after installation, Frymaster will, at its option, either replace the entire battery or replace the frypot, allowing up to the maximum time per the Frymaster time allowance chart hours of straight-time labor plus up to 100 miles/160 km of travel (50 miles/80 km each way) to change the frypot. - Page 5 E. PARTS RETURN All defective in-warranty parts must be returned to a Frymaster Authorized Factory Service Center within 60 days for credit. After 60 days, no credit will be allowed. F. WARRANTY EXCLUSIONS This warranty does not cover equipment that has been damaged due to misuse, abuse, alteration, or accident such as: •...
- Page 6 THIS PAGE INTENTIONALLY LEFT BLANK...
-
Page 7: Chapter 1: Introduction
Throughout this manual, you will find notations enclosed in double-bordered boxes similar to the one below. Hot oil causes severe burns. Never attempt to move a fryer containing hot oil or to transfer hot oil from one container to another. - Page 8 Installation, Operating, and Service Personnel Operating information for Frymaster equipment has been prepared for use by qualified and/or authorized personnel only, as defined in Section 1.6. All installation and service on Frymaster equipment must be performed by qualified, certified, licensed, and/or authorized installation or service personnel, as defined in Section 1.6.
- Page 9 QUALIFIED SERVICE PERSONNEL Qualified service personnel are those who are familiar with Frymaster equipment and who have been authorized by Frymaster, L.L.C. to perform service on the equipment. All authorized service personnel are required to be equipped with a complete set of service and parts manuals, and to stock a minimum amount of parts for Frymaster equipment.
- Page 10 Manual. Parts orders may be placed directly with your local FASC or distributor. Included with fryers when shipped from the factory is a list of Frymaster FASCs. If you do not have access to this list, contact the Frymaster Service Department at 1-800-551-8633 or 1-318-865-1711 or by email at service@frymaster.com.
-
Page 11: Chapter 2: Installation Instructions
Section 1.6 of this manual) to install or otherwise service this equipment will void the Frymaster warranty and may result in damage to the equipment or injury to personnel. Where conflicts exist between instructions and information in this manual and local or national codes or regulations, installation and operation shall comply with the codes or regulations in force in the country in which the equipment is installed. - Page 12 If the electrical power supply cord is damaged, it must be replaced by a Frymaster Dean Factory Authorized Service Center technician or a similarly qualified person in order to avoid a hazard. This appliance must be connected to a power supply having the same voltage and phase as specified on the rating plate located on the inside of the appliance door.
- Page 13 After Fryers Are Positioned At the Frying Station No structural material on the fryer should be altered or removed to accommodate placement of the fryer under a hood. Questions? Call the Frymaster Dean Service Hotline at 1-800-551-8633. WARNING WIRE MIN.
- Page 14 Adequate means must be provided to limit the movement of this appliance without depending on or transmitting stress to the electrical conduit. provided with the fryer. If the restraint kit is missing contact your local Frymaster Factory Authorized Service Center (FASC) for part number 826-0900.
-
Page 15: Chapter 3: Operating Instructions
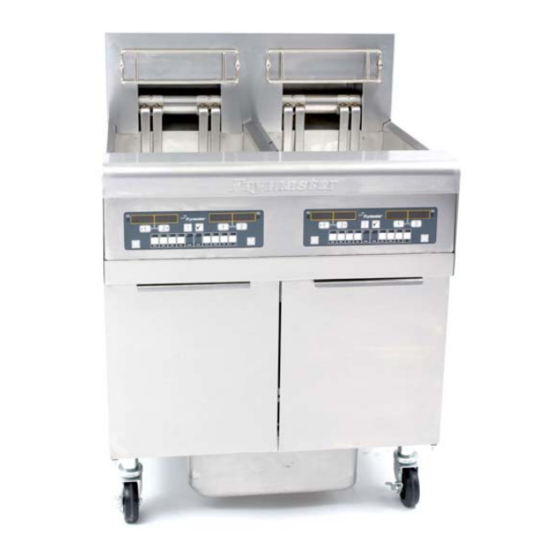
BIRE14/MRE14 SERIES E CHAPTER 3: OPERATING INSTRUCTIONS FINDING YOUR WAY AROUND THE BIRE14 SERIES E Control Panel (M2000 Computer shown) Fryer Identification Data Labels (Model and Serial Number) Drain and Filter Handles TYPICAL CONFIGURATION (BIRE214 SHOWN) Domestic The appearance of your fryer may differ slightly from that NOTE: shown depending upon the configuration and date of manufacture. - Page 16 3. Place the frypot covers on the frypots. 3.2 Operation If this is the first time the fryer is being used, refer to the frypot boil-out procedure on Page 5-2. This fryer is equipped with M2000 computers (illustrated below). Refer to the separate M2000 Computer Operating Instructions furnished with the fryer for the computer programming and operating procedures.
-
Page 17: Chapter 4: Filtration Instructions
BIRE14/MRE14 SERIES E CHAPTER 4: FILTRATION INSTRUCTIONS Introduction The FootPrint Pro filtration system allows the oil in one frypot to be safely and efficiently filtered while the other frypots in a battery remain in operation. Section 4.2 covers preparation of the filter system for use. Operation of the system is covered in section 4.3. - Page 18 4. Reinstall the crumb tray at the front of the pan. (See Figure 1) DO NOT USE FILTER POWDER WITH THE PAD! 5. Push the filter pan back into the fryer, positioning it under the fryer. The filtration system is now ready for use.
- Page 19 4. After the oil is filtered (about 5 minutes), close the drain valve and allow the fryer to refill. Let the filter pump run 10 to 12 seconds after the oil begins to bubble in the frypot then turn the filter off.
- Page 20 When your cooking oil has reached the end of its usable life, drain the oil into an appropriate container for transport to the disposal container. Frymaster recommends the use of the McDonald’s Shortening Disposal Unit (MSDU). NOTE: If using an MSDU built before January 2004 the filter pan cover on must be removed to allow the unit to be positioned beneath the drain.
-
Page 21: Chapter 5: Preventative Maintenance
Clean inside the fryer cabinet with a dry, clean cloth. Wipe all accessible metal surfaces and components to remove accumulated oil and dust. Clean the outside of the fryer cabinet with a clean, damp cloth soaked with McDonald’s All Purpose Concentrate. Wipe with a clean, damp cloth. - Page 22 Before the fryer is first used, it should be boiled out to ensure that residue from the manufacturing process has been eliminated. Also, after the fryer has been in use for a period of time, a hard film of caramelized cooking oil will form on the inside of the frypot. This film should be periodically removed by following the boil-out procedure contained in maintenance requirement card (MRC14A).
- Page 23 Verify that component box and contactor box components (i.e. computer/controller, relays, ● interface boards, transformers, contactors, etc.) are in good condition and free from oil and other debris. Verify that component box and contactor box wiring connections are tight and that wiring is in ●...
-
Page 24: Chapter 6: Operator Troubleshooting
Although the chapter covers the most common problems reported, you may encounter problems that are not covered. In such instances, the Frymaster Technical Services staff will make every effort to help you identify and resolve the problem. -
Page 25: Troubleshooting
C. Main power cord not plugged in. Corrective Action A. Press the ON/Off switch to turn the computer on. B. This fryer has two cords: a computer power cord and a main power cord. If the computer cord is not plugged in, the computer will not activate. - Page 26 The high-limit thermostat or with heat indicator contactor has failed. Probable Causes D. If the circuitry in the fryer This fryer is equipped with a drain safety switch that prevents the heating element from being energized if the drain valve is not fully closed.
- Page 27 If the display never goes out, the fryer is not heating. Shut the fryer down and call FASC. This indicates a problem within the...
- Page 28 Corrective Action This is displayed only during a test of the high-limit circuit and indicates that the high-limit has failed. DO NOT OPERATE THE FRYER! Call FASC. Call FASC Press the ON/OFF switch off, close the drain valve(s) completely, then press the ON/OFF switch on.
- Page 29 Filter pump runs but oil does not Test: Close the drain valve and pull return to frypot and the filter pan out from the fryer. there is no bubbling Activate the pump. If bubbling oil. occurs, there is a blockage in the filter pan suction tube.
- Page 30 Problem Probable Causes Corrective Action B. In order to properly filter, the oil should be at or near 350ºF (177ºC). At temperatures lower than this, the oil becomes too thick to pass through the Continued from B. Attempting to filter with oil that filter medium easily, resulting previous page.
- Page 31 THIS PAGE INTENTIONALLY LEFT BLANK...
- Page 32 Frymaster, L.L.C., 8700 Line Avenue, PO Box 51000, Shreveport, Louisiana 71135-1000 Shipping Address: 8700 Line Avenue, Shreveport, Louisiana 71106 TEL 1-318-865-1711 FAX (Parts) 1-318-688-2200 (Tech Support) 1-318-219-7135 819-6151 SERVICE HOTLINE APRIL 2006 PRINTED IN THE UNITED STATES 1-800-551-8633...
Need help?
Do you have a question about the BIRE14 Series and is the answer not in the manual?
Questions and answers