
Related Manuals for Daewoo KOC-1B4K9A


Summary of Contents for Daewoo KOC-1B4K9A
- Page 1 MICROWA VE OVEN KOC-1B4K9A OPERATING INSTRUCTIONS & COOK BOOK Before operating this oven, please read these instructions completely.
-
Page 2: Table Of Contents
PRECAUTIONS TO AVOID POSSIBLE EXPOSURE TO EXCESSIVE MICROWAVE ENERGY (a) Do not attempt to operate this oven with the door open since open-door operation can result in harmful exposure to microwave energy. It is important not to defeat or tamper with the safety interlocks. (b) Do not place any object between the oven front face and the door or allow soil or cleaner residue to accumulate on sealing surfaces. -
Page 3: Important Safety Instruction
IMPORTANT SAFETY INSTRUCTIONS When using electrical appliances, basic safety precautions should be followed, including the following: WARNING - To reduce the risk of burns, electric shock, fire, injury to persons or exposure to excessive microwave energy: 11. Read all instructions before using the appliance. c) If materials inside the oven ignite, keep oven door 12. -
Page 4: Federal Communications Commission Radio Frequency
FEDERAL COMMUNICATIONS COMMISSION RADIO FREQUENCY INTERFERENCE STATEMENT WARNING: This equipment generates and uses ISM frequency energy and if not installed and used properly, that is in strict accordance with the manufacturer's instructions, may cause interference to radio and television reception. It has been type-tested and found to comply with limits for an ISM Equipment pursuant to part 18 of FCC Rules, which are designed to provide reasonable protection against such interference in a residential installation. -
Page 5: Installation
INSTALLATION Examine the oven after unpacking. Check for damage such as a misaligned door, broken door or dent in the cavity. If any damage is visible, DO NOT INSTALL, and notify your dealer immediately. Level, flat location. Install the microwave oven on a level, flat surface and more than 3ft(914mm) above the floor. Ventilation. -
Page 6: Specifications
SPECIFICATIONS 120V AC 60Hz, SINGLE PHASE WITH POWER SUPPLY GROUNDING POWER CONSUMPTION 1500W MICROWAVE OUT POWER 1000W FREQUENCY 2450 MHz GRILL POWER CONSUMPTION 1600W CONVECTION POWER CONSUMPTION 1600W COMBINATION HEATING POWER CONSUMPTION 1600W OUTSIDE DIMENSIONS (WXHXD) 560(22.0)X543(21.3)X344(13.5)mm (inch) CAVITY DIMENSIONS (WXHXD) 368.5(14.5)X376.5(14.8)X246(9.7)mm (inch) NET WEIGHT Approx. -
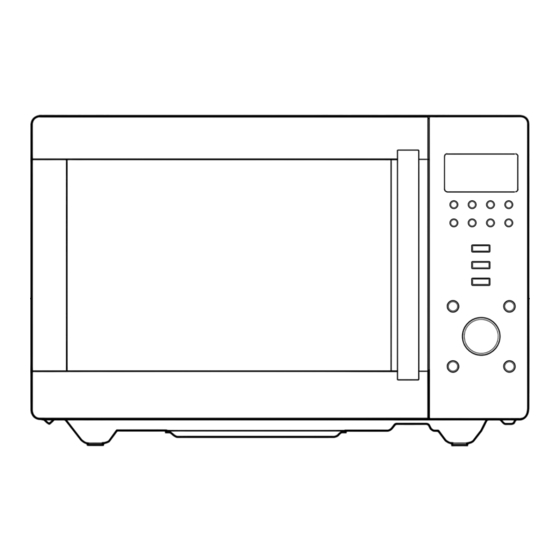
Page 7: Features Diagram
FEATURES DIAGRAM r e0 q 8 9 1 DOOR HOOK - When the door is closed, it will 8 TURNTABLE TRAY - Rotates during cooking and automatically lock shut. If door is opened while ensure even distribution of Microwaves. oven is operating, the magnetron will immediately It can also be used as a cooking utensil. - Page 8 FEATURES DIAGRAM (continued) DISPLAY WINDOW 11 MICROWAVE indicator, showing microwaving in progress. 22 DEFROST indicator, showing defrosting in progress. 33 GRILL(upper grill heater) indicator, showing grilling in progress. 44 GRILL(lower grill heater) indicator, showing grilling in progress. 55 CONVECTION indicator, showing convectioning in progress.
-
Page 9: Accessories
ACCESSORIES This oven comes equipped with several accessories. Turntable tray or turntable They can be used in various ways to facilitate cooking. This metal tray fits over the rotating base and locks into place. This is to be used in the oven for all cooking. It rotates clockwise or counterclockwise during cooking. -
Page 10: Before Operation
BEFORE OPERATION SETTING THE LANGUAGE Your new microwave oven comes with a six language word prompt system. Languages available are English, Deutsch, Nederlands, Francais, Italian and Espanol. When your oven is plugged in for the first time or when power resumes after a power interruption, the display will show "SELECT LANGUAGE SPRACHE WAEHLEN KIES TALL CHOISIR LA LANGUE SCEGLI LA LINGUA SELECCION IDIOMA"... -
Page 11: Setting The Clock
SETTING THE CLOCK When your oven is plugged in for the first time or when power resumes after a power interruption, the display resets to setting the language procedure. Your oven has multiple(12hr/24hr) clock system. To set the clock follow under procedure. Example : To set 5:30 More Less... -
Page 12: Operation
OPERATION Tips : Also remember to read this operating instruction for proper safety information and instruction before using the oven. Prior to setting the controls, place one cup of water in the oven, on a heat-proof glass measuring cup, for testing purposes. Note : When the cooking time has elapsed the oven beeps three times, "... -
Page 13: Grill Cooking
GRILL COOKING The grill enables you to heat and brown food quickly, without using microwaves. The oven has an upper and lower grill which can be operated independently or combined. 1. Touch GRILL button once. GRILL(upper grill) indicator lights. GRILL "GRILL 1"... -
Page 14: Convection Cooking(With Pre-Heat)
CONVECTION COOKING(with pre-heat) For convection cooking, it is recommended that you preheat the oven to the appropriate temperature before placing the food in the oven.( except for 105˚F convection mode ) The maximum preheating time is 30 minutes. If the cooking is not started immediately after preheating, the convection indicator will continue to flash and the preheated oven temperature will be displayed. -
Page 15: Convection Cooking (Traditional Cooking)
CONVECTION COOKING(traditional cooking)-No Microwaves The convection mode enables you to cook food in the same way as in a traditional oven. Microwaves are not used. Always use oven gloves when touching the recipients in the oven, as they will be very hot. 1. -
Page 16: Combination Cooking
COMBINATION COOKING This oven offers you a choice of five methods of combining cooking ; MODE ELEMENTS Suggested use Cookware This function has many uses, particularly roasting Food should be placed on the rack MICROWAVE meat and meringues, baking some cakes, frozen or on the turntable. -
Page 17: Combination Cooking ( Convection + Upper Grill + Lower Grill)
COMBINATION COOKING ( Microwave + Convection + Lower Grill ) This function allows you to combine convection operation with any one of the three (50%, 40%, 30%) microwave power level to produce traditional baked or roasted results in less time. Always use microwave-safe and oven-proof cookware. -
Page 18: Combination Cooking (Microwave + Upper Grill + Lower Grill)
COMBINATION COOKING ( Microwave + Upper Grill ) This function allows you to combine the speed of a microwave (50%, 40%, 30%) with the browning and crustying of a grill. Always use microwave-safe and oven-proof cookware. Glass or ceramic dishes are ideal as they allow the microwaves to penetrate the food evenly. Always use oven gloves when touching the recipients in the oven, as they will be very hot. -
Page 19: Auto Defrost
AUTO DEFROST This function allows you to accurately defrost meat, poultry, fish or bread. Simply enter the weight of the food and the oven will select the correct defrosting time. During the defrosting process the oven will beep to remind you to check the food. "TURN OVER" will appear in the display to remind you to attend to the food. -
Page 20: Cake
CAKE This function allows you to simply and automatically cook a range of cakes/breads. Always use oven gloves when touching the recipients in the oven. 1. Touch Cake button once. MICROWAVE and CONVECTION indicator light. Memory Cake Crusty Auto Cook "1 CAKE"... - Page 21 Ingredients Method Cookware Chocolate cake 50g (2oz.) cocoa 175g (6 oz.) caster sugar 1. Mix cocoa , 175g (6oz.) caster sugar and water together in a 10 ml (3fl.oz.) water small bowl. 90g (3 oz.) butter 2. Cream the butter and sugar together, gradually add the eggs. 2 eggs Beat until the mixture is light and fluffy.
- Page 22 Ingredients Method Cookware Biscuits 1. Cream butter, sugar and vanilla essence. Mix in flour. Mix to a very stiff dough with beaten egg. Knead lightly on a floured board. 2. Chill for 30mins. 200g plain flour Round baking tin 3. Roll out quite thinly, cut into rounds with a 5Cm cutter. Transfer 150g butter (or pizza dish) to greased baking trays.
-
Page 23: Crusty
CRUSTY This function allows you to simply and automatically cook a range of crusty foods. Always use oven gloves when touching the recipients in the oven. 1. Touch Crusty button once. Memory Cake Crusty Auto Cook MICROWAVE and CONVECTION indicator light. "1 FRESH PIZZA"... - Page 24 Crusty Menu Method Please refer to recommended recipes. Topping Variation : Replace the onion with chopped bacon and continental sausage, mushrooms. Place the prepared fresh pizza in a pizza tin. For best results ensure that the topping is evenly spread over the pizza surface. Pizza (White Loaf Dough base) 1.
-
Page 25: Auto Cook
AUTO COOK This function allows you to simply and automatically cook a range of popular foods. Always use oven gloves when touching the recipients in the oven. 1. Touch Auto Cook button once. MICROWAVE, CONVECTION and GRILL(lower grill) Memory Cake Crusty Auto Cook indicator light. - Page 26 Auto Cook Menu Start Temp. Method Cookware 1. Tie the joint into a neat shape. 2. Place the beef directly on the turntable. Place the beep 3. Brush with a little oil. Chilled temp. ROAST BEEF directly 4. Cook on "AUTO COOK-ROAST BEEF". 5.
-
Page 27: Memory Cook
MEMORY COOK If you often cook or reheat the same types of dishes, you can store the cooking times and functions in the oven's memory, so that you do not have to reset them each time. You can store one cooking. To set memory Set your cooking programme...... -
Page 28: Manual Cooling
MANUAL COOLING To get better cooking result, the oven needs "cooling" which discribes in below. 1. Press and hold M/W button for 3 seconds. The oven will beep and MICROWAVE indicator lights off. "COOLING" and "SET TIME" shows in display. GRILL 2. -
Page 29: To Stop The Oven While The Oven Is Operating
TO STOP THE OVEN WHILE THE OVEN IS OPERATING 1. Open the door. • Oven stops operating. • You can restart the oven by closing the door and touching START/SPEEDY COOK button. 2. Press the STOP/CLEAR button. • Oven stops operating. •... -
Page 30: General Guide Lines
GENERAL GUIDE LINES Since microwave cooking to some extent is different from Covering food helps: traditional cooking, the following general guidelines should be • To reduce spattering considered whenever you use your microwave oven • To shorten cooking times • To retain food moisture If the food is undercooked All covering, which will allow microwaves to pass through are Check if:... -
Page 31: Cooking Instruction
COOKING INSTRUCTIONS Utensils should be checked to ensure that they are suitable for use in microwave ovens. UTENSILS TEST Place the utensil in question next to a glass measure filled with water, in the microwave oven. Microwave at high power for 1-2 minutes. If the water heats up, but the utensil remains cool, the utensil is microwave-safe. However if the utensil becomes warm, microwaves are being absorbed by the utensil and it should not be in the microwave oven. -
Page 32: Microwave Principles
MICROWAVING PRINCIPLES Microwave energy has been used in this country to cook and reheat food since early experiments with RADAR in World War ll. Microwaves are present in the atmosphere all the time, both naturally and manmade sources. Manmade sources include radar, radio, television, telecommunication links and car phones. HOW MICROWAVES COOK FOOD In a microwave oven, TRANSMISSION... -
Page 33: Cooking Techniques
COOKING TECHNIQUES STANDING TIME STARTING TEMPERATURE Dense foods e.g. meat, jacket potatoes and cakes, The colder the food, the longer it takes to heat up. Food require standing time(inside or outside of the oven) after from a fridge takes longer to reheat than food at room cooking, to allow heat to finish conducting to cook the temperature. -
Page 34: Care Of Your Microwave Oven
CARE OF YOUR MICROWAVE OVEN Turn the oven off before cleaning. Keep the inside of the oven clean. When food spatters or spilled liquids adhere to oven wetal, plate tray wipe with a damp cloth. Mild detergent may be used if the oven gets very dirty. The use of harsh detergent or abrasives is not recommended. -
Page 35: Use Your Microwave Oven Safely
USE YOUR MICROWAVE OVEN SAFELY General Use Do not attempt to defeat or tamper with safety interlocks. Do not place any object between the oven front frame and the door or allow residue to build up on sealing surfaces. Wipe with a mild detergent, rinse and dry. Never use abrasive powders or pads. Do not subject the oven door to strain or weight such as a child hanging on an open door. -
Page 36: Before You Call For Service
BEFORE YOU CALL FOR SERVICE Refer to following checklist, you may prevent an unnecessary service call. * The oven doesn't work; 1. Check that the power cord is securely plugged in. 2. Check that the door firmly closed. 3. Check that the cooking time is set. 4. - Page 37 QUESTIONS AND ANSWERS (continued) Q : Why is standing time recommended after the cooking operation has been completed? A : Standing time is very important. With microwave cooking, the heat is in the food, not in the oven. Many foods build up enough internal heat to allow the cooking process to continue, even after the food is removed from the oven.
Need help?
Do you have a question about the KOC-1B4K9A and is the answer not in the manual?
Questions and answers