Table of Contents
Advertisement
Quick Links
Lea las instrucciones en español en el reverso.
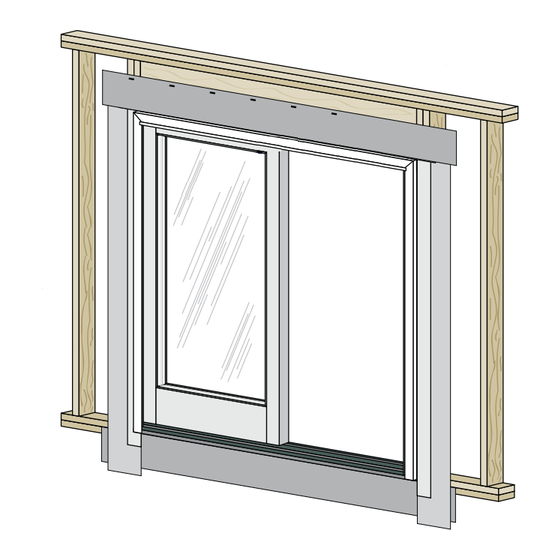
Installation Instructions for Typical Wood Frame Construction.
These instructions were developed and tested for use with typical wood frame wall construction in a wall system designed to manage water.
These instructions are not to be used with any other construction method. Installation instructions for use with other construction methods,
multiple units or bow and bay windows, may be obtained from Pella
building materials, and site conditions unique to your project may require an installation method different from these instructions and additional
care. Determining the appropriate installation method is the responsibility of you, your architect, or construction professional.
YOU WILL NEED TO SUPPLY:
• Cedar or Impervious shims/spacers (12 to 20)
• 2" galvanized roofing nails (1/4 lb.)
• Closed cell foam backer rod/sealant backer (12 to 30 ft.)
®
™
• Pella
SmartFlash
foil backed butyl window and door
flashing tape or equivalent
• High quality exterior grade polyurethane or silicone sealant
(2 to 3 tubes per door)
• Great Stuff
™
Window and Door Insulating Foam Sealant
by the Dow Chemical Company or equivalent low pressure
polyurethane window and door foam - DO NOT use high
pressure or latex foams.
• Pella aluminum sill support or 2 x 4 wood blocking
• Interior trim and/or jamb extensions (15 to 40 ft.)
• 9" wide Fortifiber flashing paper or equivalent
REMEMBER TO USE APPROPRIATE PERSONAL PROTECTIVE EQUIPMENT.
Always read the Pella
that this Limited Warranty is part of the terms of the sale. Failure to comply with all Pella installation and maintenance instructions may void your Pella product
warranty. See Limited Warranty for complete details at http://warranty.pella.com.
®
Limited Warranty before purchasing or installing Pella products. By installing this product, you are acknowledging
®
Corporation or a local Pella retailer. Building designs, construction methods,
TOOLS REQUIRED:
• Tape measure
• 6' Level
• Square
• Hammer
• Stapler
• Sealant gun
• Scissors or utility knife
• Drill
• Screwdrivers
(#2 Phillips with 8" shaft and small flat blade)
Advertisement
Table of Contents

Related Manuals for Pella 808SQ102


Summary of Contents for Pella 808SQ102
- Page 1 Limited Warranty before purchasing or installing Pella products. By installing this product, you are acknowledging that this Limited Warranty is part of the terms of the sale. Failure to comply with all Pella installation and maintenance instructions may void your Pella product...
- Page 2 A. Confirm the opening is plumb and level. Note: It is critical that the bottom is level. B. Confirm the door will fit the opening. Measure all four sides of the opening to make sure it is 3/4" larger than the door in width and 1/2" larger in height. Measure the width at the top, bottom, and center.
- Page 3 A. Remove the plastic wrap and cardboard packaging from the door. Note: If screens, grilles or hardware are removed from the door at this time, label them and store them in a protected area. B. Remove the shipping spacers. Carefully slide the movable panel halfway open and remove the spacers from both the top and bottom of the movable panel.
- Page 4 G. Architect Series and Designer Series: Apply sealant and insert a #8 x 2-1/2" screw (provided) into each hole in the bottom of the door frame (shown above in gold). H. Architect Series and Designer Series: Position and secure the panel retainer by drilling pilot holes through the remaining holes in the retainer into the sill support or wood blocking, then apply sealant to the holes and insert a screw into each hole as specified below.
- Page 5 TWO OR MORE PEOPLE WILL BE REQUIRED TO HANDLE THE PANEL SAFELY. A. Insert door panel. From the exterior of the building, tilt the top of the panel toward the door frame and insert the top of the door panel into the top track. Move the bottom of the panel toward the door frame until it is vertical.
- Page 6 The determination of the suitability of all building components, including the use of Pella products, as well as the design and installation of flashing and sealing systems are the responsibility of the Buyer or User, the architect, contractor, installer, or other construction professional and are not the responsibility of Pella.
Need help?
Do you have a question about the 808SQ102 and is the answer not in the manual?
Questions and answers