Table of Contents
Advertisement
Available languages
Available languages
Time and day
Set the time
Set the day
Program the schedule
Skip a period
Select the mode
of operation
Indicates the
heating power
*
LP appears only for the first two minutes when the thermostat is without power. This
can occur during a power outage or when the thermal protection device inside the base-
board heater is opened.
Description
This programmable thermostat can be used to control an electric
heating system such as an electric baseboard heater, a radiant ceil-
ing, a radiant floor, a convector or a fan-forced heater.
The thermostat cannot be used with:
•
a resistive load over 16.7 A
•
a resistive load under 2 A
•
a system driven by a contactor or relay (inductive load)
•
a central heating system
SUPPLIED PARTS:
•
One (1) thermostat
•
Two (2) 6-32 screws
•
Two (2) solderless connectors
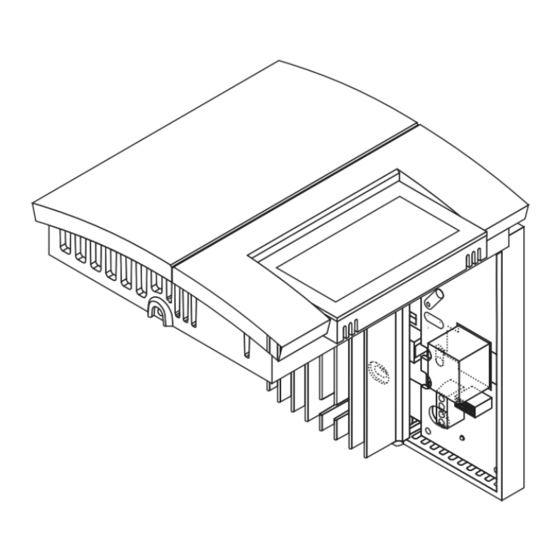
Installation
TURN OFF POWER TO THE HEATING SYSTEM AT THE MAIN
POWER PANEL TO AVOID ELECTRICAL SHOCK. THE INSTAL-
LATION MUST BE PERFORMED BY AN ELECTRICIAN.
All cables and connections must conform to the local electrical
code.
Special CO/ALR solderless connectors must be used when con-
necting with aluminum conductors.
Install the thermostat onto an electrical box.
Install the thermostat about 1.5 m (5 feet) high, on an inside wall
facing the heater.
Avoid locations where there are air drafts (such as the top of a
staircase or an air outlet), dead air spots (such as behind a
door), or direct sunlight.
Do not install the thermostat on a wall that conceals chimney or
stove pipes.
The thermostat wires are not polarized; either wire can be con-
nected to the load or to the power supply.
RLV450
Temperature
preset buttons
Indicates that the
temperature setpoint
is displayed
Indicates that the
settings are locked
Temperature
Indicates the current
mode of operation
Temperature
preset icon
Indicates that the
thermostat is configured
for a fan-forced heater
Indicates the current
period (appears in
automatic mode only)
Temperature
adjustment
Indicates that the ther-
mostat is without power *
buttons
NOTE:
Always keep the thermostat's vents clean and unobstructed.
Connect the thermostat wires to the line wires and to the load
wires using solderless connectors for copper wires.
2-wire installation
1.
4-wire installation
2.
Push any excess wire back into the electrical box.
NOTE:
If necessary, before re-installing the front component, config-
ure the thermostat (see section 3).
Return power to heating system.
RLV450
User Guide
Programmable Thermostat
69-2201EF-03
2009-08-04
1/4
Advertisement
Table of Contents

Related Manuals for Honeywell RLV450


Summary of Contents for Honeywell RLV450
-
Page 1: User Guide
RLV450 User Guide Programmable Thermostat NOTE: Always keep the thermostat's vents clean and unobstructed. Temperature preset buttons Indicates that the temperature setpoint is displayed Indicates that the Time and day settings are locked Temperature Set the time Indicates the current... -
Page 2: Configuration
Press either of the buttons to set the current month. Press the Day button briefly. The date setting is dis- played. Press either of the buttons to set the current date. Press the Mode button to end. RLV450 69-2201EF-03 2009-08-04... -
Page 3: Schedule
Daylight Savings Time changeover function, it must be re-enabled. When power returns, the thermostat will return to the mode of opera- tion active prior to the power failure. RLV450 69-2201EF-03 2009-08-04... -
Page 4: Warranty
55422, or whether a replacement product can be sent to you. This warranty does not cover removal or reinstallation costs. This warranty shall not apply if it is shown by Honeywell that the defect or malfunction was caused by damage which occurred while the prod- uct was in the possession of a consumer. -
Page 5: Guide De L'utilisateur
RLV450 Guide de l’utilisateur Thermostat programmable NOTA : S’assurer que les ouvertures d'aération du thermostat soient Boutons de préréglage propres et dégagées. de température Indique que la température de consigne est affichée Indique que les réglages Heure et jour sont verrouillés Température... -
Page 6: Réglage De La Température
Appuyer brièvement sur le bouton Day. Le jour du Régler la température en utilisant le bouton ou . mois est affiché. Appuyer sur l’un des boutons pour régler le jour courant. Appuyer sur le bouton Mode pour terminer. RLV450 69-2201EF-03 2009-08-04... -
Page 7: Problèmes Et Solutions
Cependant, si la panne dure plus de 4 heures, l’horloge du thermostat devra être rajustée et, si vous utilisez la fonction de passage automatique à l’heure avancée/normale, celle-ci devra être ré-activée. Au retour du courant, le thermostat retournera au mode actif précédant la panne. RLV450 69-2201EF-03 2009-08-04... -
Page 8: Garantie
à un endommagement du produit alors que le consommateur l'avait en sa possession. La responsabilité de Honeywell se limite à réparer ou à remplacer le produit conformément aux modalités susmentionnées. HONEYWELL N'EST EN AUCUN CAS RESPONSABLE DES PERTES OU...
Need help?
Do you have a question about the RLV450 and is the answer not in the manual?
Questions and answers
How do I reset to factory settings?
How do I set the device to have the panel illuminated always