Table of Contents
Advertisement
Available languages
Available languages
Day button
Hour button
Description
The RLV4300 thermostat can be used to control an electric heating
system such as a baseboard heater, a radiant floor, a radiant ceiling,
a convector, a fan-forced heater, etc. The thermostat cannot be used
with the following:
•
a resistive load under 2 A
•
a resistive load over 12.5 A
•
systems driven by a contactor or a relay (inductive load)
•
central heating systems
SUPPLIED PARTS
•
One (1) thermostat
•
Two (2) 6-32 mounting screws
•
Two (2) solderless connectors
Installation
TURN OFF POWER TO THE HEATING SYSTEM AT THE MAIN
POWER PANEL TO AVOID ELECTRICAL SHOCK.
Loosen the screw under-
neath the thermostat and
separate the front plate
from the back plate.
NOTE: The screw cannot
be completely removed.
Connect the thermostat wires to the power and to the load using
solderless connectors for copper wires. The thermostat wires are not
polarized; meaning either wire can be connected to the load or to the
power supply.
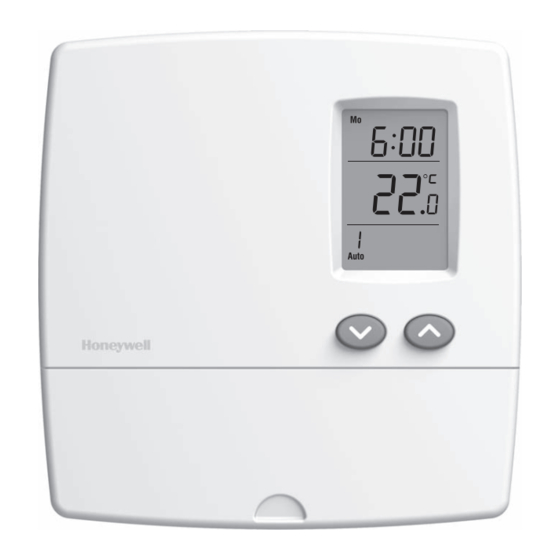
RLV4300
Screen
Up/Down buttons
Program button
Return button
Mode button
Minute button
Pull cover down
Appears if the
thermostat is configured
for a fan-forced heater
Heating power
indicator
Period no. in
automatic mode
* The thermostat normally displays the actual (measured) temperature.
To view the set temperature (setpoint), press either of the
NOTE: All cables and connections must comply with local electrical
1.
codes. This thermostat has tinned copper wires for line and load connec-
tions. Special CO/ALR solderless connectors must be used if these wires
will be connected to aluminium conductors.
2-wire Installation
2.
4-wire Installation
RLV4300
5-2 Programmable Thermostat
Display
Time and day
Appears when the
setpoint is displayed
Flashes when the
clock has been reset
Temperature *
Appears during
a power failure
Period no. in
economy mode
Economy
Automatic
Manual
mode
mode
mode
69-1918EF
User Guide
buttons once.
7/24/06
1/4
Advertisement
Table of Contents

Related Manuals for Honeywell RLV4300


Summary of Contents for Honeywell RLV4300
-
Page 1: User Guide
This thermostat has tinned copper wires for line and load connec- tions. Special CO/ALR solderless connectors must be used if these wires The RLV4300 thermostat can be used to control an electric heating will be connected to aluminium conductors. -
Page 2: Clock And Day Setting
To change the temperature display between °C and °F: Pull the cover down. Press and hold the button. Insert a pointed object (e.g., paperclip) through the reset open- ing. Remove it when the thermostat’s screen becomes blank. Wait one second and release the button. RLV4300 69-1918EF 7/24/06... -
Page 3: Modes Of Operation
MAN is Wait one second and release the button. selected (outlined) on the screen. Then, set the desired temperature using the buttons. In this mode, any modification to the temperature setpoint must be done manually. RLV4300 69-1918EF 7/24/06... -
Page 4: Specifications
This warranty does not cover removal or reinstallation costs. This and 40°C (104°F). warranty shall not apply if it is shown by Honeywell that the defect or malfunction was caused by damage which occurred while the Correct if any the following conditions product was in the possession of a consumer. -
Page 5: Guide De L'utilisateur
Les fils du thermostat qui servent aux rac- cordements de ligne et de charge sont étamés. Des connecteurs Le thermostat RLV4300 peut servir à commander un appareil de CO/ALR spéciaux doivent être utilisés si ces fils doivent être reliés à... -
Page 6: Affichage Et Réglage De La Température
Tirer le couvercle sur n’importe quel bouton. vers le bas 3.1 Affichage de la température Pour changer le format d’affichage de la température : Tirer le couvercle vers le bas. Appuyer sur le bouton et le maintenir enfoncé. RLV4300 69-1918EF 7/24/06... -
Page 7: Modes De Fonctionnement
à partir des boutons réinitialisation. Enlever le trombone Ouverture de réinitialisation lorsque l’affichage disparaît de Dans ce mode, toute modification au réglage de tem- l’écran. pérature doit être faite manuellement. Attendre une seconde et relâcher le bouton RLV4300 69-1918EF 7/24/06... -
Page 8: Garantie
• L’autocollant sur l’écran du thermostat chée est erronée. La responsabilité de Honeywell se limite à réparer ou à remplacer le n’a pas été enlevé. produit conformément aux modalités susmentionnées. HONEYWELL • Le thermostat est situé près ou au-des- N'EST EN AUCUN CAS RESPONSABLE DES PERTES OU sus d’une source de chaleur tel qu’un...
Need help?
Do you have a question about the RLV4300 and is the answer not in the manual?
Questions and answers