Table of Contents
Advertisement
Available languages
Available languages
Quick Links
Time and day
Set the time
Set the day
Program the schedule
Skip a period
Select the mode
of operation
Indicates the
heating power
*
LP appears only for the first two minutes when the thermostat is without power. This
can occur during a power outage or when the thermal protection device inside the base-
board heater is opened.
Description
This programmable thermostat can be used to control an electric
heating system such as an electric baseboard heater, a radiant ceil-
ing, a radiant floor, a convector or a fan-forced heater.
The thermostat cannot be used with:
•
a resistive load over 16.7 A
•
a resistive load under 2 A
•
a system driven by a contactor or relay (inductive load)
•
a central heating system
SUPPLIED PARTS:
•
One (1) thermostat
•
Two (2) 6-32 screws
•
Two (2) solderless connectors
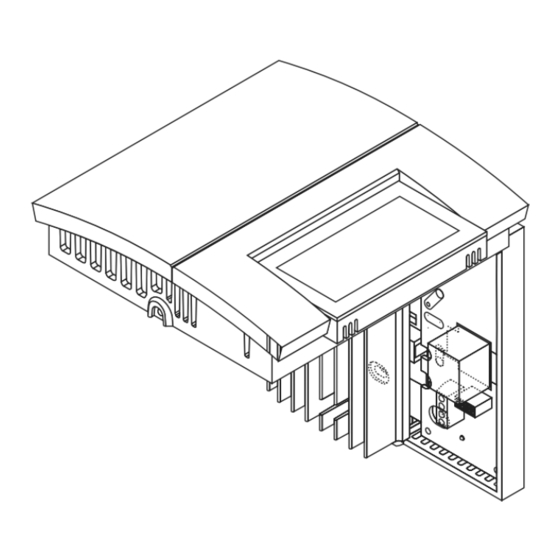
Installation
TURN OFF POWER TO THE HEATING SYSTEM AT THE MAIN
POWER PANEL TO AVOID ELECTRICAL SHOCK. THE INSTAL-
LATION MUST BE PERFORMED BY AN ELECTRICIAN.
All cables and connections must conform to the local electrical
code.
Special CO/ALR solderless connectors must be used when con-
necting with aluminum conductors.
Install the thermostat onto an electrical box.
Install the thermostat about 1.5 m (5 feet) high, on an inside wall
facing the heater.
Avoid locations where there are air drafts (such as the top of a
staircase or an air outlet), dead air spots (such as behind a
door), or direct sunlight.
Do not install the thermostat on a wall that conceals chimney or
stove pipes.
The thermostat wires are not polarized; either wire can be con-
nected to the load or to the power supply.
RLV450
Temperature
preset buttons
Indicates that the
temperature setpoint
is displayed
Indicates that the
settings are locked
Temperature
Indicates the current
mode of operation
Temperature
preset icon
Indicates that the
thermostat is configured
for a fan-forced heater
Indicates the current
period (appears in
automatic mode only)
Temperature
adjustment
Indicates that the ther-
mostat is without power *
buttons
NOTE:
Always keep the thermostat's vents clean and unobstructed.
Connect the thermostat wires to the line wires and to the load
wires using solderless connectors for copper wires.
2-wire installation
1.
4-wire installation
2.
Push any excess wire back into the electrical box.
NOTE:
If necessary, before re-installing the front component, config-
ure the thermostat (see section 3).
Return power to heating system.
RLV450
User Guide
Programmable Thermostat
69-2201ES-03
2009-08-04
1/4
Advertisement
Table of Contents

Related Manuals for Honeywell RLV450


Summary of Contents for Honeywell RLV450
-
Page 1: User Guide
RLV450 User Guide Programmable Thermostat NOTE: Always keep the thermostat's vents clean and unobstructed. Temperature preset buttons Indicates that the temperature setpoint is displayed Indicates that the Time and day settings are locked Temperature Set the time Indicates the current... -
Page 2: Modes Of Operation
Press either of the buttons to set the current month. Press the Day button briefly. The date setting is dis- played. Press either of the buttons to set the current date. Press the Mode button to end. RLV450 69-2201ES-03 2009-08-04... -
Page 3: Schedule
Daylight Savings Time changeover function, it must be re-enabled. When power returns, the thermostat will return to the mode of opera- tion active prior to the power failure. RLV450 69-2201ES-03 2009-08-04... -
Page 4: Warranty
55422, or whether a replacement product can be sent to you. This warranty does not cover removal or reinstallation costs. This warranty shall not apply if it is shown by Honeywell that the defect or malfunction was caused by damage which occurred while the prod- uct was in the possession of a consumer. -
Page 5: Instalación
RLV450 Guía del usuario Termostato programable NOTA: mantener siempre los agujeros de ventilación del termostato Botones de temperatura limpios y sin obstrucciones. predefinida Aparece cuando se visualiza el punto de ajuste Hora y día Indica que los ajustes están bloqueados... -
Page 6: Ajuste De La Temperatura
Ajustar la temperatura usando los botones en curso. Presionar el botón Day brevemente. Aparece el ajuste de la fecha. Presionar uno de los botones para ajustar la fecha en curso. Presionar el botón Mode para terminar. RLV450 69-2201ES-03 2009-08-04... -
Page 7: Solución De Problemas
4 horas, debe ajustarse el reloj del termostato y la función de cambio automático a la hora avanzada/normal se reac- tivará si estaba en uso. Cuando vuelve la corriente, el termostato volverá al modo de funcionamiento que estaba activo antes del corte de electricidad. RLV450 69-2201ES-03 2009-08-04... -
Page 8: Asistencia Al Cliente
Garantía Honeywell garantiza por un período de un (1) año, a partir de la fecha de compra por el consumidor, que este producto, sin incluir las baterías, no presentará defectos en los materiales ni en lo referente a la mano de obra, en condiciones normales de uso y de servicio.
Need help?
Do you have a question about the RLV450 and is the answer not in the manual?
Questions and answers