Table of Contents
Advertisement
Available languages
Available languages
Advertisement
Chapters
Table of Contents

Related Manuals for Honeywell RLV4300


Summary of Contents for Honeywell RLV4300
- Page 1 Owner’s Guide RLV4300 5-2 Programmable Thermostat...
-
Page 2: Table Of Contents
Owner’s Guide 69-1918EF-03 Table of contents Overview About your new thermostat ................... 1 Controls ......................... 2 Display ........................3 Installation Installation guidelines .................... 4 Wiring ........................5 Mounting the thermostat ..................6 Operation Advanced settings ....................7 Clock and day setting..................10 Temperature display and setting ................11 Automatic mode .................... -
Page 3: About Your New Thermostat
RLV4300 About your new thermostat This thermostat is designed to control an electric heating system such as a baseboard heater, a radiant ceiling, a convector or a fan-forced heater. The thermostat CANNOT be used with: • a resistive load under 1.25 A •... -
Page 4: Controls
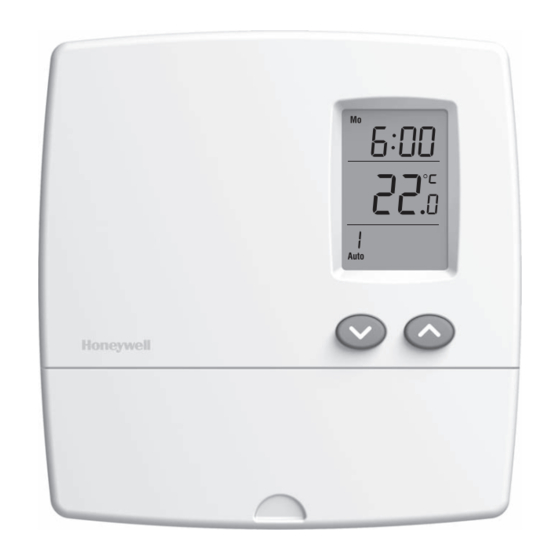
Owner’s Guide 69-1918EF-03 Controls Screen Up/Down buttons Program button Return button Mode button Advanced setup Pull cover down Minute button Hour button Day button... -
Page 5: Display
RLV4300 Display Time and day Appears when the thermostat is configured for a Appears when fan-forced heater the setpoint is Appears when power to displayed the thermostat is cut off Appears when the Temperature clock has been reset Heating intensity... -
Page 6: Installation Guidelines
Owner’s Guide 69-1918EF-03 Installation guidelines TURN OFF POWER TO THE HEATING SYSTEM AT THE MAIN POWER PANEL TO AVOID ELECTRICAL SHOCK. • All cables and connections must comply with local electrical codes. • This thermostat has tinned copper wires for line and load connections. -
Page 7: Wiring
RLV4300 Wiring Connect the thermostat wires to the heating system (load) and to the power supply using solderless connectors for copper wires. 2-wire Installation 4-wire Installation... -
Page 8: Mounting The Thermostat
Owner’s Guide 69-1918EF-03 Mounting the thermostat Loosen the screw underneath the thermostat and separate the faceplate from the wallplate. NOTE: The screw remains captive and cannot be completely removed. Mount the wallplate to the electrical box using the provided screws. Insert the screws through the two left or the two right mounting holes of the wallplate. -
Page 9: Advanced Settings
RLV4300 Advanced settings NOTE: The parameter tables are on the following pages. Pull the cover down. Briefly insert a pointed object (e.g., paperclip) through the advanced setting opening. The first parameter will appear. To display the next parameter, press the Mode button. - Page 10 Owner’s Guide 69-1918EF-03 Advanced settings (cont’d) Parameter Display and Parameter Display and and Options Default Setting and Options Default Setting Temperature Time display display format format • °C / °F • 24 h / 12 h Early Start * Automatic Daylight Saving Time ** •...
- Page 11 RLV4300 Advanced settings (cont’d) Parameter Display and Parameter Display and and Options Default Setting and Options Default Setting Year *** Month *** • 00 - 99 • 1 - 12 Day *** Cycle length **** • 1 - 31 • Std / Fan *** Available only if Daylight Saving Time is enabled (On).
-
Page 12: Clock And Day Setting
Owner’s Guide 69-1918EF-03 Clock and day setting The clock must be set when Time appears on the screen. Pull the cover down. Press the Day button to set the day. Use the Hour and Min buttons to set the clock. Press the Ret button to exit. -
Page 13: Temperature Display And Setting
RLV4300 Temperature display and setting The thermostat normally displays the room (measured) temperature. • To display the set temperature (setpoint), press the Up or Down button once. The setpoint temperature will remain on the screen for 5 seconds. • To change the setpoint temperature, press the Up or Down button repeatedly until the desired temperature is displayed. -
Page 14: Automatic Mode
Owner’s Guide 69-1918EF-03 Automatic mode (running the schedule) To place the thermostat in Automatic mode, press the Mode button until Auto appears on the screen. The current period number also appears. In this mode, the thermostat follows the programmed schedule. You can program up to 4 periods in a day. - Page 15 RLV4300 Automatic mode (cont’d) To modify the schedule: Press the Mode button until Auto appears on the screen. Press the Pgm button. Period 1 of the weekday (Monday to Friday) program is displayed To display another period, press the Pgm button.
- Page 16 Owner’s Guide 69-1918EF-03 Automatic mode (cont’d)
-
Page 17: Manual Mode
RLV4300 Manual mode (permanent override of schedule) To place the thermostat in Manual mode, press the Mode button until Man appears on the screen. In this mode, any modification to the temperature must be done manually. Press the Up or Down button to set the temperature. - Page 18 Owner’s Guide 69-1918EF-03 Economy mode (cont’d) The Economy mode has two periods which you can set as follows: Period Temperature Start Time Set the day and time that you want the tem- Set to a comfortable level perature to start rising so that the comfort- (e.g., 22°C).
- Page 19 RLV4300 Economy mode (cont’d) To program the two periods of the Economy mode: Press the Mode button until Econo appears on the screen. Press the Pgm button. Period 1 is displayed. Press the Day button to set the start day of the displayed period.
-
Page 20: Power Outage
Owner’s Guide 69-1918EF-03 Power outage During a power outage, the thermostat display remains lit for the first 2 minutes. During this time, the LP (low power) indicator appears and all buttons are disabled. Then the screen turns blank. The settings are stored in memory. When power returns, the ther- mostat returns to the mode of operation preceding the power out- age. -
Page 21: In Case Of Difficulty
RLV4300 In case of difficulty PROBLEM SOLUTIONS Thermostat’s housing is This is normal. hot. Correct the situation if any of the following exists: • The thermostat is exposed to an air draft. Wrong temperature is dis- • The sticker on the thermostat’s screen has played. -
Page 22: Specifications
Owner’s Guide 69-1918EF-03 Specifications Supply: 120/240 VAC, 60 Hz Minimum load: 1.25 A (resistive only) 150 W @ 120 VAC 300 W @ 240 VAC Maximum load: 12.5 A (resistive only) 1500 W @ 120 VAC 3000 W @ 240 VAC Display range: 0°C to 50.0°C (32°F to 99°F) Setpoint range: 5.0°C to 27.0°C (41°F to 81°F) Resolution: 0.5°C (1°F) -
Page 23: Warranty
This warranty does not cover removal or reinstallation costs. This warranty shall not apply if it is shown by Honeywell that the defect or malfunction was caused by damage which occurred while the product was in the possession of a consumer. - Page 24 Automation and Control Systems Honeywell International Inc. 1985 Douglas Drive North Golden Valley, MN 55422 http://yourhome.honeywell.com Honeywell Limited 35 Dynamic Drive Scarborough, Ontario M1V 4Z9 Printed in USA 69-1918EF-03 03-2013...
- Page 25 Guide du propriétaire RLV4300 Thermostat programmable 5-2...
- Page 26 Guide du propriétaire 69-1918EF-03 Table des matières Aperçu À propos du thermostat ..................1 Contrôles....................... 2 Affichage ....................... 3 Installation Directives d’installation..................4 Branchement ......................5 Installer le thermostat .................... 6 Fonctionnement Réglages avancés....................7 Réglage de l’heure et du jour ................10 Affichage et réglage de la température ..............11 Mode Automatique ....................
-
Page 27: À Propos Du Thermostat
RLV4300 À propos du thermostat Ce thermostat est conçu pour commander un appareil de chauffage électrique tel qu’une plinthe chauffante, un plafond radiant, un convecteur ou un ventiloconvecteur. Ce thermostat NE PEUT être utilisé avec : • une charge résistive inférieure à 1,25 A •... -
Page 28: Contrôles
Guide du propriétaire 69-1918EF-03 Contrôles Écran Boutons Haut/Bas Bouton Programme Bouton Retour Bouton Mode Réglages Tirer le couvercle avancés vers le bas Réglage des minutes Réglage de l’heure Réglage du jour... -
Page 29: Affichage
RLV4300 Affichage Heure et jour Apparaît lorsque le thermostat est configuré pour un Apparaît lorsque ventiloconvecteur la température de consigne est Apparaît lors d’une affichée panne de courant Apparaît lorsque Température l’horloge a été réinitialisée Indicateur de l’intensité du chauffage... -
Page 30: Directives D'installation
Guide du propriétaire 69-1918EF-03 Directives d’installation METTRE LE SYSTÈME DE CHAUFFAGE HORS TENSION AFIN D’ÉVITER TOUT RISQUE DE CHOC ÉLECTRIQUE. • Tous les câbles et les connexions doivent être conformes au code d’électricité local. • Les fils du thermostat qui servent aux raccordements de ligne et de charge sont étamés. -
Page 31: Branchement
RLV4300 Branchement Brancher le thermostat au système de chauffage (charge) et à l’alimentation en utilisant des connecteurs sans soudure pour fils de cuivre. Installation à 4 fils Installation à 2 fils... -
Page 32: Installer Le Thermostat
Guide du propriétaire 69-1918EF-03 Installer le thermostat Desserrer la vis sous le thermostat et séparer la façade du thermostat de la plaque murale. NOTA : La vis ne peut être complètement retirée. Fixer le thermostat à la boîte électrique à l’aide des vis fournies. -
Page 33: Réglages Avancés
RLV4300 Réglages avancés NOTA : Les tableaux des paramètres sont sur les pages suivantes. Tirer le couvercle vers le bas. Insérer brièvement un objet pointu (par exemple: un trombone) dans l’ouverture des réglages avancés. Le premier paramètre apparaîtra. Pour afficher le paramètre suivant, appuyer sur le bouton Mode. - Page 34 Guide du propriétaire 69-1918EF-03 Réglages avancés (suite) Affichage Affichage Paramètre et options et réglage Paramètre et options et réglage par défaut par défaut Format d’affichage de la Format d’affichage de l’heure température • 12 h / 24 h • °C / °F Démarrage anticipé...
- Page 35 RLV4300 Réglages avancés (suite) Affichage Affichage Paramètre et options et réglage Paramètre et options et réglage par défaut par défaut Année *** Mois *** • 00 - 99 • 1 - 12 Jour *** Durée du cycle **** • 1 - 31 •...
-
Page 36: Réglage De L'heure Et Du Jour
Guide du propriétaire 69-1918EF-03 Réglage de l’heure et du jour Régler l’horloge lorsque Time apparaît à l’écran. Cette situation se produit lorsque le thermostat est mis sous tension pour la première fois ou après une panne de courant de plus de 5 heu- res. -
Page 37: Affichage Et Réglage De La Température
RLV4300 Affichage et réglage de la température Le thermostat affiche normalement la température (mesurée) de la pièce. • Pour voir la température de consigne (réglée), appuyer une fois sur le bouton Haut ou Bas. La température de consi- gne restera affichée pendant 5 secondes. -
Page 38: Mode Automatique
Guide du propriétaire 69-1918EF-03 Mode Automatique (utiliser l’horaire) Pour placer le thermostat en mode Automatique, appuyer sur le bouton Mode jusqu’à ce que Auto apparaisse à l’écran. La période en cours est affichée. Dans ce mode, le thermostat suit l’horaire programmé. Vous pouvez programmer jusqu'à... - Page 39 RLV4300 Mode Automatique (suite) Pour modifier l’horaire : Appuyer sur le bouton Mode jusqu’à ce que Auto apparaisse à l’écran. Appuyer sur le bouton Pgm. La période 1 pour les jours de la semaine (lundi au vendredi) est affichée. Pour changer de période, appuyer sur le bouton Pgm jusqu’à ce que la période désirée soit affichée.
- Page 40 Guide du propriétaire 69-1918EF-03 Mode Automatique (suite)
-
Page 41: Mode Manuel
RLV4300 Mode Manuel (dérogation permanente à l’horaire) Pour placer le thermostat en mode Manuel, appuyer sur le bouton Mode jusqu’à ce que Man apparaisse à l’écran. Appuyer sur le bouton Haut ou Bas pour régler la tempéra- ture. Dans ce mode, toute modification au réglage de tempéra- ture doit être faite manuellement. - Page 42 Guide du propriétaire 69-1918EF-03 Mode Économie (suite) Le mode Économie utilise deux périodes que vous pouvez régler comme suit : Période Température Heure du début de la période Régler le jour et l’heure auxquels vous dési- Régler à un niveau rez que la température commence à...
- Page 43 RLV4300 Mode Économie (suite) Pour programmer les deux périodes du mode Économie : Appuyer sur le bouton Mode jusqu’à ce que Econo apparaisse à l’écran. Appuyer sur le bouton Pgm. La période 1 est affichée. Appuyer sur le bouton Day pour régler le jour du début de la période.
-
Page 44: Panne De Courant
Guide du propriétaire 69-1918EF-03 Panne de courant Lors d'une panne de courant, l’écran reste allumé pendant les 2 premières minutes. Durant cette période, la mention LP est affi- chée et tous les boutons sont désactivés. Ensuite, l’écran s’éteint. Les réglages sont sauvegardés en mémoire. Au retour du courant, le thermostat retourne au mode de fonctionnement précédant la panne. -
Page 45: En Cas De Difficulté
RLV4300 En cas de difficulté PROBLÈMES SOLUTIONS Le boîtier du thermostat est chaud. Ceci est normal. Corriger la situation si : • Il y a un courant d’air à proximité. • L’autocollant sur l’écran du thermostat n’a pas La température affichée est erronée. -
Page 46: Fiche Technique
Guide du propriétaire 69-1918EF-03 Fiche technique Alimentation : 120/240 Vca, 60 Hz Charge minimale : 1,25 A (résistive seulement) 150 W @ 120 VCA 300 W @ 240 VCA Charge maximale : 12,5 A (résistive seulement) 1500 W @ 120 VCA 3000 W @ 240 VCA Plage d’affichage : 0 °C à... -
Page 47: Garantie
Garantie Honeywell garantit ce produit, à l'exception des piles, contre tout vice de fabrication ou de matière dans la mesure où il en est fait une utilisation et un entretien convenables, et ce, pour un (1) an à partir de la date d'achat par le consommateur. - Page 48 Solutions de régulation et d’automatisation Honeywell International Inc. 1985 Douglas Drive North Golden Valley, MN 55422 http://yourhome.honeywell.com Honeywell Limitée 35 Dynamic Drive Scarborough, Ontario M1V 4Z9 Imprimé aux É.-U. 69-1918EF-03 03-2013...
Need help?
Do you have a question about the RLV4300 and is the answer not in the manual?
Questions and answers
Should the thermostat screen be green