Table of Contents
Advertisement
Advertisement
Table of Contents

Related Manuals for TC Electronic Finalizer Express


Summary of Contents for TC Electronic Finalizer Express
- Page 1 USER’S MANUAL Finalizer Express STUDIO MASTERING PROCESSOR...
-
Page 3: Important Safety Instructions
IMPORTANT SAFETY INSTRUCTIONS The lightning flash with an arrowhead symbol with- The exclamation point within an equilateral triangle in an equilateral triangle, is intended to alert the is intended to alert the user to the presence of user to the presence of uninsulated "dangerous important operating and maintenance (servicing) voltage"... - Page 4 IMPORTANT SAFETY INSTRUCTIONS EMC / EMI. This equipment has been tested and found to comply with the limits for a Class B Digital device, pursuant to part 15 of the FCC rules. These limits are designed to provide reasonable protection against harmful interference in residential installations.
-
Page 5: Table Of Contents
EXTERNAL CONTROL Using the TC Master Fader p. 20 Controlling Fader via MIDI p. 20 Record/Playback of a Fade p. 21 TC Electronic, Sindalsvej 34, DK-8240 Risskov - tcdk@tcelectronic.com English version Rev 3 - SW - V 1.01 Prod. No: 606064013... -
Page 6: Welcome
It will optimize the level and punch of your music by increasing the average perceived level. The user interface of the Finalizer Express is presented in an analog style, making it extremely intuitive and fast to use. The Finalizer Express interfaces with the outside world through 24 bit A/D and D/A converters, AES/EBU, S/PDIF and Optical I/O’s. -
Page 7: Introduction
The Finalizer Express The Finalizer Express is a studio mastering device meant for optimizing the overall perceived level of your mixes. This is done by utilizing TC’s proprietary Multiband Dynamics algorithm that the Finalizer Express inherited from the TC Finalizer Plus/96. -
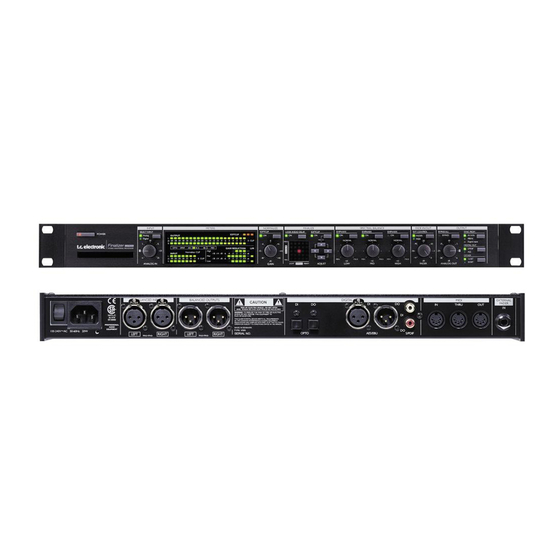
Page 8: Front Panel
This delay time is to avoid show the Input and Output level Sets the gain of the Normalizer switching off the device by of the Finalizer Express. The section. This parameter accident. Clip LEDs indicate digital determines how hard the clipping on the Input or Output. - Page 9 Dithering. Dynamics section. ANALOG OUT Controls the analog Output gain. SYNC FROM Sets the digital clock that the Finalizer Express should utilize. DIGITAL OUT Sets the digital Status bits used on all digital Outputs. DITHER Toggles Dither between 16 bit, 20 bit and Off (24 bit).
-
Page 10: Rear Panel
Pin 2 is “Hot” on all XLR’s (IEC and AES standards) The Finalizer Express power supply is capable of operating at any line voltage from 100-240 Volts, 50-60Hz. For further instructions on cables please see our Soldering instructions on page 28-29. -
Page 11: Signal Flow Diagram
SIGNAL FLOW INPUT PPM OUTPUT PPM Left Left Right Right ANALOG IN Input Normalizer Spectral Balance Fader ANALOG OUT GAIN Bypass Selector GAIN Left ANALOG SOFT COMP SOFT ANALOG Analog INPUTS CLIP CLIP OUTPUTS [balanced] [balanced] Right Digital Digital Input Select Digital Output Digital Input Dither... -
Page 12: Compressor/Limiter
COMPRESSOR - LIMITER The Dynamics Algorithm This chapter explains the basic principles of the Finalizer Express Dynamics Algorithm, including Auto Make-up Gain, Look-Ahead Delay and Softclipping. The Compressor A Compressor is meant to reduce the dynamic content of the Input signal, and thereby keep a more constant level. -
Page 13: Setups
3. Connect one of the digital Outputs of the Finalizer Express to your digital recording device. 4. Connect the analog Outputs of the Finalizer Express to your monitoring system. Example 2 Setup with a digital mixing console and a digital recording device 1. -
Page 14: Basic Operation
BASIC OPERATION Knobs & Keys This chapter will explain all of the controls of the Finalizer Express. introduced is somewhat similar to tape saturation that can occur POWER key Turn on the Finalizer Express with a single light touch. To turn when overdriving an analog tape recorder. - Page 15 Status bits are correct. hitting the Limiter harder, by boosting each of the bands accordingly. When none of the two LEDs are lit, the Finalizer Express simply copies the Status bits of the selected Digital Input. This setting...
-
Page 16: Working The Express Step By Step
DON’T WORRY! the most aggressive setting is in the upper right corner. The Finalizer Express is easy to use and you will soon At page 15 you’ll find the Finalizer Express Matrix, be confident operating this unit. -
Page 17: The Finalizer Matrix
THE FINALIZER MATRIX The Finalize Matrix This appendix shows you the actual settings of the Finalize Matrix... -
Page 18: Working The Finalizer Express
WORKING THE FINALIZER EXPRESS This chapter contains a number of tips and examples on how to use the Finalizer Express in different applications such as recommended settings and special setups, etc. Digital Outputs Analog Inputs The digital Outputs of the Finalizer Express will always outputs Gaining levels in the digital domain can be perceived as a all 24 bits. -
Page 19: How To Hit The Limiter
Classical or Acoustic Source Material When using the Finalizer Express for classical music, it is preferable to choose a subtle setting. Here is a suggestion: Disable both Softclippers. This will eliminate the risk of adding second harmonic distortion to your signal. -
Page 20: Average Rock/Pop Music
Commercial Speak You might want to try the Finalizer Express for compressing a commercial speaker. This will most likely require a bit more compression than a full mix would do. Here is a suggestion to get you started: Enable both Softclippers. Choose a Matrix setting in the Upper right corner using higher Ratios and a bit aggressive response times. -
Page 21: Special Setups
Using an External Clock with Analog In The Finalizer Express may be forced to use an incoming digital clock as master clock and still use the audio of the analog Inputs. This may be handy if you have a house clock or if you prefer to use a second digital device as master clock of your setup. This is a step by step guide on how to set this up. -
Page 22: External Control
Remote Controlling the Finalizer Express digital fader The digital fader of the Finalizer Express can be remote controlled by the optional TC Master Fader or by MIDI. This enables you to perform your fades within the digital domain, and to record, playback, edit or move fades when using a sequencer. - Page 23 Express. This is a step by step guide on how to record and playback a fade with the Finalizer Express. 1. Connect The MIDI Out of the Finalizer Express to the MIDI In of your MIDI recording device and vice versa.
-
Page 24: Appendix
APPENDIX Self Test PRESS AND HOLD THE “BYPASS ALL” KEY, WHILE Test 5 - Opto In/Out test POWERING UP, TO ACCESS THE SELF TEST Connect an optical cable between OPTO Output and Input. Press Use the ARROW left and right < > keys to select a test, press the the FINALIZE SOFTCLIP key to start test. -
Page 25: Troubleshooting
The incoming Sample Rate is 44.1kHz, but the Finalizer Express sends out 48kHz. • You are using digital Input but the Finalizer Express is set to use its own internal clock. Press the “Sync from” key to select the digital clock. -
Page 26: Midi Implementation Chart
APPENDIX MIDI Implementation Chart EFFECTS PROCESSOR Finalizer Express - August, 1998 Version 1.0 Function Transmitted Recognized Remarks Basic Channel Default 1(-16) 1(-16) Changed 1-16 1-16 Mode Default Messages Altered Note Number True Voice Velocity Note ON Note OFF After Touch Key’s... -
Page 27: Technical Specifications
APPENDIX Technical Specifications Digital Inputs and Outputs Connectors: XLR (AES/EBU), RCA Phono (S/PDIF), Optical (Tos-link) Formats: AES/EBU (24 bit), S/PDIF (24 bit), EIAJ CP-340, IEC 958, EIAJ Optical (Tos-link) Output Dither: HPF TPDF dither 16, 20 and 24 bit Sample Rates: 44.1 kHz, 48 kHz Processing Delay: 0.2 ms @ 48 kHz... -
Page 28: Note
Class B digital device, pursuant to part 15 of the FCC rules. These limits are designed to provide reasonable protection against TC Electronic A/S, Sindalsvej 34, 8240 Risskov, Denmark, harmful interference in a residential installation. hereby declares on own responsibility that following product:... -
Page 29: Glossary
APPENDIX Glossary AES/EBU Dithering Professional digital in/out standard, using balanced XLR cables. When going from one type of bit resolution to a lower, e.g. from The AES/EBU format outputs 24 bit. 24 bit to 16 bit, you actually loose 8 bits of information. The process of cutting of bits is called truncation and it introduces digital distortion of low level signals, due to the lack of complete S/PDIF... -
Page 30: Soldering Instructions
APPENDIX Soldering instructions MIDI Cable DIN CONNECTOR DIN CONNECTOR 5POLE - MALE 5POLE - MALE max. 10m 45 degrees 45 degrees SHIELDED CABLE (3 or 5 wires + screen) Pedal Cable PEDAL SWITCH or similar JACK PLUG Mono - male Ø... - Page 31 APPENDIX Soldering instructions XLR - XLR Jack (unbalanced) - XLR Jack (balanced) - XLR Pin 1 - Pin 1 (Ground) Sleeve - Pin 1 (Ground) Sleeve - Pin 1 (Ground) Pin 2 - Pin 2 (Hot) Tip - Pin 2 (Hot) Tip - Pin 2 (Hot) RING Pin 3 - Pin 3 (Cold)
-
Page 32: My Settings
MY SETTINGS My settings Use this to write down your own settings Name: Purpose: Date: Name: Purpose: Date: Name: Purpose: Date: Name: Purpose: Date:... -
Page 33: Optional Master Fader
Why make a Master Fader? If a fade is performed before the Finalizer Express, the Compressor will try to increase the level as the fader decreases. To avoid this problem, fades must always be done after the Finalizer Express. The Master Fader makes it possible to perform a manual fade on the very output of the Finalizer Express and you thereby keep your fade in digital domain and ensuring perfect tracking of left and right.
Need help?
Do you have a question about the Finalizer Express and is the answer not in the manual?
Questions and answers