Miele KM 2034 Operating And Installation Manual
Gas
Hide thumbs
Also See for KM 2034:
- Operating and installation instructions (52 pages) ,
- Operating instructions manual (44 pages) ,
- Operating and installation instructions (68 pages)
Table of Contents
Advertisement
Advertisement
Table of Contents

Related Manuals for Miele KM 2034


Summary of Contents for Miele KM 2034
- Page 1 Operating and installation instructions Gas hobs KM 2014 KM 2034 / 2035 KM 2052 KM 2054 en - GB To avoid the risk of accidents or damage to the appliance it is essential to read these instructions before it is installed and used for the first time.
- Page 2 Per questo se si vuole usare l’apparecchio in un paese diverso rivolgersi al servizio di assistenza tecnica Miele del paese in cui si intende usarlo.
- Page 3 Gas-heated appliances Safety precautions to take if you smell gas ß Turn off the gas emergency control valve immediately. This is usually located near the gas meter. ß Eliminate all sources of ignition in a safe manner. Do not smoke, light cigarette lighters or matches. ß...
-
Page 4: Table Of Contents
Contents Guide to the appliance ..........5 Models . -
Page 5: Guide To The Appliance
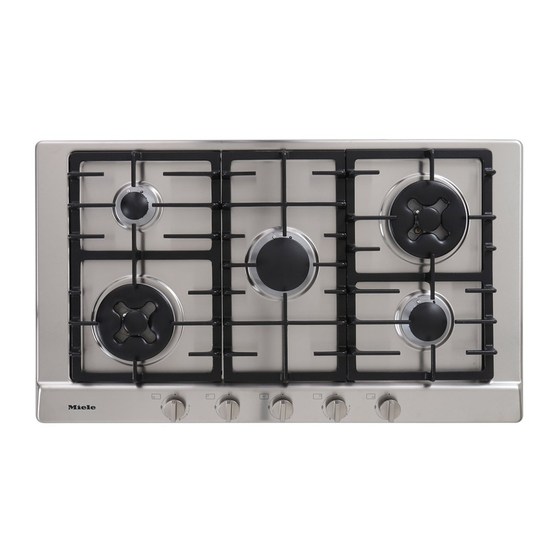
Guide to the appliance Models KM 2014 Wok burner Controls: e Front right Small burner cd Medium burners f Rear right g Rear left h Front left... - Page 6 Guide to the appliance KM 2034 / KM 2035 Large burner Controls: f Front right Small burner cd Medium burners g Rear right h Middle Wok burner i Rear left j Front left...
- Page 7 Guide to the appliance KM 2052 Wok burner Controls: f Front right Small burner g Rear right Large burner de Medium burners h Middle i Rear left j Front left...
- Page 8 Guide to the appliance KM 2054 ad Wok burners Controls: f Front right Small burner g Rear right Large burner h Middle Medium burner i Rear left j Front left...
-
Page 9: Burner
Guide to the appliance Burner Wok burner Small, medium and large burners a Burner ring b Burner cap c Burner head d Burner base e Ignition safety device f Ignitor... -
Page 10: Warning And Safety Instructions
Keep these instructions in a safe the manufacturer and could be place and ensure that new users are dangerous. Miele cannot be held liable familiar with the content. Pass them for damage resulting from incorrect or on to any future owner. - Page 11 Warning and Safety instructions Safety with children Packaging, e.g. cling film, polystyrene and plastic wrappings, This appliance is only intended for must be kept out of the reach of babies use by adults who have read these and young children. Danger of instructions.
- Page 12 Miele cannot be held liable for the supply by a suitably qualified and consequences of an inadequate competent electrician in strict earthing system (e.g.
- Page 13 H 05 V V-F (pvc insulated), available from the Miele Spare Parts Department.
- Page 14 Warning and Safety instructions Correct use Always use heat-resistant pot holders or gloves when working with a The appliance gets hot when in use hot appliance. Ensure that they do not and remains hot for quite a while after it come into contact with the flames.
- Page 15 If the hob is used for very long hob. Miele cannot be held liable for this periods of time additional ventilation of type of damage. the room may be necessary, e.g. by...
- Page 16 Warning and Safety instructions Spray canisters, aerosols and other inflammable substances must not be Miele cannot be held liable for stored in a drawer under the hob. Cutlery inserts must be heat-resistant. damage caused by non-compliance with these Warning and Safety Always ensure that food is instructions.
-
Page 17: Caring For The Environment
Caring for the environment Disposal of the packing Disposal of your old appliance material Electrical and electronic appliances often contain materials which, if The transport and protective packing handled or disposed of incorrectly, has been selected from materials which could be potentially hazardous to are environmentally friendly for human health and to the environment. -
Page 18: Before Using For The First Time
Before using for the first time Please stick the extra data plate for the appliance supplied with this documentation in the space provided in the "After sales service" section of this booklet. Cleaning for the first time ^ Remove any protective foil and adhesive labels. ^ Clean all removable parts of the burners with a solution of warm water and a little washing-up liquid applied with a soft sponge. -
Page 19: Operation
Operation The control is used to ignite the burner and to regulate the strength of the flame. The burners can only be switched on by pressing in the appropriate control and turning it anti-clockwise, and switched off by turning the control clockwise. The outer flame ring on the wok burner can only be switched on and off by pressing the control in and turning it the appropriate way. -
Page 20: Switching On
Operation Switching on ^ The control for the burner required must be pressed in and turned anti-clockwise to the largest flame symbol to switch Pressing a burner control will automatically create a spark on all burners. This is normal and no cause for concern. ^ When the flame ignites, keep the control pressed in for 8-10 seconds, and then let it go. -
Page 21: Regulating The Flame
Operation Regulating the flame Regulate the flame so that it does not spread out beyond the sides of the pan. As the outer part of the flame is much hotter than the centre, the tips of the flames should stay beneath the pan base. -
Page 22: Suitable Pans
Suitable pans Burner Min. pan base diameter in cm Small burner Medium burner Large burner Wok burner Max. diameter at top of pan in cm Small burner Medium burner Large burner Wok burner – Refer to the chart above and ensure that the pan diameter falls within the minimum and maximum diameters given for the burner you are using. - Page 23 Suitable pans – Remember when purchasing new pans that manufacturers usually refer to the diameter at the top of the pan in their documentation. – Use a pan lid whenever possible to minimise heat loss. When placing pans on the pan support(s) make sure you position them so that they cannot tip up.
-
Page 24: Safety Cut-Out
Safety cut-out This appliance is fitted with a thermoelectric ignition safety device which cuts off the supply of gas to a burner if the flame goes out, for example if food has boiled over, or if there was a sudden draught. ^ To use the burner again, turn the control clockwise to the "ß"... -
Page 25: Cleaning And Care
Cleaning and care For Miele branded and cleaning and conditioning products see “Optional accessories”. Do not use a steam cleaning appliance to clean this appliance. The steam could reach electrical components and cause a short circuit. – The appliance should be cleaned after each use. Allow the appliance to cool down to a safe temperature before cleaning. - Page 26 Remove any soiling which applied with a soft sponge. comes into contact with the If necessary, you could use Miele ceramic and printed flame symbols straight stainless steel hob cleaner (see "Optional away. Soiling, particularly accessories") and the scouring pad on the...
- Page 27 Cleaning and care To assemble the small, medium and large burners ^ Place the burner head c onto the burner base d so that the the ignition safety device e, the ignitor f and the retaining pins g fit into their respective holes in the burner head.
- Page 28 Cleaning and care To assemble the wok burner ^ Place the burner head c onto the burner base d so that the holes fit over the jets in the burner base and the locating bar in the notch. If the burner head is correctly in position, it does not move about.
-
Page 29: Problem Solving Guide
– the flame slits are dry and unblocked. – the mains fuse has tripped. If it has, contact a qualified electrician or the Miele Service Department. The gas can be lit with a match. (See “Use during a power cut”). - Page 30 ... the ignitor on the burner does not spark. – check whether the mains fuse has tripped. If it has, contact a qualified electrician or the Miele Service Department. – Check whether food deposits have lodged themselves between the ignitor and the burner cap.
-
Page 31: Optional Accessories
Optional accessories Miele offer a comprehensive range of useful accessories as well as cleaning and conditioning products for your appliance. These products can be ordered online at: or from Miele (see back cover for contact details) Cleaning products Ceramic and stainless steel hob cleaner... -
Page 32: Safety Instructions For Installation
Safety instructions for installation The electrical cable (and a flexible Fit the wall units and extractor hood gas connection pipe in countries where before fitting the hob to avoid applicable) must be installed in such a damaging the surface. way so that they do not come into contact with any moving kitchen parts The room in which the gas hob is (e.g. - Page 33 Safety instructions for installation Safety distance above the hob When two or more appliances are installed together below a cooker hood, e.g. a gas hob and an induction hob combiset, which have different safety distances given in the installation instructions, you should select the greater distance of the two.
- Page 34 Safety instructions for installation Ideally the hob should be installed with plenty of space on either side. There may be a wall at the rear and a tall unit or wall at one side. On the other side, however, no unit or divider should stand higher than the hob (see illustrations).
-
Page 35: Appliance And Building-In Dimensions
Appliance and building-in dimensions KM 2014 5 2 0 6 5 0 ß R 4 8 0 - 4 9 2 1 7 1 9 6 a Front b Casing depth c Gas connection R 1/2" ISO 7-1 (DIN EN 10226) d Mains connection box with mains connection cable, L = 2000 mm... - Page 36 Appliance and building-in dimensions KM 2034 / KM 2035 5 2 0 7 5 0 ß R 0 5 0 4 8 0 - 4 9 2 1 7 1 9 6 a Front b Casing depth c Gas connection R 1/2" ISO 7-1 (DIN EN 10226)
- Page 37 Appliance and building-in dimensions KM 2052 / KM 2054 5 2 0 9 0 0 ß R 0 5 0 4 8 0 - 4 9 2 1 7 1 9 6 a Front b Casing depth c Gas connection R 1/2" ISO 7-1 (DIN EN 10226) d Mains connection box with mains connection cable, L = 2000 mm...
-
Page 38: Installation
Installation Preparing the worktop Installing the hob ^ Make the worktop cut-out following ^ Feed the connection cable down the dimensions applicable. through the cut-out. Remember to maintain a minimum ^ Place the hob in the cut-out without safety distance from the back wall, securing it. -
Page 39: Tiled Worktop
Installation General installation tip Tiled worktop Grout lines a and the hatched area Do not use any sealant unless underneath the hob frame must be expressly instructed to do so. The smooth and even. If they are not the sealing strip under the edge of the top hob will not sit flush with the worktop part of the appliance provides a and the sealing strip underneath the... -
Page 40: Electrical Connection
Electrical connection Connection should be made via a All electrical work should be carried suitable isolator or a double pole fused out by a suitably qualified and spur connection unit which complies competent person, in strict with national and local safety accordance with current local and regulations and the on/off switch should national safety regulations (BS 7671... - Page 41 If the connection cable is damaged, it must be replaced by a suitably qualified electrician with a special connection cable of type H 05 V V-F (pvc insulated), available from the Miele Service Department. The manufacturer cannot be held liable for damage which is the direct or indirect result of incorrect installation or connection.
-
Page 42: Gas Connection
Please contact your dealer or the Miele Spare Parts Department for the Check with your local gas supplier appropriate conversion jets if about the type of gas and its necessary. - Page 43 Gas connection Connection The gas connection must be installed so that connection can be made either from inside or outside the kitchen unit, and the isolating valve must be easily accessible and visible (by opening one of the kitchen doors, if necessary). After installing the appliance the gas burners have to be set for local conditions.
-
Page 44: Burner Ratings
Burner ratings Nominal ratings for all gas types with the burner full on Burner Gas type KM 2014 KM 2034 / KM 2035 / KM 2052 Small Natural gas burner Liquid gas Medium Natural gas 1.75 1.75 burner Liquid gas 1.75... - Page 45 Burner ratings Nominal rating at low setting Burner Gas type KM 2014 KM 2034 / KM 2035 / KM 2052 / KM 2054 Small Natural gas 0.25 0.25 burner Liquid gas 0.25 0.25 Medium Natural gas 0.35 0.35 burner Liquid gas 0.35...
-
Page 46: Conversion To Another Type Of Gas
Conversion to another type of gas Jet table Connection to the gas supply, or conversion from one type of gas to another, should only be undertaken by an approved and registered gas installer in strict accordance with local and national safety and building regulations (e.g. -
Page 47: Changing The Jets
Conversion to another type of gas Changing the jets Wok burner Disconnect the gas hob from the electricity supply by switching off at the socket or by disconnecting the mains fuse. To change the main jets Small, medium and large burners ^ Remove burner cap b, burner ring a and burner head c. -
Page 48: To Change The Small Jets
Conversion to another type of gas To change the small jets Small, medium and large burners The top of the appliance has to be removed before the small jets can be changed. ^ Loosen the fixing screws on the burners. ^ Pull the control knobs off. - Page 49 Conversion to another type of gas Wok burner ^ Remove ignitor a. ^ Using a small screwdriver, unscrew small jets b and c in the gas fitting. ^ Pull out the jets with a pair of pliers. ^ Fit the correct jets securely (see jet table).
-
Page 50: After Changing The Jets
Conversion to another type of gas After changing the jets ^ Reassemble the burner parts in the reverse order, ^ Check all gas fittings for leaks by operating the burner without the top section of the hob in place (use a match to ignite the flame). -
Page 51: After Sales Service, Data Plate
Please note that telephone calls may be monitored and recorded to improve our service. When contacting Miele, please quote the model and serial number of your appliance. These are given on the data plate. N.B. A call-out charge will be applied for service visits where the problem could have been resolved as described in these instructions. - Page 52 Alteration rights reserved / 2111 M.-Nr. 07 181 160 / 05...
Need help?
Do you have a question about the KM 2034 and is the answer not in the manual?
Questions and answers