Advertisement
Table of Contents
- 1 General Directions for Use
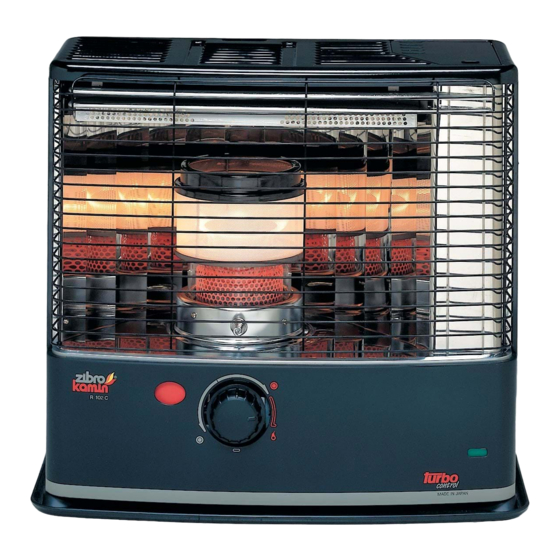
- 2 Main Components
- 3 What You Need to Know in Advance
- 4 The Right Fuel
- 5 Installing the Heater
- 6 Filling Fuel
- 7 Switching off the Heater
- 8 Malfunction, Causes and Solutions
- 9 Maintenance
- 10 Specifications
- 11 Warranty Provisions
- 12 Tips for Safe Use
- 13 Replacement of the Wick
- Download this manual
Advertisement
Table of Contents

Subscribe to Our Youtube Channel
Related Manuals for Zibro Kamin R 102 C


Summary of Contents for Zibro Kamin R 102 C
- Page 1 ® R 102 C MANUEL D'UTILISATION GEBRAUCHSANWEISUNG BRUGSANVISNING INSTRUCCIONES DE USO OPERATING MANUAL ISTRUZIONI D’USO > GEBRUIKSAANWIJZING...
- Page 2 Dear Sir, Madam, Congratulations on your purchase of this Zibro Kamin heater, the number one brand amongst portable heaters. You have purchased a first-class quality product, which will serve you for many years to come. This, of course, provided you use the heater correctly. Please read these Directions for Use first, to ensure the maximum lifetime for your Zibro Kamin heater.
-
Page 3: General Directions For Use
• The right quality of fuel will be assured, when you use Zibro Plus for your heater. • If you change to another brand and/or type of paraffin oil, you must first finish up all the... -
Page 4: What You Need To Know In Advance
Only use Class C1 paraffin fuel in accordance with BS2869 Part two, or equivalent. Your heater has been designed for use with high-quality water-free pure paraffin oil, such as Zibro Plus. Only fuels of this kind will ensure clean and proper burning. Lower quality fuel may result in:... -
Page 5: Installing The Heater
MANUAL INSTALLING THE HEATER Carefully remove your heater from the box and check the contents. In addition to the heater you also need to have: the batteries a manual fuel pump a transportation cap a fuel cap cover these directions for use Keep the box and the packaging materials (Fig. - Page 6 Take the manual fuel pump and insert the smooth, most rigid tube into the jerrycan. Make sure that it is in a higher position than the removable tank (Fig. I). Insert the ribbed hose into the opening of the removable tank. Lock the valve on top of the pump (turn clockwise).
-
Page 7: Switching Off The Heater
After having ignited the heater, always check whether the combustion chamber is level, by sliding it slightly to the left and the right by its handle (Fig. E). This should be a smooth movement. If the combustion chamber is not level, this will cause smoke and soot to develop. -
Page 8: Malfunction, Causes And Solutions
If adjustment of the wick height does not have the required effect, let the heater burn until all fuel has been used up (Section H). If the flame height is still too low and the wick is set on position 3, then contact your dealer, or replace the wick, refer to section M. -
Page 9: Maintenance
Leave a window or a door wide open for a while. THE HEATER IS BURNING TOO HIGH You are using an incorrect, too volatile type of fuel. Refer to THE RIGHT FUEL (See Section ’What you need to know in advance’). Wick position too high. -
Page 10: Specifications
Clean the fuel filter (refer to section H). Store the heater in a dust-free place, if possible in its original packaging. Unused fuel cannot be used for the next heating season. If there is still some fuel left, do not throw it away, but dispose of it in accordance with the local regulations for the disposal of domestic chemical waste. -
Page 11: Tips For Safe Use
Any repairs or replacements of components within the term of warranty will not result in an extension of the term of warranty. The warranty will no longer apply, when the heater has been modified, non-original parts have been used, or when it is repaired by third parties. The warranty will not apply to parts that are subject to normal wear, such as the batteries, the ignition coil, the wick and the manual fuel pump. -
Page 12: Replacement Of The Wick
REPLACEMENT OF THE WICK ENSURE THAT THE HEATER IS OFF AND COMPLETELY COOL BEFORE STARTING TO REPLACE THE WICK. Open the lid and remove the removable tank. Remove the batteries from the battery holder. Open the front grill. Remove the combustion chamber from the heater. - Page 13 Put the wick holder and the wick mechanism back into 1 1 2 2 1 1 1 1 position. Screw the four wing nuts hand tight. Place the knurled wick adjustment knob on the wick mechanism. Turn the knob as far to the right as possi- ble.
- Page 15 ¸ ¸...
- Page 16 Holloway Bank, Wednesbury tel: +43 7434 44867 West Midlands WS10 0AW fax: +43 7434 44868 Tel.: +44 121 506 1818 email: pvgaustria@zibro.com Fax: +44 121 505 1744 email: gases@lister.co.uk e BELGIË PVG Belgium NV/SA > ITALIA Industrielaan 55 PVG Italy SRL 2900 SCHOTEN Via Niccolò...
Need help?
Do you have a question about the Kamin R 102 C and is the answer not in the manual?
Questions and answers