Table of Contents
Advertisement
Quick Links
Advertisement
Table of Contents

Subscribe to Our Youtube Channel
Related Manuals for MF DIGITAL 5500 Series


Summary of Contents for MF DIGITAL 5500 Series
- Page 1 5500 Series Operator’s Guide Includes Live...
-
Page 2: Table Of Contents
Document Revision: 030501.1 CD-3706/P Operator’s Guide 5500 Series Operator’s Guide Document Revision:05/07/07 Table of Contents WELCOME TO THE 5500 SERIES PROFESSIONAL DUPLICATION SYSTEM ..........3 ..............................3 OPYRIGHT OTICE CD-R/RW DVD-R/RW R ...................3 ECORDER ARRANTY OLICY ..................................3 IRACY ..........................4 ICENSE GREEMENT MF DIGITAL ..............................5... - Page 3 ........................30 REATING UDIO OMPILATION ISCS CD-R (CD-RW) D ....................32 ORKING RITABLE ISCS CD-RW Supported Formats ..........................32 UTILIZING THE 5500 SERIES CLIENT......................33 5500 S ..........................33 ONFIGURING THE ERIES ............................34 ONFIGURING THE LIENT ......................40 SING THE LIVE EVENT RECORDER FEATURE Page 2...
-
Page 4: Welcome To The 5500 Series Professional Duplication System
The copying of audio, video, or software without the permission of the copyright holder is illegal. MF DIGITAL. accepts no responsibility for the copyright use or misuse of this equipment. It is the sole responsibility of the user to ensure that the legal rights of copyright in duplicating are respected. -
Page 5: End User License Agreement
End User License Agreement • You have acquired a device (“5500 Series CD-R/RW duplicator”) that includes software licensed by MF DIGITAL from Microsoft Licensing Inc. or its affiliates (“MS”). Those installed software products of MS origin, as well as associated media, printed materials, and “online”... -
Page 6: About Mf Digital
5500 Series Operator’s Guide Document Revision:05/07/07 About MF DIGITAL Thank you for purchasing MF DIGITAL’s 5500 Series Copier Module duplicator. MF DIGITAL manufactures a wide variety of CD / DVD duplication equipment, including manual and fully automated CD / DVD duplicators and printers. -
Page 7: Getting Started
The Best Place To Put The 5500 The best operating location for the 5500 Series duplicator is in a climate- controlled area, free of dirt, dust, humidity, excessive heat, and electronic or electromagnetic interference. Room temperature should be between 65 and 75 degrees Fahrenheit, or between 18 and 23 degrees Celsius. - Page 8 Document Revision: 030501.1 CD-3706/P Operator’s Guide 5500 Series Operator’s Guide Document Revision:05/07/07 Page 7...
-
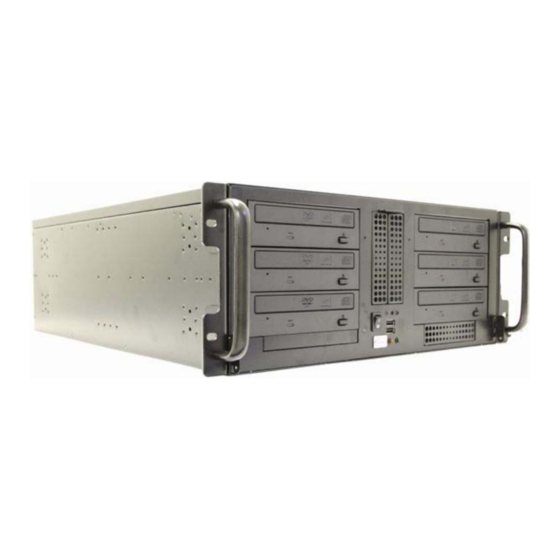
Page 9: Location Of 5500 Series Components
Document Revision: 030501.1 CD-3706/P Operator’s Guide 5500 Series Operator’s Guide Document Revision:05/07/07 Location Of 5500 Series Components Location Of 5500 Series (6 drives) Components Front View Connect a Keyboard, Monitor and Mouse (not supplied) To the corresponding connections below. Rear View... -
Page 10: O F 5500 Series Recorder Parts And Controls
Legend 1) Disc Tray - Discs are loaded and removed from this tray. Clicking the eject button will open the tray when the power to the 5500 Series is switched on. 2) Headphone Jack – Connect headphones here. 3) Volume Control Knob – This controls the volume level of the headphones. -
Page 11: System Startup
• Next, verify that the voltage selector switch is set correctly. It is located between the two power receptacles. The 5500 Series supports both 115 VAC and 230 VAC at 50 ~ 60 Hz. Please confirm that the appropriate voltage (115 VAC for North America) has been selected. -
Page 12: Loadinga Disc
Document Revision:05/07/07 Loading A Disc • After the 5500 Series’ power has been switched on, click the eject button on the front of the recorder to open its disc tray. • Load by carefully placing the disc (label side up) into the recessed area of the disc tray, so that the disc lays flat. -
Page 13: General Operation
CD-3706/P Operator’s Guide 5500 Series Operator’s Guide Document Revision:05/07/07 General Operation The 5500 Series is extremely versatile and offers many useful and powerful features. Function Keys Various uses for the 5500 will be explained throughout this Operator’s Guide. The following section explains the purpose of the function keys. - Page 14 Document Revision: 030501.1 CD-3706/P Operator’s Guide 5500 Series Operator’s Guide Document Revision:05/07/07 • This displays the Verify After status of the 5500. The Verify After function will verify a copied disc against the master disc immediately after it has been copied.
- Page 15 Document Revision: 030501.1 CD-3706/P Operator’s Guide 5500 Series Operator’s Guide Document Revision:05/07/07 • 2- The factory setting for this function is “enabled”. When “disabled”, the Click Detection feature allows masters with small random errors to be read to the hard drive. Caution should be taken when disabled, as masters that would normally be rejected will be allowed to be read-in.
- Page 16 Document Revision: 030501.1 CD-3706/P Operator’s Guide 5500 Series Operator’s Guide Document Revision:05/07/07 • Click the “6” key with your mouse. Something similar to the following will be displayed in sequence: This display is the device information for each of the recorders installed in the 5500.
- Page 17 CD-3706/P Operator’s Guide 5500 Series Operator’s Guide Document Revision: 030501.1 Document Revision:05/07/07 • Close the drive tray of the drive you would like to be drive number “1”. It can be any one of the drives. You will then see the following screen: •...
-
Page 18: Creating A Hard Disk Image
Creating A Single Hard Disk Image Although the 5500 Series’ internal hard disk can store up to six images of master discs, it is sometimes prudent not to use this Multiple Image feature and only allow one image to be created and stored. For example, using a single image simplifies the copying process. - Page 19 Document Revision: 030501.1 CD-3706/P Operator’s Guide 5500 Series Operator’s Guide Document Revision:05/07/07 • Click the START/YES key. The screen will now read in sequence: The master disc is now stored as an image on the hard disk. If you are creating an audio image, Pregaps and SubIndexes will be shown.
-
Page 20: Creating Multiple Hard Disk Images
Document Revision:05/07/07 Creating Multiple Hard Disk Images The Multiple Images feature allows the 5500 Series’ internal hard disk to store up to six master disc images. The factory setting for this function is “disabled”. To enable multiple images proceed as follows: •... - Page 21 Document Revision: 030501.1 CD-3706/P Operator’s Guide 5500 Series Operator’s Guide Document Revision:05/07/07 • Select the number that will designate the location of your master. The screen will then read in sequence: The master disc is now stored as an image on the hard disk. If you are creating audio images, Pre gaps and Sub Indexes will be shown.
-
Page 22: Enabling Verify After
Document Revision: 030501.1 CD-3706/P Operator’s Guide 5500 Series Operator’s Guide Document Revision:05/07/07 Enabling Verify After The Enabling Verify After option, allows the user to verify the copy against the image on the hard drive. This ensures the user that the copies are exactly like the master image. -
Page 23: Copying From A Hard Disk Image
Document Revision: 030501.1 CD-3706/P Operator’s Guide 5500 Series Operator’s Guide Document Revision:05/07/07 Copying From A Hard Disk Image After a hard disk image has been created, it can be used as the copying master source. If you have not already created a hard disk image, do so now, as described in the previous section. -
Page 24: Multiple Images Enabled
“COPY” key with your mouse. The screen will now read: • Click the “START/YES” key. The screen will now read: The 5500 Series defaults to the first image (1). For the purposes of this example, click the “1” key to select this image, followed by the “START/YES”... - Page 25 Document Revision: 030501.1 CD-3706/P Operator’s Guide 5500 Series Operator’s Guide Document Revision:05/07/07 • Upon successful completion, the copied disc(s) will be ejected. The screen will now read: • Click the “START/YES” key, and you will be returned to the main...
-
Page 26: Comparing From A Hard Disk Image
5500 Series Operator’s Guide Document Revision:05/07/07 Comparing From A Hard Disk Image For quality control purposes, the 5500 Series is equipped with powerful verification capabilities. Copied discs can be compared against hard disk images. This feature ensures copying integrity. Note: Due to the nature of the various compact disc formats, only CD-ROM Mode 1, CD-ROM Mode 2, CD-ROM XA Mode 2 Form 1, and most CD/DVD formats can be compared. -
Page 27: Multiple Images Enabled
Document Revision: 030501.1 CD-3706/P Operator’s Guide 5500 Series Operator’s Guide Document Revision:05/07/07 • Click the “START/YES” key, and you will be returned to the main operating screen: Note: If discs failed to Compare properly, the recorder tray drawers stay closed at completion, giving the user a “Compare Failed, Click Start”... - Page 28 Document Revision: 030501.1 CD-3706/P Operator’s Guide 5500 Series Operator’s Guide Document Revision:05/07/07 Upon successful completion, the compared disc(s) will be ejected. The screen will now read: • Click the “START/YES” key, and you will be returned to the main operating screen: Note: If discs failed to Compare properly, the recorder tray drawers stay closed upon completion.
-
Page 29: Atip Codes (Cd-R/Rw Series Only)
Document Revision: 030501.1 CD-3706/P Operator’s Guide 5500 Series Operator’s Guide Document Revision:05/07/07 ATIP Codes (CD-R/RW series only) ATIP stands for “Absolute Time In Pre-Groove”. In firmware 1.0XX and higher, the ATIP option allows you to determine the manufacturer of the disc placed in the top drive of the 5500. -
Page 30: Viewing Device Information
5500 Series Operator’s Guide Document Revision:05/07/07 Viewing Device Information To view the 5500 Series’ DRIVE device information, the steps are as follows: • From the main operating screen depicted below: • Click the “6” key. Something similar to the following will be displayed... -
Page 31: C Reating A Udio C Ompilation D Iscs
Document Revision: 030501.1 CD-3706/P Operator’s Guide 5500 Series Operator’s Guide Document Revision:05/07/07 Creating Audio Compilation Discs In addition to copying entire CDs, audio compilation discs can be created one track at a time, from one or more master discs containing audio CD- DA, Mixed Mode, or CD-Extra. - Page 32 If you are finished click the “STOP/NO” key and the screen will now read: • Click the “COPY” key and place blank CD-Rs into the drives of the 5500 Series. The screen will now read: Click the “START/YES” key to begin copying. The screen will now read: •...
-
Page 33: Iscs
Document Revision: 030501.1 CD-3706/P Operator’s Guide 5500 Series Operator’s Guide Document Revision:05/07/07 Working With CD-Re-Writable (CD-RW) Discs In addition to working with DVD+/-R and CD+/-R discs, the 5500 can also copy both to and from DVD and CD RE-Writable (DVD/RW CD/RW) discs. -
Page 34: Utilizing The 5500 Series Client
5500 Series Operator’s Guide Document Revision:05/07/07 Utilizing the 5500 Series Client The 5500 series has a client feature which enables a remote user. Configuring the 5500 Series • Connect the 5500 Series to your network using the RJ-45 connector on the back of the system. -
Page 35: C Onfiguring The C Lient
Document Revision: 030501.1 CD-3706/P Operator’s Guide 5500 Series Operator’s Guide Document Revision:05/07/07 • Enter the 4 sets of numbers of the subnet. Clicking “START/YES” after each set. You will then see: • Click the “START/YES” key and then Restart the system by turning it Off and back On again. - Page 36 CD-3706/P Operator’s Guide 5500 Series Operator’s Guide Document Revision:05/07/07 • Enter the name of the 5500 Series on the network. • Click “OK” • A new tab will appear at the top of the screen called “MF123” • Click the “MF123” tab and you will see: •...
- Page 37 Document Revision: 030501.1 CD-3706/P Operator’s Guide 5500 Series Operator’s Guide Document Revision:05/07/07 • To burn from the client, click “Start job”. Click “Browse” to select an image to burn to the 5500. Select “Copy”, “Verify”, or “Test. Enter a quantity and click “OK”.
-
Page 38: Setting The Internal Clock
Document Revision: 030501.1 CD-3706/P Operator’s Guide 5500 Series Operator’s Guide Document Revision:05/07/07 Setting The Internal Clock The 5500’s internal clock is set at the factory for Eastern Standard Time (observing daylight savings when applicable). To set the internal clock, the steps are as follows: •... - Page 39 Document Revision: 030501.1 CD-3706/P Operator’s Guide 5500 Series Operator’s Guide Document Revision:05/07/07 Firmware Updates From time to time the 5500 internal “firmware” may need updating to add new features or improve existing functions. Firmware is easily updated by loading a “Firmware Update CD”...
- Page 40 Document Revision: 030501.1 CD-3706/P Operator’s Guide 5500 Series Operator’s Guide Document Revision:05/07/07 • You will then be returned to the main operating screen: Page 39...
- Page 41 Document Revision: 030501.1 CD-3706/P Operator’s Guide 5500 Series Operator’s Guide Document Revision:05/07/07 Digital recording with the 5500 Live enabled systems Introduction The 5500 “Live” is a special edition of the 5500 which allows for audio recording directly to the system’s HD. This proves to be an ideal solution for live event recording, enabling the user to go from recorded event to making multiple CDs with in only a few minutes of the event.
- Page 42 Document Revision: 030501.1 CD-3706/P Operator’s Guide 5500 Series Operator’s Guide Document Revision:05/07/07 Input / Output Page 41...
- Page 43 PC, XP Embedded is specially designed for embedded applications. Do not install any non MF Digital supported software. Any damage as a result of this will not be covered under warranty. Using the 5500 Live Recording •...
- Page 44 Document Revision: 030501.1 CD-3706/P Operator’s Guide 5500 Series Operator’s Guide Document Revision:05/07/07 • Click on RECORD to bring up the RECORDER dialog Using your mouse, select the desired input from the Audio Capture Device pull- down. • Click on browse to select location and a filename to save the recording to. Keep in mind that CD-DA quality recording consumes about 10 MB/min •...
- Page 45 Document Revision: 030501.1 CD-3706/P Operator’s Guide 5500 Series Operator’s Guide Document Revision:05/07/07 Browse: Selects the desired folder and filename. You will be prompted to over- write existing files. Preview: Check this box to preview the audio as it is being recorded. Attach speakers to the green jack on the back on the 5500.
- Page 46 Document Revision: 030501.1 CD-3706/P Operator’s Guide 5500 Series Operator’s Guide Document Revision:05/07/07 Adding Tracks By default, each WAV, or MP3 file represents a single track. Certainly there are times, especially in live recording, where a single large WAV file, which might represent 60 minutes or more, may slit into multiple tracks, edited for in point, out point, and start IDs.
- Page 47 Document Revision: 030501.1 CD-3706/P Operator’s Guide 5500 Series Operator’s Guide Document Revision:05/07/07 • To edit a track, right click on the desired track and select EDIT. A screen similar to the following will be displayed: The operations available are as follows: Set In Point: In Point is the point where you wish to begin the track.
- Page 48 Document Revision: 030501.1 CD-3706/P Operator’s Guide 5500 Series Operator’s Guide Document Revision:05/07/07 Once you are satisfied, click on the SET IN POINT button Set Out Point: Out Point sets the end of the track. If you are making a disc from a...
- Page 49 Document Revision: 030501.1 CD-3706/P Operator’s Guide 5500 Series Operator’s Guide Document Revision:05/07/07 to the desired point you would like the new START ID to appear. Use the up and down arrow keys for fine adjustments, or click on the large main green LCD digital time display in the top left corner for direct entry.
- Page 50 If you have not, you may wish to do so now. Jobs can be started from either the STATUS tab or the LOCALHOST tab. STATUS TAB is best iof you wish to start the job on multiple MF Digital CD copiers. Optionally you may use the network client remotely.
- Page 51 .IMG). Likely this will be the .ISC file made in the previous step. • Leave LABEL blank as the 5500 does not support in-line direct to disc printing so you need not enter anything here. Consider the MF Digital 3000 Series for automating duplication and printing if desired.
- Page 52 Document Revision: 030501.1 CD-3706/P Operator’s Guide 5500 Series Operator’s Guide Document Revision:05/07/07 • Click on the START NEWJOB button • Use the default JOB ID or enter your own. This is a handy way to identify your job making it easy to recognize what job is running.
- Page 53 .IMG). Likely this will be the .ISC file made in the previous step. • Leave LABEL blank as the 5500 does not support in-line direct to disc printing so you need not enter anything here. Consider the MF Digital 3000 Series for automating duplication and printing if desired.
- Page 54 Keeping track of how the various formats relate to each other can be confusing. For example, the 5500 Series can copy all CD-ROM Mode 1 discs - this includes ISO 9660, HFS, Hybrid, Rock Ridge and many other types of file systems. As a result, the 5500 Series will most likely copy CD formats not listed in the table below.
- Page 55 Document Revision: 030501.1 CD-3706/P Operator’s Guide 5500 Series Operator’s Guide Document Revision:05/07/07 5500 Series Supported Formats DVD single layer DVD-R (In case of write, 650nm disc only) DVD-RW DVD+R DVD+RW CD-ROM Mode 1 CD-ROM XA Mode 2 (form 1, form 2)
Need help?
Do you have a question about the 5500 Series and is the answer not in the manual?
Questions and answers