SECO-LARM E-941SA-600 Manual
Electromagnetic lock 600-lb. (272kg), 1200-lb. (545kg) with led, bond sensor, weatherproof
Hide thumbs
Also See for E-941SA-600:
- Manual (8 pages) ,
- Installation manual (5 pages) ,
- Installation manual (2 pages)
Advertisement
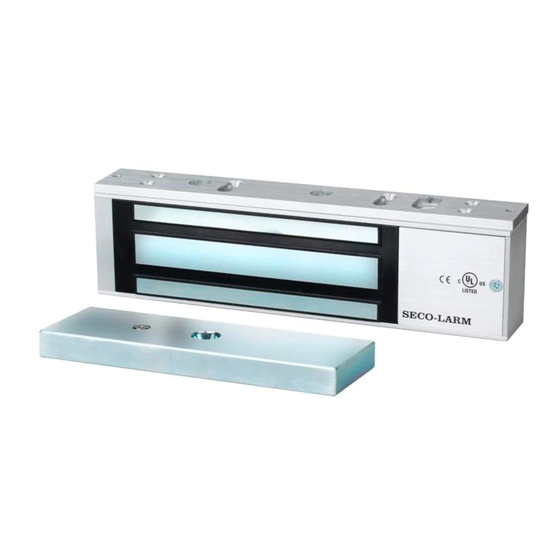
Electromagnetic Lock
E-941SA-600
600-lb. (272kg)
E-941SA-1200
1200-lb. (545kg)
With LED, Bond Sensor
E-941SA-600PQ
600-lb. (272kg)
E-941SA-1K2PQ
1200-lb. (545kg)
Weatherproof
E-941SA-300
300-lb. (136kg)*
Manual
*E-941SA-300 is not UL listed.
NOTE: Products with a model number that ends with "Q" or have a round green "Q" sticker represent RoHS compliant products.
Advertisement
Table of Contents

Related Manuals for SECO-LARM E-941SA-600


Summary of Contents for SECO-LARM E-941SA-600
- Page 1 Electromagnetic Lock E-941SA-600 600-lb. (272kg) E-941SA-1200 1200-lb. (545kg) With LED, Bond Sensor E-941SA-600PQ 600-lb. (272kg) E-941SA-1K2PQ 1200-lb. (545kg) Weatherproof E-941SA-300 300-lb. (136kg)* Manual *E-941SA-300 is not UL listed. NOTE: Products with a model number that ends with “Q” or have a round green “Q” sticker represent RoHS compliant products.
-
Page 2: Parts List
SECO-LARM ELECTROMAGNETIC LOCK Table of Contents: Introduction Installation Features Wiring Diagram Parts List Maximum Wiring Distance Specifications Troubleshooting Overview and Installation Applications Warranty Introduction: The E-941SA series of electromagnetic locks is the ideal way to secure a door against unauthorized entry. When power is applied to the electromagnetic lock, it creates an extremely strong magnetic field. -
Page 3: Typical Installation
SECO-LARM ELECTROMAGNETIC LOCK Overview: Short self- tapping screws Armature screw Mounting plate Rubber washer Long self- tapping screws Guide pins Electromagnet Steel washers Armature plate Door spacer Hex-head mounting screws Sexnut bolt Tamper caps Installation Applications: NOTE: When mounting the electromagnet, it may be necessary to use a “Z”-bracket, 1 or 2 “L”-brackets, and/or plate spacers, depending on the location and the type of door and frame. -
Page 4: Installation Notes
SECO-LARM ELECTROMAGNETIC LOCK Installation Notes: 1. Read this installation manual thoroughly. A clear understanding of the product and this manual will make installation much easier. 2. The electromagnetic lock is designed for indoor use ONLY. 3. The most suitable mounting location for the electromagnetic lock may require the use of additional SECO-LARM accessories such as Z-brackets, L-brackets, and/or spacer plates. - Page 5 SECO-LARM ELECTROMAGNETIC LOCK Depending on the type of door being protected, drill holes according to the diagrams below: Solid Core Door Reinforced Door Hollow Metal Door 5/8” (16mm) 5/16” (8mm) 1/4” (6.8mm) for M8x1.25 thread 1/2” (12 .7mm) 5/16” (8mm) Drill an 5/16”...
-
Page 6: Also Available From Seco-Larm
SECO-LARM ELECTROMAGNETIC LOCK . Once the position of the mounting plate is correct, Drill the cable access hole. Run the power leads use the four long self-tapping screws to permanently through the cable access hole in the mounting plate mount the mounting plate. and through the hole in the door frame. -
Page 7: Wiring Diagram
SECO-LARM ELECTROMAGNETIC LOCK Wiring Diagram: Bond Status Sensor: The Bond Status Sensor checks to make sure the door is closed, (600PQ and 1K2P and the electromagnet is locked. models ONLY) LED Indicators: Green Door is closed and locked Door not closed and/or locked Door in use / No power 600PQ and 1K2P models ONLY Control... -
Page 8: Troubleshooting
SECO-LARM ELECTROMAGNETIC LOCK Troubleshooting: Door does not lock Check to make sure the wires are securely tightened to the terminal block. Bond status LED does not Illuminate Check that the power supply is connected and operating. Use a meter to check the resistance of coils inside the lock. See below. ...
Need help?
Do you have a question about the E-941SA-600 and is the answer not in the manual?
Questions and answers