Table of Contents
Advertisement
Advertisement
Table of Contents

Related Manuals for Roberts PISA two CR9934


Summary of Contents for Roberts PISA two CR9934
- Page 1 CR9934 PLL Dual Alarm Clock Radio Please read this manual before use...
-
Page 2: Table Of Contents
Contents Contents ................1 Specifications ..............13 Controls ................2-3 Circuit features ..............13 Display ................4 General ................14 Connecting to mains supply ..........5 Guarantee ............backpage Display backlight ............... 5 Night light ................5 Setting the clock ..............6 Setting the day of week ............ -
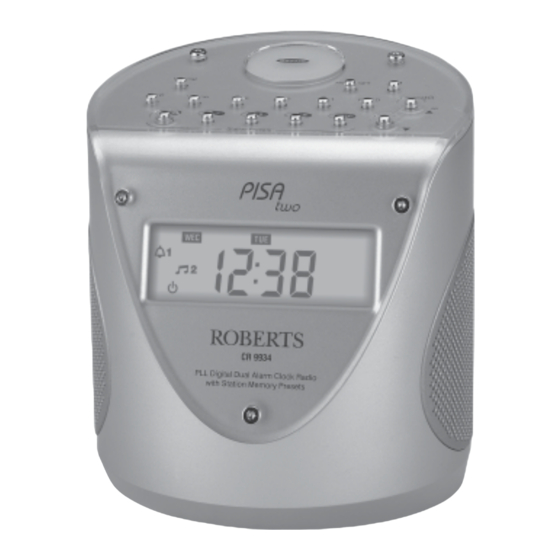
Page 3: Controls
Controls 9 10 (Top) 1. Preset buttons 5. Time button 9. Night Light button 13. Tuning down button 2. Weekend cancel button 6. Alarm 2 button 10. Band button 3. On/Off button 7. Snooze button 11. Sleep button 4. Memory button 8. - Page 4 Controls (Left side) (Right side) 17. Headphone socket 19.Volume control 18. Dimmer switch (underside) 20. Battery compartment (underside) 21. Reset button (inside battery compartment)
-
Page 5: Display
Display 1. Alarm 2 indicators 7. Frequency indicators 2. Alarm 1 indicators 8. Frequency and time display area 3. Sleep indicator 9. Waveband indicators 4. Weekend cancel indicator 10. Radio off indicator 5. Days of week indicators 11. Radio on indicator 6. -
Page 6: Connecting To Mains Supply
Connecting to mains supply 1. Place your radio on a flat surface. 2. Plug the mains plug into a wall socket and switch on the wall socket. Night light 1. Press the Night Light button to adjust level of night light, press once for dim light press once again for bright light and once again to switch off. -
Page 7: Setting The Clock
Setting the clock 1. Press and hold down the Time button. 2. Whilst the Time button is held down set the time by pressing the Up or Down buttons. The clock uses the 24 hour system e.g. 2:30pm is shown as 14:30 3. -
Page 8: Setting The Alarm Time
Setting the alarm times 1. Press and hold down the Alarm 1 or Alarm 2 buttons. 2. Whilst the Alarm 1 or Alarm 2 button is held down set the alarm time by pressing the Up or Down buttons. The clock uses the 24 hour system e.g. -
Page 9: Wake To Radio
Wake to radio 1. Set the alarm time as previously described. 2. Press and release the Alarm 1 or Alarm 2 button until the symbol appears in the display. 3. At the preselected time the radio will switch on. The radio will switch off automatically after 90 minutes. -
Page 10: Weekend Alarm Cancel
Weekend alarm cancel 1. Your clock radio can be set to automatically cancel alarms at the weekend. 2. Press the WEC button until the WEC symbol appears in the display. The alarm will now only sound on weekdays. 3. To switch off the weekend cancel function press the WEC button until the WEC symbol is removed from the display Operating your radio - search tuning 1. -
Page 11: Operating Your Radio - Manual Tuning
Operating your radio - manual tuning 1. Switch on your radio by pressing the On/Off button. 2. Select the required waveband by pressing the Band button. The waveband selected will appear in the display. On FM fully extend the pigtail aerial from the rear of your clock radio. On MW rotate your radio for best reception. -
Page 12: Presetting Stations
Pre-setting stations You may store up to 10 different stations on FM and 5 for MW giving a total of 15 preset stations. 1. Switch on your radio using the On/Off button. 2. Select the desired waveband using the Band button. 3. -
Page 13: Recalling A Preset Station
Recalling a preset station 1. Switch on your radio using the On/Off button. 2. Select the desired waveband using the Band button. 3. Press one of the Preset buttons to recall the station. Presets 6 to 10 are obtained by pressing the Preset button twice. Last station memory 1. -
Page 14: Headphones
Headphones 1. A Headphone Socket (3.5mm) located on the left hand side of your radio is provided for use with either headphones or an earpiece. Inserting the headphone plug automatically mutes the internal loudspeaker. Specifications Circuit Features Power Requirements Loudspeaker 77mm 8ohms Mains AC 230 volts, 50Hz... -
Page 15: General
Fuse General Do not allow this unit to be exposed to moisture (e.g. dripping or This apparatus must be protected by a 3A fuse (BS1362) in a 13A plug splashing) or to temperatures exceeding 70 degrees centigrade. It is (BS1363). If another type of plug is used a 5A fuse should be fitted in recommended that the FM band be used wherever possible as better the plug, adaptor or distribution board. -
Page 16: Guarantee
In the event that it is not possible to return the instrument to the Roberts' dealer from whom it was purchased, please contact Roberts Radio Technical Services at the address shown below. These statements do not affect the statutory rights of a consumer.
Need help?
Do you have a question about the PISA two CR9934 and is the answer not in the manual?
Questions and answers
The screen is lighting up but I can't get the time display to show
The display backlight of the Roberts PISA two CR9934 can be set to three different levels: Lo, Med, and Hi. To adjust it, slide the Dimmer switch located on the underside of the clock radio to the desired position. Additionally, a sensor on the right side of the LCD display automatically adjusts the brightness based on room lighting.
This answer is automatically generated