Table of Contents
Advertisement
Available languages
Available languages
Advertisement
Table of Contents

Related Manuals for ION LP DOCK


Summary of Contents for ION LP DOCK
- Page 1 QUICKSTART GUIDE ENGLISH ( 3 – 12 ) MANUAL DE INICIO RÁPIDO PARA EL USUARIO ESPAÑOL ( 13 – 22 ) GUIDE D’UTILISATION RAPIDE FRANÇAIS ( 23 – 32 ) KURZANLEITUNG DEUTSCH ( 33 – 42 ) MANUALE RAPIDO DI UTILIZZAZIONE ITALIANO ( 43 –...
- Page 3 After you finish converting your vinyl, you can then burn to CD or load onto portable media devices. * iTunes and iPod are trademarks of Apple, Inc., registered in the U.S.A. and other countries. ** A version of EZ Vinyl/Tape Converter with Gracenote MusicID is available for download at your product’s page at www.ion-audio.com.
-
Page 4: General Controls
GENERAL CONTROLS (bottom panel connections) Power Cable: This power cable should be plugged into a wall receptacle AFTER all audio connections are made. RCA Audio Output Cables: These cables should be plugged into the audio inputs of your home stereo system. (Please note: you can still copy records to your iPod or computer, even if the audio outputs of the turntable are not connected to a stereo system). - Page 5 Power Button: Turns the unit on and off. Platter: This platter must be securely fastened to the turntable prior to operation. The Motor Drive Belt can be found on the drive ring underneath the platter. See SETUP INSTRUCTIONS for detailed information on installing the Motor Drive Belt. Start/Stop Buttons: This button starts and stops the turntable motor.
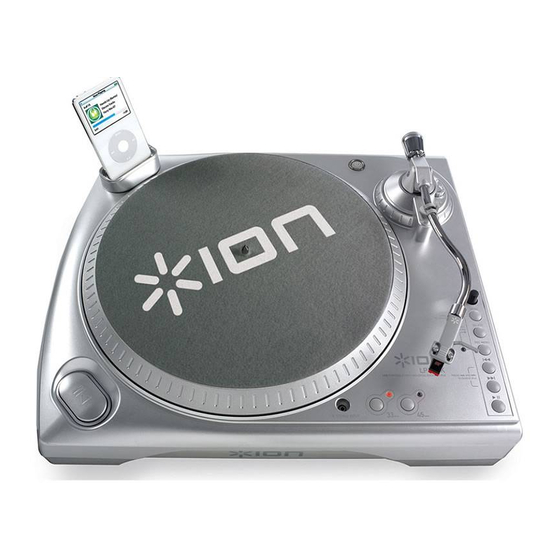
- Page 6 11. iPod Dock: Connect your iPod to this dock. Please make sure that your iPod fits snuggly over the dock connector but do not force it! The dock allows you to record your vinyl directly to your iPod or to play back music from your iPod through the turntable’s RCA outputs.
-
Page 7: Platter Setup
TONE ARM: Items 19 – 23 are all parts of the tonearm. Refer to the TONEARM SETUP section for additional details on these controls. 19. Counter Weight and Scale Ring: The Counterweight is used to balance the head shell and cartridge assembly so that the proper amount of stylus pressure is applied to the record. -
Page 8: Tonearm Setup
TONEARM SETUP Begin rotating counterweight counter- clockwise until it is in the complete forward position (NOTE: this is also the maximum amount pressure that applied to the cartridge.) Now there should be a feeling weight resistance when the head shell raised lowered. - Page 9 RECORDING TO YOUR iPod Please follow the instructions below to record music directly to your iPod. Note that your iPod will record audio from your turntable, as well as audio coming through the 1/8” Stereo Input. Note that it is possible to record to your iPod without having any audio connections plugged in. However, we highly recommend connecting the audio outputs (RCA or USB) to a speaker system so you can monitor your recordings.
- Page 10 SYNCING YOUR iPod THROUGH THE TURNTABLE Your iPod can be synced to your iTunes right from the turntable. Follow the instructions below to establish the connection. Make sure that your turntable is connected to your computer, using the included USB cable.
- Page 11 CONVERTING YOUR 78RPM VINYL If you wish to transfer your 78RPM records to your computer, you will need to install and use the Audacity application. This application can be found on the CD included in the box. Please install Audacity and follow the instructions below to record your 78RPMs. For Audacity troubleshooting, refer to the Audacity Software Guide included on the CD.
-
Page 12: Troubleshooting
Select between the two different strange pitch. turntable. speeds by pressing 33RPM or 45RPM. BEFORE RETURNING THE PRODUCT, please contact ION Audio or your retailer for technical support. Contact information can be found in the Safety Instruction Booklet included with this product. -
Page 13: Guía De Inicio Rápido
GIRADISCOS LP DOCK INTRODUCCIÓN LP Dock es un producto revolucionario que permite grabar música de discos de vinilo y entradas de audio externas directamente en su iPod*. Además, el giradiscos USB se conecta directamente a su computadora para convertir sus valiosos vinilos en música digital. Hemos incluido varios paquetes de software para ayudarle a convertir sus grabaciones de vinilo: Tenga en cuenta que no se requiere instalar ningún software a fin de grabar directamente en su iPod. -
Page 14: Controles Generales
CONTROLES GENERALES (conexiones del panel inferior) Cable de alimentación: Este cable de alimentación se debe enchufar a un tomacorriente en la pared DESPUÉS de que se hagan todas las conexiones de audio. Cables RCA de salida de audio: Estos cables se deben enchufar en las entradas de audio de su sistema estéreo hogareño. - Page 15 Botón de encendido: Enciende y apaga la unidad. Plato: Este plato se debe ajustar firmemente al giradiscos antes de hacerlo funcionar. La correa de transmisión del motor se puede encontrar en el aro impulsor debajo del plato. Vea las INSTRUCCIONES DE INSTALACIÓN para ver información más detallada sobre la instalación de la correa de transmisión del motor.
- Page 16 11. Estación de acoplamiento de iPOD: Conecte su iPod a esta estación de acoplamiento. Asegúrese de que el iPod se ajuste en forma ceñida en el conector de la estación, ¡pero no lo fuerce! La estación de acoplamiento permite grabar su vinilo directamente en el iPod o reproducir la música desde este último a través de las salidas RCA del giradiscos.
-
Page 17: Instalación Del Plato
BRAZO: Los elementos 19 a 23 son las partes del brazo. Consulte la sección INSTALACIÓN DEL BRAZO para ver más detalles de estos controles. 19. Contrapeso y anillo de escala: El contrapeso se usa para balancear el conjunto del portacápsula y la cápsula para que se le aplique la cantidad adecuada de presión de la púa al disco. - Page 18 INSTALACIÓN DEL BRAZO Para empezar, gire contrapeso sentido antihorario hasta que esté completamente posición hacia adelante. (NOTA: ésta es también la máxima cantidad presión que se le puede aplicar a la cápsula.) Ahora debe sentir una sensación peso resistencia cuando levanta o baja el portacápsula.
- Page 19 CÓMO GRABAR EN EL iPod Para grabar música directamente en el iPod, siga las instrucciones que se indican a continuación. Tenga en cuenta que el iPod graba música de su giradiscos, así como el audio proveniente de la entrada estéreo de 1/8”. Observe también que es posible grabar en el iPod sin tener ninguna conexión de audio enchufada.
- Page 20 CÓMO SINCRONIZAR EL iPod A TRAVÉS DEL GIRADISCOS Su iPod se puede sincronizar a iTunes directamente desde el giradiscos. Para establecer a continuación, siga las instrucciones que se indican a continuación. Asegúrese de que el giradiscos esté conectado a la computadora mediante el cable USB incluido.
- Page 21 CÓMO CONVERTIR SU VINILO DE 78 RPM Para transferir sus discos de 78 RPM a la computadora, es necesario que instale la aplicación Audacity. Esta aplicación se puede encontrar en el CD incluido en la caja. Instale Audacity y siga las instrucciones de más abajo para grabar sus discos de 78 RPM. Para solucionar los problemas de Audacity, consulte la Guía del software Audacity incluida en el CD.
-
Page 22: Solución De Problemas
33RPM o 45RPM. ANTES DE DEVOLVER EL PRODUCTO, comuníquese con Ion Audio o con su vendedor minorista para solicitar soporte técnico. La información de contacto se encuentra en el folleto de instrucciones de seguridad incluido con este producto. - Page 23 GUIDE D’UTILISATION RAPIDE Veuillez vous assurer que les articles suivants sont dans la boîte. VEUILLEZ LIRE LE LIVRET DES CONSIGNES DE SÉCURITÉ AVANT D'UTILISER LE PRODUIT. Allez à http://www.ion-audio.com pour enregistrer le produit. ADAPTATEUR 45 T/MIN TAPIS CONTREPOIDS PLATEAU CÂBLE USB CARTOUCHE PRÉINSTALLÉE...
-
Page 24: Commandes Principales
COMMANDES PRINCIPALES (Branchements du panneau inférieur) Câble d’alimentation : Ce câble d’alimentation doit être branché dans la prise murale APRÈS avoir effectué tous les autres branchements. Câbles stéréo RCA : Ces câbles doivent être branchés dans les entrées audio de votre système stéréo. - Page 25 Interrupteur d'alimentation : Met l'appareil sous et hors tension. Plateau : Le plateau doit être fixé fermement au tourne-disque avant de pouvoir l’utiliser. La courroie d’entraînement se trouve sur l’anneau d’entraînement sous le plateau. Voir les CONSIGNES D’INSTALLATION pour de plus amples informations sur l’installation de la courroie d’entraînement.
- Page 26 11. Socle iPod : Ce socle permet de brancher un iPod. Assurez-vous que l'iPod est bien ajusté sur le connecteur, mais ne le forcez surtout pas. Le socle permet d’enregistrer vos vinyles directement sur l’iPod ou de retransmettre le signal audio provenant de l’iPod aux sorties RCA du tourne-disque.
-
Page 27: Installation Du Plateau
BRAS DE LECTURE : Les items 19 à 23 font tous partie du bras de lecture. Veuillez consulter la section « Installation du bras de lecture » pour plus de détail sur ces commandes. 19. Contrepoids et anneau de tension : Le contrepoids est utilisé pour équilibrer l’ensemble de coquille et de cartouche afin que la force d’appui de la pointe de lecture soit adéquate. - Page 28 RÉGLAGE DU BRAS DE LECTURE Commencez par tourner le contrepoids dans le sens horaire jusqu’à ce qu’il soit complètement penché vers l’avant. (Note : C’est également la quantité de tension maximale qui peut être appliquée cartouche.) devrait avoir maintenant une sensation de tension et de résistance lorsque coquille...
- Page 29 ENREGISTREMENT SUR iPod Veuillez suivre les consignes ci-dessus pour enregistrer votre musique directement sur votre iPod. Veuillez noter que le iPod enregistre le signal audio du tourne-disque, ainsi que le signal audio provenant de l’entrée stéréo de 1/8 po. Notez qu’il est possible d’enregistrer sur l’iPod sans avoir aucune connexion audio branchée au tourne-disque.
- Page 30 SYNCHRONISATION DU IPOD PAR LE BIAIS DU TOURNE-DISQUE Il est possible de synchroniser votre iPod à iTunes à partir du tourne-disque. Suivez les consignes ci-dessous afin d’établir la connexion. Assurez-vous que le tourne-disque est branché à votre ordinateur à l’aide du câble USB inclus.
- Page 31 CONVERSION DU VINYLE 78 TR/MIN Pour transférer les disques 78 tr/min sur votre ordinateur, vous devez installer et utiliser l'application Audacity. Cette application se trouve sur le CD inclus dans la boîte. Veuillez installer Audacity et suivre les indications ci-dessous pour l'enregistrement des 78 tr/min. Pour toute question concernant Audacity, veuillez consulter son guide d'utilisation inclus sur le CD.
-
Page 32: Dépannage
Sélectionnez la vitesse appropriée, soit 33RPM ou 45RPM. AVANT DE RETOURNER CE PRODUIT, veuillez contacter Ion Audio ou votre détaillant pour du soutien technique. Toutes les coordonnées se trouvent dans le livret des consignes de sécurité inclus avec de produit. - Page 33 Sie aus den Titeln eine CD brennen oder die Songs auf einen portablen MP3-Player laden. * iTunes und iPod sind geschützte Warenzeichen von Apple, Inc., registriert in den U.S.A. und anderen Ländern. ** Eine Version der EZ Vinyl/Tape Converter mit Gracenote MusicID steht zum Download auf der Web-Seit für Ihr Produkt auf www.ion- audio.com.
-
Page 34: Anschlüsse Und Bedienelemente
ANSCHLÜSSE UND BEDIENELEMENTE (Anschlüsse auf der Unterseite) NETZKABEL: Das Netzkabel verbinden Sie mit einer Steckdose, NACHDEM Sie alle Audioverbindungen hergestellt haben. RCA Audioausgang: Diese Kabel schließen Sie an die Audioeingänge Ihrer Stereoanlage an. (Beachten Sie bitte: Sie können auch dann noch Musik auf Ihren iPod oder Computer kopieren, wenn die Audioausgänge des Gerätes nicht mit Ihrer Stereoanlage verbunden sind). - Page 35 Power Taste: Schaltet das Gerät ein und aus. Plattenteller: Der Plattenteller sollte sicher auf dem Plattenspieler montiert werden, bevor Sie das Gerät verwenden. Der Motorantriebsriemen, der sich auf dem Ring unter dem Plattenteller befindet, muss dafür vorher installiert werden. Weitere Informationen hierzu finden Sie im Abschnitt AUFBAUANLEITUNG.
- Page 36 11. iPod Dock: Schließen Sie hier Ihren iPod an. Achten Sie darauf, dass Ihr iPod gut in den Dock Connector gleitet. Wenden Sie keine Kraft an! Das Dock ermöglicht es Ihnen, Ihre Schallplatten direkt auf dem iPod aufzunehmen oder Musik von Ihrem iPod über die RCA Audioausgänge wiederzugeben.
-
Page 37: Montage Des Plattentellers
TONARM: Die Punkte 19 – 23 beschreiben die Teile des Tonarms. Beachten Sie den Abschnitt TONARM SETUP für weitere Informationen. 19. Gegengewicht und Skalenring: Das Gegengewicht dient dazu, die Headshell (Systemträger) Tonabnehmersystem auszubalancieren, dass der korrekte Nadeldruck auf die Schallplatte ausgeübt wird. - Page 38 AUFBAU DES TONARMS Zuerst drehen Gegengewicht Uhrzeigersinn, bis es sich vollständig in der vordersten Position befindet (HINWEIS: dies ist zugleich der größtmögliche Druck, Tonabnehmersystem ausgeübt werden kann.) Sie sollten nun Gewicht und Widerstand fühlen können, wenn Tonarm angehoben und abgesenkt wird.
- Page 39 AUF IHREN iPod AUFNEHMEN Folgen Sie bitte der folgenden Anleitung, um Schallplatten direkt auf dem iPod aufnehmen zu können. Beachten Sie bitte, dass Ihr iPod Audiosignale des Schallplattenspielers und des 3,5 mm Miniklinkeneingang des Plattenspielers aufnehmen kann. Wie Sie wissen, können Sie auf Ihrem iPod auch dann aufnehmen, wenn keine Audioverbindungen am Plattenspieler hergestellt wurden.
- Page 40 IHREN iPod ÜBER DEN SCHALLPLATTENSPIELER SYNCHRONISIEREN Sie können Ihren iPod mit iTunes direkt über den Plattenspieler synchronisieren. Folgen Sie dazu den nun beschriebenen Schritten: Verbinden Sie Ihren Plattenspieler über das mitgelieferte USB Kabel mit Ihrem Computer, (Windows Anwender aufgepasst! Falls Sie das erste Mal Ihren Plattenspieler an Ihren Computer anschließen, warten Sie bitte, bis der Computer automatisch die benötigten Hardware-Treiber geladen hat.
- Page 41 UMWANDELN IHRER 78RPM SCHALLPLATTEN Wenn Sie Ihre Schallplatten mit 78RPM auf Ihrem Computer aufnehmen möchten, müssen Sie die Audacity Software installieren und verwenden. Dieses Programm finden Sie auf der mitgelieferten CD. Installieren Sie Audacity und folgen Sie dann den nachstehend beschriebenen Schritten.
- Page 42 Plattenspieler ausgewählt. 33RPM oder 45RPM zwischen zwei Geschwindigkeiten wählen. BEVOR SIE DIESES PROKT ZURÜCK SENDEN nehmen Sie bitte Kontakt mit ION Audio oder Ihrem Fachhändler zur Behebung eines Problems auf. Die Kontaktinformationen finden Sie in der Broschüre mit den Sicherheitshinweisen,...
-
Page 43: Guida Rapida
GIRADISCHI LP DOCK INTRODUZIONE L’LP DOCK è un prodotto rivoluzionario che consente di registrare musica da dischi in vinile e da ingressi audio esterni direttamente sul vostro iPod*. Inoltre, il giradischi USB si collega direttamente al computer per trasformare i vostri preziosi dischi in vinile in musica digitale. Per aiutarvi nella conversione dei dischi in vinile, abbiamo incluso diversi pacchetti software: va notato che per la registrazione diretta su iPod non è... -
Page 44: Comandi Generali
COMANDI GENERALI (Collegamenti pannello inferiore) Cavo di alimentazione: questo cavo di alimentazione va inserito in una presa a muro DOPO aver effettuato tutti i collegamenti audio. Cavi di uscita RCA Audio: questi cavi vanno collegati a livello degli ingressi audio dell’impianto home stereo (Nota bene: si possono copiare dischi sull’iPod o sul computer, anche se le uscite audio del giradischi non sono collegate ad un impianto stereo). - Page 45 Tasto di alimentazione: accende e spegne l’apparecchio. Piatto: il piatto va fissato bene al giradischi prima dell’uso. La cinghia di trazione motore si trova sull’apposito anello posto sotto al piatto. Per istruzioni dettagliate sull’installazione della cinghia di trazione motore vedi le ISTRUZIONI DI SETUP. Tasto Start/Stop: questo tasto avvia e ferma il motore del giradischi.
- Page 46 11. Dock iPod: collegare l’iPod a questo dock. Assicurarsi che l’iPod si inserisca agevolmente nel connettore, ma non forzarlo! Il dock permette di registrare il vinile direttamente sull’iPod o di riprodurre musica proveniente dall’iPod attraverso le uscite RCA del giradischi. L’LPDOCK è compatibile con i seguenti modelli di iPod: Modello iPod Riproduzione Registrazione...
- Page 47 BRACCIO: tutti gli elementi da 19 a 23 fanno parte del braccio. Fare riferimento al paragrafo “CONFIGURAZIONE DEL BRACCIO” per ulteriori dettagli circa questi comandi. 19. Contrappeso e anello graduato: il contrappeso serve a bilanciare il gruppo fonorivelatore e cartuccia in modo che venga applicato il giusto livello di pressione della puntina sul disco.
- Page 48 CONFIGURAZIONE DEL BRACCIO Iniziare facendo ruotare il contrappeso senso antiorario fino a che non si trovi completamente dritto (NOTA BENE: questa è anche quantità massima di pressione che è possibile applicare alla cartuccia). Ora, quando fonorivelatore viene alzato e abbassato, si dovrebbe avere una sensazione di peso resistenza.
- Page 49 REGISTRARE SULL’iPod Seguire le istruzioni di cui sotto per registrare musica direttamente sull’iPod. Va notato che l’iPod registrerà audio proveniente dal giradischi, oltre all’audio proveniente dall’ingresso stereo da 1/8”. Nota bene: è possibile registrare sull’iPod senza avere collegamenti audio inseriti. Tuttavia, raccomandiamo di collegare le uscite audio (RCA o USB) ad un impianto di casse in modo da poter monitorare le registrazioni.
- Page 50 SINCRONIZZAZIONE DELL’iPod ATTRAVERSO IL GIRADISCHI L’iPod può essere sincronizzato all’iTunes direttamente dal giradischi. Seguire le istruzioni di cui sotto per stabilire il collegamento. Assicurarsi che il giradischi sia collegato al computer servendosi del cavo USB in dotazione. (Utenti Windows: se questa è la prima volta che si collega il giradischi, lasciare che il computer inizializzi automaticamente i driver hardware necessari.
- Page 51 CONVERSIONE DEI VINILI A 78 GIRI Per trasferire i vostri dischi a 78 giri sul computer, sarà necessario installare e utilizzare l’applicazione Audacity. Questa si trova sul CD contenuto nella confezione. Installare Audacity e seguire le istruzioni di cui sotto per registrare i vostri 78 giri. Per la risoluzione di eventuali problemi con Audacity fare riferimento alla relativa Guida inclusa nel CD.
-
Page 52: Risoluzione Di Problemi
45RPM (33 o 45 giri). PRIMA DI RESTITUIRE IL PRODOTTO, si prega di contattare ION Audio o il vostro rivenditore per ottenere assistenza tecnica. Le informazioni di contatto sono reperibili nel libretto di istruzioni di sicurezza in dotazione con questo prodotto. - Page 53 SNELSTARTGIDS Controleer of onderstaande onderdelen in de doos zitten. LEES DE VEILIGHEIDSINSTRUCTIES VOOR HET PRODUCT GEBRUIKT WORDT Bezoek http://www.ion-audio.com voor productregistratie. 45 TPM ADAPTER SLIPMAT TEGENGEWICHT DRAAITAFEL KABEL VOORGEMONTEERD ELEMENT LP DOCK DRAAITAFEL INTRODUCTIE De LPDock is een revolutionair product dat u in staat stelt muziek van vinyl platen en externe audio- ingangen direct op te nemen op uw iPod*.
-
Page 54: Algemene Bediening
ALGEMENE BEDIENING (aansluitingen onderste paneel) Netsnoer: Deze kabel dient in een stopcontact te worden gestoken NADAT alle audio- aansluitingen zijn gemaakt. RCA Audio uitgangskabels: Deze kabels worden in de audio-ingangen van uw stereosysteem gestoken. (N.B.: u kunt platen naar uw iPod of computer blijven opnemen, ook wanneer de audio-uitgangen van de draaitafel niet aangesloten zijn naar een stereosysteem). - Page 55 Aan/Uit-knop: Schakelt de eenheid in of uit. Plateau: Dit plateau dient vóór gebruik stevig bevestigd te zijn op de draaitafel. De aandrijfriem voor de motor vindt u op de ring onder het plateau. Zie INSTALLATIE- INSTRUCTIES voor gedetailleerde informatie over installatie van deze aandrijfriem. Start/Stopknop: Deze knop start en stopt de motor van de draaitafel.
- Page 56 11. iPod Dock: Sluit uw iPod aan op deze dock. Zorg ervoor dat uw iPod nauw aansluit op de aansluiting maar oefen geen kracht uit. De dock stelt u in staat uw platen rechtstreeks op te nemen naar uw iPod om zo muziek af te spelen via uw iPod door de RCA-uitgangen van de draaitafel.
- Page 57 TOONARM: Items 19 – 23 zijn onderdelen van de toonarm. Raadpleeg de sectie INSTALLATIE TOONARM voor aanvullende informatie over deze elementen. 19. Tegengewicht en schaalring: Het tegengewicht wordt gebruikt om de naalddruk juist te kunnen instellen. 20. Anti-Skate aanpassing: deze knop wordt gebruikt om inwaartse krachten op de arm te compenseren.
- Page 58 INSTALLATIE TOONARM Begin door het tegenge- wicht tegen de klok in te draaien tot deze niet ver- der naar voren kan (N.B.: dit is ook de maximale druk die op het element kan worden toegepast). Bij het optillen en laten zakken van de head shell voelt de arm relatief zwaar aan met weerstand.
- Page 59 OPNEMEN NAAR UW iPod Volg onderstaande instructies voor het rechtstreeks opnemen van muziek naar uw iPod. Houd in gedachten dat uw iPod zowel geluid van de draaitafel als geluid dat doorkomt via de 1/8” stereo-ingang opneemt. Het is mogelijk op te nemen naar uw iPod zonder aangesloten audio-aansluitingen. We raden u echter aan de audio-uitgangen aan te sluiten (RCA of USB) op een speakersysteem zodat u de opnamen kunt monitoren.
- Page 60 SYNCHRONISATIE VAN UW iPod VIA DE DRAAITAFEL Uw iPod kan rechtstreeks vanaf de draaitafel gesynchroniseerd worden met uw iTunes. Volg de instructies hieronder om de verbinding te maken. Zorg ervoor dat uw draaitafel aangesloten is op uw computer met de bijgeleverde USB- kabel (voor Windows gebruikers: wanneer u de draaitafel voor het eerst aansluit, laat dan de computer automatisch de benodigde stuurprogramma’s initialiseren.
- Page 61 CONVERSIE VAN UW 78 TOERENPLATEN Wanneer u uw 78 toerenplaten wilt overzetten naar uw computer dient u de toepassing Audacity te installeren en te gebruiken. Deze toepassing staat op de CD die meegeleverd wordt. Installeer Audacity en volg de onderstaande instructies om uw 78 toerenplaten op te nemen.
- Page 62 33RPM of 45RPM. Voor technische ondersteuning wordt u verzocht VÓÓR RETOURNERING VAN HET PRODUCT contact te zoeken met ION Audio of uw verkooppunt. Contactinformatie vindt u in de Veiligheidsinstructies die bij het product geleverd worden.
- Page 63 MANUAL VERSION 3.2...
Need help?
Do you have a question about the LP DOCK and is the answer not in the manual?
Questions and answers